Fix: Minecraft Multiplayer Not Working on PC & Consoles
When connecting to online servers in Minecraft, many users have reported that they face different errors which prevent them from joining the servers. You may face these kinds of connectivity errors in Minecraft for several reasons, such as internet connectivity issues, Microsoft account privacy Settings, Antivirus/Firewall interference, DNS Server problems, and NAT issues.
According to user reports online, the most common multiplayer errors users face in Minecraft are: “Multiplayer is disabled. Please check your Microsoft account settings.” and “You cannot play online multiplayer because of how your Microsoft account is set up.”
To help you determine the cause of these errors and find their solutions, we have written down all their possible causes below.
- Slow Internet Connection: The most common cause of connectivity issues when connecting to online game servers is the user’s internet connection. Connectivity errors will occur if the user’s internet connection suffers from slow speeds or other issues such as packet loss.
- Minecraft Server Issue: If the Minecraft server you’re connecting to is offline or experiencing problems on its end, you will be unable to connect to it.
- Minecraft Version Mismatch: If the server requires a different version of Minecraft than the one used by the player, they will be unable to connect to the server.
- Incompatible Mods: To be able to join a vanilla server in Minecraft, you must ensure that you’re not playing a modded version of the game. If you have mods installed, you won’t be able to join the server.
- Microsoft Account Privacy Settings: If your Microsoft Account’s privacy settings are not configured properly, they will block your access to multiplayer servers and other online features of Minecraft.
- Expired Online Subscription (on Console): If your online subscription (on console) has expired, you will be unable to play Minecraft multiplayer (or any other multiplayer game) until you renew the subscription.
- Windows Firewall or Antivirus Issue: The Firewall feature of Windows or the Antivirus program on your system can prevent you from connecting to online servers.
- NAT Issue (on Console): The NAT type on consoles must be configured properly to allow the console to connect to online servers. If the NAT type is not set correctly, the console won’t be able to connect to certain servers.
- DNS Server Error: If the default DNS Server setting of Windows is being used, the system could have trouble connecting to Minecraft servers.
1. Check the Status of your Internet Connection
The first step of troubleshooting is to check the status of your internet connection. Open a browser and try to load a website. If the website loads successfully, you will have ensured that your internet connection is online. If the website fails to load, check if your system is connected to Wifi or Ethernet or not.
After ensuring that your internet connection is online, the next step is to check the download/upload speed. Your internet connection may be suffering from slow download/upload speeds. This could be a major cause of the connectivity issues you’re facing.
To check your internet speed on your PC, you can perform a quick online speed test using your browser. If you’re using a console, you can run the native network connection test feature through its network settings menu. The speed test will inform you whether your download/upload speed is facing any issues or not.
If your download/upload speed is very slow, try connecting your system to the router using an Ethernet cable instead of Wifi. The Ethernet cable will ensure your internet connection is as strong and stable as possible.
After that, you should pause/stop any downloads and/or streams on your network. Even if these downloads/streams are happening on another device in the same network, they will affect your system’s internet connection and lead to connectivity issues.
Once all downloads/streams are paused, your system will get the maximum internet bandwidth, allowing for the highest download/upload speed.
If you’re still experiencing errors in Minecraft Multiplayer after fixing your download and upload speed, your internet connection might be facing packet loss issues.
Packet loss occurs in unstable internet connections. When a user sends or receives data in a network, the data moves in a packet form. Instability in the user’s internet connection can lead to this packet being lost in transmission. When this happens, the user faces the “Packet Loss” issue.
After slow download/upload speeds, Packet Loss is the main culprit of connectivity problems in online games. Therefore, by performing a quick packet loss test, you must check if your internet is experiencing any packet loss.
To perform a packet loss test on PC, follow the steps we’ve listed below:
- Open the Start menu by pressing the Windows Key on your keyboard.
- Type cmd and press the “Run as administrator” option.
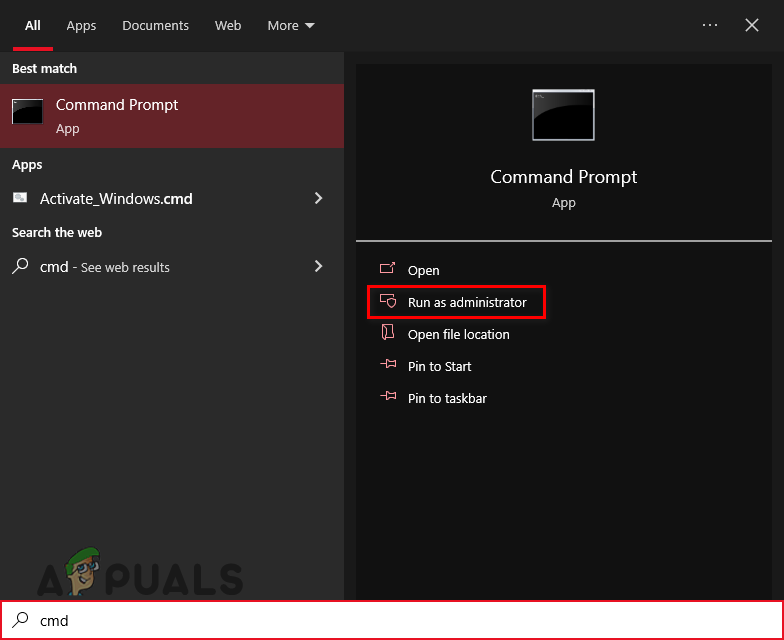
- In Command Prompt, type the command shown below and press enter.
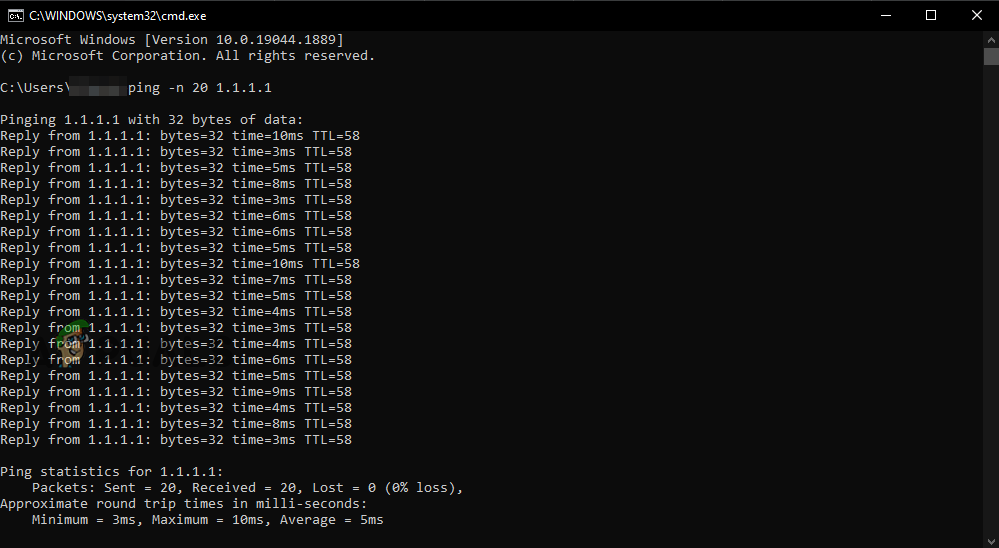
ping -n 20 1.1.1.1
- Wait for the packet loss test to finish.
To perform a packet loss test on Xbox/Playstation, go into Settings > Network Settings and select the “Test Network/Internet Connection” option.
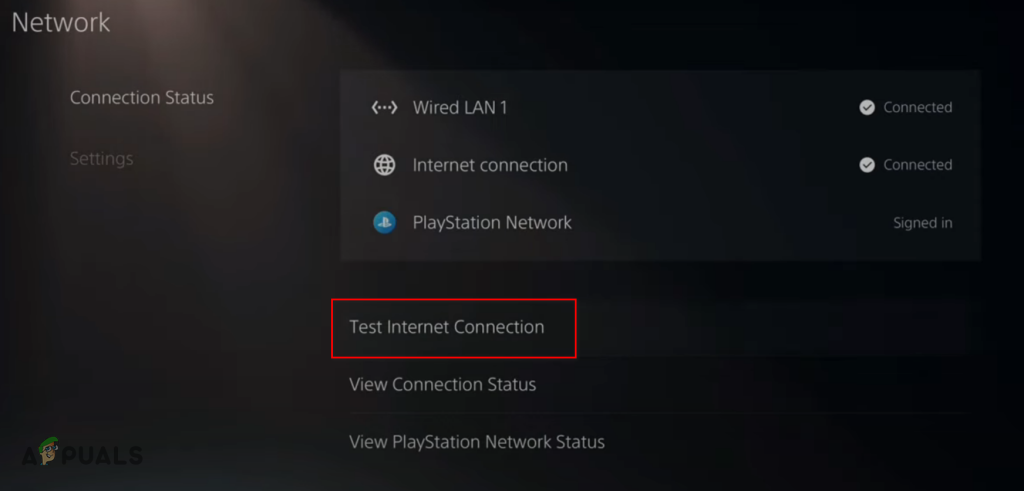
The test will only take a few seconds to finish. Once it’s completed, it will show you the result, which will indicate exactly how much packet loss is being experienced by your internet connection. The higher the number, the more unstable your internet connection is.
It is not an issue if your packet loss is not above 5%. But if you’re experiencing packet loss (>5%), you can try fixing it by restarting your router.
Turn off your router, wait for a minute, and turn it back on. After your router restarts, perform the packet loss test again and see if it has been fixed. If it hasn’t, you’ll need to contact your Internet Service Provider (ISP) to solve this issue.
If packet loss isn’t the issue, the final step of determining if your internet connection is the cause of the Minecraft multiplayer connection issue is to use a different internet connection.
If you use a different internet connection and you’re still unable to connect to the Minecraft servers, it will confirm that the cause of the issue is something else.
If there’s only one internet connection available in your home, don’t worry, as you can connect your system to your mobile data using the Hotspot feature on your phone and the Wifi on your PC.
To connect your PC to your phone’s cellular data, follow the steps we’ve listed below:
- Disconnect from the internet connection your PC is connected to.
- Go into Settings on your phone and enable the Portable Hotspot feature.
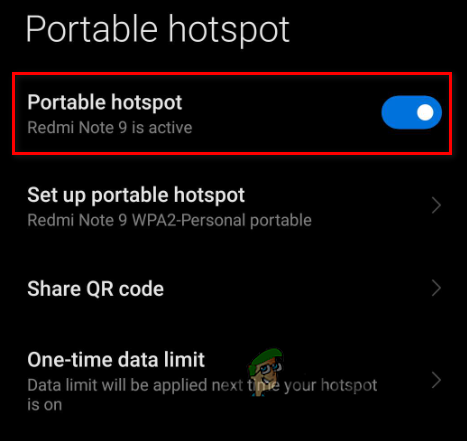
- Enable Cellular Data.
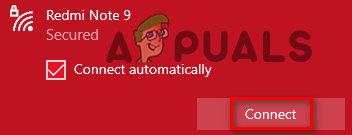
- Turn on the Wifi on your PC.
- Connect to your phone’s Hotspot in the list of Wifi connections.
Your PC will now be connected to your phone’s cellular data. After the connection is established, relaunch Minecraft and try to get into a server. If you’re still unable to connect, your internet connection is not the cause of the issue, and you should move on to our next solution.
2. Check the Status of the Minecraft Server
The next step in finding the solution for your problem is quickly checking the status of the Minecraft server you’re trying to connect to.
Online game servers can sometimes experience issues and even go offline. So before you try more troubleshooting on your end, you should check and confirm that the server you’re trying to connect to is online.
If you’re trying to connect to a popular Minecraft server, such as Hypixel, check online to see if other people are also having trouble connecting to the server. If this is the case, the server is experiencing problems, and the issue is not on your end.
And when the server itself is experiencing issues, you cannot do anything to fix it. You simply need to wait until the server comes back online.
If you’re trying to connect to a small server, you can contact the server’s owner and ask them to check its status. The system they were using to host the server might have shut down, causing the server to go offline.
If you’ve checked the server’s status and the server seems to be up and running, continue with the next solution we’ve listed below.
3. Configure Microsoft Account Privacy Settings (If Applicable)
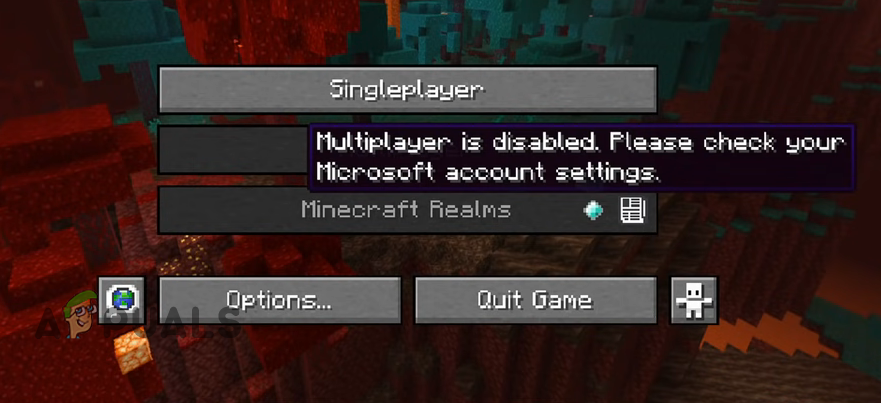
When you try to click on the Multiplayer option in Minecraft, it might give an error that says one of the following messages:
- You cannot play online Multiplayer because of how your Microsoft account is set up.
- Multiplayer is disabled. Please check your Microsoft account settings.
Minecraft Multiplayer Error
These error messages are related to the same problem in your Microsoft account’s privacy settings.
Your Microsoft account is what you use to connect to Minecraft multiplayer servers. If the account’s privacy settings aren’t configured properly, the account will be blocked from connecting to these online servers.
To unblock your Microsoft account, you’ll need to head into settings and change all the privacy settings. To do so, follow the steps we’ve written below:
- Open a web browser.
- Head to Microsoft’s official website.
- Click on the Sign-in option in the top-right corner of the page and sign in to your Microsoft account (that you bought Minecraft with)
- After signing in, click on the same profile icon in the top-right corner of the page.
- Click on “My Microsoft Account”
- Click on the “Family” option at the top.
- On the Family page, if it says “Leave the Family group“, click on this option.
- If it says “Create a Family group“, simply return to the previous page.
- Click on the “Your Info” option at the top.
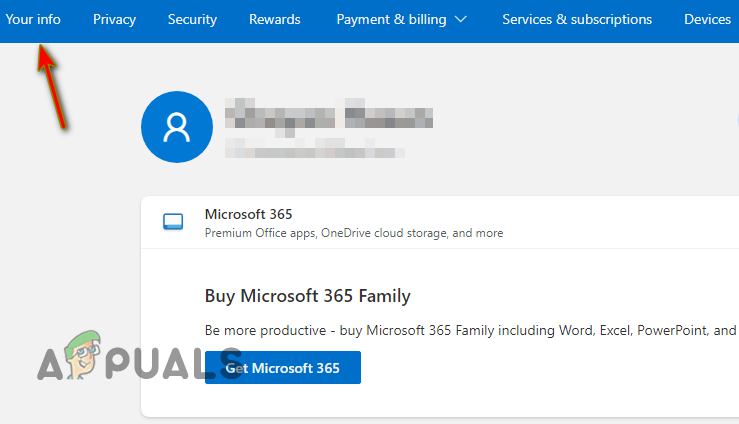
Opening your Microsoft Account Info Page - Ensure your age is set to 18 or above (you can change it by clicking on the “Edit account info” option).

Editing your Microsoft Account Info - Scroll down to the end of the page and click on the “Xbox profile” option.

Opening your Xbox Profile - Click on “Privacy Settings.”
- In the Privacy tab, set everything to “Everyone.”
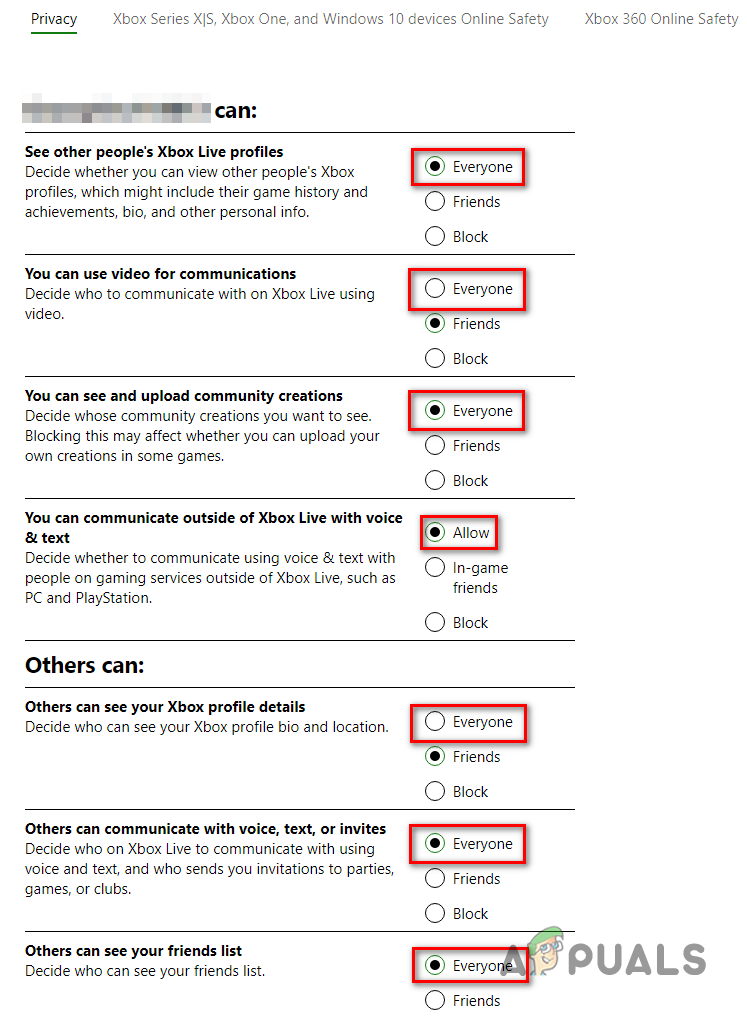
Changing Microsoft Account Privacy Settings - Click on Submit.
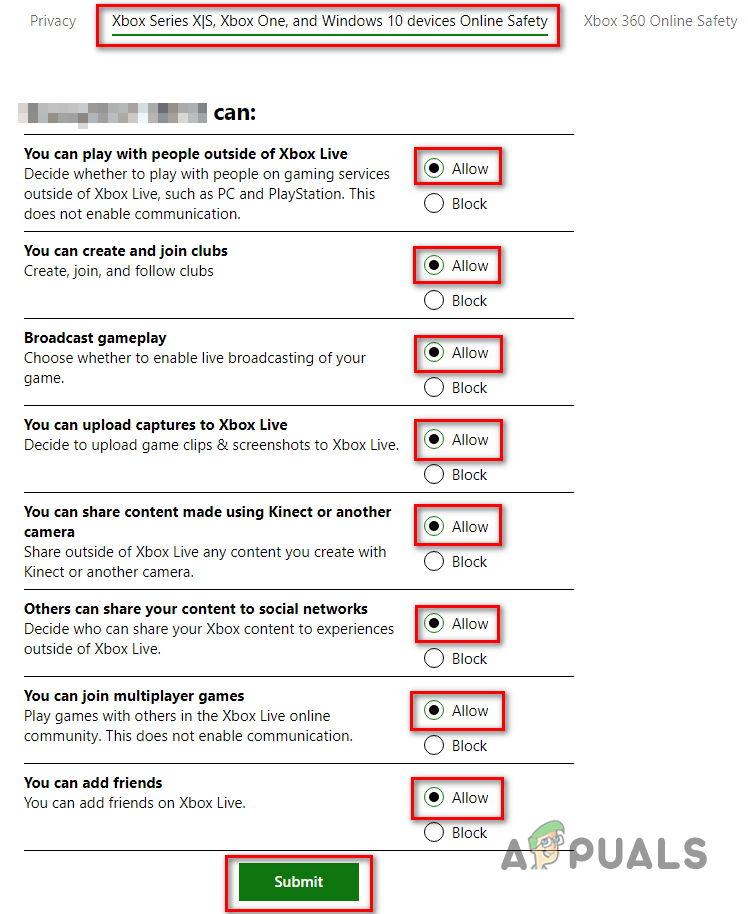
- In the Xbox Series X|S, Xbox One, and Windows 10 devices Online Safety tab, set everything to “Allow.”
- Click on Submit.
Enabling Multiplayer Access
You have now unblocked your Microsoft account by properly configuring the privacy settings. Now, open the Minecraft launcher and log out of your account by clicking on your profile icon in the top-left and selecting the “Log out” option.
After logging out of your account, log back into it. This will make the changes you made to the privacy settings take effect.
Once you’ve done that, launch Minecraft and click on the Multiplayer option. The error you were facing before should now go away.
4. Use the Same Version of Minecraft as the Server
Every multiplayer server in Minecraft is configured to run on a specific game version. Any player that wishes to join the server must be using the same version of Minecraft to be able to do so.
So you’re unable to join a Minecraft multiplayer session, you must ensure that you’re using the correct version of the server. If you try to join the server with the incorrect version, it will usually show you an error message saying you are using the wrong game version.
If you see this error message, don’t be alarmed, as you can easily change your Minecraft (Java Edition) version by following the steps listed below:
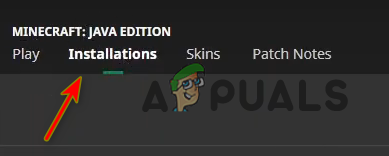
- Open the Minecraft launcher.
- Click on the “Installations” tab at the top.
Navigating to the Minecraft Installations tab - Click on the “New installation” option.

Creating a new Minecraft Installation - Type any name for the installation.
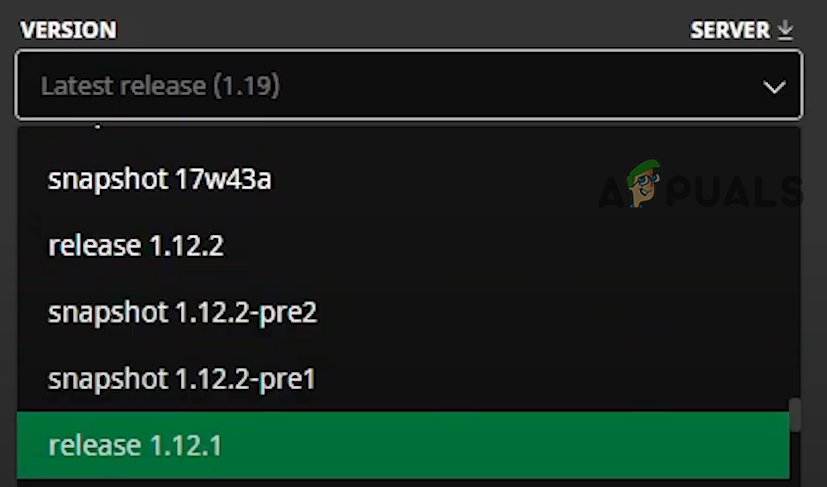
- Expand the drop-down list under “Version.”
- Select the required version of Minecraft.
Selecting the desired Minecraft Version - Click on the Create button at the bottom-right corner.
When selecting the Minecraft version from the drop-down list, ignore the versions with “snapshot” in their name. Only select the versions which are titled “release”.
Once you’ve created this new installation, it will appear in the list of versions in the Installations tab. To play this version, return to the “Play” tab and then click on the version select option at the bottom-left.
When you click on the version selector, you’ll see your selected version in the list of options. Click on the version and press the Play button to launch Minecraft with that specific version.
Now that you’re using the Minecraft version required by the server, you should have no trouble connecting to it.
Note that this method only works for Minecraft Java Edition. Unfortunately, if you’re using the Bedrock Edition of Minecraft, there’s no legitimate way to revert back to an older game version.
5. Launch Minecraft without Mods
When trying to connect to an online server in Minecraft, not only do you have to ensure that you’re using the required version of the game, but you must also ensure that you have no mods installed – if you’re using the Java Edition of the game.
If the server you’re trying to connect to is running on vanilla (unmodded) Minecraft, it will not allow users with mods to join.
And if the server is running some mods, you’ll only be able to join if you launch Minecraft with only those specific mods installed. The server will kick you out if you have any extra mods installed other than the ones used by the server.
This being said, there are some specific types of mods that can be used even in vanilla Minecraft servers. These are known as the “Client-side Mods,” as they only change the user’s quality of life and don’t interfere with the game’s world and the items/structures/mobs. A good example of a Client-side Mod is Optifine.
Now, if you have mods installed and wish to join a server that is running on vanilla Minecraft, you can easily switch back to the vanilla version of the game by following the steps we’ve listed below:
- Open the Minecraft launcher.
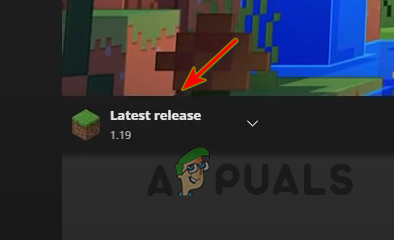
- Click on the version selector to the left of the green Play button.
- Select the game version that’s simply titled “Latest release.”
Launching unmodded Minecraft - Press the Play button.
When you press Play, you will now launch the vanilla (unmodded) version of the game. You should now be able to join the server without any issues.
6. Check if Online Subscription is Active (If Applicable)
If you’re playing Minecraft on a console, such as the PlayStation, Xbox, or Nintendo Switch, you must subscribe to its online subscription service to play Minecraft multiplayer.
If you have a Playstation, you must subscribe to the “PlayStation Plus” service to be able to play (most) online games. For Xbox users, the online subscription service is called “Xbox Live Gold.” And for Nintendo Switch users, the service is known as “Nintendo Switch Online.”
So if you want to play Minecraft multiplayer on console, you must ensure that you have an active subscription for the online service. If you’ve subscribed to the service, you should check to see if the subscription has expired. If your online subscription has expired, you will need to renew it to be able to play Minecraft multiplayer.
To check the status of your PlayStation Plus subscription, follow the steps we’ve listed below:
- Open your PlayStation’s home screen.
- Click on the PlayStation Plus icon.
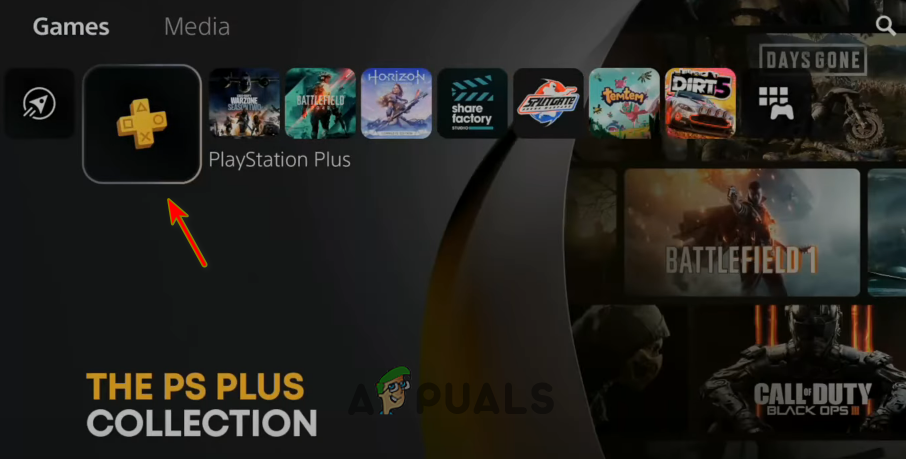
Opening PlayStation Plus Menu - Click on the “More” option (three dots) in the top-right corner.
- Select “Manage Subscription.”
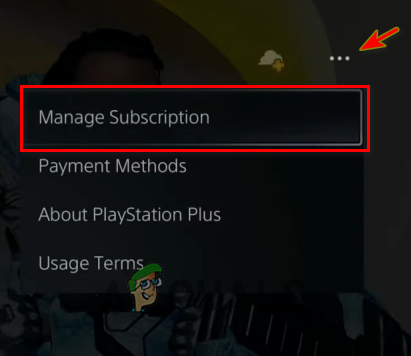
Opening the PlayStation Plus Subscription Menu
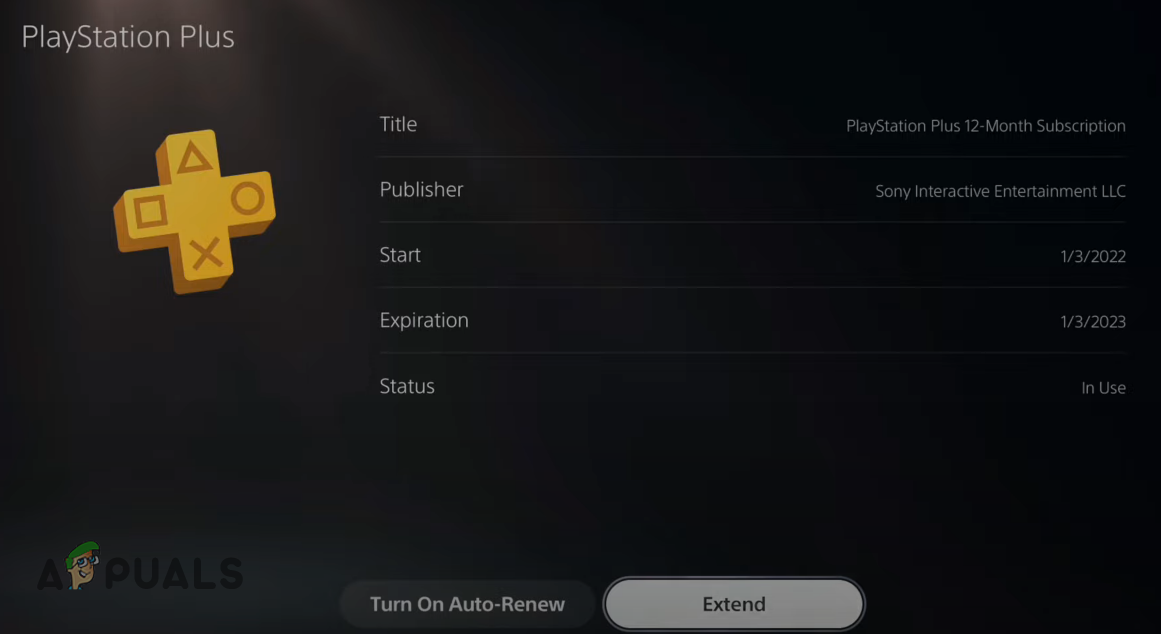
When you click on the Manage Subscription option, a menu will appear on your screen, showing you all the relevant information regarding your PlayStation Plus subscription.
If the subscription is active, it will show you the exact expiration date. And it will also give you the option to extend the subscription easily, and you’ll even have a “Turn On Auto-Renew” option, which will automatically extend the subscription each time it expires.
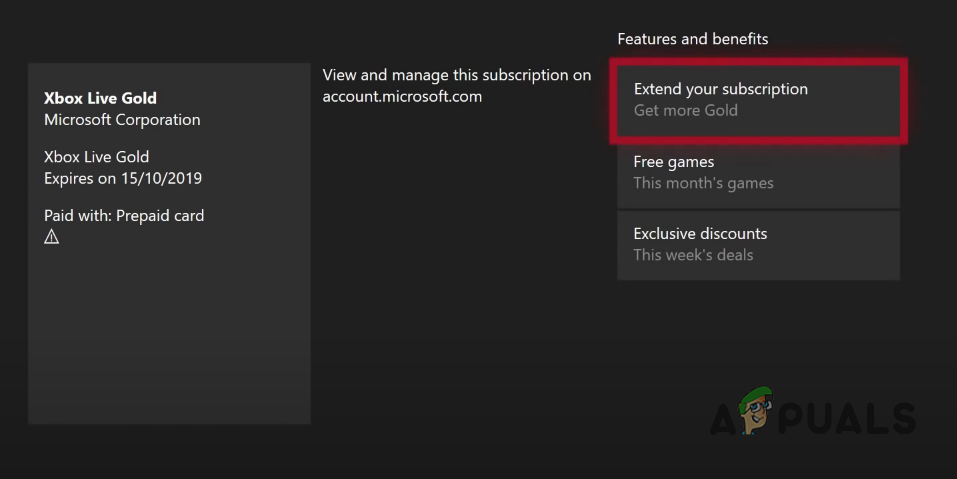
To check the status of your Xbox Live Gold subscription, follow the steps we’ve listed below:
- Open your Xbox home screen.
- Select the Settings option.
- In the Account section, select the “Subscriptions” option.
Checking the expiration date of your Xbox Live Gold subscription
In the Subscriptions menu, you’ll see all of your active subscriptions and the expiration date. If you click on an active subscription, you’ll get the option to extend the subscription further.
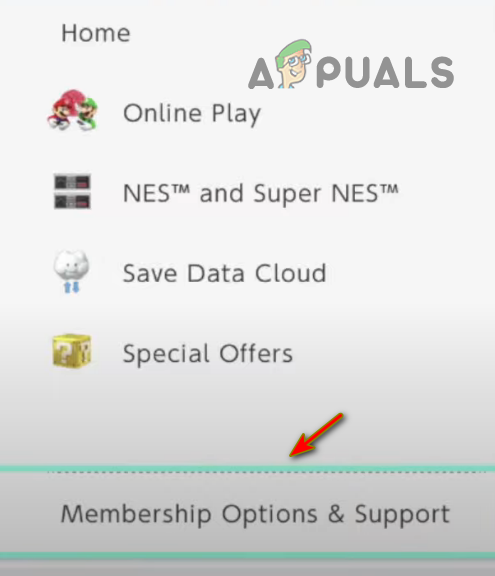
To check the status of your Nintendo Switch Online subscription, follow the steps we’ve listed below:
- Open your Nintendo Switch’s home screen.
- Select the Nintendo Switch Online icon from the hotbar at the bottom.

Opening the Nintendo Switch Online menu - Log into your profile.
- Select the “Membership Options & Support” button at the bottom left.
Opening the Membership Options - Click on the “Change Membership” button.
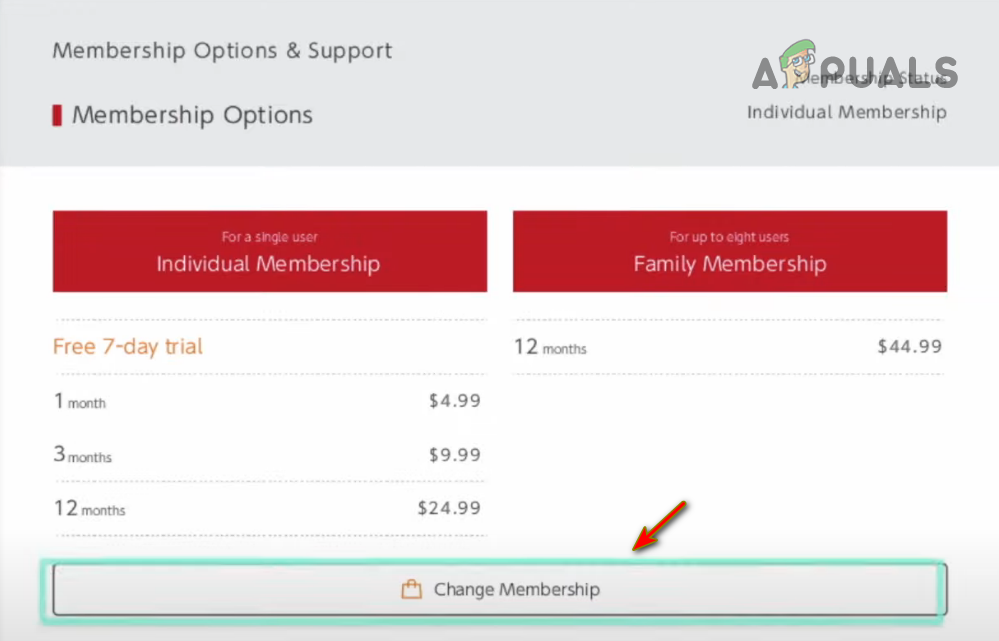
Press the Change Membership Button - Click on your profile icon in the top-right corner of the new menu.
- Scroll down to the “Nintendo Switch Online” section.
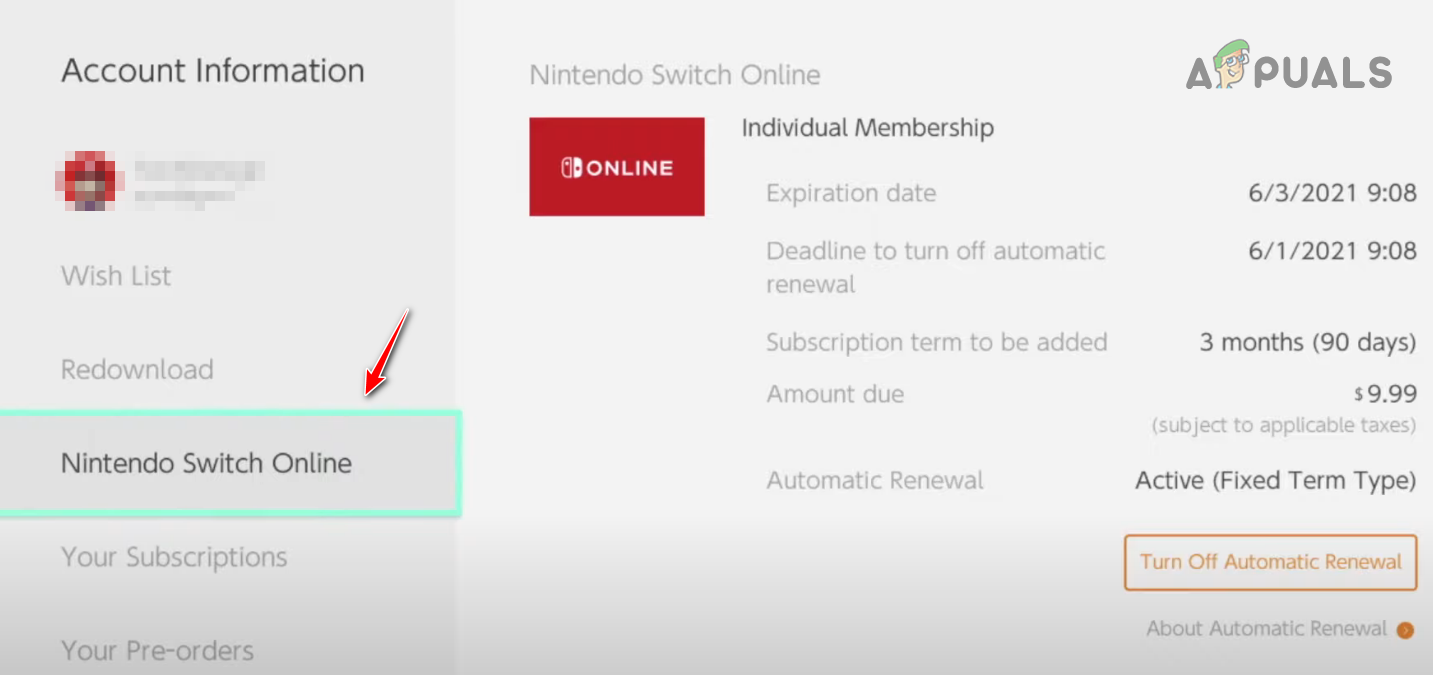
Checking the expiration date of your Nintendo Switch Online subscription
You’ll see all the important information regarding your online subscription in the Nintendo Switch Online section. It will show you the expiration date, Automatic Renewal status (On or Off), the deadline to turn off Automatic Renewal, and renewal charges.
If the Automatic Renewal feature isn’t active, click on the “Turn On Automatic Renewal” option to maintain your Nintendo Switch Online subscription automatically.
7. Turn Off Antivirus Temporarily
The Antivirus programs we use to protect our systems are infamous for causing issues with games. These Antivirus programs are designed to block unsafe applications from running on our systems, and for the most part, they do a good job at this.
But sometimes, they prevent entirely safe and trusted applications, such as games like Minecraft, from running properly.
And when the Antivirus programs conflict with these games, they cause all types of issues, such as preventing the user from connecting to the game’s online servers.
Therefore, if you’re experiencing trouble connecting to multiplayer servers in Minecraft, an easy solution to the problem is to disable your Antivirus program temporarily.
While playing the game, keep the Antivirus program turned off, then re-enable it once you’re done playing. This is better than uninstalling or permanently disabling the Antivirus altogether, as the Antivirus is essential for the safety of your system.
To turn off your Antivirus temporarily, follow the steps we’ve written below:
- Press the Windows Key on your keyboard.
- Type “Windows Security” in the search bar, and press the enter key.
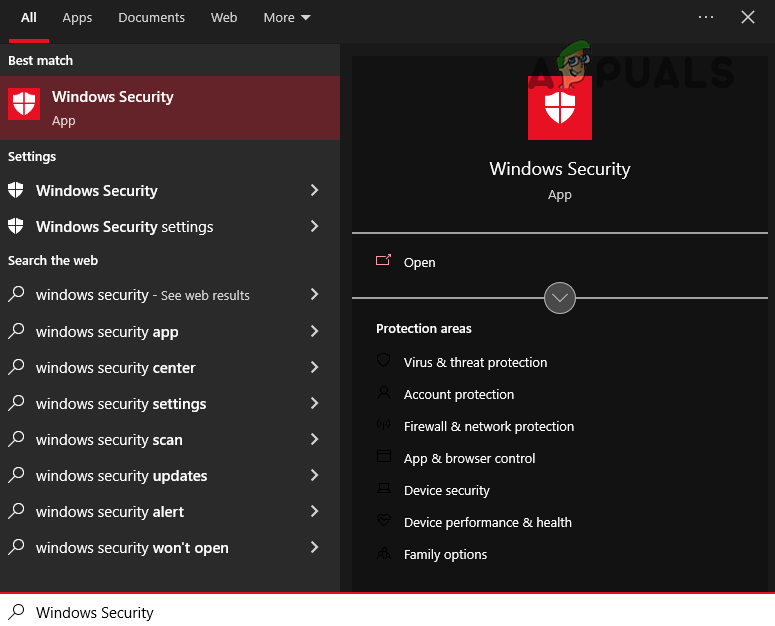
Opening Windows Security - Click on the “Virus & Threat Protection” option in the sidebar on the left.
- Click on the “Open App” option.
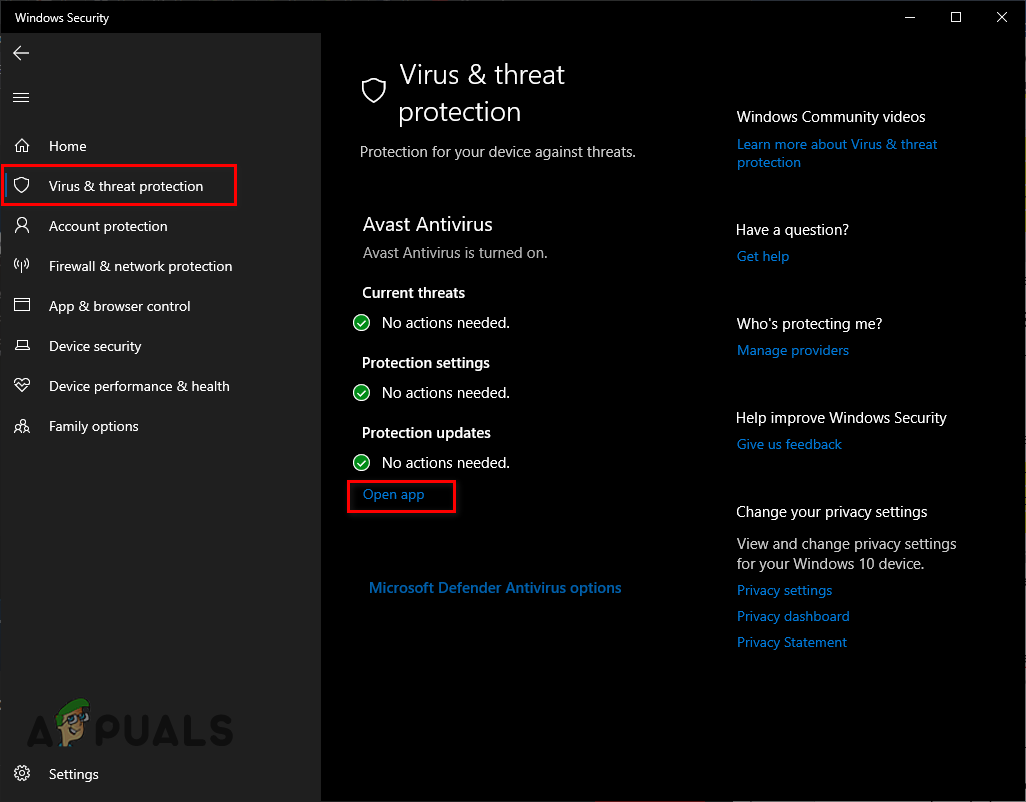
Temporarily Disabling Antivirus
Your Antivirus software will open when you press this option. Through its menu, you’ll be able to disable it temporarily by going to its settings.
If your Antivirus software does not offer an option for temporarily disabling it, you can disable it permanently, and then play Minecraft. And when you’re done with your Minecraft session, you can re-enable the Antivirus through the same menu so it can continue protecting your PC.
8. Create an Exception for Minecraft in Windows Firewall
If you’re still encountering errors in Minecraft Multiplayer after disabling your Antivirus, the problem may be caused by your Windows Firewall instead.
If the Windows Firewall thinks that the program is unsafe, it will block the program from being able to connect to the internet or even communicate within the local network.
Windows Firewall is a helpful safety program as it safeguards your system from cyber threats. However, this program has a tendency to cause problems with multiplayer games that need to connect to online servers.
It often flags trusted games, like Minecraft, as threats and prevents them from being able to access internet resources. The user cannot connect to the game’s online servers when this happens.
So the next step to fixing the Minecraft multiplayer issue is to create an exception for the game in the Windows Firewall menu. To do so, follow these steps:
- Press the Windows Key on your keyboard.
- Type “Windows Security” in the search bar, and press the enter key.
Opening Windows Security - Click on the “Firewall & Network Protection” option in the sidebar on the left.
- Click on the “Allow an app through Firewall” option.
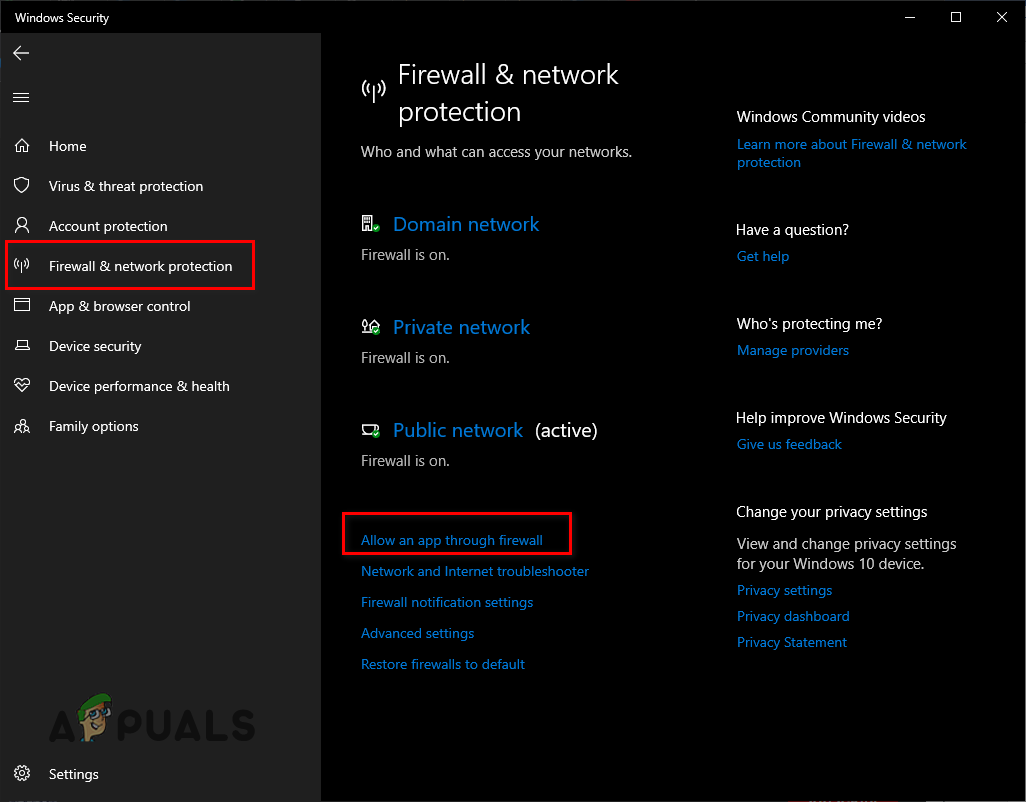
Opening Windows Firewall Settings - In the menu that appears, click on the “Change Settings” button (top-right).
- Put two checkmarks next to Minecraft in the list of allowed apps.
If you do not see Minecraft in the list of allowed apps, click on the “Allow another app…” option at the bottom. This will open File Explorer, where you can select the Minecraft launcher from your desktop and add it to the list.
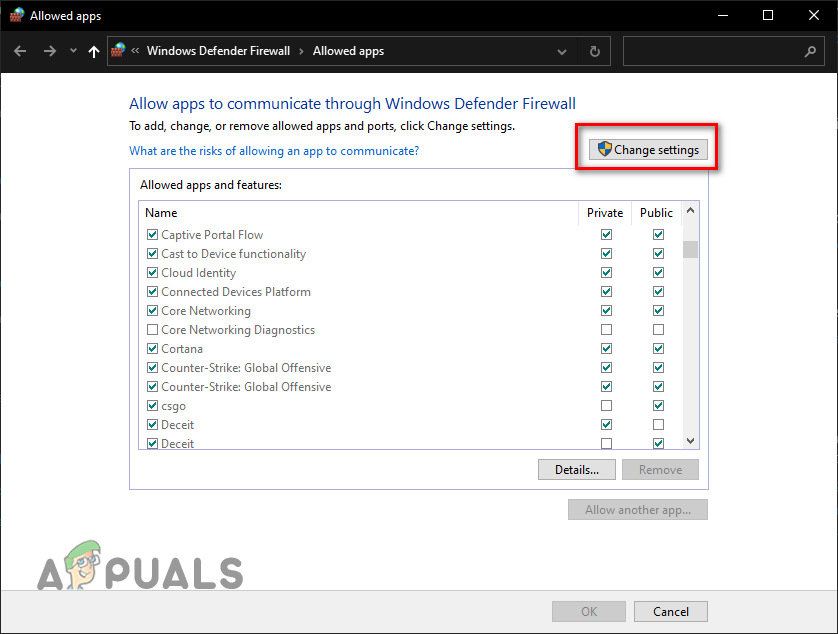
Once Minecraft is added to the list, put the checkmarks next to it, then click on the OK button at the bottom. Now that you’ve created an exception for Minecraft, Windows Firewall will no longer prevent Minecraft from connecting to the internet. This will likely fix the multiplayer issue you were facing.
9. Change NAT Type (on Console)
If you’re playing Minecraft on a console, such as the PlayStation, Xbox, or Nintendo Switch, you must ensure that the NAT type is set to Open (Type 1).
The Network Address Translation (NAT) setting is an extremely important network setting for console players. This setting governs the console’s ability to connect to online servers.
The NAT setting has three different types, which are listed below:
- Type 1 – Open: If the NAT type is set to Open (Type 1), the console can host and connect to servers with other players with any type of NAT.
- Type 2 – Moderate: If the NAT type is set to Moderate (Type 2), the console can only host and connect to servers with other players that have their NAT setting set to Open (Type 1) or Moderate (Type 2).
- Type 3 – Strict: If the NAT type is set to Strict (Type 3), the console can only host and connect to servers with other players with their NAT setting set to Open (Type 1).
This means that your network’s NAT setting should always be set to Open, as it allows you to connect to any Minecraft server and allows everyone to join your servers.
If your NAT setting is set to Strict or Moderate, your ability to join different Minecraft servers will be very restricted, as you’ll only be allowed to join specific types of servers.
To check your network’s NAT setting, you can run a quick network test on your console. From the home screen, head to the Settings menu and navigate to the Network Settings section.
This section will have a “Test your Internet Connection” option. Select this option to run a quick network test. This test will show you all the important information regarding your network, including what type of NAT it is currently.

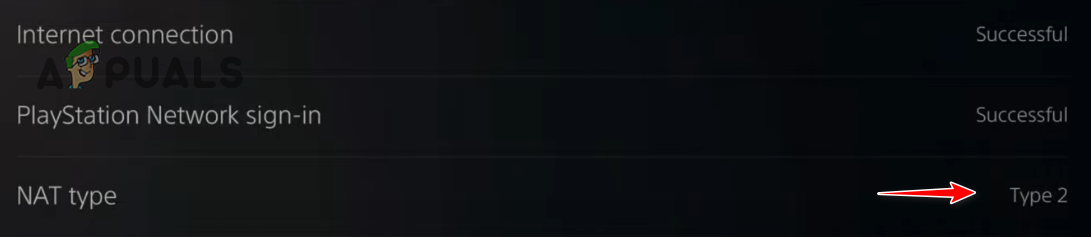
If it shows your NAT as Open (Type 1), you can move on to the next solution listed below. But if it shows your NAT as Strict (Type 2) or Moderate (Type 3), you’ll have to change it to Open (Type 1) manually.
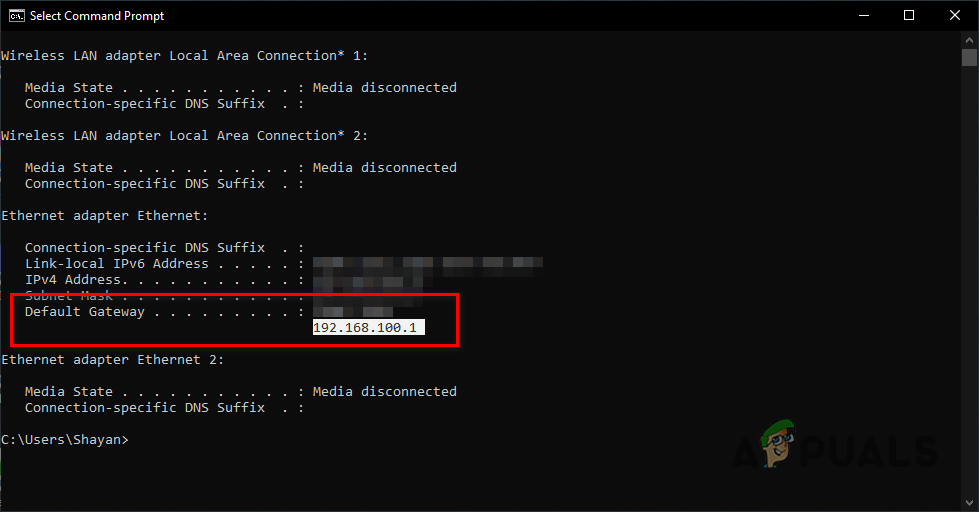
To change your network’s NAT type to Open/Type 1, you must first find your IP Address, also known as the network’s default gateway. This IP Address/default gateway will allow you to open your router’s settings page, where you can change the NAT type.
To find your router’s IP Address, follow the steps we’ve listed below:
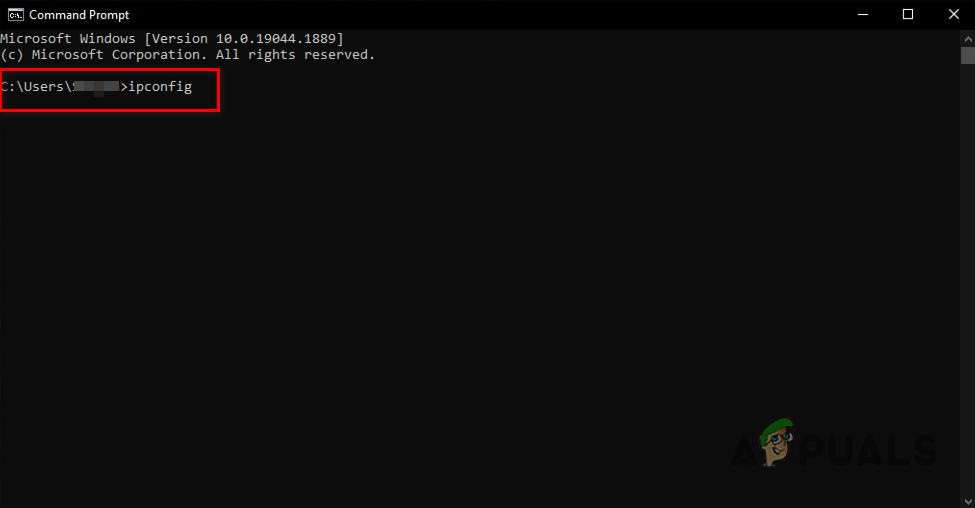
- Press Windows Key, type cmd, and press the “Run as Administrator” option.
- Type the following command in Command Prompt and press the enter key.
ipconfig
- Go down to the “Ethernet Adapter” section.
- Copy the IP Address written next to “Default Gateway”.
Finding routers IP Address
After copying your IP Address, open your browser of choice, paste it into the search bar and press the enter key. This will load your router’s login page, where you’ll need to enter the username and password of your router.
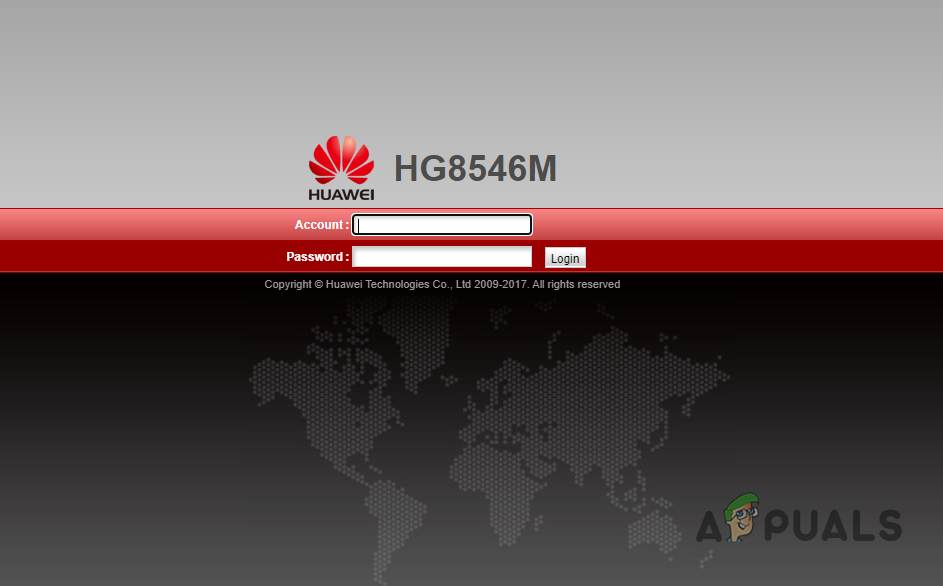
If you have no idea what your router’s username and password is, there’s no need to be alarmed, as you can easily find this out using Google.
Simply type “(router model name) username and password” into the Google search bar and press enter. The search results that will appear will show you the default username and password of your router.
Enter your router’s default username and password into the login page and press the enter key. Once logged in, you must find a setting called “UPnP Configuration.”
Since each type of router has its own distinct settings page, we cannot say exactly where you’ll find this option, but it’ll likely be under the “Network Application” section. If you’re struggling to find the UPnP Configuration option, you can search online for help.
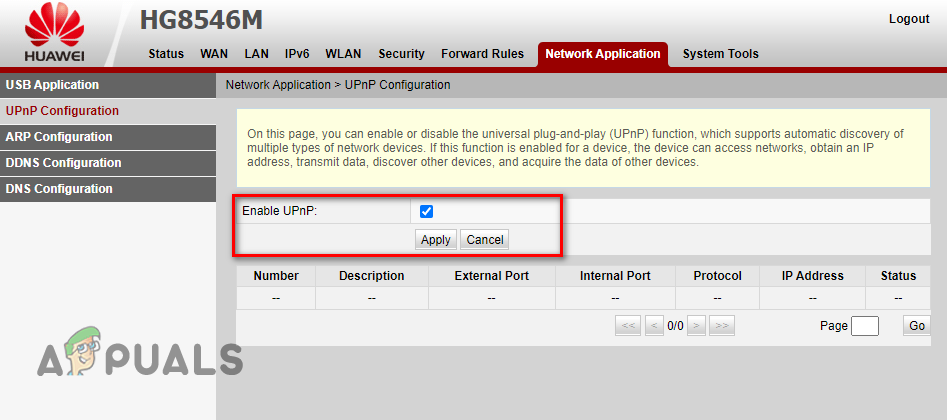
After finding the UPnP Configuration setting, enable it and save the changes. After that, restart your router and run the network test on your console once again. The NAT Type will now show as Open or Type 1.
10. Flush your DNS
Whenever you visit a website, your PC/Console uses a system known as the “Domain Name System” to translate that website’s domain name into a proper IP address, allowing the system to load that website. The time it takes to connect to the website heavily depends on the efficiency of the DNS server.
If the DNS server can translate the domain name quickly, the webpage will load swiftly. But if the DNS server is slow and has trouble translating the domain name, the webpage will take some time to load.
The DNS server used by your system is not only important for internet browsing, but it also impacts your system’s ability to connect to online game servers. If the DNS server your system uses is slow and inefficient, you may experience high ping and connectivity errors when connecting to online Minecraft servers.
To determine if your DNS server setting is the cause of the connectivity issues you’re facing in Minecraft multiplayer, the first step is to remove the DNS cache by flushing the DNS. The DNS cache builds over time as you browse the internet and connect to different servers.
The DNS system uses this cache to quickly access different websites’ IP addresses, so it doesn’t need to translate their domain names each time you connect to them. This allows your system to load webpages instantly and connect to online game servers within a few seconds.
But one major problem with the DNS cache is that it can often get corrupted or outdated. In both cases, the DNS cache leads to connectivity problems. This could explain why you’re having trouble connecting to servers in Minecraft.
An outdated/corrupted DNS cache can easily be removed by flushing your PC’s DNS. To do so, follow the steps we’ve listed below:
- Open the Start menu by pressing the Windows Key on your keyboard.
- Type cmd and press the “Run as administrator” option.
- In Command Prompt, type the command shown below and press enter.
ipconfig /flushdns
When you enter this command, your DNS will be cleared instantly, indicated by a message saying, “Successfully flushed the DNS Resolver Cache.”
One thing to note about clearing the DNS cache is that it has no negative effects on your internet connection. When you open a webpage or connect to a game server for the first time after clearing your DNS, it will take slightly longer than usual to load as the DNS is translating its domain name into an IP address again.
But after that, the connection speed will return to normal, and you may even see an improvement in the connection speed.
11. Change your DNS Setting
If the connectivity errors still occur in Minecraft multiplayer even after you’ve flushed your DNS, the problem may lie in your PC/Console’s DNS server itself.
There are different DNS servers available on the internet. Some DNS servers, like Google and Cloudflare, are objectively better than the rest as they provide much faster domain name translation.
But if your PC/Console’s DNS server setting is set to automatic (which is the default setting), it is likely not using the Google or Cloudflare DNS. This means that your system’s DNS is not as efficient as it has the potential to be.
Therefore, you should manually switch over to the Google or Cloudflare DNS to ensure your system’s DNS is as fast as possible.
If you’re playing Minecraft on PC, you can follow the steps we’ve written below to switch your system’s DNS to Google or Cloudflare:
- Press Windows Key + I simultaneously to open the Settings menu.
- Select the “Network & Internet” option from the menu.
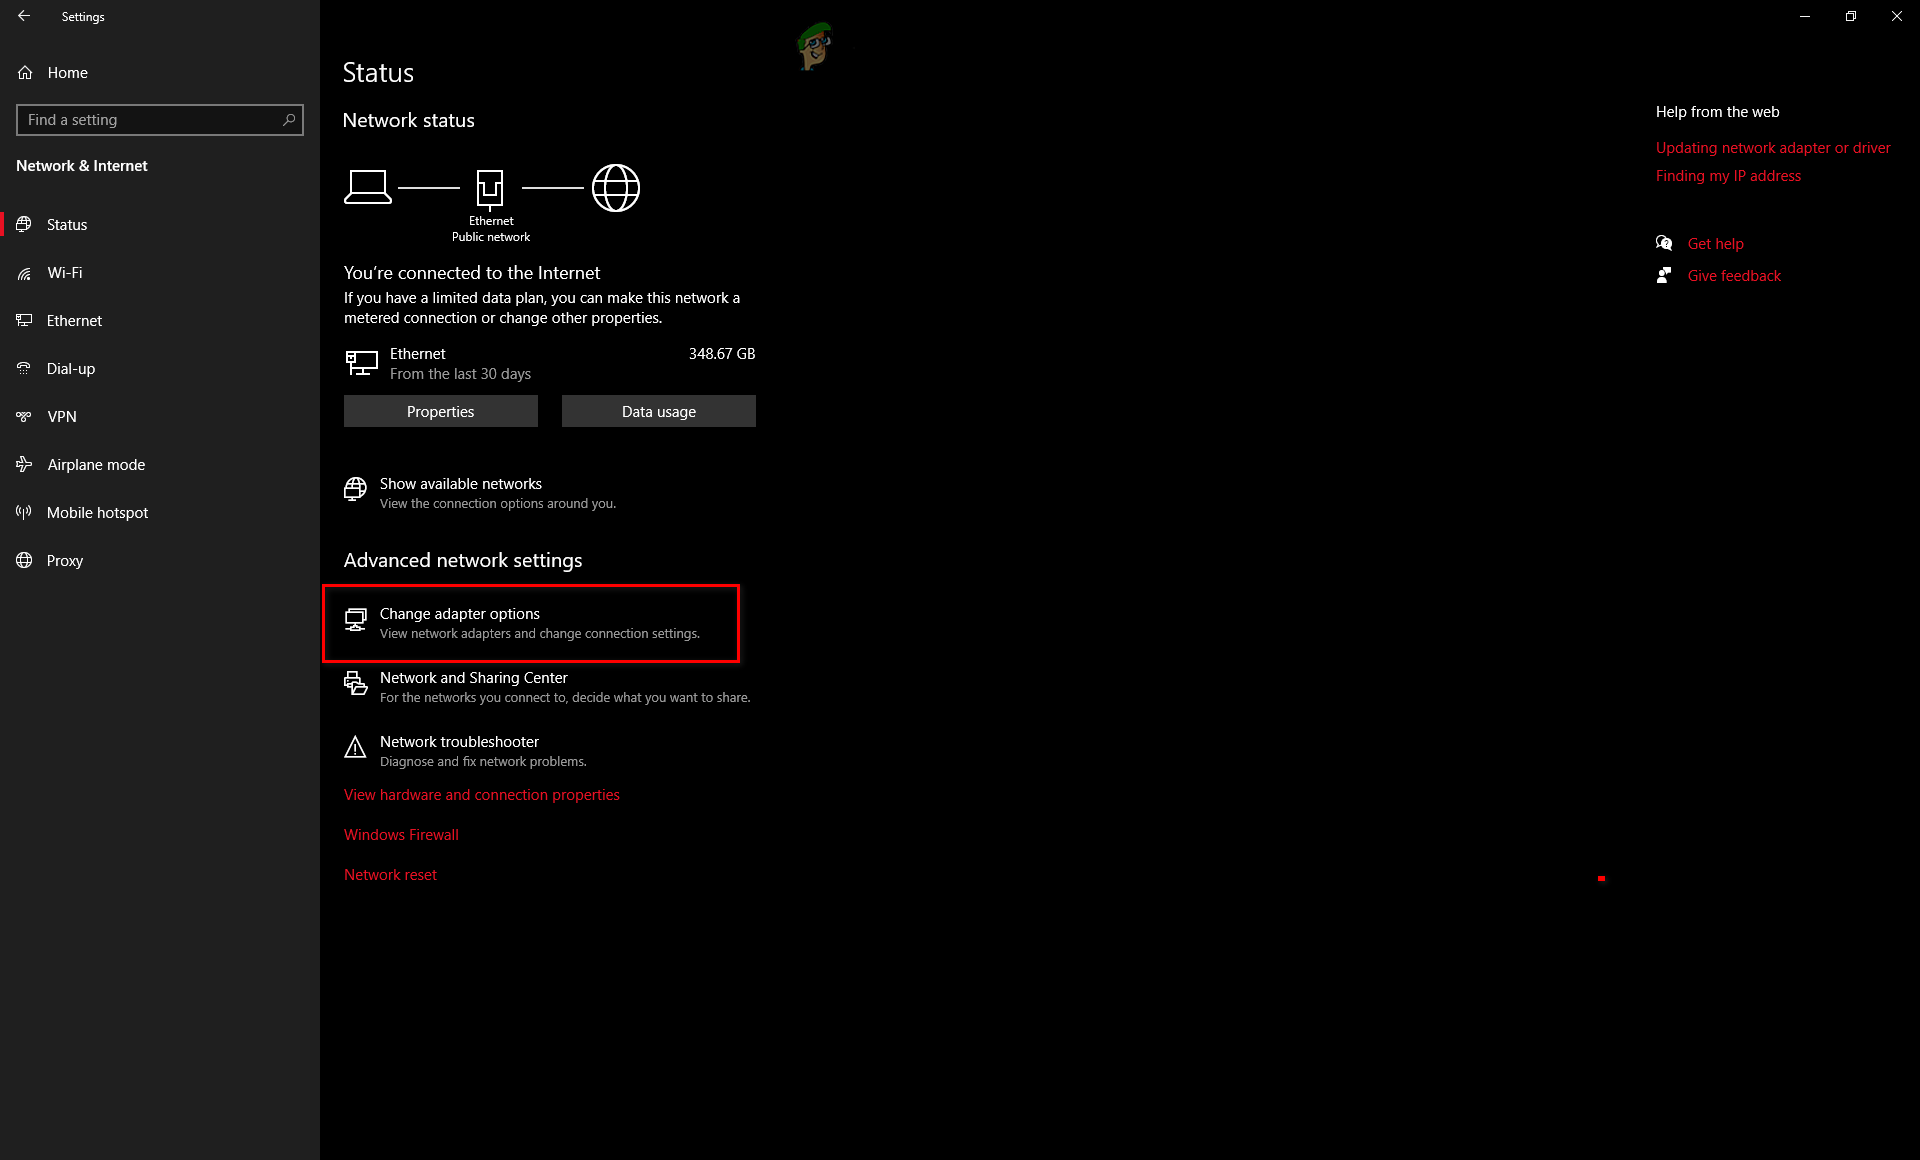
Opening Network and Internet Settings - Select the “Change Adapter Settings” option.
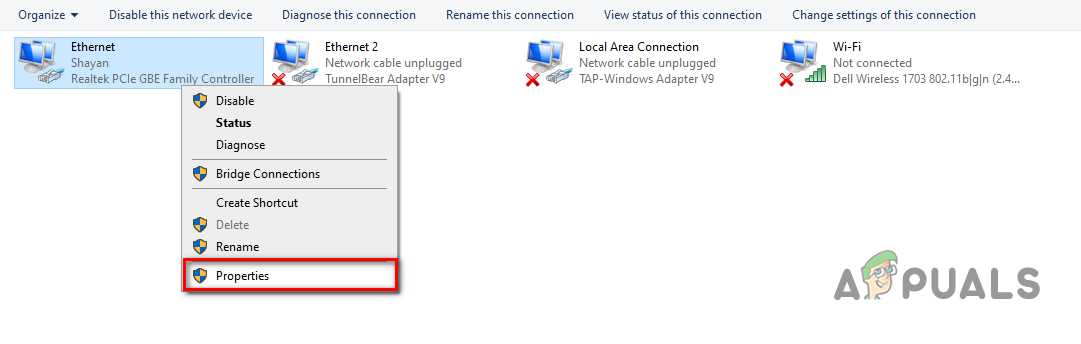
Opening Adapter options - In the Network Connections Window, right-click on the Network your system is connected to.
- Click on Properties.
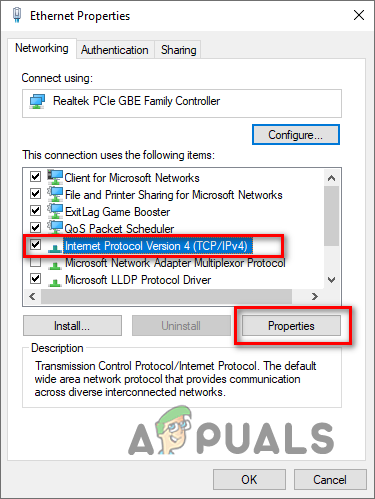
Opening Network properties - In the Networking tab, left-click on Internet Protocol Version 4 (TCP/IPv4) in the list of items.
- Press the Properties button.
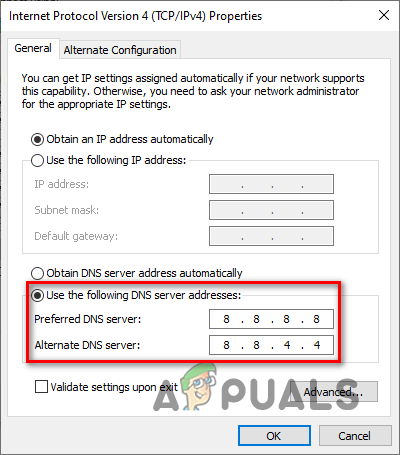
Opening Internet Protocol options - Click the “Use the following DNS server addresses” option.
If you want to switch to the Google DNS, type 8.8.8.8 next to “Preferred DNS” and 8.8.4.4 next to “Alternate DNS.”
If you want to switch to the Cloudflare DNS, type 1.1.1.1 next to “Preferred DNS” and 1.0.0.1 next to “Alternate DNS.” - Press OK.
Changing DNS Server
If you’re playing Minecraft on a PlayStation 4, you can follow the steps we’ve written below to switch your system’s DNS to Google or Cloudflare:
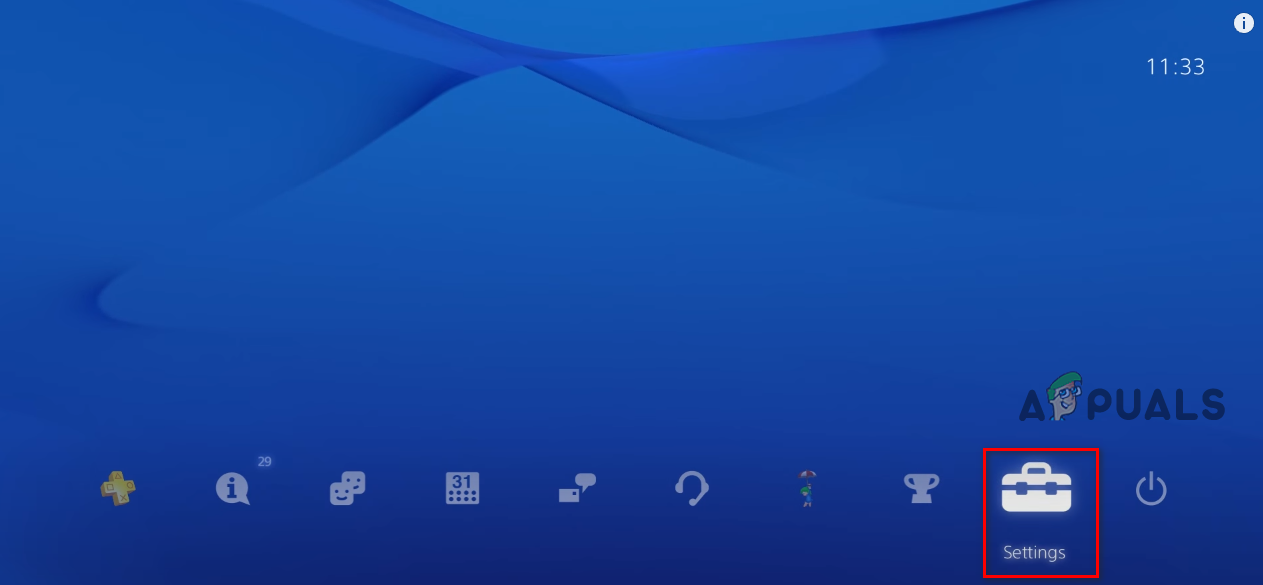
- Open your PS4’s home screen.
- Scroll to the settings icon and select it.
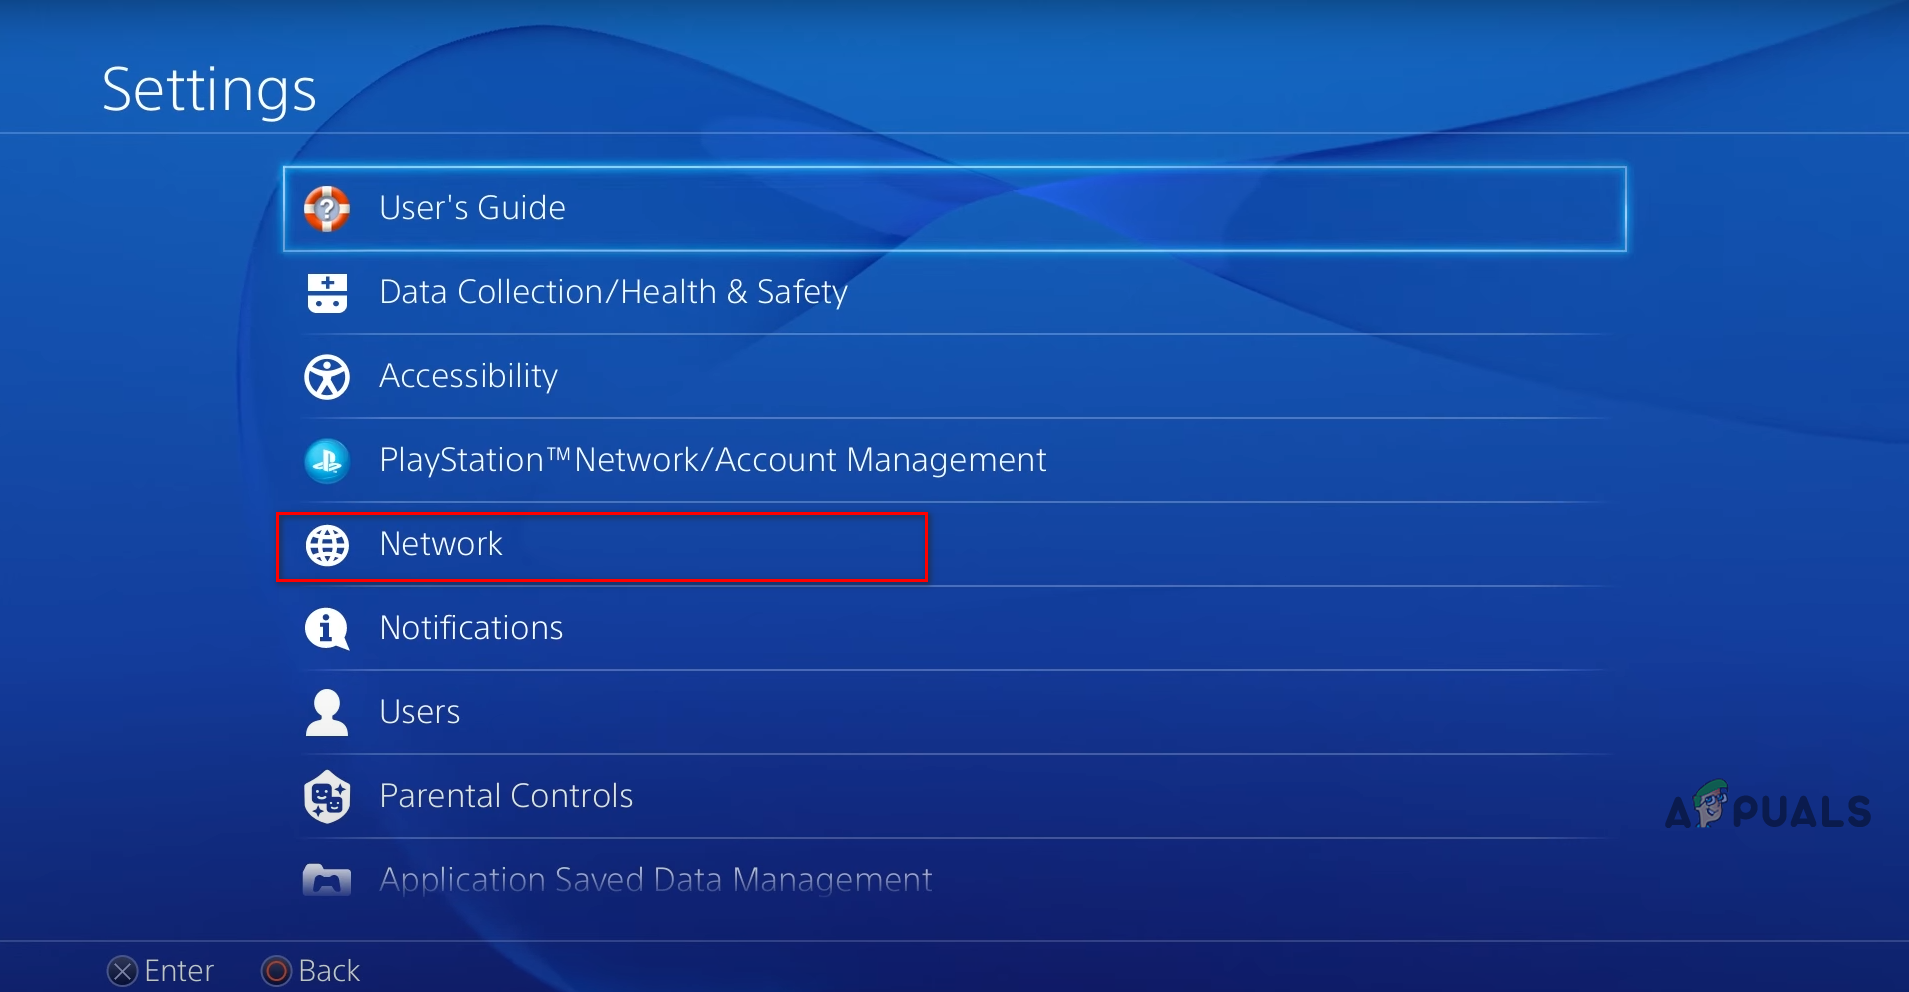
Opening PS4 Settings - From the list of options, select “Network.”
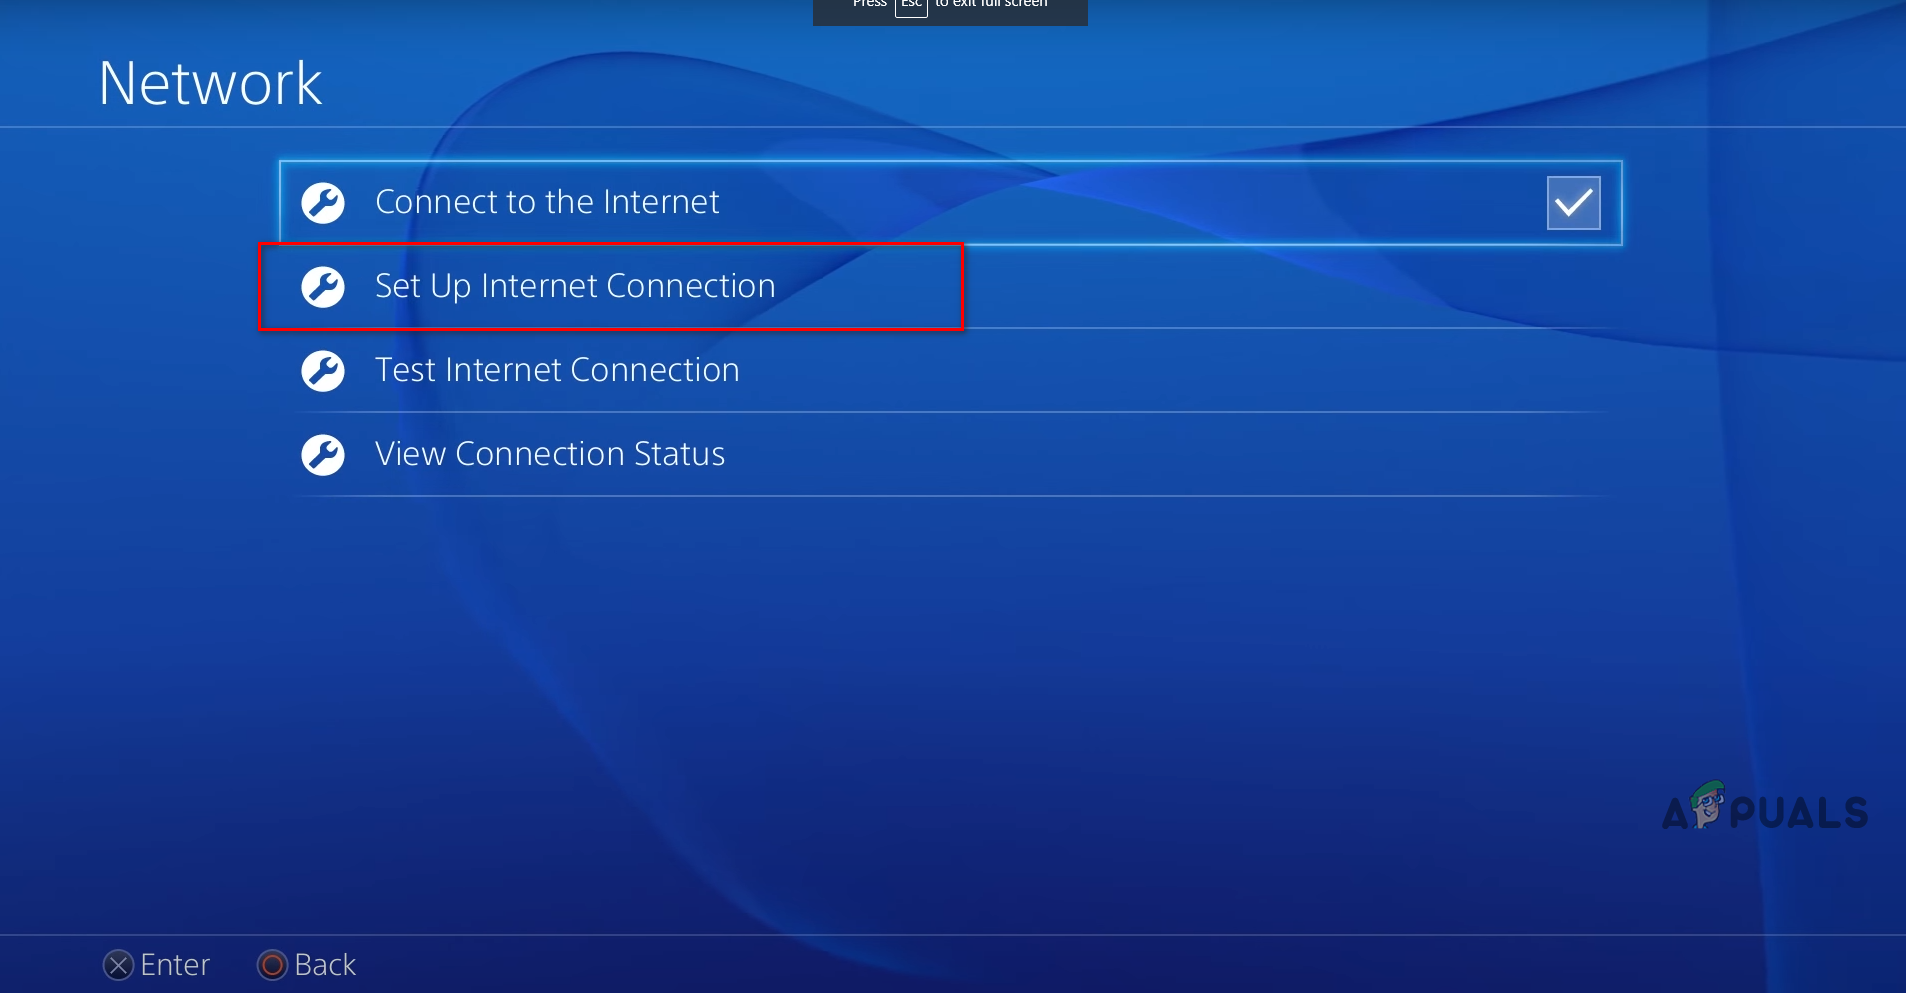
Opening PS4 Network Settings - In the Network menu, select the “Set Up Internet Connection” option.
Select Set Up Internet Connection If your PS4 is connected to your router using an Ethernet Cable, select the “Use a LAN (Ethernet) Cable” option.
If your PS4 is connected to your router using Wifi, select the “Use Wifi” option. - When asked, “How do you want to set up the Internet connection?” select “Custom”.
- Set the IP Address Settings to “Automatic”.
- Set the DHCP Host Name to “Do Not Specify“.
- Set the DNS Settings to “Manual”.
- If you want to switch to the Google DNS, type 8.8.8.8 in the Primary DNS section and 8.8.4.4 in the Secondary DNS section.
If you want to switch to the Cloudflare DNS, type 1.1.1.1 in the Primary DNS section and 1.0.0.1 in the Secondary DNS section.
Changing DNS Server on PS4 - Click on the Next button.
- Set the MTU Settings to “Automatic”.
- Set the Proxy Server to “Do Not Use“.
- Restart your PS4.
If you’re playing Minecraft on a PlayStation 5, you can follow the steps we’ve written below to switch your system’s DNS to Google or Cloudflare:
- Open your PS5’s home screen.
- Press the Settings icon on the top-right corner.
Opening PS5 Settings - In the list of options, select “Network.”
Opening PS5 Network Settings - Select the “Set Up Internet Connection” option in the Settings section.
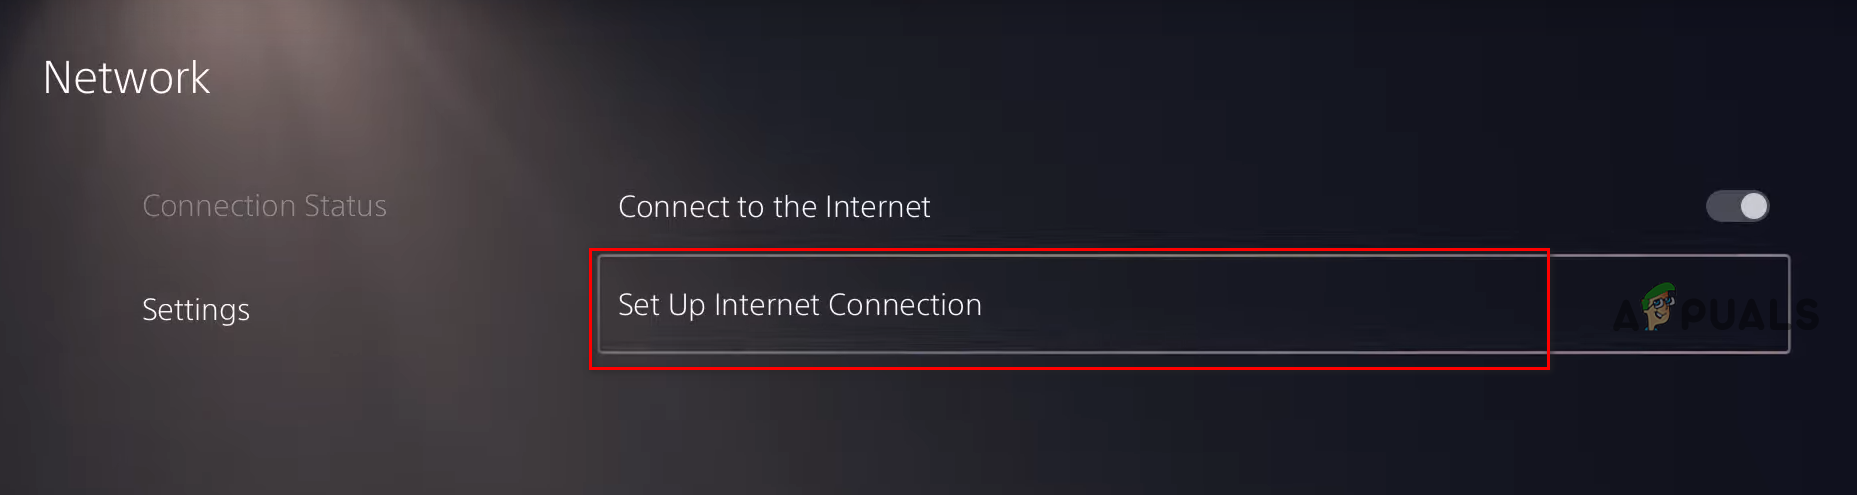
Selecting Set Up Internet Connection - Select the Network your PS5 is connected to.
- Select the “Advanced Settings” option.
- Select the “DNS Settings” option.
- Change it to Manual.
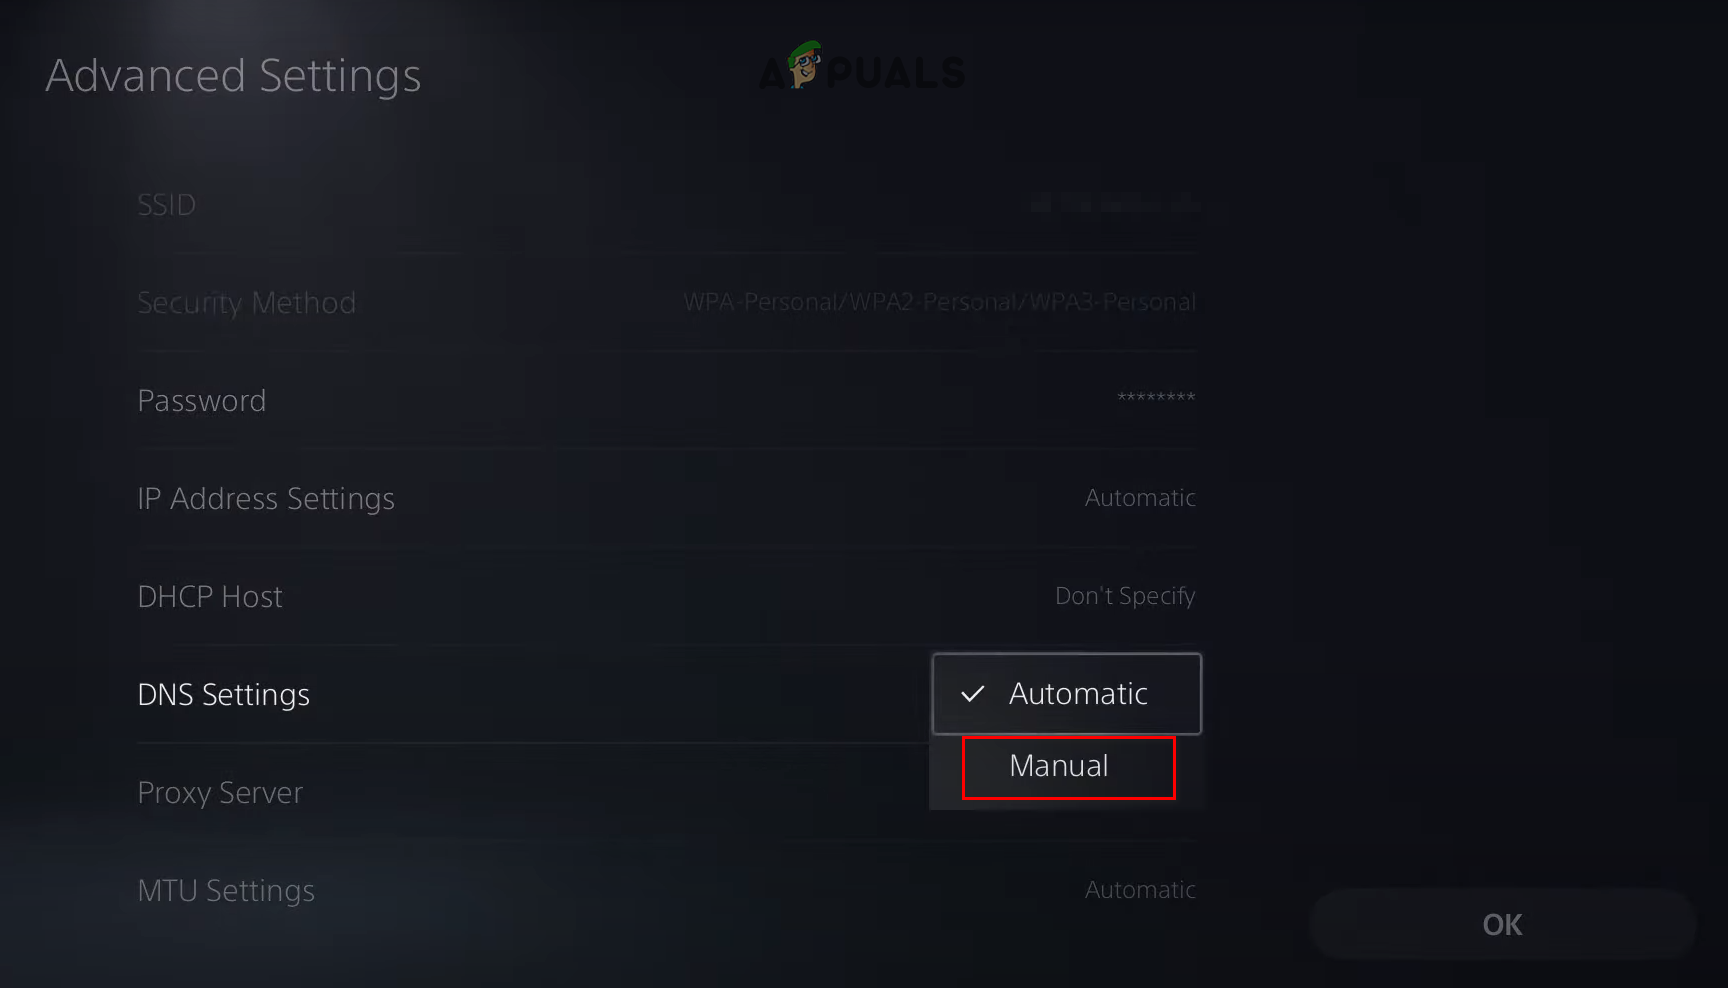
Changing DNS Settings to Manual If you want to switch to the Google DNS, type 8.8.8.8 in the Primary DNS section and 8.8.4.4 in the Secondary DNS section.
If you want to switch to the Cloudflare DNS, type 1.1.1.1 in the Primary DNS section and 1.0.0.1 in the Secondary DNS section. - Press the OK button.
Changing Primary and Secondary DNS Settings
If you’re playing Minecraft on an Xbox One, you can follow the steps we’ve written below to switch your system’s DNS to Google or Cloudflare:
- Open your Xbox One’s home screen.
- Open the Guide menu by pressing the Xbox button on your controller.
- Scroll to the gear icon on the right.
- Click on “Settings”.
Opening Xbox Settings - In the Network section, click on “Network Settings”.
Opening Xbox Network Settings - Click on “Advanced Settings”.
Selecting Advanced Settings - Click on “DNS Settings”.
Selecting DNS Settings - Select the “Manual” option.
If you want to switch to the Google DNS, type 8.8.8.8 in the Primary IPv4 DNS option and 8.8.4.4 in the Secondary IPv4 DNS option.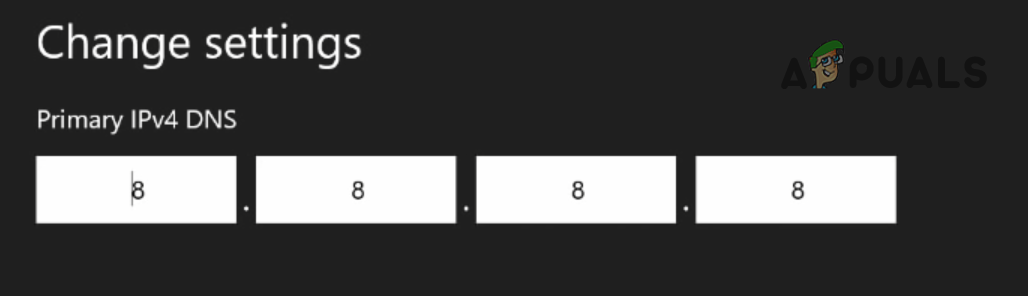
Changing Primary DNS 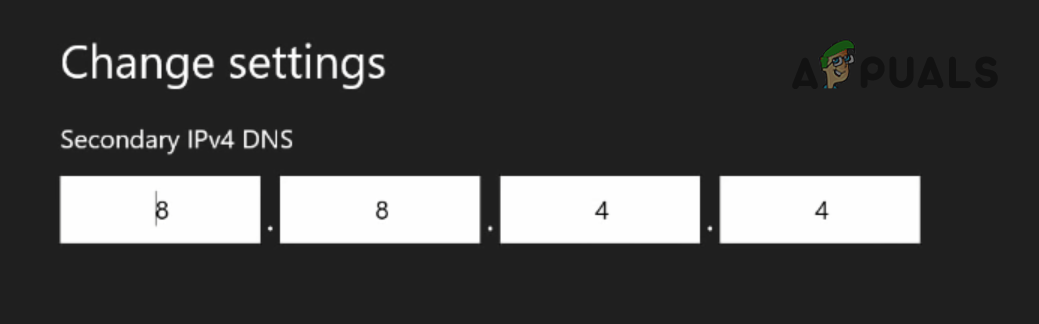
Changing Secondary DNS If you want to switch to the Cloudflare DNS, type 1.1.1.1 in the Primary IPv4 DNS option and 1.0.0.1 in the Secondary IPv4 DNS option.
- Press the Enter key on the on-screen keyboard to save the changes.
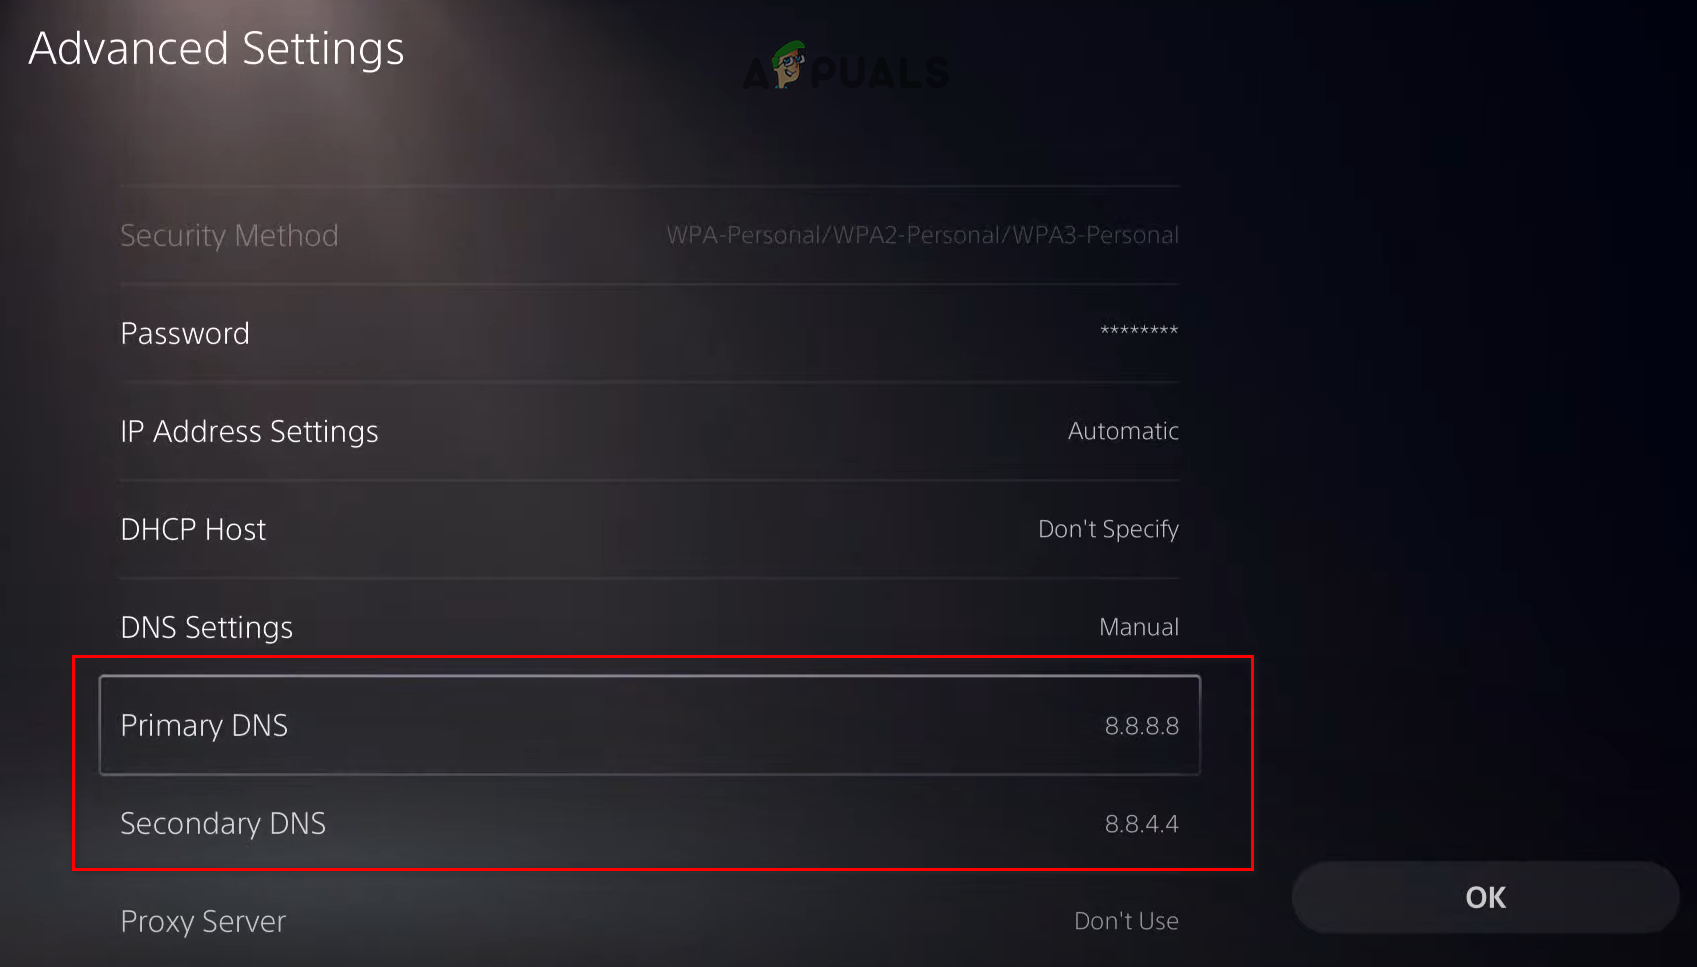
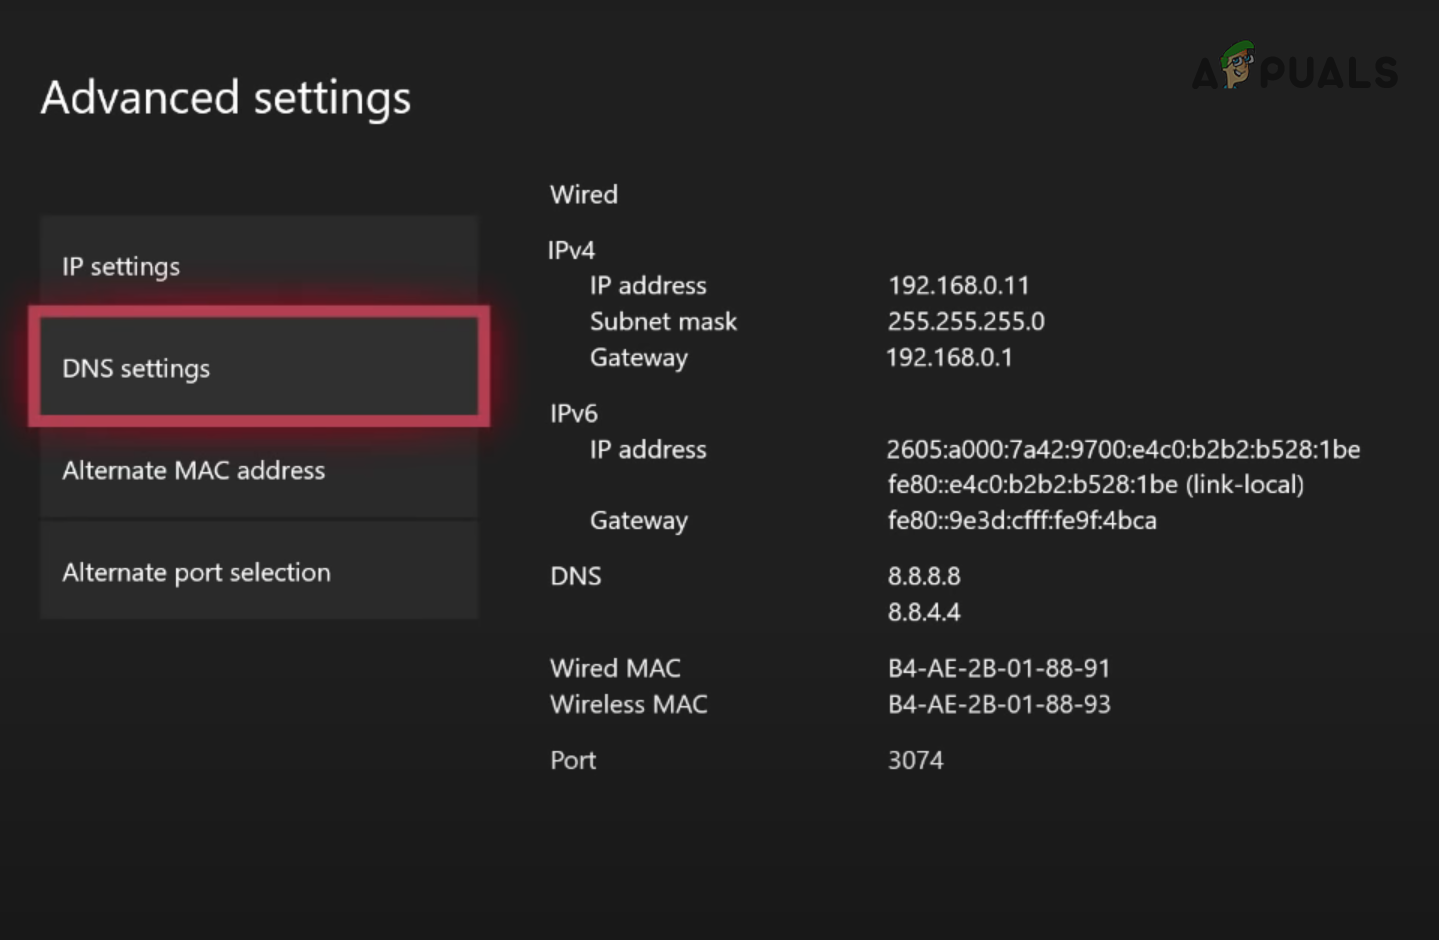
If you’re playing Minecraft on an Xbox Series S or Series X, follow the steps we’ve written below to switch your system’s DNS to Google or Cloudflare.
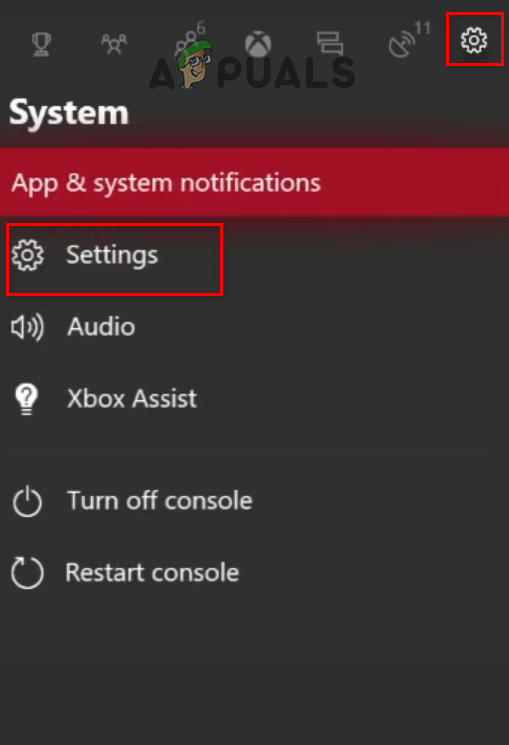
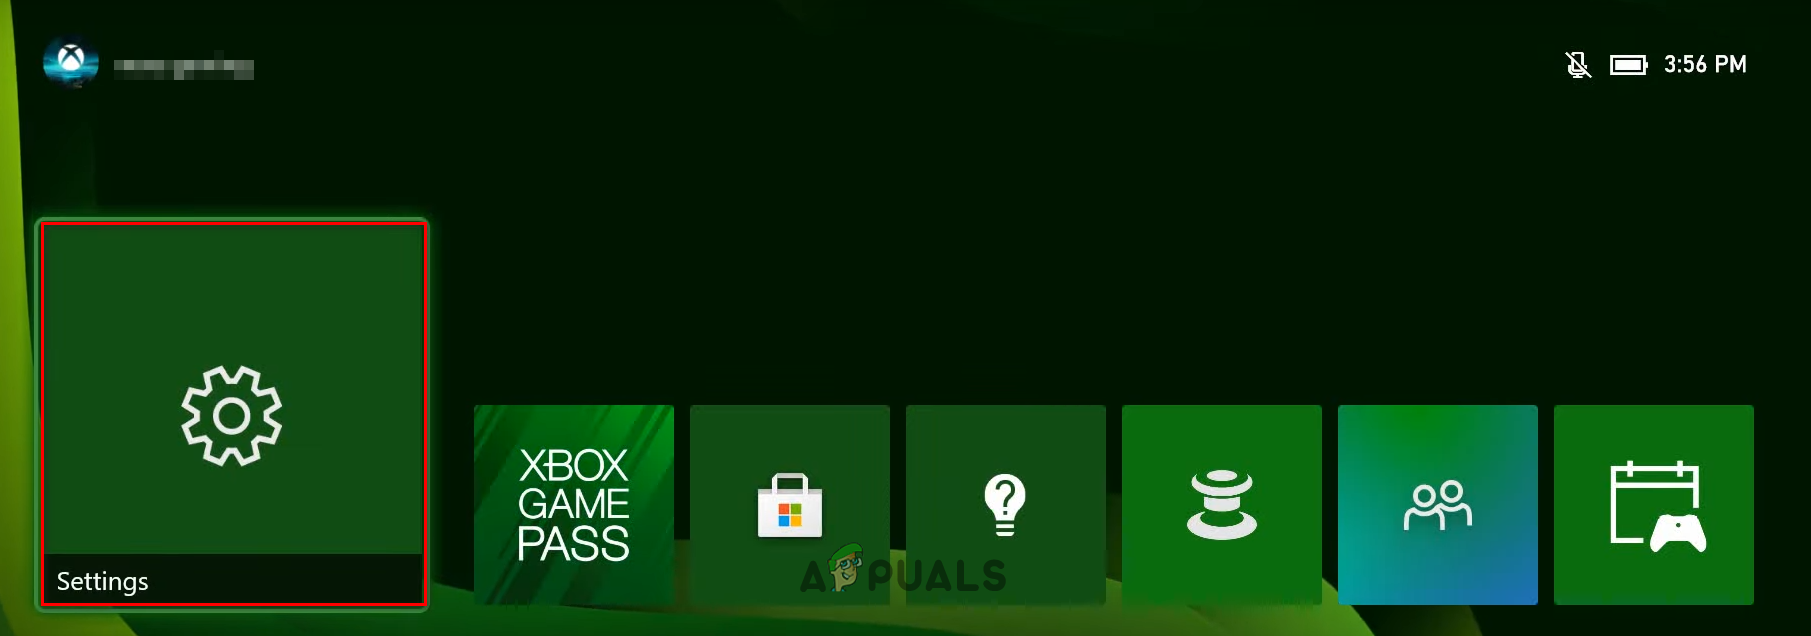
- Open your Xbox Series X/S’s home screen.
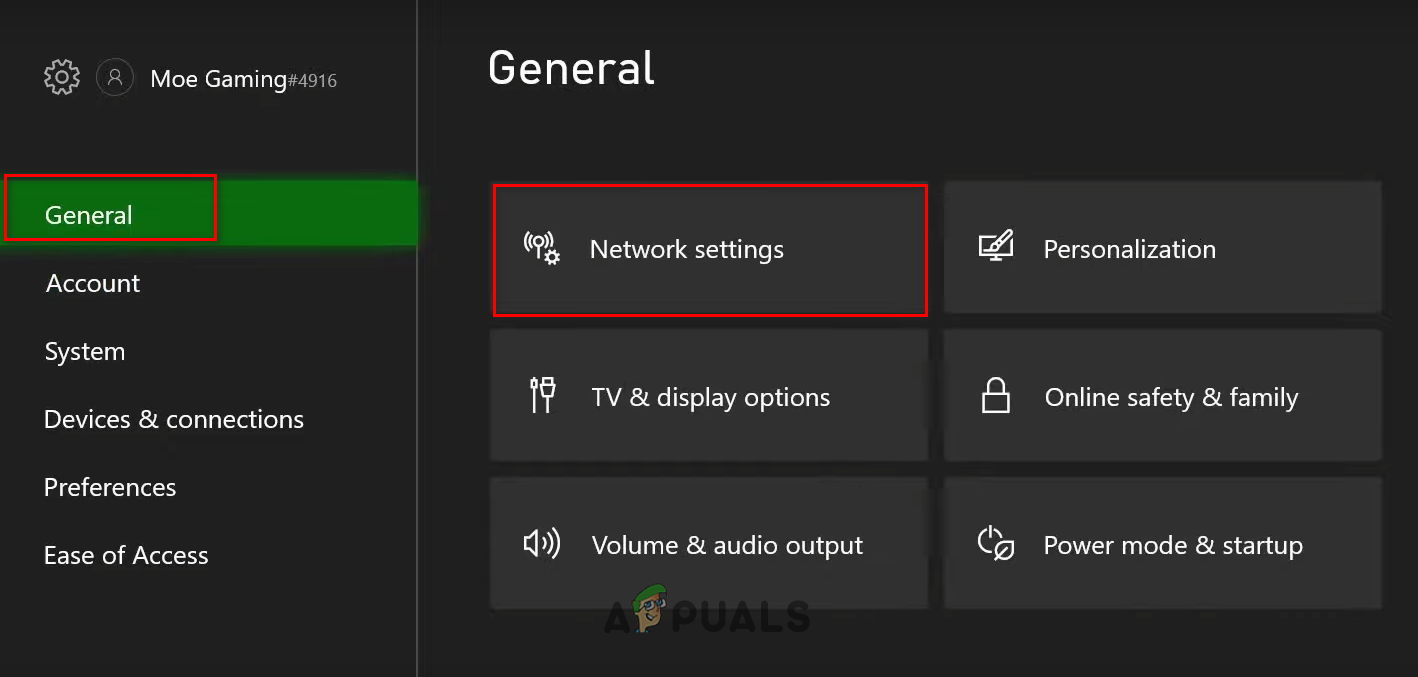
- Select the Settings option.
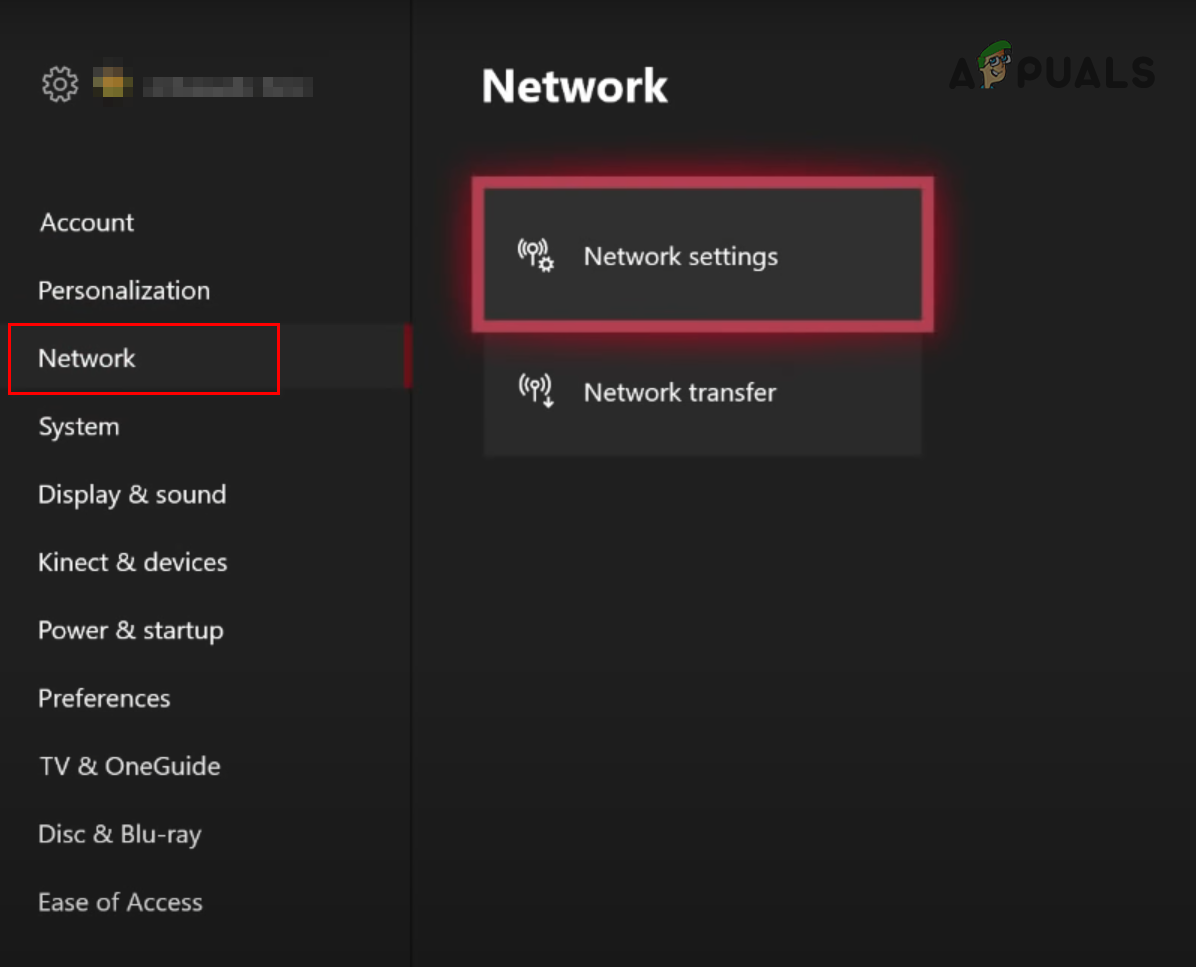
Opening Xbox Series X/S Settings - In the “General” section, select the “Network Settings” option.
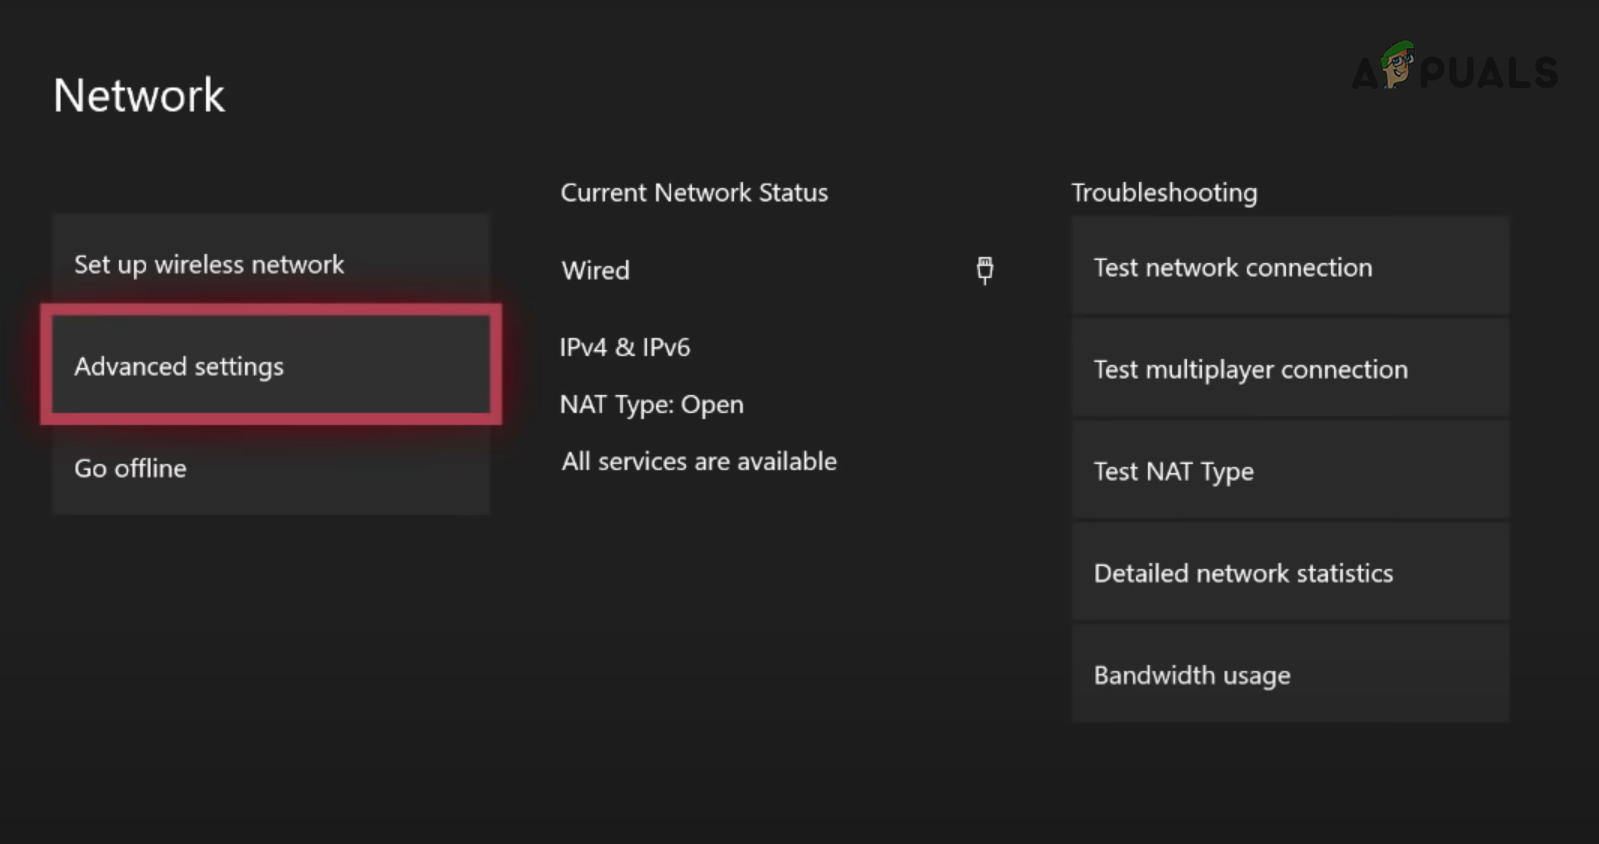
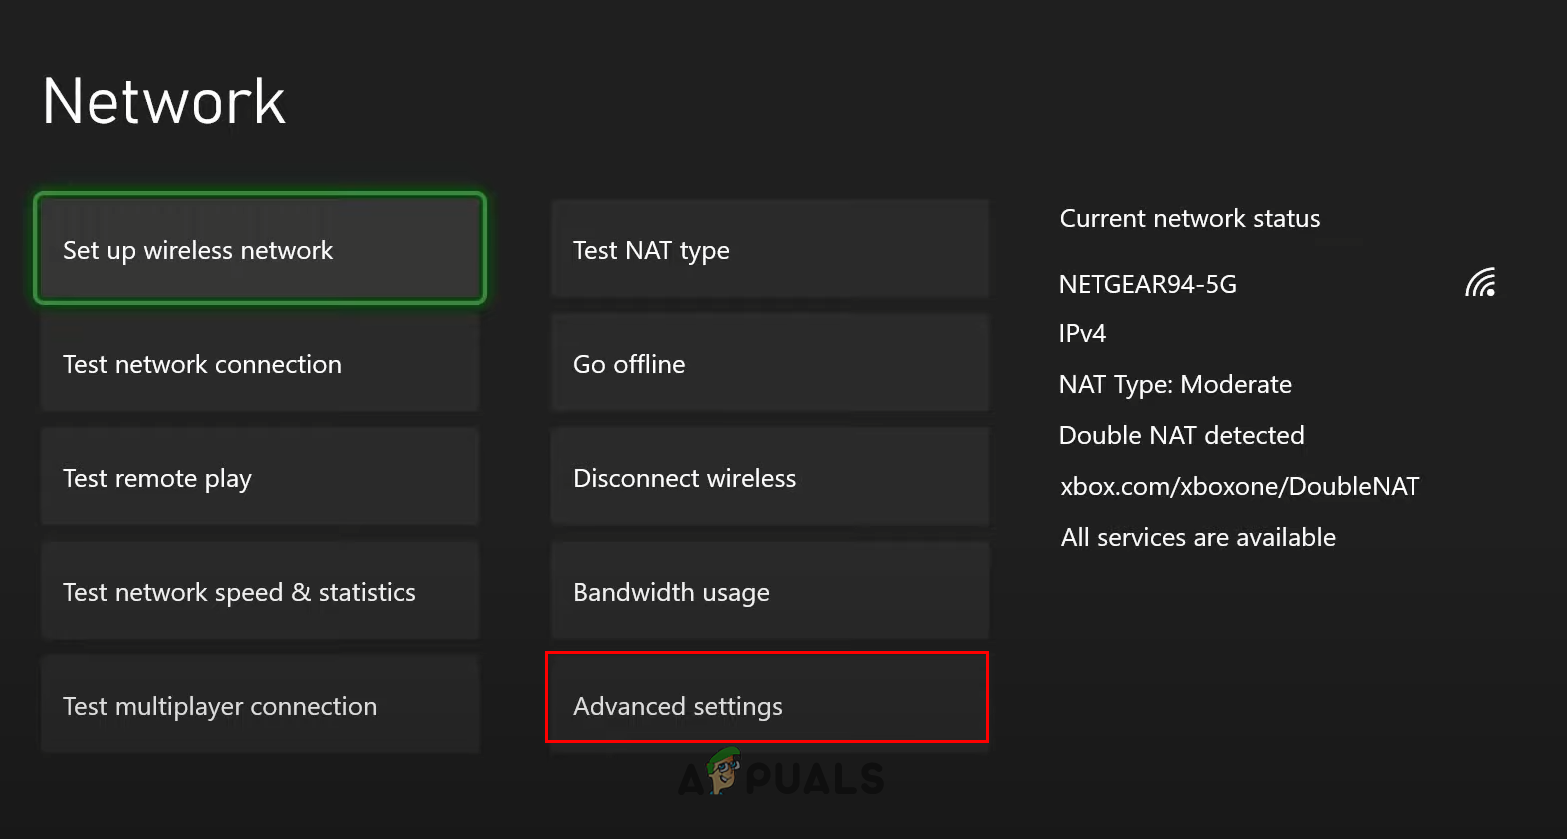
Opening Xbox Series X/S Network Settings - In the “Set Up Wireless Network” section, select “Advanced Settings”.
Opening Advanced Settings - Select “DNS Settings”.
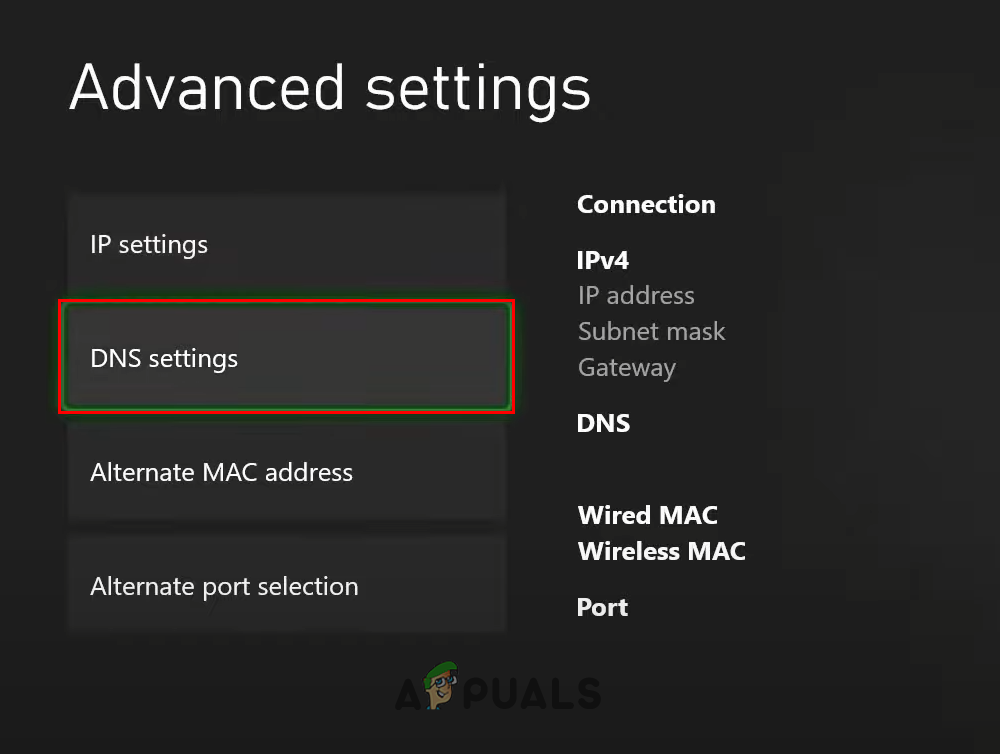
Opening DNS Settings - Select “Manual”.
If you want to switch to the Google DNS, type 8.8.8.8 in the Primary IPv4 DNS option and 8.8.4.4 in the Secondary IPv4 DNS option.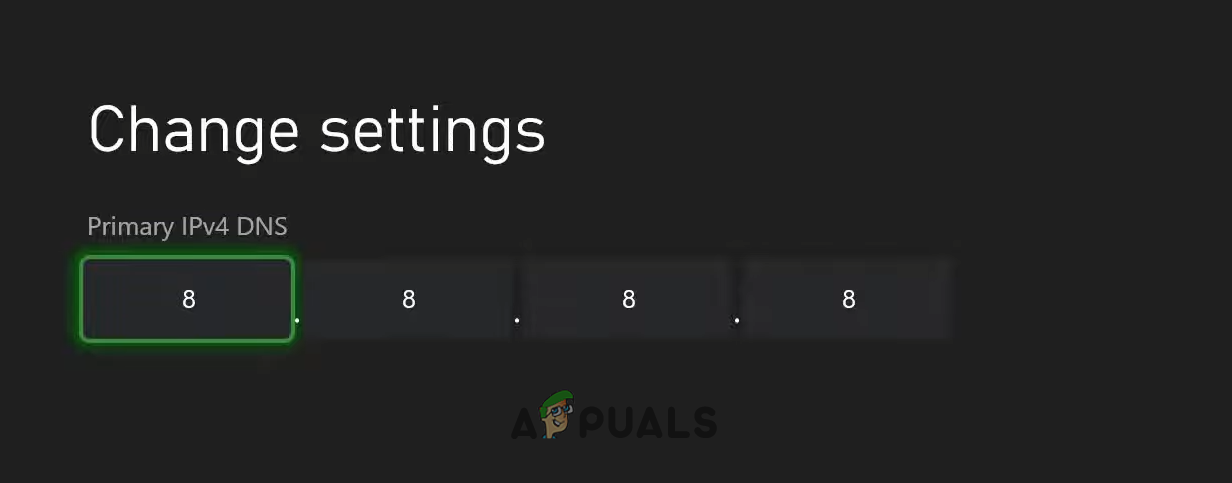
Changing Xbox Primary DNS Server 
Changing Secondary DNS Server If you want to switch to the Cloudflare DNS, type 1.1.1.1 in the Primary IPv4 DNS option and 1.0.0.1 in the Secondary IPv4 DNS option.
- Press the Enter key on the on-screen keyboard to save the changes.
12. Reinstall Minecraft
If you’ve tried all the solutions we’ve written above and can still not join online servers in Minecraft, then some of your Minecraft game files may be corrupted and/or missing.
While Minecraft was being downloaded on your system, some of its files may have become corrupted, and some may not have been downloaded during the process.
These missing/corrupted game files are generally caused by the user’s internet connection, which can often become slow or unstable, leading to errors during the download process.
Due to these improper game files, the user experiences all kinds of errors in the game, which would explain why you’re still having trouble playing Minecraft multiplayer.
Since the Minecraft launcher has no native feature for repairing missing/corrupted game files, the only way to fix this problem is to fully reinstall Minecraft. This will reinstall all the game files, fixing any missing or corrupted files.
To reinstall Minecraft, you must first uninstall it from your system. To do so, follow these steps:
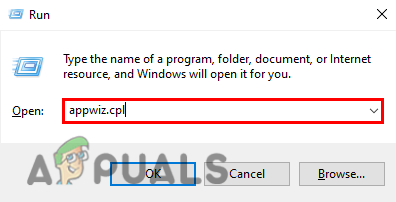
- Press Windows Key + R simultaneously.
- In the Run dialog box at the bottom-left corner of your screen, type appwiz.cpl, and press the enter key.
Type appwiz.cpl in the run box - Locate Minecraft in the list of applications.
- Right-click on Minecraft.
- Click the “Uninstall” option.
Once Minecraft has been uninstalled from your system, open the official Minecraft website on your browser and download the game again. While downloading the game, ensure your internet connection is as stable as possible.
After Minecraft has been reinstalled on your system, you should finally be able to connect to its online servers.


