How to Fix Minecraft Authentication Servers Are Down Error?
Minecraft: Java Edition can list a server as online, then refuse to join with “Authentication servers are down.” The game cannot verify your account before loading the world.

The message may also say “The authentication servers are currently down for maintenance” or “Please try again later, sorry!” That wording does not confirm a widespread outage.
Your computer or the server failing to reach account verification can produce the same warning, even while single-player works.
| What you notice | Where to start |
|---|---|
| Several players cannot join unrelated servers. | Check service announcements before changing settings. |
| Other players can join, but your game cannot. | Refresh your launcher sign-in. |
| Only an older version or modded launcher fails. | Compare the installation and Java runtime. |
| The launcher shows Play Demo or Buy. | Check the signed-in account. |
| Everyone fails on one server but can join elsewhere. | Ask its owner to check the server logs and verification connection. |
1. Check Service Status and Another Server
An online server can still need an unavailable verification service. Players already connected may keep playing while new joins fail.
- Check the official Xbox status page for account/sign-in incidents and Mojang Status for Minecraft announcements.

A real authentication outage affects many players and cannot be fixed from one PC or one Minecraft server. - Try another known-working Java server that accepts your game version.
- Ask another player, preferably on a different network, to try a fresh join rather than report that they are already connected.
If several players still cannot join unrelated servers, wait for recovery and retry. A clear Xbox status page does not rule out a Minecraft-only incident. One server failing for everyone needs its owner’s attention.
2. Close Minecraft and Sign In Again
The launcher can show your account while the game uses an outdated session. Minecraft’s sign-out procedure renews it without removing worlds.
- Close Minecraft and the launcher. On Windows, press Ctrl + Shift + Esc and end remaining client/launcher processes. Only end Java processes belonging to that game, not other apps or your server.

- Reopen the launcher, select the menu beside your gamertag, and choose Log out.

Logging out and back in replaces a stale Minecraft access token with a new one. - Choose Microsoft Login, sign in with the account that owns Java Edition, and launch one fresh instance. Keep the version required by the server.
If the server accepts you now, stop here. An explicit “Invalid session” error needs related sign-in checks rather than being treated as an outage.
3. Correct the Clock if It Is Wrong
An incorrect date can prevent secure verification. Check the actual date and time; changing the time zone alone will not repair an inaccurate clock.
- Open Settings > Time & language > Date & time in Windows.
- Enable Set time automatically and select the correct time zone, automatically or manually.

A wrong clock can break secure Minecraft authentication requests on both the player PC and the server host. - Click Sync now, confirm the displayed date and time, and reopen Minecraft to test.
Server owners: on systemd-based Linux, check synchronization with timedatectl status. If disabled, enable it with sudo timedatectl set-ntp true and confirm the time is correct.

If the error still appears with a correct clock, leave time settings alone. Report persistent clock errors on managed machines to the administrator.
4. Remove Incorrect Hosts Entries and Refresh DNS
Mojang’s notice for this error identifies software that redirects authentication addresses through the hosts file. Removing unwanted redirects lets Minecraft contact the intended service.
Check the Hosts File on Windows
- Close Minecraft. Copy
%SystemRoot%\System32\drivers\etc\hoststo a safe location as a backup. - Open Notepad as administrator. Choose File > Open, select All files, and open the original
hostsfile. - Remove only unexpected entries that redirect Mojang authentication addresses, such as
sessionserver.mojang.com. Leave unrelated entries intact. Save as hosts, not hosts.txt.
Leave the file unchanged if no matching entries exist. Ask IT before editing managed settings. Remove offending software if redirects return; restore the backup if your edit disrupts another service.
Clear Cached Addresses and Restart the Router
- Open Command Prompt as administrator.
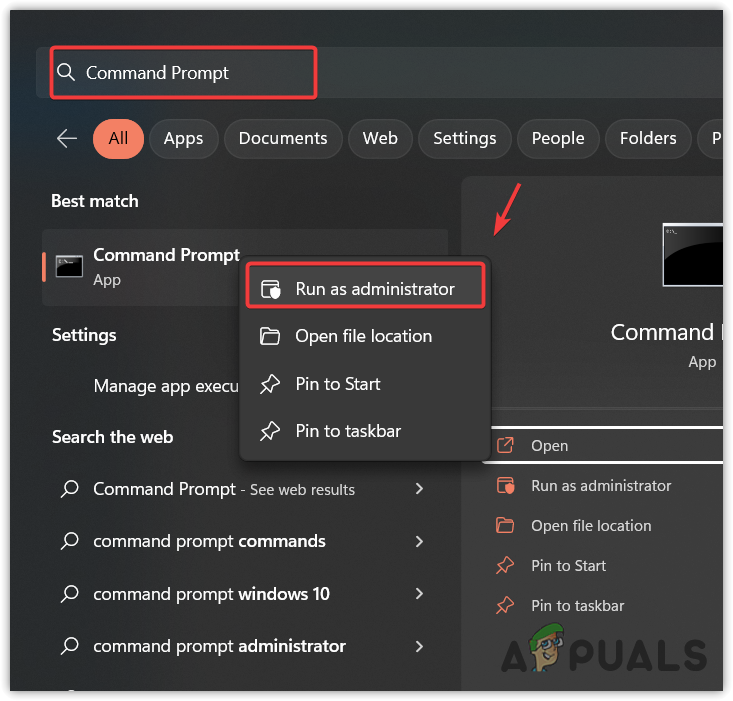
Open an elevated command prompt before flushing DNS. - Run the following command to clear Windows’ cached DNS answers:
ipconfig /flushdns
DNS and router cache issues can make Minecraft look offline even when authentication services are reachable elsewhere. - Test again. If it still fails on your home connection, unplug the router for about 30 seconds, reconnect it, and wait for internet access. Do not press the factory-reset button.

If the error still appears, compare another connection before replacing DNS settings or adding firewall rules.
5. Test Another Network and Check Filtering
A VPN or filter can interrupt Minecraft verification while browsing still works. Compare connections before changing security settings.
- Disconnect a VPN you control, reopen the launcher, and test the same server.
- Try a trusted alternative connection, such as a phone hotspot. Allow for mobile-data charges.
- Check your security app’s blocked-connection history for the launcher or the Java executable used by Minecraft. Correct only a confirmed block; leave unrelated rules unchanged.

Security tools should allow Minecraft and Java instead of silently blocking authentication traffic.
The screenshot’s Private/Public checkboxes are not required for this error: Windows normally allows outgoing connections. Keep antivirus/firewall protection enabled; opening incoming ports will not repair account verification.
If another connection works, report that to your administrator or ISP. Leave managed and parental-control filters to their owner, and reconnect your VPN after testing.
6. Check the Launcher and Java Runtime
Older installations sometimes use Java with outdated certificate support. Verification can fail in that profile while another version joins successfully.
- Install pending Minecraft Launcher updates from Microsoft Store, or use the official Minecraft download page.
- In the official launcher, open Java Edition > Installations > New installation. Select a version accepted by a known vanilla-compatible server and test it without custom Java settings.

Old launcher builds and outdated Java runtimes can fail the secure session check used by online servers. - When only a third-party launcher fails, update it and refresh its saved Microsoft sign-in before changing the modpack.
Check logs/latest.log inside the installation’s game directory, normally %APPDATA%\.minecraft on Windows.
Older Java 8 profiles: when logs mention SSLHandshakeException or PKIX path building failed, try a maintained Java 8 build, such as Eclipse Temurin, for updated certificate support.
Install the Windows build matching your processor, then choose Edit > More Options > Java Executable > Browse in the official profile and select its bin\javaw.exe. Other launchers have their own Java setting.
Keep the Java major version required by the modpack, and note the previous executable for restoration. Do not disable certificate checks or download untrusted trust stores. If the test works, repair the original profile without upgrading existing worlds.
7. Check the Account When the Launcher Shows Demo or Buy
Play Demo, Buy, or a product-verification warning needs an account check. The server-down message alone does not prove that you lack a license, and outages can temporarily hide ownership.
- Use Minecraft’s sign-in checks to compare your Microsoft account with the purchase confirmation or order history.

Online servers need a valid Minecraft session from the account that owns Java Edition or has active access. - For subscription access, confirm the subscription is active and includes Minecraft: Java Edition on PC.
- On Windows, sign into the Xbox app with that account, then sign into the launcher again.
If ownership still fails, the product-verification guide covers that separate warning. Do not buy another copy during an outage. Offline accounts cannot join servers requiring verified sessions.
8. Check the Host if Everyone Fails on Your Server
Your server can accept connections but fail to reach Minecraft’s session service. These checks belong to its administrator, not players changing their PCs.
- Open the hosting panel console or
logs/latest.logand find the failed join’s timestamp. - Look for Couldn’t verify username because servers are unavailable and the exception beside it.
- Check the host’s date/time, DNS resolution, and outbound HTTPS access to
sessionserver.mojang.comon port 443. Test inside the container if Minecraft runs in one.
If only one server fails, check whether that server can reach Minecraft authentication services over HTTPS.
| Nearby log text | What the administrator should check |
|---|---|
UnknownHostException | DNS resolution on the server or container. |
SSLHandshakeException / PKIX | Host clock, Java certificate trust, and HTTPS inspection. |
| Connection timed out | Outbound filtering, hosting connectivity, and current service incidents. |
Keep Account Verification Enabled
For a standalone server, keep online-mode=true in server.properties. Setting it to false bypasses verification rather than fixing it, permits username impersonation, and can load different UUID-based inventories or permissions. A whitelist does not prevent that impersonation.

The screenshots are illustrative. Do not copy their proxy settings or offline-mode behavior onto a standalone server.
Proxy networks need different settings. Follow the software’s official instructions; Velocity documents player forwarding and backend security. Authenticate at the proxy and restrict backend access.
If players still cannot join, send the hosting provider the timestamp and relevant log lines. A successful browser request or ping does not test the full Java authentication exchange.
9. Repair the Launcher if Only This PC Still Fails
Consider repair when the same account joins from another PC but this computer fails across servers. It cannot repair a server or service outage.
%APPDATA%\.minecraft\saves, custom game directories, and profile settings for rollback before reinstalling. Keep the original .minecraft and modpack folders intact.- Close Minecraft and its launcher.
- Open Windows Settings > Apps > Installed apps > Minecraft Launcher > Advanced options. Windows 10 calls the app list Apps & features.
- Select Repair if available, then reopen the launcher and test.

Repairing or resetting the launcher forces a clean account session when local launcher data is corrupted. - If repair is unavailable or unsuccessful, reinstall the launcher only from Minecraft’s official download page and sign in again.
The screenshot also shows Reset; it is not required here. If repair or reinstall restores multiplayer, leave the game files unchanged.
If the error still appears, contact Minecraft Support with its exact wording, game/launcher versions, network/server test results, and relevant logs. Remove tokens and private details before sharing logs publicly.


