How to Fix Microsoft Compatibility Telemetry High CPU Usage in Windows
Microsoft Compatibility Telemetry is a crucial Windows service that plays a pivotal role in enhancing user experience. By transmitting performance data to Microsoft, it aids in refining the system’s performance. However, at times, this service can be a culprit behind high CPU usage. In this guide, we’ll delve deep into the reasons behind this and offer a plethora of solutions to mitigate the issue.
Preliminary Checks Before Diving into Solutions:
Before jumping into the technical solutions, it’s essential to ensure that the high CPU usage isn’t a transient issue or caused by other factors:
- Restart Your Device: Sometimes, a simple restart can resolve many underlying issues.
- Update Windows: Ensure that your Windows OS is up-to-date. Microsoft often releases patches that can fix known bugs.
- Check for Malware: Run a quick malware scan to ensure that the high CPU usage isn’t due to malicious software.
- Close Unnecessary Applications: Ensure that no other resource-intensive applications are running in the background.
Having conducted these preliminary checks, if the issue persists, it’s time to delve into the specific solutions for Microsoft Compatibility Telemetry.
Understanding Microsoft Compatibility Telemetry
Before we embark on the solutions, it’s paramount to grasp the essence of Microsoft Compatibility Telemetry. This service is responsible for collecting and dispatching technical performance data about Windows and its applications to Microsoft. This data assists Microsoft in pinpointing and rectifying potential hitches caused by updates or unforeseen bugs.
Why Does High CPU Usage Occur?
The telemetry service operates silently in the background, periodically transmitting data. This incessant activity can occasionally trigger surges in CPU usage, particularly if there are underlying glitches with the service or the data it’s endeavoring to dispatch.
1. Disable Microsoft Compatibility Telemetry via Task Scheduler
Task Scheduler is a Windows job scheduler that launches programs and services at predefined times. It can be used to disable tasks scheduled to run with Windows, including Microsoft Compatibility Telemetry. You can prevent this task from running by configuring Task Scheduler as follows:”.
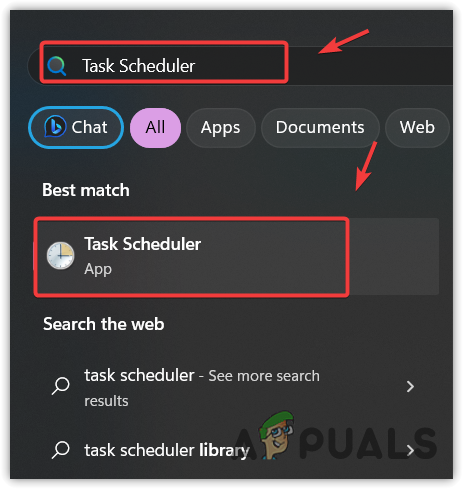
- Press the Win key and type Task Scheduler.
- Hit Enter to open the Task Scheduler.
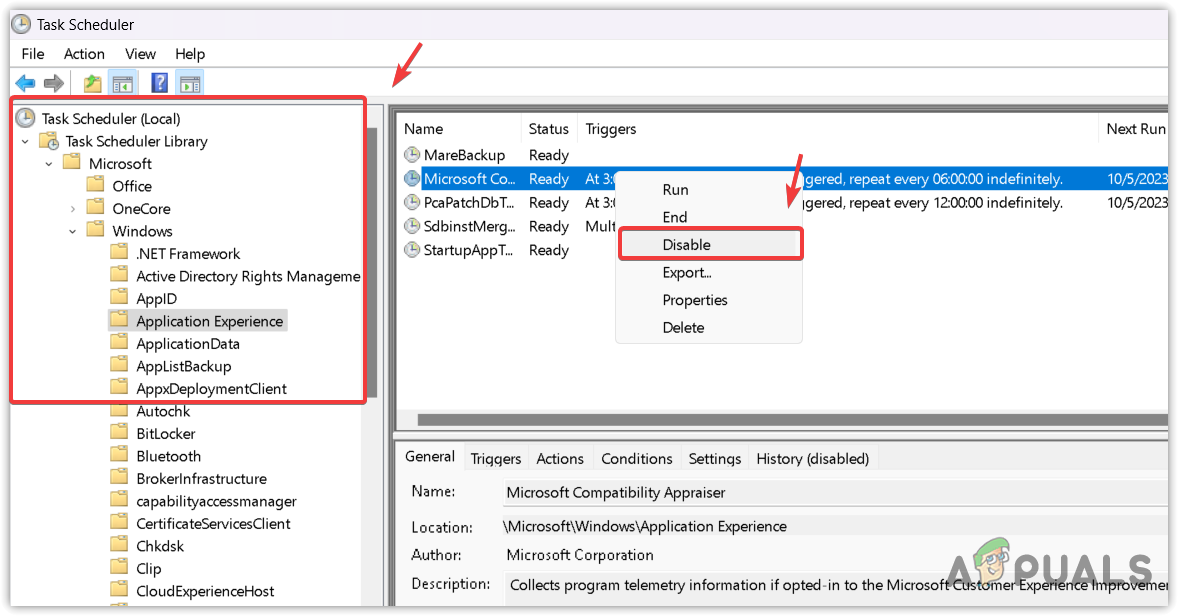
- Now go to the following path:
Task Scheduler/Microsoft/Windows/Application Experience
- On the right pane, right-click the Microsoft Compatibility Appraiser and click Disable.
- Once done, see if the issue is now fixed.
2. Deactivating Connected User Experiences and Telemetry
Connected User Experiences and Telemetry (CompatTelRunner.exe) sends data to Microsoft, but can be disabled to reduce consumption. Follow these steps to do so:
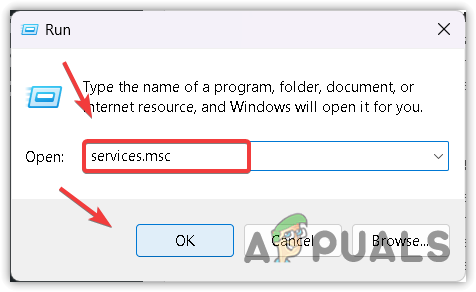
- Press the Win + R keys simultaneously.
- Type services.msc in the input box and click OK to open the services Window.
- Here, find the service with the named Connected User Experiences and Telemetry.
- Then, right-click on it to go into Properties.
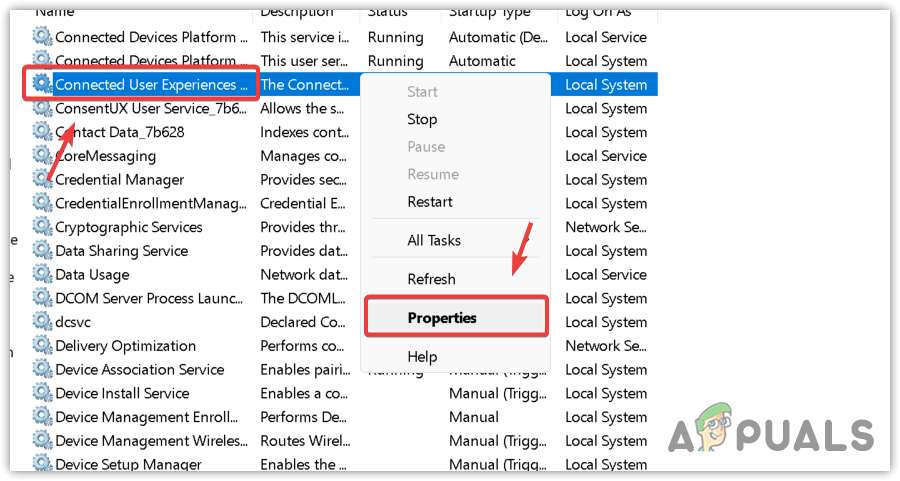
- Click Stop and select Disable from the startup type.
- Then, click Apply and click OK to save the settings.
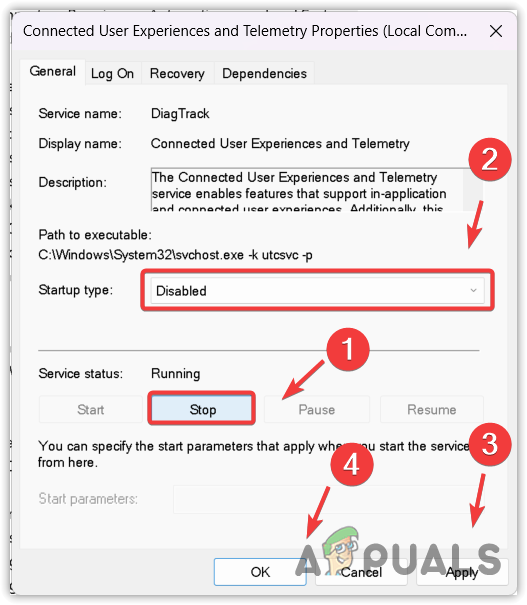
- Open Task Manager and see whether the Microsoft Compatibility Telemetry is consuming high CPU usage or not.
3. Delete CompatTelRunner.exe
If the issue continues, consider deleting the CompatTelRunner file, in charge of operating Microsoft Compatibility Telemetry. As CompatTelRunner.exe is situated in the system 32 folder and vital to system processes, it requires appropriate permissions to delete. Here are the instructions to eliminate CompatTelRunner.exe.
- Open the File Explorer by pressing the Win + E keys.
- Once it is opened, navigate to the following path.
C:\Windows\System32
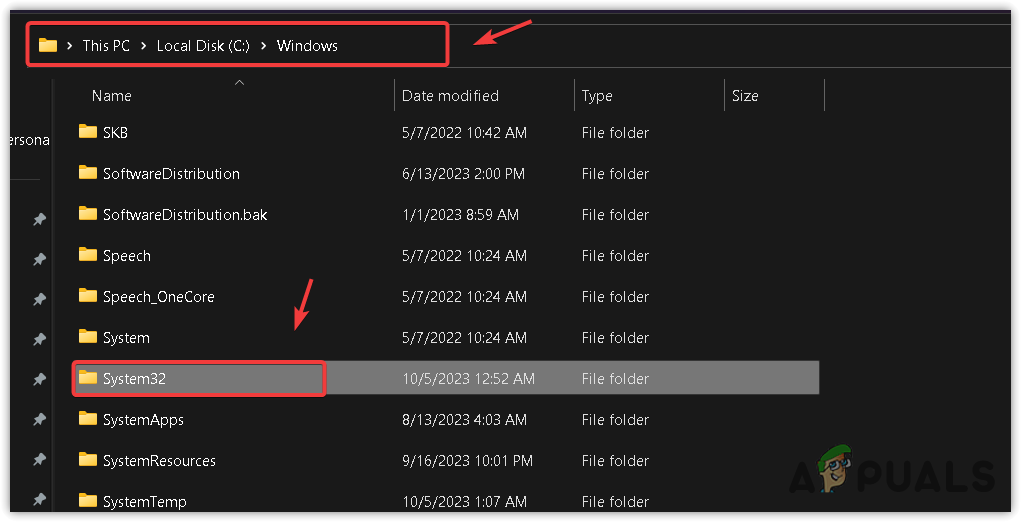
- Here, search the CompatTelRunner and hit Enter to find the file.
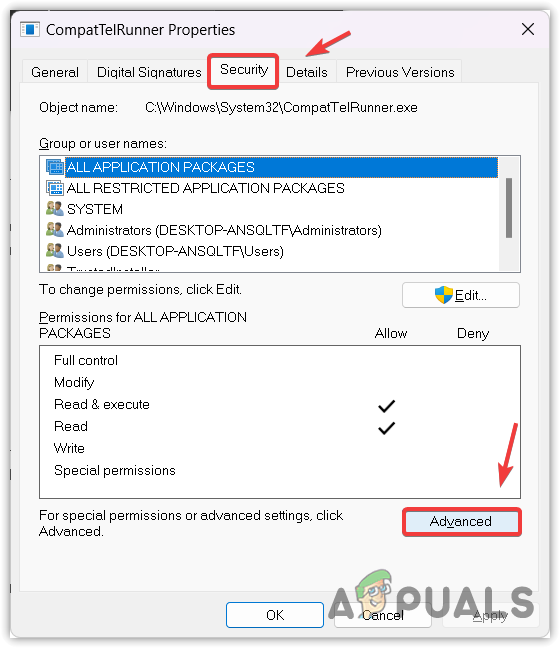
- Then, right-click on it and select Properties.
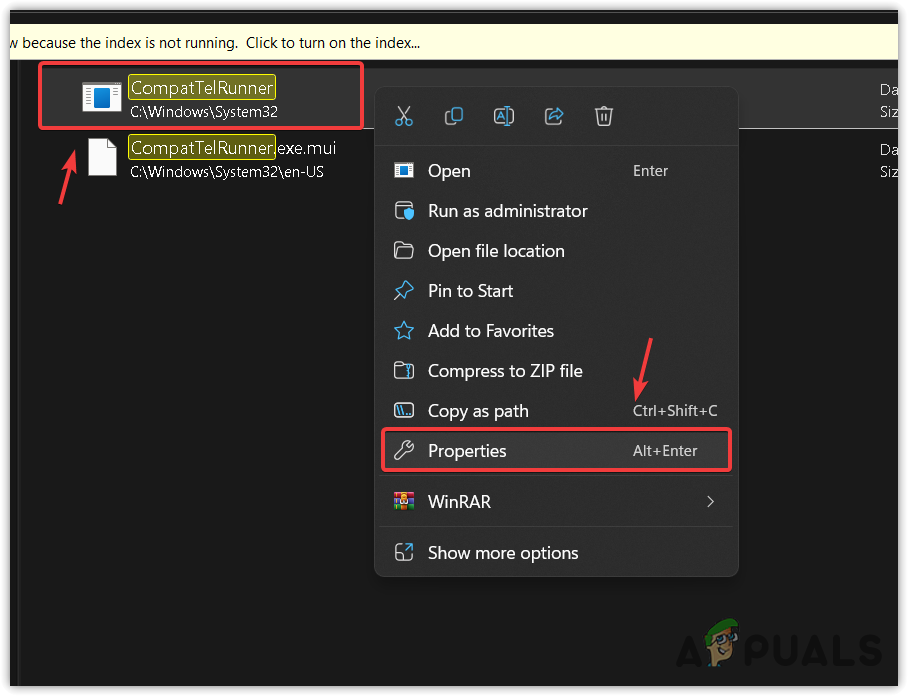
- Go to Security and click Advanced.
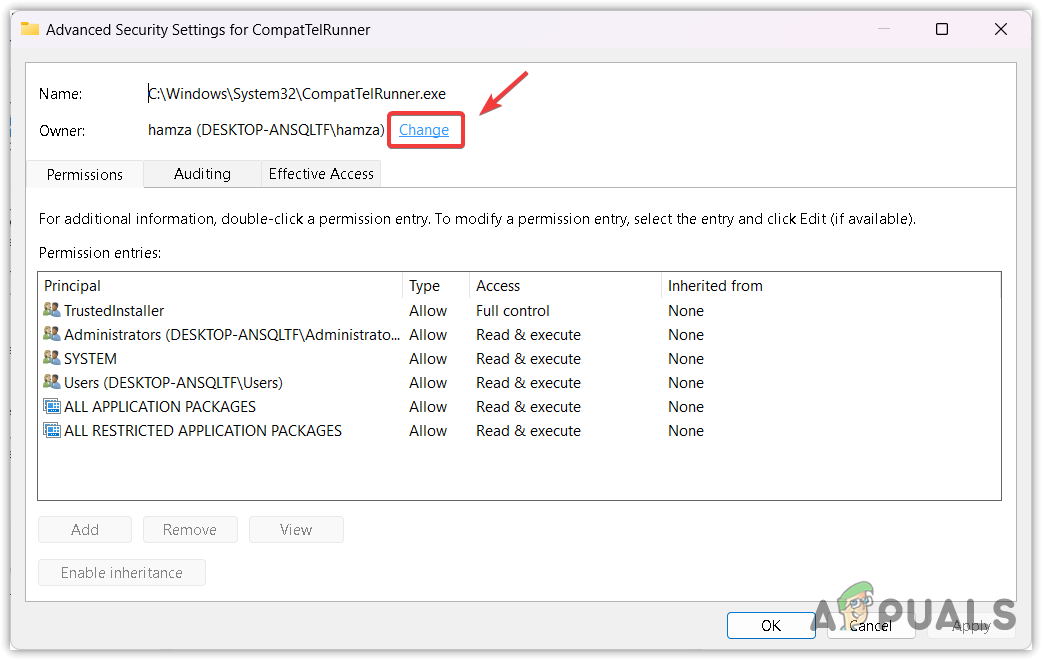
- Then, click Change and type the username of the logged account to transfer the permissions.
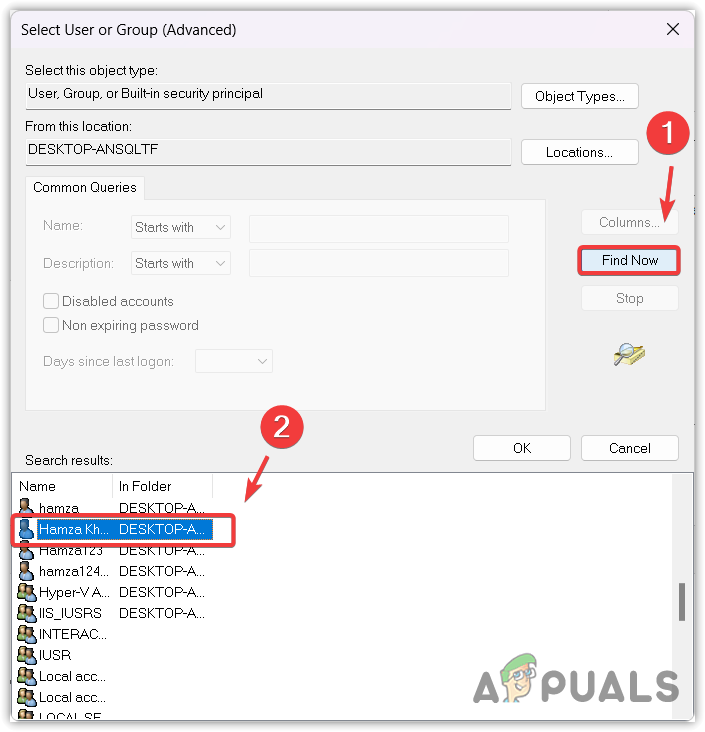
- If you don’t know the exact name of your local account, click Advanced.
- Then, click Find Now and select the username of your account that you are logged on.
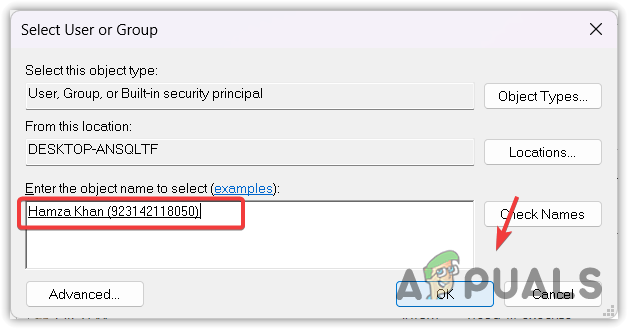
- Once done, click OK and again click OK to select the account.
- Now click Add to make changes to permissions.
- Then, click Select a principal.
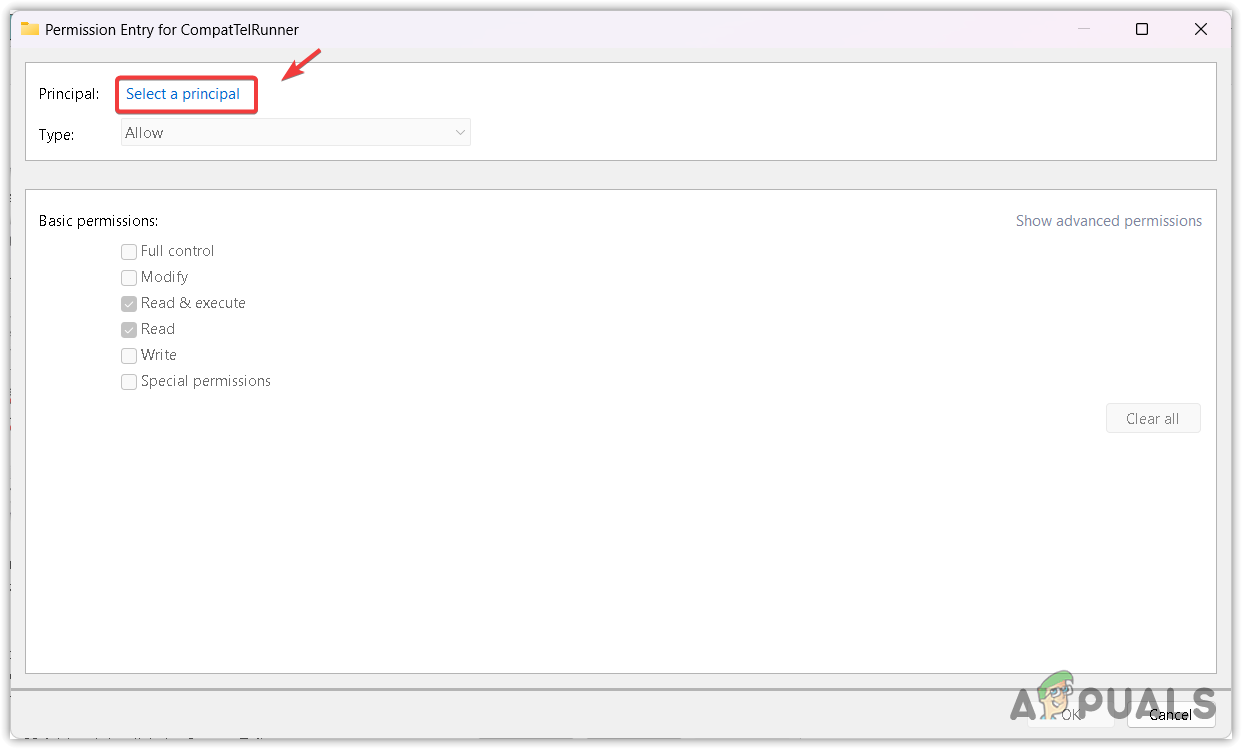
- Click Advanced and click Find Now.
- Select a username and click OK.

- Again, click OK.
- Now tick all the basic permissions and click OK.
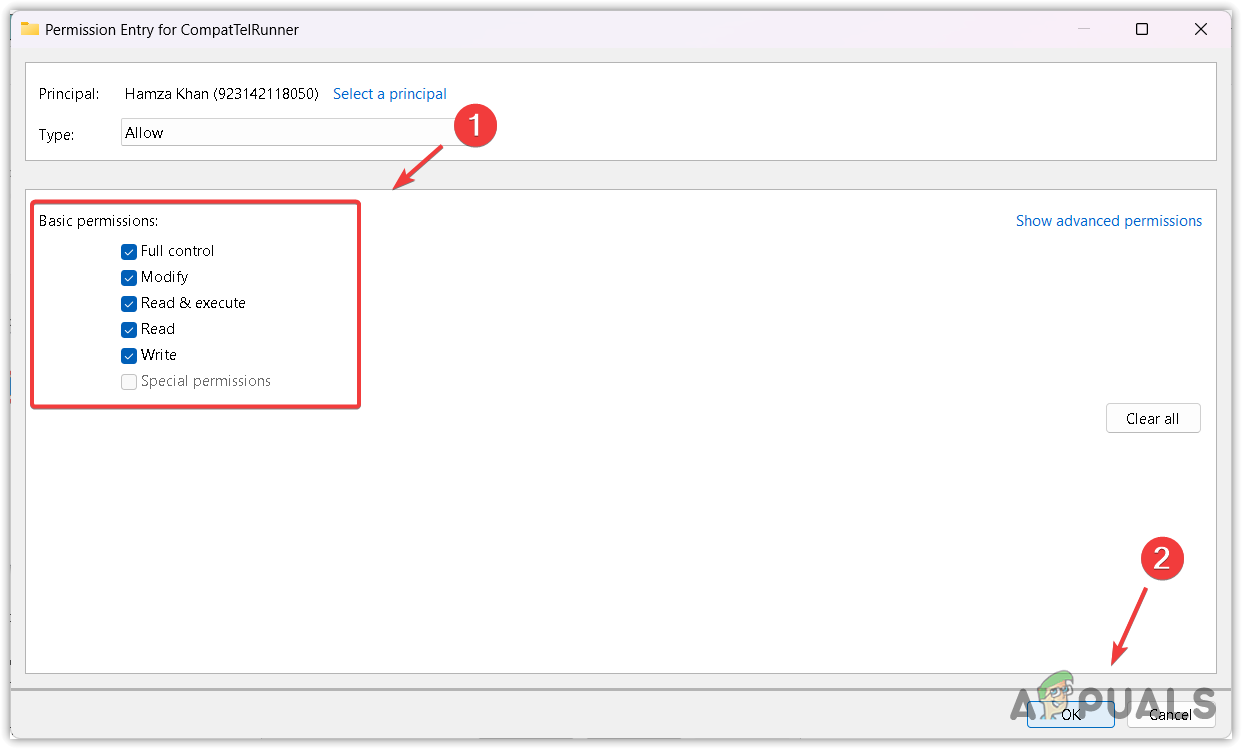
- Once done, click Apply and click Yes to confirm.
- Finally, click OK to save the changes.
- Now, you can delete the CompatTelRunner without any error.
- Go back to the System 32 folder, right-click the CompatTelRunner file, and click the Delete icon.
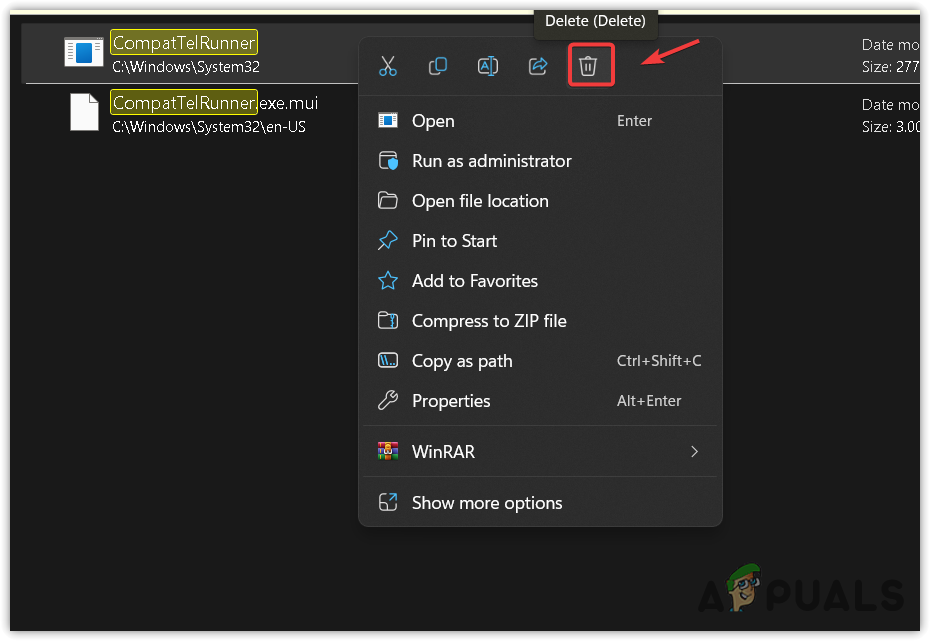
- Once deleted, the issue should be fixed.
4. Disable Microsoft Compatibility Telemetry from the Registry Editor
You can also disable Microsoft Compatibility Telemetry by configuring a registry entry. Follow these steps:
Note: We recommend creating a registry backup before proceeding with the following steps.
- Click the Start Menu and type Registry Editor.
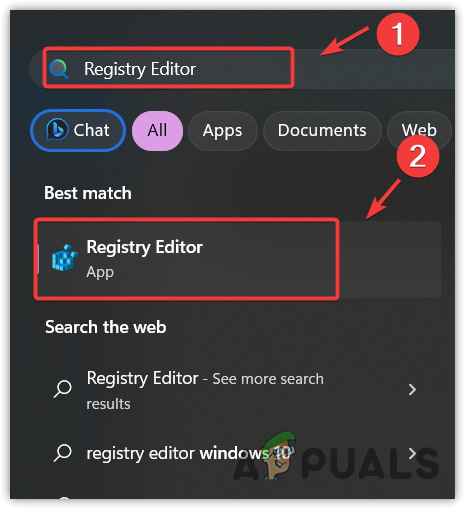
- Open the registry editor and navigate to the following path.
- You can either go manually or copy the following path and paste it into the address bar to navigate fast.
HKEY_LOCAL_MACHINE\SOFTWARE\Policies\Microsoft\Windows\DataCollection
- In the right pane, right-click the empty space and choose New > Dword value (32-bit) to create a new registry entry.
- Name it as AllowTelemetry and set the Value Data to 0.
- Once done, close the registry editor and move on to disable the Connected User Experiences and Telemetry service.
- After that, open Task Manager to check whether the Microsoft Compatibility Telemetry is causing the high CPU usage.
5. Update Your Windows
To reduce high CPU usage without deleting or disabling the CompatTelRunner process, consider updating Windows. This action scans and restores corrupted system files. Follow these steps to update your Windows.
- Press the Win key and type Check for updates.

- Press Enter to open the Windows update settings.
- Here, click Check for updates, then click Download and Install.

- Once all the updates are downloaded, restart your Windows to install the updates.
6. Run SFC/scannow
CompatTelRunner is a system file that can be restored using the sfc/scannow command. If this executable file uses a noticeable amount of CPU resources, it might be corrupted. In this case, we’ll use the System File Checker (SFC) utility, which is useful for restoring corrupted system files.
To run the SFC command line utility, follow the steps:
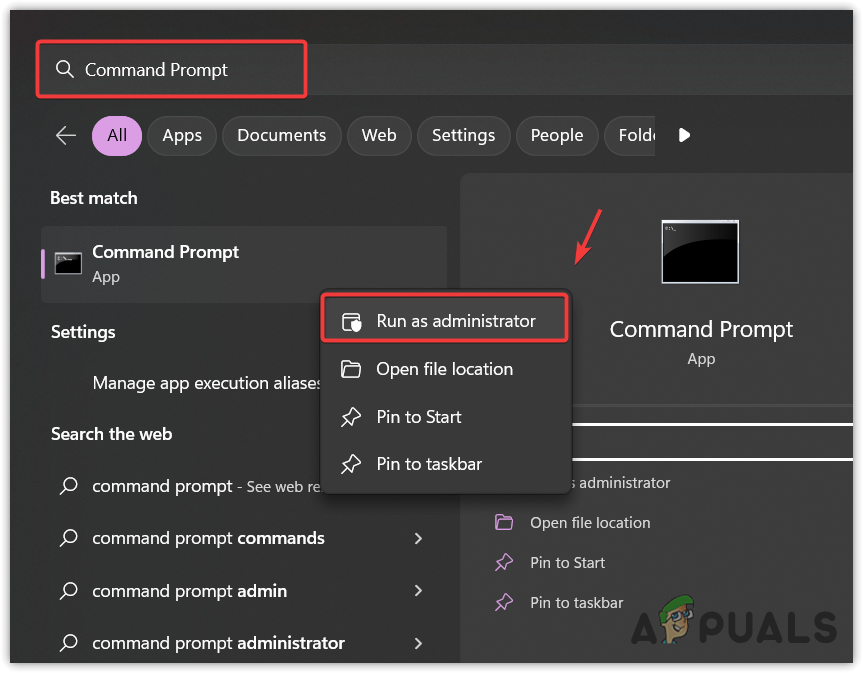
- Click the Start Menu and type Command Prompt.
- Right-click the command prompt and select Run as administrator.
- After opening the CMD as admin, type sfc/ scannow and hit Enter to execute the command. It might take up to several minutes, so be patient.
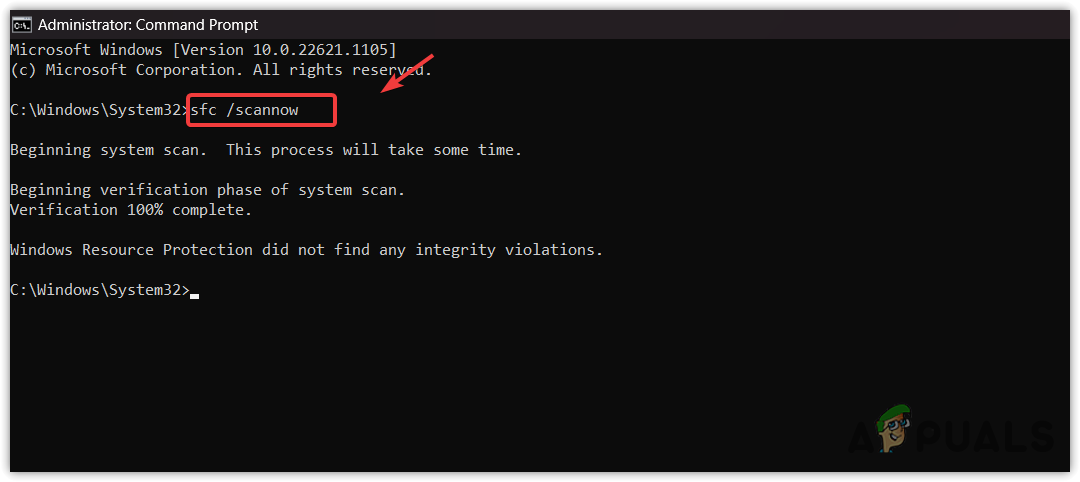
- Once all the system files have been verified successfully, close the command prompt and see whether the issue is fixed or not.
If the issue persists after following the above methods, there’s a possibility that CompatTelRunner.exe may be infected with malware, resulting in high CPU usage. Confirm this by scanning your computer using a trustworthy third-party or Windows antivirus program.
In the worst case, if you have to reset or reinstall Windows, then don’t hesitate. Just go for reinstalling or resetting Windows in order to resolve this issue. You can also try more ways to disable the Microsoft Compatibility Telemetry by visiting the article.
Microsoft Compatibility Telemetry, while beneficial, can sometimes be a resource hog. By following the above solutions, you can ensure smoother system performance without compromising on the benefits of telemetry.
 Reviewed by


