How to: Disable Telemetry in Windows 10
Although Microsoft has been pushing telemetry data collection since Windows 7, nothing was as comprehensive a the one on Windows 10. By default, Windows 10 comes with the telemetry feature enabled by default which collects all sorts of user activity and sends it directly to Microsoft. As Microsoft provides no way of disabling it completely from the GUI menu (unless you own an Enterprise edition), some users have been searching for alternatives on preventing their Windows OS installation from gathering telemetry data.
How to Disable Telemetry Data collection on Windows 10
When it comes to stopping Windows 10 from gathering telemetry data, there are only one GUI setting that regular users have access to – By setting the Diagnostic and usage data to feature to Basic, you will limit the amount of telemetry data that gets collected based on you. You can also inhibit telemetry data collection via Registry Editor, but this is only a little more effective than the GUI equivalent.
However, if you want to limit this feature even more, you should also consider disabling the Microsoft Compatibility telemetry service via an elevated CMD and disabling the Microsoft Compatibility Appraiser (either via the Task Scheduler or via Powershell).
But if you have Windows 10 PRO or Windows 10 Enterprise, the best way to do this is via Group Policy Editor.
Method 1: Changing Privacy Options
Although many telemetry settings are “on” by default, it is comforting for Windows 10 users that they can turn them off. Follow these steps to tweak telemetry options in Windows 10 privacy settings.
Go to Windows 10 settings and select Privacy. You will find a number of tabs on the left-hand side. Explore the tabs and you will find many options that you can tweak according to your preferences.
However, not all the options can be accessed through the Windows 10 settings. To disable telemetry in Windows 10, you need to use some hacks for these additional options.
If you’re looking for a different way of disabling the telemetry service, move down to the next potential fix below.
Method 2: Disabling Diagnostic and usage data
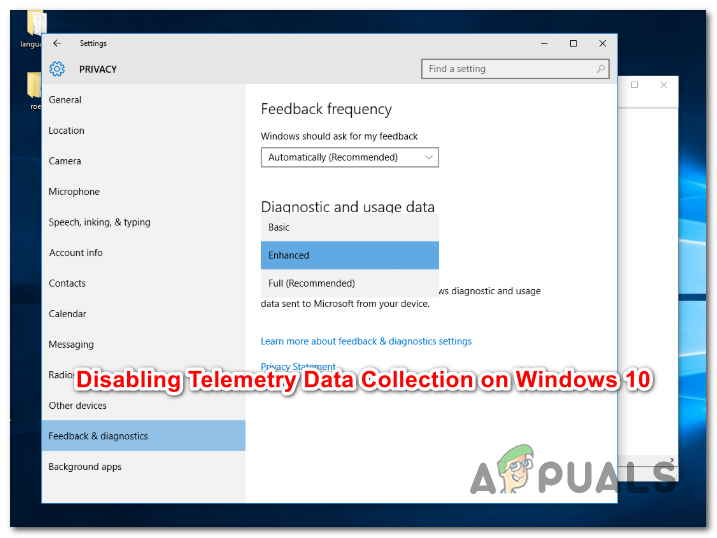
If you are contempt with limiting the amount of data you send to Microsoft, you might consider setting the Diagnostic and usage data to Basic from the Feedback & Diagnostics menu (in Windows Settings).
Although this operation doesn’t stop the telemetry data from being collected, it will force your Windows 10 installation to only collect the basic information that is vital to the operating system. Data collected includes hardware capabilities, average running parameters and critical errors that bring your system to a halt.
Keep in mind that going this route will still allow the installation of new Windows updates, but some UWP apps might not function correctly after some time.
If you decide to go this route, here are the step by step instructions that will allow you to modify the Diagnostic and usage data settings in order to limit the amount of telemetry data that is collected from your Windows 10 computer:
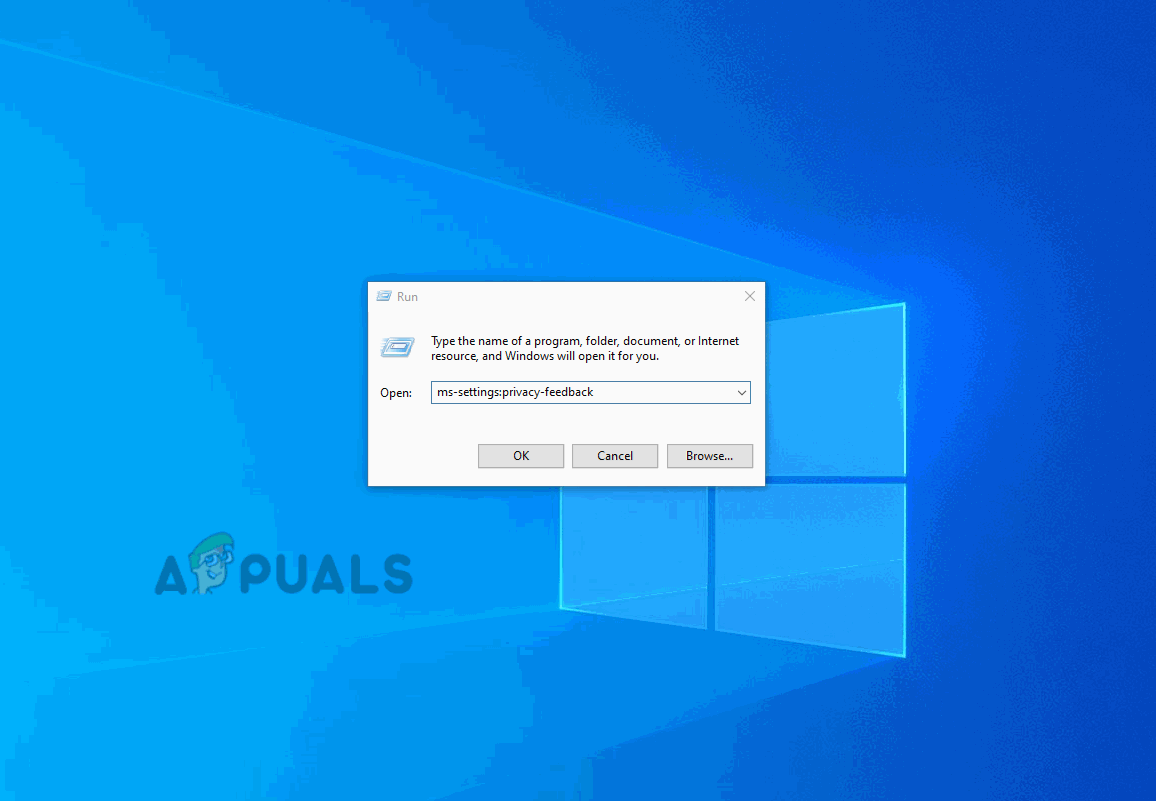
- Press Windows key + R to open up a Run dialog box. Next, type ‘ms-settings:privacy-feedback‘ and press Enter to open up the Feedback & diagnostics tab of the Settings app.
- Once you arrive to the correct location, move over to the right-hand section and scroll down to the Diagnostic data section.
- After you identify the Diagnostic data tab, set it’s associated toggle to Basic.
- Restart your computer to save the modification.
In case you’re looking for a way to completely stop the telemetry data collection of Windows 10, move down to the next method below.
Method 3: Disable Microsoft Compatibility telemetry via CMD
If you are willing to get a little technical, you can also disable the telemetry data collection on Windows 10 by disabling the main service that is being used for this task.
This method will only work on Windows 10, will affect any other applications that are designed to call upon the Microsoft Compatibility Telemetry services.
Several affected users have confirmed that this operation finally allowed them to stop telemetry data collection from their system. Here’s a quick guide on disabling telemetry data collection on Windows 10 from an elevated CMD prompt:
- Press Windows key + R to open up a Run dialog box. Next, type ‘cmd’ and press Ctrl + Shift + Enter to open up an elevated CMD prompt. When you’re prompted by the UAC (User Account Control), click Yes to grant administrative privileges.

Running the Command Prompt - Once you’re inside the elevated CMD prompt, type the following commands successfully and press Enter after each line to effectively disable the Microsoft Compatibility Telemetry:
sc delete DiagTrack
sc delete dmwappushservice
echo “” > C:\\ProgramData\\Microsoft\\Diagnosis\\ETLLogs\\AutoLogger\\AutoLogger-Diagtrack-Listener.etl
reg add “HKLM\\SOFTWARE\\Policies\\Microsoft\\Windows\\DataCollection” /v AllowTelemetry /t REG_DWORD /d 0 /f
- Once every command has been successfully processed, restart your computer.
If you’re looking for a different way of disabling Telemetry data collection on Windows 10, move down to the next method below.
Method 4: Disable Microsoft Compatibility Appraiser
If you’re experiencing an unusually high CPU usage whenever your Windows 10 installation is collecting telemetry data, you’ll probably need to disable the task associated with CompatTelRunner.exe (Microsoft Compatibility Appraiser.
When it comes to doing this, you have two ways forward – you can either do it directly from the Task Scheduler windows or you can do it from an elevated Powershell prompt.
Disable Microsoft Compatibility Appraiser via Task Scheduler
The least intrusive operation that will allow you to do this is to use Task Scheduler to disable the Microsoft Compatibility Appraiser located under \Microsoft\Windows\Application Experience.
Here’s a quick guide on using Task Scheduler to disable the Microsoft Compatibility Appraiser scheduled task:
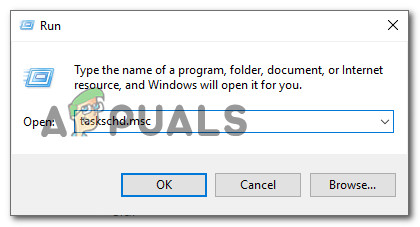
- Press Windows key + R to open up a Run dialog box. Next, type’ taskschd.msc” and press Enter to open up Task Scheduler. When you’re prompted by the UAC (User Account Control), click Yes to grant admin access.
Running the Task Scheduler utility from the Run dialog box - Once you’re inside Task Scheduler, use the left-hand section to navigate to Microsoft > Windows > Application Experience.
- After you get to the correct location, move over to the right-hand section, right-click on the task named Microsoft Compatibility Appraiser and choose Disable from the newly appeared context menu.
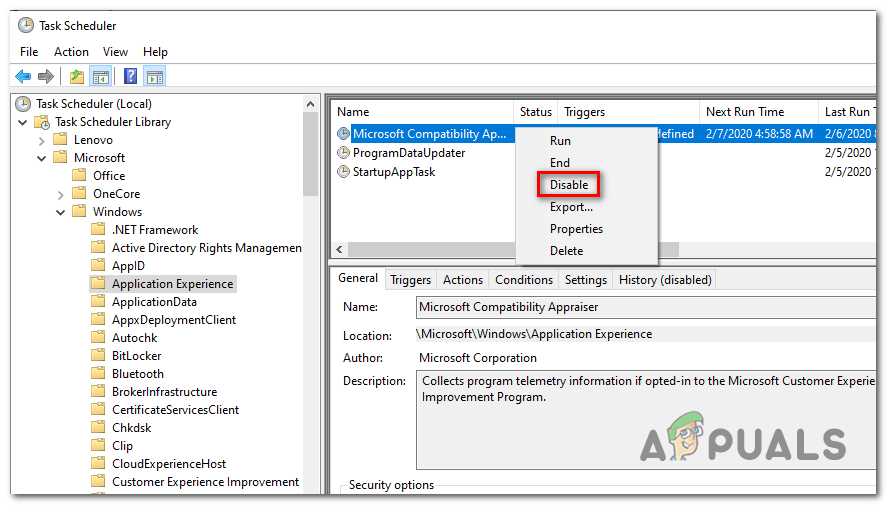
Disabling the Microsoft Compatibility Appraiser task
Disable Microsoft Compatibility Appraiser via Powershell
If you aren’t afraid to get technical, you can also disable this task from a Powershell terminal. But unless you open it with elevated privileges, the command will trigger an error.
Here’s a quick guide on disabling the Microsoft Compatibility Appraiser from an elevated Powershell prompt:
- Press Windows key + R to open up a Run dialog box. Inside the text box, type ‘powershell’ and press Ctrl + Shift + Enter to open up an elevated Powershell terminal window.
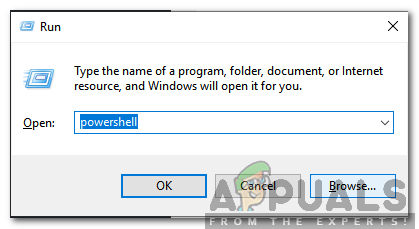
Typing in “Powershell” and pressing “Shift” + “Alt” + “Enter” Note: When you’re prompted by the UAC (User Account Control), click Yes to grant administrative privileges.
- Once you’re inside the elevated Powershell window, type or paste the following commands and press Enter to disable the Microsoft Compatibility Appraiser task:
Disable-ScheduledTask -TaskName "Microsoft Compatibility Appraiser" -TaskPath "\Microsoft\Windows\Application Experience"
- After the command is successfully processed, restart your computer and see if the issue is resolved.
In case, you’re looking for a different way of disabling telemetry data collection on Windows 10, move down to the next method below.
Method 5: Disabling Telemetry collection via Registry Editor
If you’re not afraid of going through the registry and disabling telemetry collection this way, you can force the data collection to stop using Registry Editor. But the operation will only be complete after you open up the Services screen and disable the Diagnostics Tracking Service.
This method will only work on Windows 10, but a lot of affected users have reported that this operation was the only one that allowed them to completely stop telemetry collection on their computer.
Note: Going this route may inhibit your machine’s ability to fetch and install OS updates.
If you decide to go this route, here’s a quick guide on disabling telemetry collection via Registry Editor and Services utility:
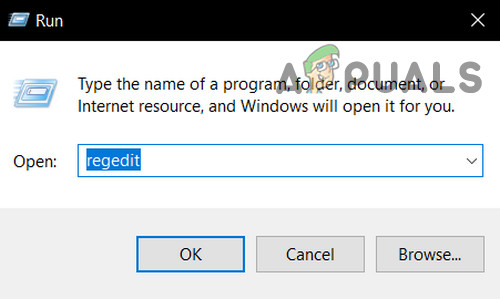
- Press Windows key + R to open up a Run dialog box. Next, type ‘regedit’ inside the text box and press Enter. Once you are prompted by the UAC (User Account Control) prompt, click Yes to grant administrative privileges.
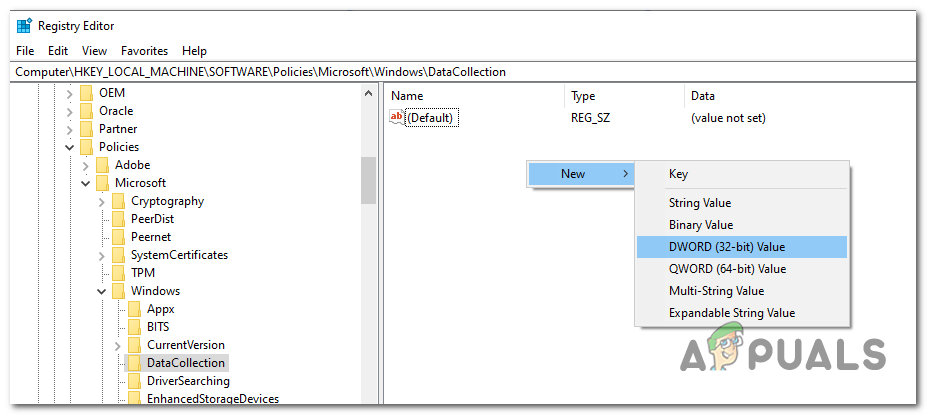
Open Regedit - Once you’re inside the Registry Editor, use the left-hand section to navigate to the following location:
HKEY_LOCAL_MACHINE\SOFTWARE\Policies\Microsoft\Windows\DataCollection
Note: You can either browse to this location manually or you can paste it directly into the nav box and press Enter to get there instantly.
- With the DataCollection key selected, move down to the right panel, right-click on an empty space and choose New > Dword value (32-bit). Next, name the newly created Dword value AllowTelemetry and press Enter to save the changes.
Creating the AllowTelemetry Dword value - After the new Dword value is created, double-click on AllowTelemetry and set the Base to Hexadecimal and the Value Data to 0.
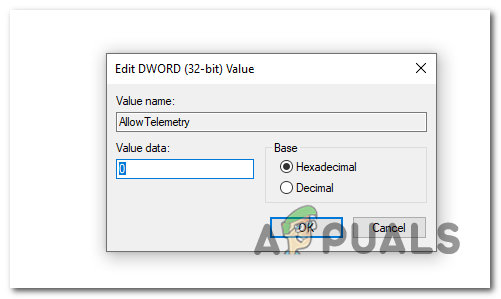
Creating the AllowTelemetry value Note: This modification will set the telemetry settings to security only, meaning that no other type of data will be sent to Microsoft.
- Save the change by clicking on Ok, then close the Registry Editor utility.
- Press Windows key + R to open up another Run dialog box. Inside the text box, type ‘services.msc’ and press Enter to open up the Services utility.
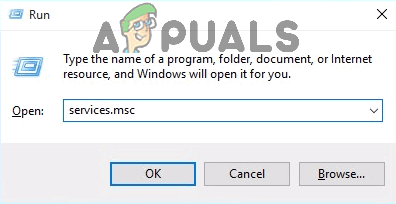
Type “services.msc” into the Run dialog and press Enter Note: When you’re prompted by the UAC (User Account Control), click Yes to grant administrative privileges.
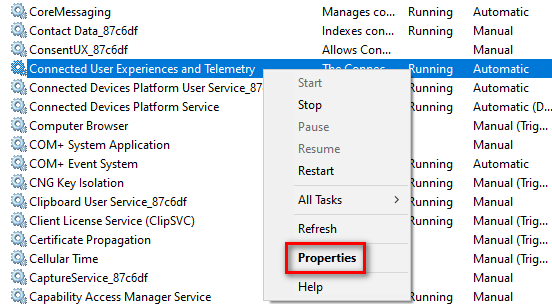
- Once you’re inside the Services screen, scroll down through the list of local Services and locate the entry associated with Connected User Experiences and Telemetry. Once you manage to locate it, right-click on the entry and choose Properties from the context menu.
Accessing the Properties screen of the Diagnostics Tracking Service - Once you’re inside the Properties screen of Connected User Experiences and Telemetry, select the General tab from the horizontal menu at the top and change the Startup type to Disabled and click on Apply to save the configuration.
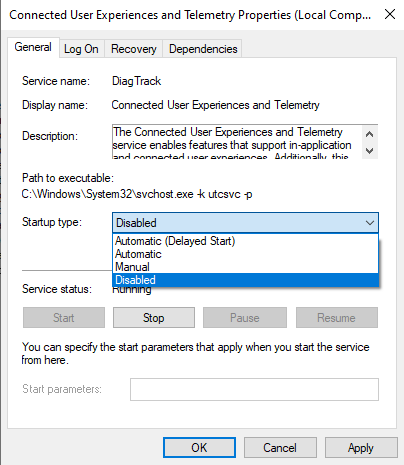
Disabling the Connected User Experiences and Telemetry service - Next, repeat steps 7 and 8 with the Diagnostics Tracking Service and restart your computer to enforce the changes that you just made.
In case you’re looking for a different way of disabling telemetry collection on Windows 10, move down to the next method below.
Method 6: Disabling Telemetry data collection via Group Policy Editor
If you want to disable telemetry data collection on a Windows 10 Pro or Windows 10 Enterprise, you can do it in a convenable way by using the Local Group Policy Editor to stop the policy associated with Data Collection and Preview Builds.
But keep in mind that if you’re using Windows 10 Home, the Local Group Policy Editor will not be available by default. In this case, you will need to enable the Local Group Policy Editor on Windows 10 Home first.
If you have access to your GPEDIT utility and you want to disable data collection using this tool, here’s what you need to do:
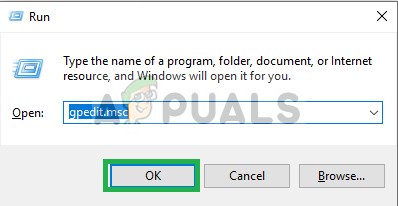
- Press Windows key + R to open up a Run dialog box. Next, type ‘gpedit.msc’ and press Enter to open up the Local Group Policy Editor. When you see the User Account Control (UAC) prompt, click Yes to grant administrative privileges.
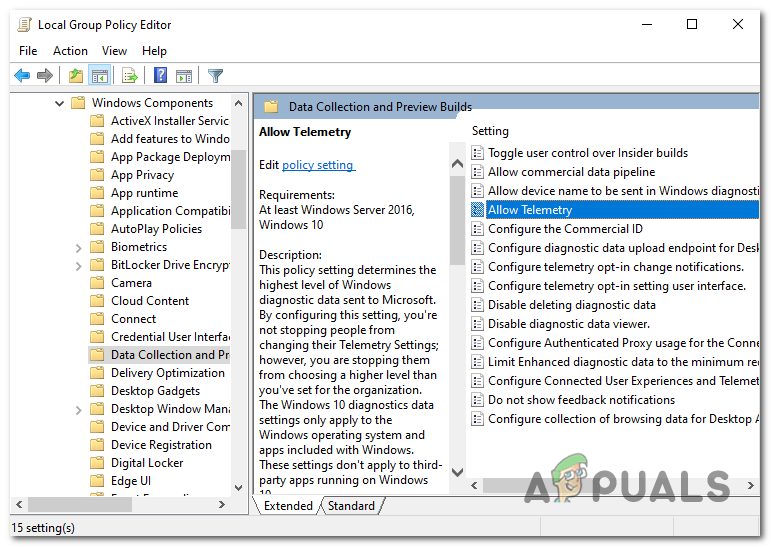
Typing gpedit.msc in RUN - Once you’re inside the Local Group Policy Editor, use the left-hand section to navigate to the following location:
Computer Configuration -> Administrative Templates -> Windows Components -> Data Collection and Preview Builds
- Once you’re inside the Data Collection and Preview Builds key, move over to the right-hand side and double-click on Allow Telemetry.
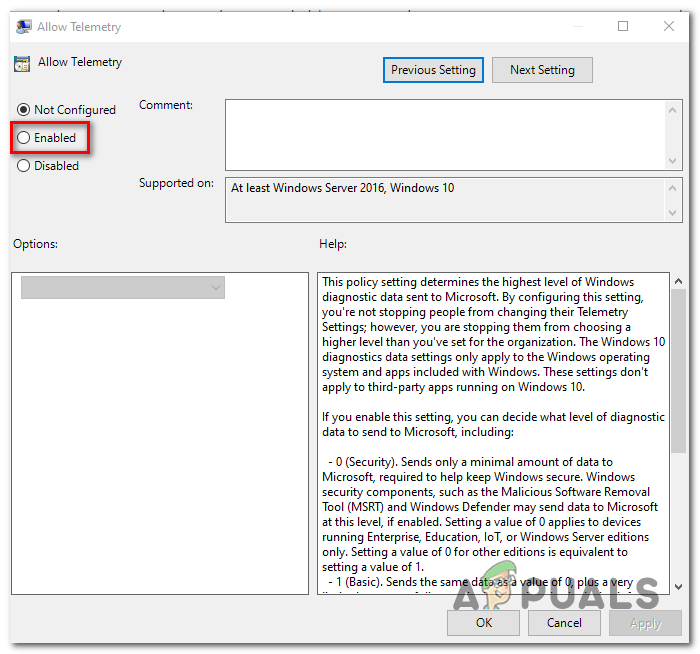
Navigating to the Allow Telemetry policy - Once you get to the correct location, double-click on Allow Telemetry and set it’s status to Disabled before clicking Apply to save the changes.
Disabling the Allow Telemetry policy - Close the Local Group Policy Editor and restart your computer to enforce the changes.