How to Delete a User on Mac in 2 Easy Steps [2024]
 Reviewed by Huzaifa Haroon
- To delete a user account on macOS, you can use System Settings for a graphical interface or Terminal for command-line operations.
- In System Settings, you access "Users & Groups" to delete a selected user account after authentication, with options to save or delete the user's files.
- In Terminal, you list users with "/usr/bin/dscl . -list /Users" and delete a specific user with "sudo /usr/bin/dscl . -delete /Users/[username]".
On macOS, if you have an unused account in your system, you can delete it. However, deciding what to do with the user’s data, permissions, and disk space can make the process seem complex. This guide will simplify things by explaining the details and procedure for deleting a user account on your Mac.
Table of Contents
How Do Users Work on Mac?
A user account on a Mac is a unique set of rules and settings that defines a particular user’s preferences and habits when using the device. These accounts are the only way to access or log in to macOS. Without accessing and authenticating your account, you cannot use your computer.
A single Mac system can use multiple user accounts. Each account allows users to store their preferences and settings, keeping them separate from other accounts. This enables multiple users to share the same device while having their own set of file structures.

↪ Windows vs. macOS
The concept of user accounts on Windows is similar to that of macOS. Both operating systems allow for separate user profiles with unique settings, including separate file partitions. For instance, having multiple accounts on a home computer gives each user a private experience. In both OSes, users can avoid sharing details such as emails and messages, and use separate desktop customizations and file arrangements.

Parents can set parental controls on their children’s accounts too. Thus, if you wish to keep your Mac separate, you can delete other accounts. The methods for doing so are outlined below.
READ MORE: How to Delete Users on PS4 in 6 Easy Steps [2024 Guide] ➜
How to Delete a User?
You’ll need access to the administrator account to delete a user account on your macOS system. The administrator account is mainly reserved for the primary owner or main user and has full permissions and privileges. This account can modify or change major system settings, including creating, deleting, and managing user accounts.
To delete a user on a Mac, you can use System Settings or the Terminal window. Both will perform the same function, but you can choose what you find more convenient.
Method 1: System Settings
The easier and more straightforward method is to use the System Settings. It gives you a graphical user interface, and unless you know the basics of how user accounts work, it is advisable not to tinker around with the other method and use this one instead.
Step 1: Accessing User Controls in System Settings
The first step is to essentially access the user control page where you will find details on all the accounts associated with the device. To do this,
- Head to System Settings (or System Preferences on older macOS versions).

Opening System Settings via the Menu bar - In the sidebar, scroll to find “Users & Groups” and click on it.

Opening “Users & Groups” in System Settings
Step 2: Deleting the User Account
After you open Users & Groups, you’ll see a list of user accounts, each with different permissions (like Admin, Standard, or Guest). Remember that you need to be logged into an Admin account to delete any account on the system.
- Click on the user you want to remove.
- Look for a small “info” icon (i) on the right side and click it.

Choose the user account you wish to delete. - Here, you’ll see a list of options to change the username, password, or account type.
- On the bottom left corner of this dialog box, click “Delete User.”

Deleting the user account. - You will now be prompted to authenticate your current account. In this step, Touch ID is unavailable; you will need to enter your password instead. In the dialog box that appears, enter your password and click “Unlock.

Authenticating current account before deleting a separate account on macOS - A confirmation dialog box will then appear, asking if you want to save the files from your deleted account to a disk image. You can also choose to delete the user’s home folder entirely. Choose the appropriate option and click “Delete User.”

Confirmation dialog for deleting a user on macOS
READ MORE: How to Find Passwords on Mac: Step-by-Step Guide [2024] ➜
Method 2: Terminal
The second method involves using the Terminal to delete a user account on macOS. The Terminal gives you a command line interface (CLI) to work with and easily communicate with the system software.
Step 1: Access the List of Users on your Mac
To list the total users on your Mac, run the following command on the Terminal. You can open this by searching for it in the Spotlight Search (which can be invoked by pressing Command + Space) or using the Launchpad and searching for “Terminal.”
Use the command below to list all the users on your Mac.
/usr/bin/dscl . -list /Users
Step 2: Delete the User Account
Once you’ve entered the command to list all users on your Mac, you’ll see a huge list of environments and permissions. Ignore them and scroll down to the bottom where you’ll find the username to your actual physical account.
Identify the username and then run the command below in Terminal to delete the specified account.
sudo /usr/bin/dscl . -delete /Users/[username]After you enter this command, the Terminal will prompt you to authenticate your current account. Once you do that, the specified account will automatically be deleted. If you see your current account name, know the process has been completed.
READ MORE: The 13 Best macOS Terminal Commands to Get the Most Out of Your Mac ➜
Deleting a User: Windows vs. Mac
While the basic functionality of deleting a user is similar on both OSes, Windows offers a more versatile option in that it allows an administrator account to essentially use not only the Windows Settings but also the Control Panel, the Command Prompt, Windows Terminal, and Computer Management to delete an account.
Here are all the different ways you could delete a user on Windows:
1. Windows Settings
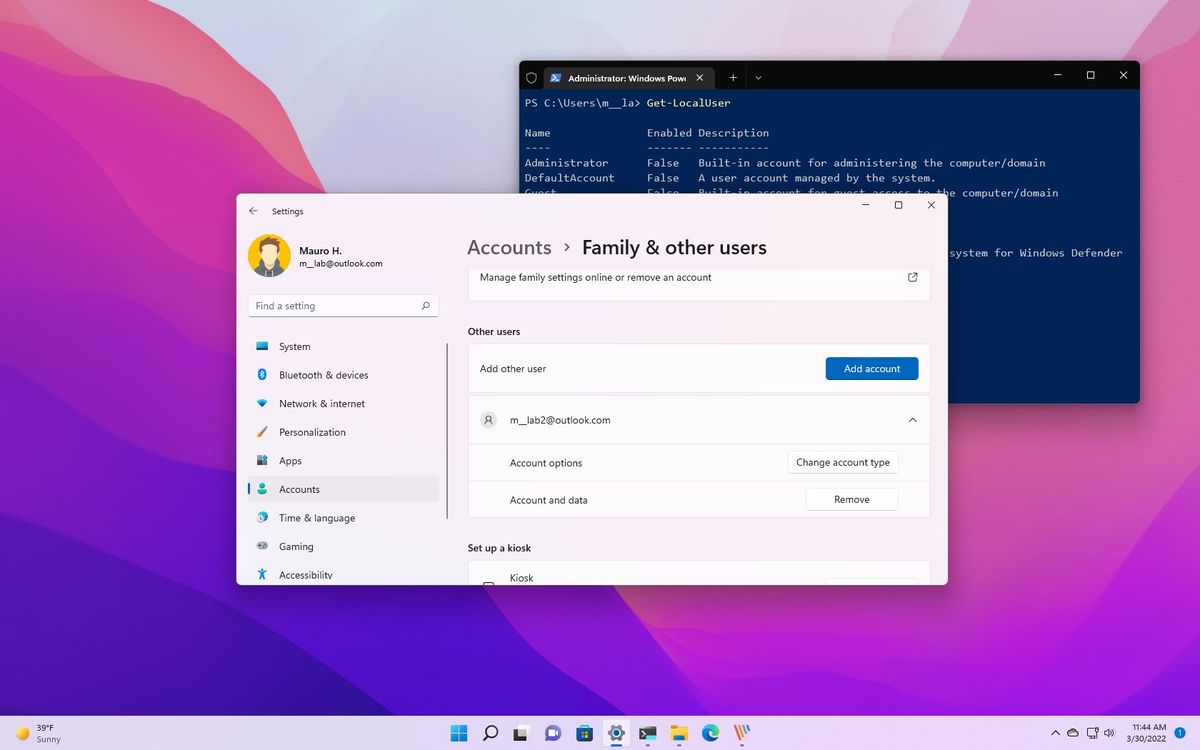
The most surefire and straightforward way to remove an account is to use Windows Settings. Go to Settings > Accounts > Other users > Choose the user you wish to remove > Click “Remove” > Choose “Delete account and user data.
This method, along with the next one (Control Panel) is mainly similar to how users are managed on macOS. Both have a separate settings page to list all user accounts and have a small marker/toggle in front of each account to either change its type or delete it.
2. Control Panel
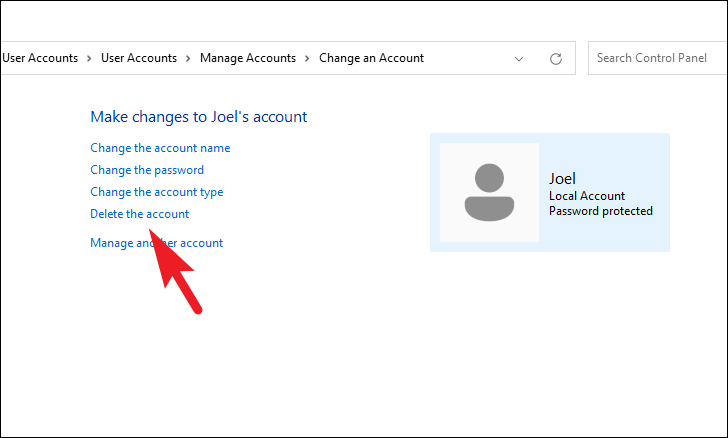
The older but more common method is to use the Control Panel to delete a user account. Since Windows XP, this has been the primary way of deleting accounts on a Windows PC. Go to Control Panel > User accounts > Remove user accounts > Choose the account to delete > Click on “Delete the account.” > Choose whether you wish to keep or remove user files.
This method is more similar to the one used in macOS since it essentially gives you the option to keep or delete the user’s files in the last step. This option can come in handy if the account being deleted has important files that need to be kept.
READ MORE: How to Disable Access to Control Panel and Settings App in Windows ➜
3. Windows Terminal
Another way to delete user accounts on Windows is to use a CLI method, which essentially involves using Windows PowerShell or Terminal to delete an account. Run the Terminal as an admin > type “Get-LocalUser” > Hit Enter > type “Remove-LocalUser -Name [USERNAME] ” > hit Enter, and the account will be deleted.
If you compare this to macOS, you can also use the in-built Terminal on Mac to delete a user account. Both OSes essentially offer the same functionality here.
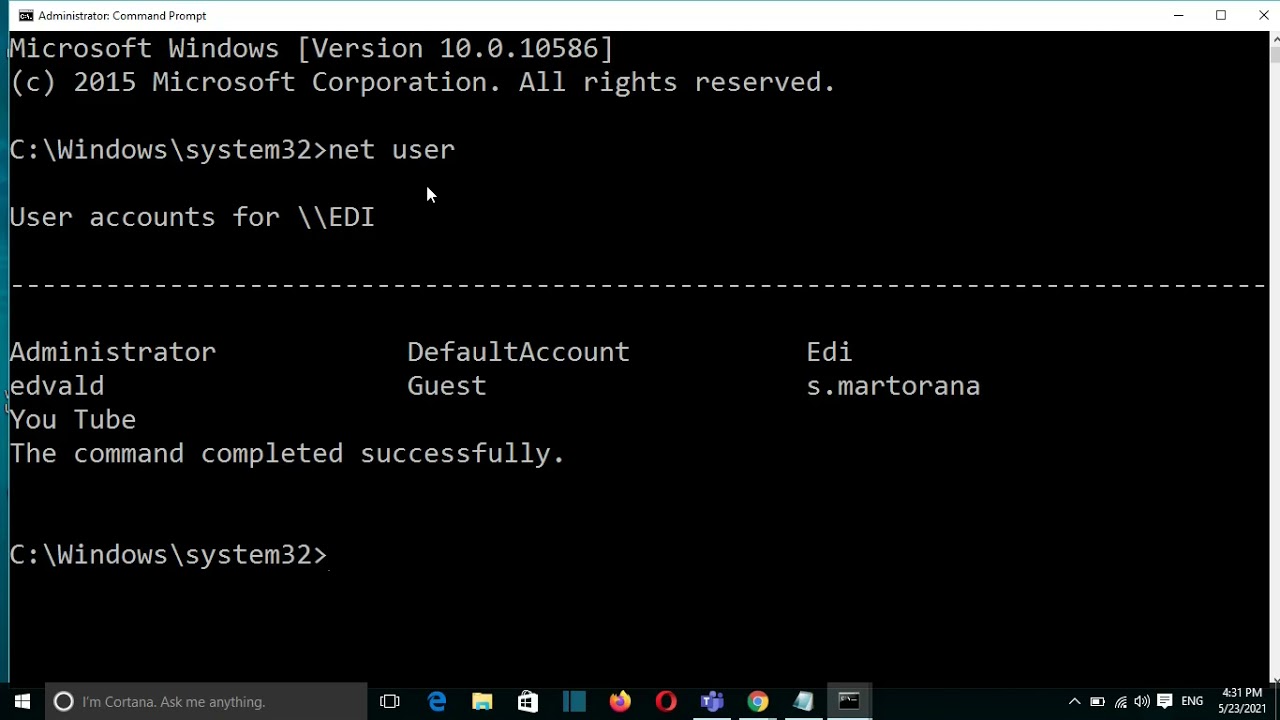
4. Command Prompt
Command Prompt can also delete a user account on Windows. Launch Command Prompt as an admin, type “net user” > hit Enter, and type “net user [USERNAME] /delete” > then hit Enter. The account will be deleted.
This method differs from the Windows Terminal as it doesn’t delete the user files but instead chooses to keep them. In contrast, macOS Terminal doesn’t prompt you to keep user files. In the background, however, the system doesn’t delete the deleted user’s home folder.
READ MORE: How to Fix Windows Terminal Not Working in Windows 11 ➜
Conclusion
Deleting a user account on a Mac is useful to free up space or remove a particular person or his set of permissions from a device. The procedure is also relatively simple; however, if compared to Windows, macOS offers less versatility and fewer options to delete user accounts.
FAQs
When removing a user account, you’ll be prompted to keep or delete the user’s files. Deleting them will free up a considerable amount of space on your PC.
The procedure for adding a user account is similar to deleting one. Go to System Settings > Users & Groups > Add User. This way, you can add a new user account and set its permissions or parental controls if you create an account for your children.
On Mac, you have fewer options to perform the same task. On Windows, you can toy around and work with Command Prompt, Terminal, or even Computer Management settings, but on macOS, the only way to easily delete user accounts is through the System Settings.
Reviewed by Huzaifa Haroon