How to Fix Error Code MARMOT in Destiny 2 (11 Solutions)
The Destiny 2 error Code MARMOT typically occurs upon launching the game. Affected players are reporting that this problem occurs at every attempted startup and they’re suddenly unable to play the game at all. This problem is much more common on PC and is confirmed to appear with Steam, Microsoft Store, Epic Games, as well as Xbox & Playstation consoles.

This error code will mostly occur if the Destiny 2 game files have been damaged and require repair or verification. Doing this will obviously differ depending on the platform on which you are experiencing the issue.
However, the ‘Marmot’ error can also occur due to a cache issue or due to the fact that an important dependency (steamclient64.dll) is blocked at a system level. Other potential causes include a corrupted XMP profile, corrupted Steam installation, corrupted BattleEye service, system file corruption, or failing RAM.
Below you’ll find a list of confirmed methods that other affected users have successfully used to get past the ‘Marmot’ error and connect to the game server without issues.
1. Verify the integrity of the game files (PC Only)
Since an integrity issue is by far the most common cause that will trigger this issue, the first thing you should do is verify the integrity of the Destiny 2 game files.
This method will likely work if you started experiencing this issue after a new game update was installed.
Enforcing this fix will be different depending on the launcher that you’re using. This problem is confirmed to occur regardless if the game was installed through Steam, Microsoft Store, or the Epic Games store.
To help you troubleshoot this issue on every launcher, we’ve created a series of sub-guides that will walk you through the process of verifying the integrity of Destiny 2 on Steam, Microsoft Store, and Epic Games Store.
Follow the sub-guide that’s applicable to your current situation.
1.1. Verify the game’s integrity on Steam
To verify Destiny’s 2 integrity on Steam, you’ll need to access the Properties screen of the game and go to the Local files tab. From there, you will be able to identify the integrity check and force the launcher to replace every corrupted game file with a healthy equivalent.
Here’s a quick step-by-step guide on how to do this:
- Launch the Steam client and log in using your credentials.
- Select Library from the top menu, then right-click on Destiny 2 from the left menu and select Properties.
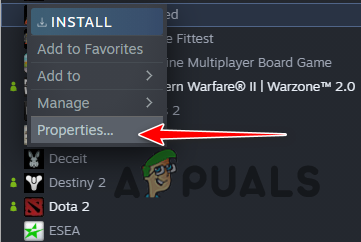
Accessing the Properties screen of Destiny 2 - Select the Local files area from the screen’s left side.
- Click the Verify game file integrity button to begin the procedure.
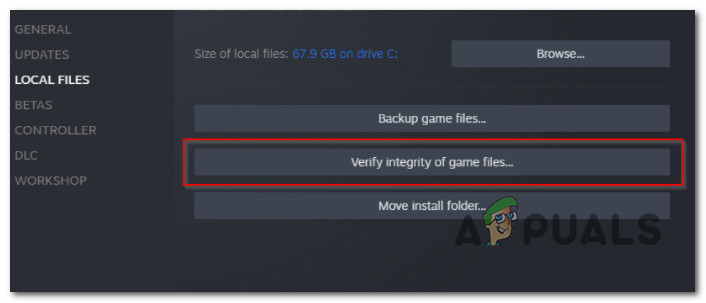
Verify the integrity of the game files in Destiny 2 - Select Yes and then await the completion of the process.
- Follow the on-screen directions to continue the procedure if the validation scan identifies flaws with the game files.
- Relaunch the game to see whether or not the Destiny 2 Marmot error has been fixed.
1.2. Verify the game’s integrity on Microsoft Store
If you purchased the game from the Microsoft Store, deploying an integrity check is the equivalent of repairing an app from the Apps menu of your Windows installation.
To do this, you’ll need to access the Apps & Features menu, then access the Advanced Options menu of Destiny 2 and trigger a repair.
Here’s a quick guide on how to do this:
- Press Windows key + R to open up a Run dialog box.
- Next, type ‘ms-settings:appsfeatures’ and press Ctrl + Shift + Enter to open up a Run dialog box.
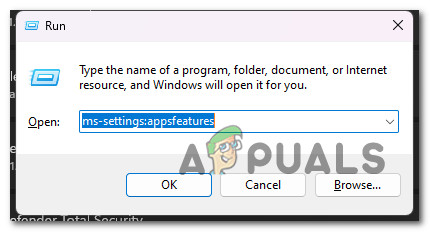
Access the Apps screen - At the User Account Control (UAC), click Yes to grant admin access.
- Inside the Apps menu, go to Installed apps tab (right-hand section), scroll down through the list of apps and locate Destiny 2.
- Click on the action icon (three-dot icon), then click on Advanced Options from the context menu that just appeared.
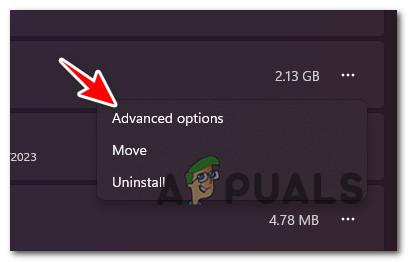
Access the Advanced Options menu - From the Advanced Options menu,s croll down to the Reset tab.
- Next, click on the Repair button, then confirm your choice and wait for the operation to complete.
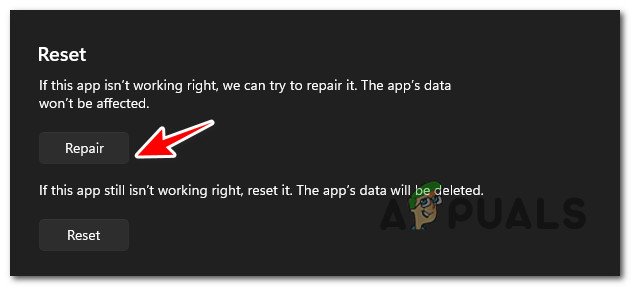
Repairing the Destiny 2 installation via Microsoft Store - Reboot your PC and see if the problem is now fixed.
1.3. Verify the game’s integrity on Epic Games Store
If you launch Destiny 2 via the Epic Games Store when you get the Marmot error code, you can verify the integrity of the game installation by accessing the Library menu and clicking on the Verify Files button under Manage.
Here’s how to do this:
- You must begin by launching the Epic Games Launcher. Sign in with your account information.
- After logging into your account, you must navigate to the Library and find the Destiny 2 item.
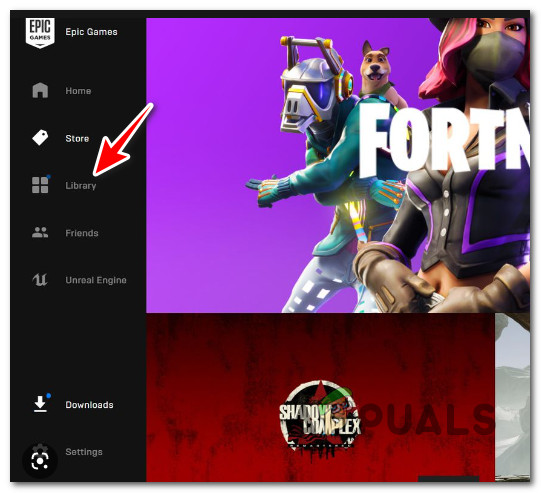
Open the Library menu - When it appears, right-click on it and select Manage.
- Then, click the Verify button located under the Verify Files section.
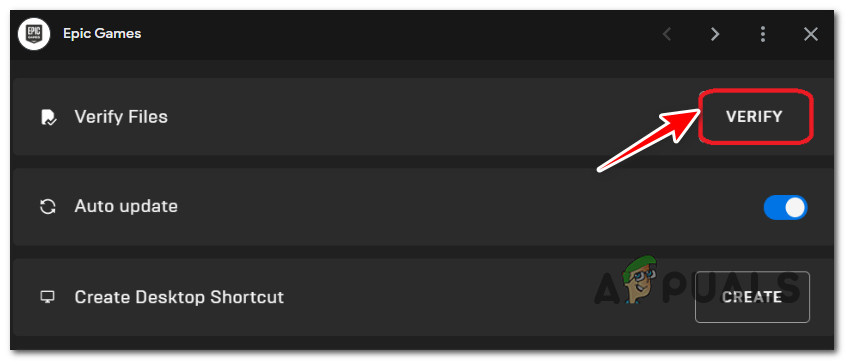
Verify the files of Destiny 2 in Epic Games Store - Wait till the procedure is finished. If corrupted files are discovered, they are fixed or replaced.
- Restart your computer before launching Destiny 2 once again and check if the Marmot error code has been fixed.
2. Power-cycle console (if applicable)
If you are experiencing the Marmot code on an Xbox or PlayStation console, the first thing you should investigate is the temporary data maintained by your console. The steps of doing so will be different depending on your console of choice.
This method was confirmed to be effective on Playstation 4, Playstation 5, Xbox One, and Xbox Series S / X.
Power cycling on Xbox One and Xbox Series S / X is an identical procedure. The same goes for PlayStation 4 and Playstation 5.
We’ve created 2 sub guides that will walk you through the complete procedure on both platforms:
2.1. Power-cycle Playstation 4 & Playstation 5
To power-cycle your PlayStation console, you will need to press and hold on to the power button until you see the audio queue, then unplug it from the power outlet in order to drain the power capacitors.
Here’s a quick guide on how to do this:
- Ensure that your console is not in sleep mode and is not actively running any game.
Note: If it is, this procedure might cause data loss. - Press and hold the console’s power button and keep it pressed until the console turns off and you can hear the fans shut off.
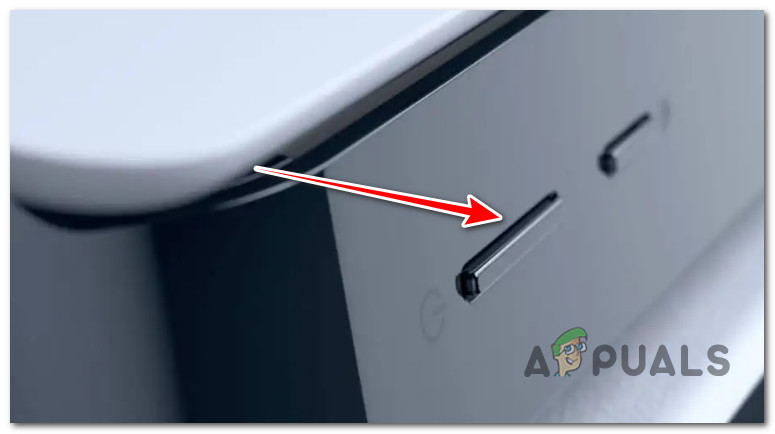
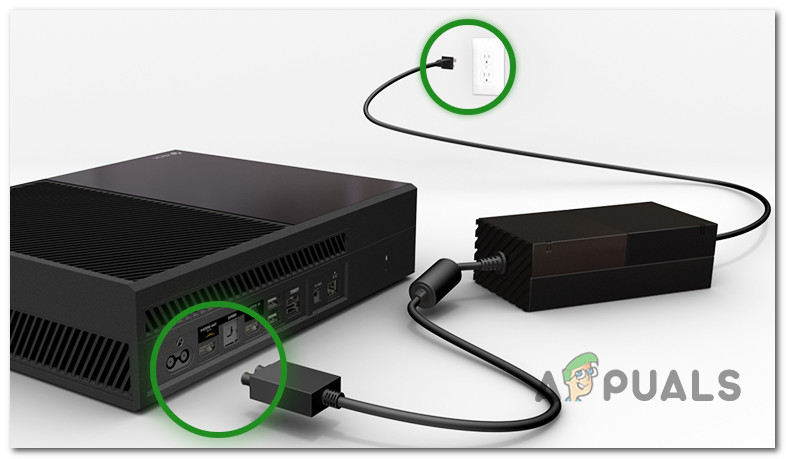
Press the power button - Once you hear the fans shut off, disconnect the power cable from the electrical outlet and wait at least 30 seconds to ensure that the power capacitors have been depleted.
- Restore power to your console, wait for the next startup to finish, and then run Destiny 2 to see whether the issue has been resolved.
2.2. Power-cycle Xbox One & Xbox Series S / X
If you’re trying to power-cycle your Xbox console, you will need to keep the power button pressed for 10 seconds or more for the procedure to be initiated. You will be able to confirm that the operation was completed successfully by looking for the long startup animation.
Here’s how to power cycle your Xbox console:
- Ensure that your console is turned on but idle before touching the Xbox button.
- Press and hold on the Xbox button (on your console) for 10 seconds or until the front LED goes off.

Press the Xbox button on your console - After turning off your console, unplug the power cord and wait approximately one minute to allow the power capacitors to drain.
Unplugging the console Note: This is an important step. If you don’t unplug the power cord, temporary data will likely be maintained during the next start.
- Next, reconnect the power cord and start the console normally to determine if the issue has been resolved.
Note: If during the next startup, you see a longer Xbox animation than usual, the operation was completed successfully.
3. Force a Re-download manually (if applicable)
If you are launching the game through Steam and triggering an integrity check didn’t make much of a difference, the next thing you should try is the manual route.
Other users that we’re also dealing with this problem have confirmed that we’re able to fix the Marmot error by manually navigating to the game folder and deleting everything inside except for the ‘packages’ folder.
This action will force the Steam launcher to recognize that a big chunk of the game is missing and re-download it automatically.
Update: We’ve been able to confirm that this method also works with the Epic Games Launcher.
Here’s a quick guide on forcing the game to re-download by deleting everything inside the installation folder except for the ‘packages’ folder:
- Make sure the game is not running in the background.
- Launch the Steam client and log in using your credentials.
- Select Library from the top menu, then right-clicks on Destiny 2 from the left menu and select Properties.
Accessing the Properties screen of Destiny 2 - Select the Local files tab from the left-hand side menu, then move over to the right and click on Browse.

Browse the location of the game - Once you’re inside the game installation folder, select every item inside except from the ‘packages’ folder, then right-click on a selected item and click on Delete from the context menu.
- After the game folder has been stripped down of files and you only see the ‘packages’ folder, reboot your PC.
- Launch Steam or Epic Games Store once the next startup is complete to prompt it to re-download the missing file and see if the marmot error code has been fixed.
4. Rebuild the Database (Playstation only)
If you see the marmot error code on Playstation 4 and Playstation 5 consoles, this error might be related to a problem with your console’s database.
To fix this particular scenario, you need to restart your console in Safe Mode and recreate the database.
Typically, such issues are caused by logical defects, which may be rectified by rebuilding the database using the console’s recovery option. Both the Playstation 4 and Playstation 5 have almost identical menus and the procedure is virtually the same.
Note: If during this procedure the utility discovers system file damage, the rebuilt attempt might affect your account data and safe games. Because of this, we recommend uploading your saved games to the cloud before starting this procedure.
Here’s a quick guide on building your PS4 or PS5 database:
- Press and hold the console’s power button to turn your console off and wait until you no longer hear any sounds coming from the fans.
- If you see the power button showing on the screen before your console shuts down, select Turn Off PS4 / PS5.
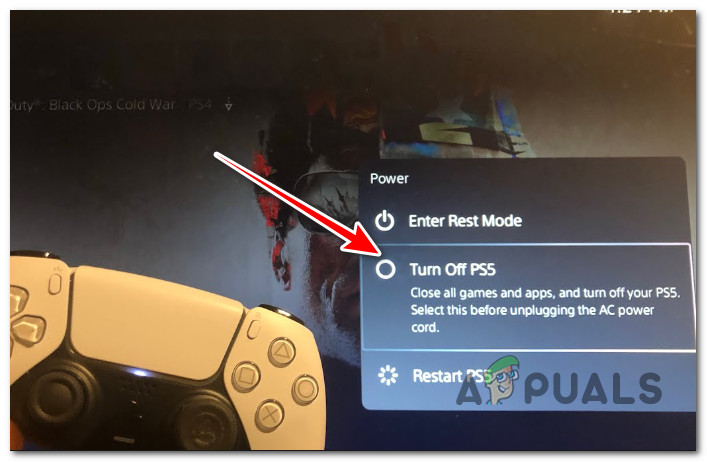
Turning off your Playstation console Note: Short pressing the power button will put your console to sleep and we don’t want that.
- Then, wait one minute before pressing and holding the power button until you hear two consecutive beeps.
- When you hear the second beep, your console is about to enter Safe Mode. Release the power button when you hear the second sound.
- At the initial Safe Mode screen, you must connect your controller with the provided cable.
- After connecting your controller, scroll down until you see Rebuild Database (Options 5), then press X to initiate this procedure.
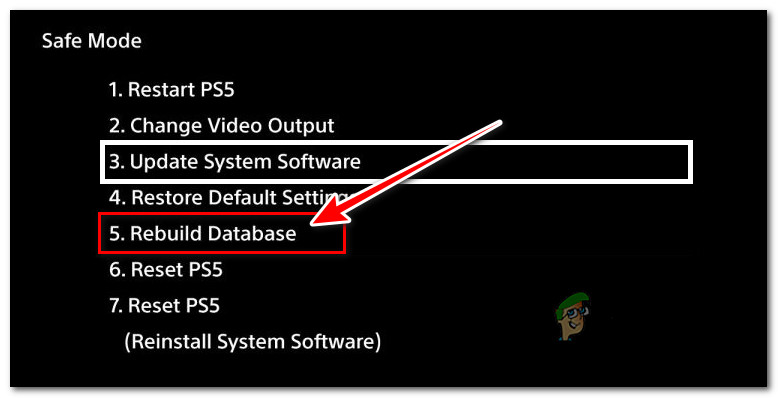
Rebuilding the database Note: Wait till the operation is complete. Depending on the size of your HDD or SSD, this process might take anywhere from a few minutes to more than an hour. This technique reorganizes your hard drive to make it easier and faster for your operating system to retrieve and access files.
- After the procedure has been completed, reboot your console and launch Destiny 2 to see of the marmot error code has been fixed.
5. Clear the persistent storage (Xbox only)
If you’re experiencing this issue on an Xbox One or Xbox Series S / X console and the power cycle procedure didn’t fix the marmot error code, you’re likely dealing with an issue caused by the permanent cache that Xbox keeps.
If this scenario is applicable, you should be able to fix the issue by clearing the persistent storage cache.
Note: It is essential to know that your console will prompt you to download anything from the Xbox store after you execute this procedure. (since the Blu-Ray infrastructure is missing). This will happen on both current-gen and last-gen consoles from Xbox. When you are presented with this message, click Install and then follow the on-screen instructions.
After the operation is complete, the permanent cache will be deleted, allowing you to reinstall the Blu-Ray software support after it has been updated without risk.
Here’s a quick guide on how to do this:
- Verify that you are inside the home screen of your console.
- To access the help menu, press the Xbox button on the controller.
- Select the Games & Apps option from the displayed guidance menu.
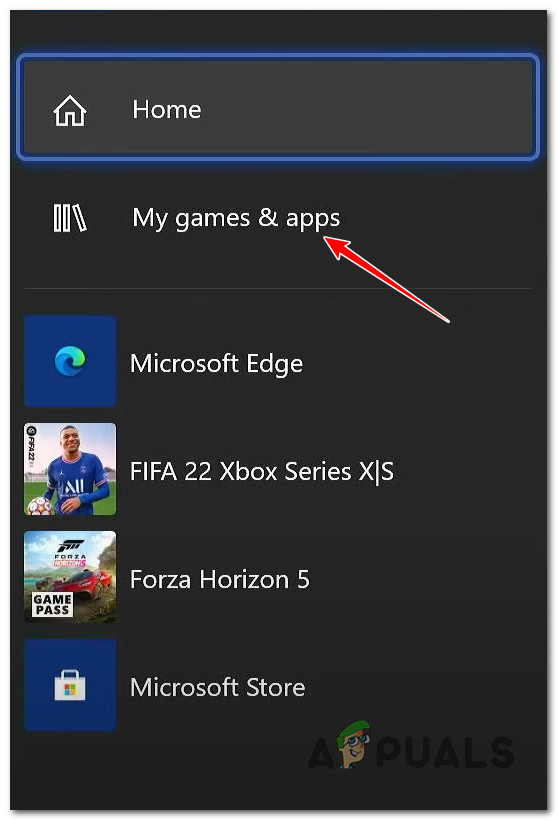
Access the My Games & Apps - In the Game & apps menu, locate the Blu-ray app by scrolling down the list of installed programs & games and open it.
- From the just-displayed context menu, select Manage app / Manage game from the subsequent menu.

Access the Manage game menu - Next, scroll to the right pane and select Uninstall all to remove all updates and extensions.
- To ensure that all traces of the Blu-Ray application are removed, select Uninstall all at the next confirmation box.
- Return to the main dashboard menu and access the instruction menu by pressing the Xbox button on your controller again.
- Return to the menu and choose Settings (gear icon).
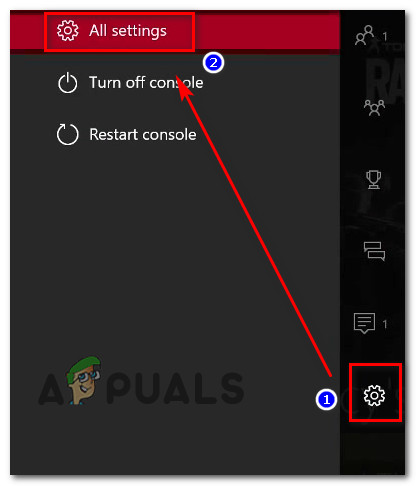
Access the All Settings menu - Returning to the Settings menu, navigate to the Console settings menu and choose Disc & Blu-ray from the menu on the right.
- Select the Persistent storage option from the Blu-ray menu (under Blu-Ray).
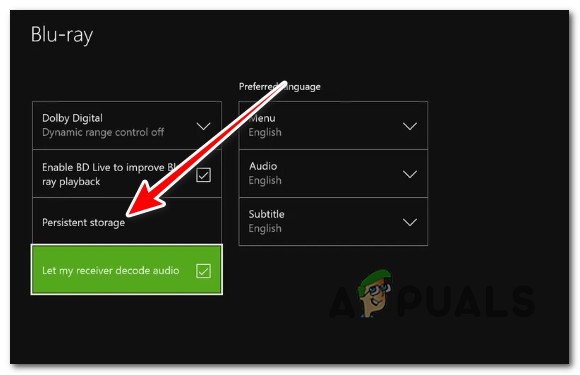
Access the Persistent Storage menu - Confirm at the next prompt, then wait until the persistent storage is cleared.
- Reboot your Xbox console and see if the Marmot error code is now fixed.
6. Perform a factory reset (consoles only)
If you experience the marmot error code on your console and you already tried clearing the cache and power cycling to no effect, the final thing you can do is perform a factory reset.
We’ve been able to confirm the efficiency of this method on both current-gen and last-gen Playstation and Xbox consoles.
Note: Factory resetting will be different depending on your console version and manufacturer. We’ve covered every potential scenario in the sub-guides below.
6.1. Factory Reset Xbox consoles (Xbox One / Xbox Series S / X)
If you see this error on an Xbox console, factory resetting your console is almost identical regardless if you’re using an Xbox One or Xbox Series console (if you do it from the Troubleshoot menu)
Here’s how to factory reset your Xbox console:
- With your console turned out and idle, press the bind + Eject buttons simultaneously on your console.
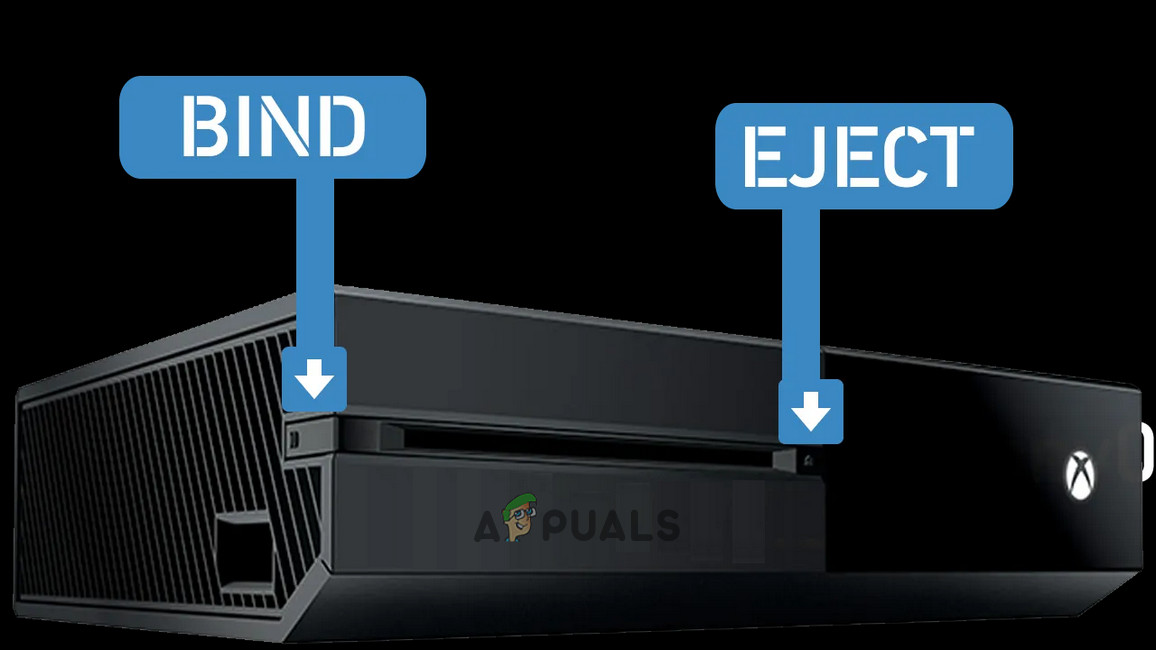
Press the Bind + Eject Button - After a few seconds, you’ll see the Troubleshooting popping up.
- From the next menu, hit “Reset this Xbox” and then press the confirm button on your controller.
- From the next menu, choose Reset and Remove everything.
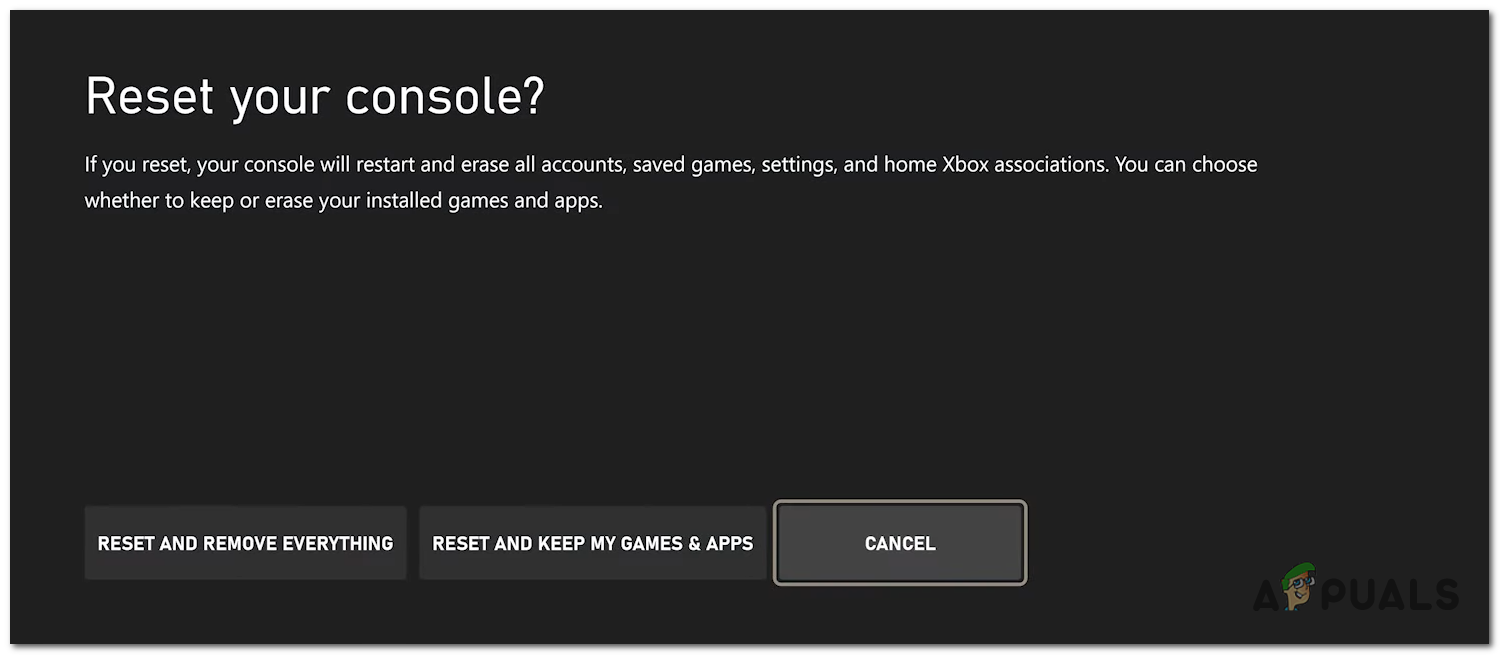
Reset your console Note: Although your console gives you the option to keep your games and apps, our recommendation is to go for the full wipe since the issue might be caused by a Destiny 2 game file.
- Once the procedure is complete, re-download Destiny 2 and launch it again to see if the Mamot error code has been fixed.
6.2. Factory Reset Playstation 4 and Playstation 5
Although Sony revamped the OS entirely for Playstation 5, factory resetting will be identical to on Playstation 4 if you use the Troubleshooting menu.
Follow the steps below to boot in the Troubleshoot menu and initialize your PS5 or PS4 console:
- Press and hold the console’s power button to turn your console off and wait until you no longer hear any sounds coming from the fans.
- If you see the power button showing on the screen before your console shuts down, select Turn Off PS4 / PS5.
Turning off your Playstation console Note: Short pressing the power button will put your console to sleep and we don’t want that.
- Then, wait one minute before pressing and holding the power button until you hear two consecutive beeps.
- When you hear the second beep, your console is about to enter Safe Mode. Release the power button when you hear the second sound.
- At the initial Safe Mode screen, you must connect your controller with the provided cable.
- Once you’re inside the Safe Mode menu, select 7. Initialize PS4 / PS5 (Reinstall System Software).

- Confirm your choice and wait until the operation is complete.
- Allow your console to restart normally, then launch Destiny 2 and see if the problem is now fixed.
7. Unblock Steamclient64.dll (PC only)
Another scenario that might cause this problem is when BattleEye ends up blocking a file (steamclient64.dll) that is essential in the connection with Destiny 2 servers if you are launching the game on Steam.
Note: BattleEye is a patented anti-cheat software system that safeguards online games and their users against hacking, cheating, and other sorts of exploits. It’s used by Destiny 2 and a wide array of other triple-A titles (especially first-person shooters).
If you launch the game on Steam and you haven’t modified the game files and installed any software that you shouldn’t install (aimbots and other tools that allow you to chat), this is probably occurring due to a false positive.
To address this issue, follow the instructions below to ensure that the steamclient64.dll is not blocked by the BattlEye anti-cheat engine:
- Press Windows key + R to open up a Run dialog box.
- Next, type, ‘regedit’ and press Ctrl + Shift + Enter to open up a Run dialog box.

Open up the Registry Editor - At the User Account Control (UAC), click Yes to grant admin access.
- Once you’re inside the Registry Editor, use the left-hand side menu to navigate to the following location:
HKEY_LOCAL_MACHINE\SOFTWARE\Policies\Microsoft\SystemCertificates\AuthRoot
Note: You can either navigate to this location manually or you can paste the location directly into the navigation bar at the top and press Enter to get there instantly.
- Once you arrive in the correct location and the Authroot key is selected, move over to the right-hand section of the screen and double-click on DisableRootAutoUpdate.
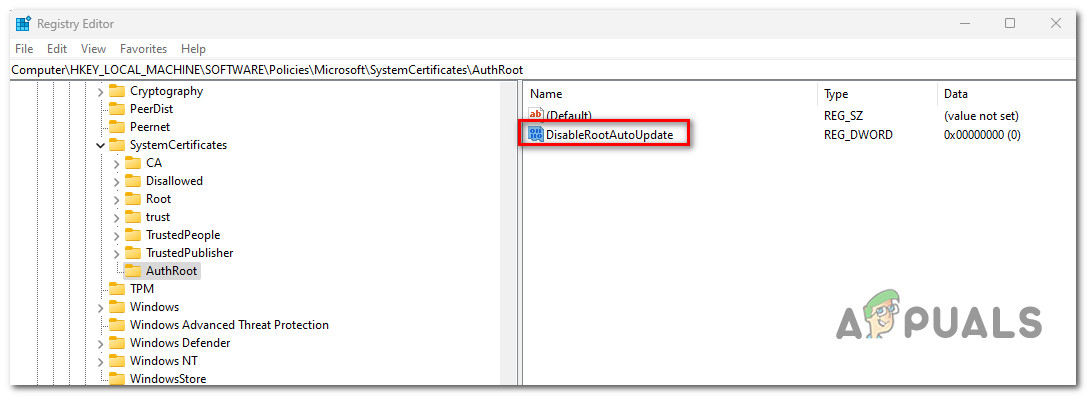
Access the DisableRootAutoUpdate value - Next, set the base of DisableRootAutoUpdate to Hexadecimal and the value to 0 before clicking on Ok got save the changes.
- Close Registry Editor and reboot your PC to save the changes.
- Reboot your PC and see if the problem is now fixed.
8. Disable the XMP (if applicable)
If you’re experiencing the Marmot error on PC and you’re using Intel hardware, one culprit that you should investigate is the XMP (Extreme Memory Profile).
Update: XMP has now become the industry standard for addressing memory profiles and it’s likely that you will find the option with AMD processors too. You might find it under different names on AMD (A-XMP or DOCP), but the underlying technology is the same.
XMP is a set of improved frequencies and timings that a RAM module can employ to achieve greater performance. However, in combination with certain hardware, it can cause stability problems that might lead to the malfunctioning of the rendered applications.
This seems to happen with Destiny 2 which tends to throw the Marmot Error code as XMP throttles the RAM frequencies to values not expected so the connection is terminated.
Several users that were also dealing with his problem have confirmed that they managed to fix this issue by disabling SMP at a BIOS or UEFI level.
Here’s how to do this:
- Restart your PC and start pressing the Setup key as soon as you see the initial screen.

Press the Setup screen Note: The setup screen will be different depending on your motherboard manufacturer. The Setup screen will be displayed on the bottom right or bottom left section of the screen.
- Once you’re inside the BIOS or UEFI settings, look for your overclocking settings. Depending on your motherboard manufacturer, you’ll find them under CPU, Overclocking, or AI Tweaker.
- Next, look for the XMP setting and make sure it’s disabled or set to Manual.
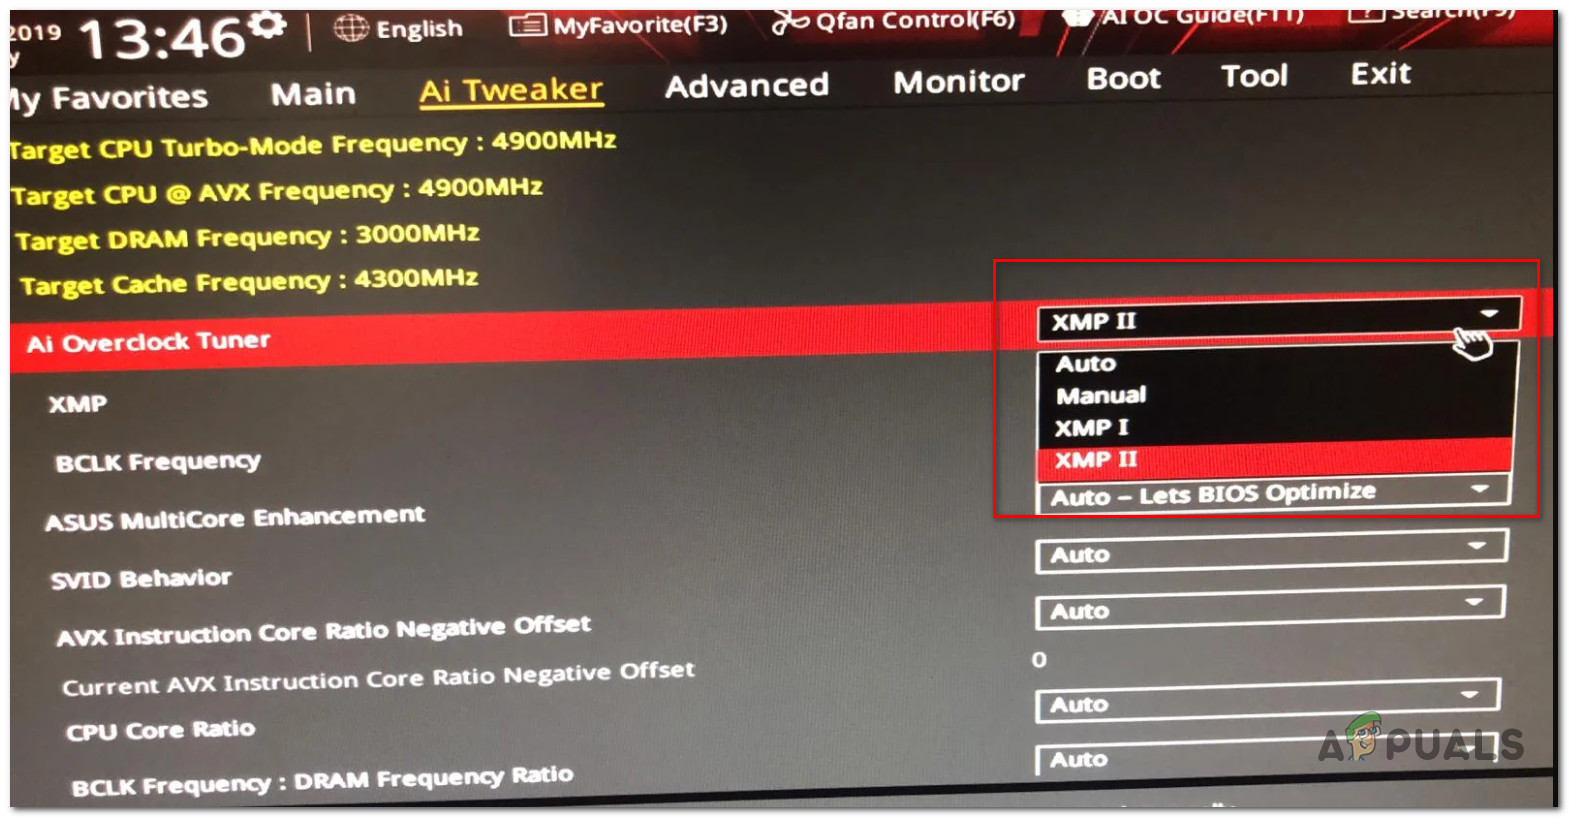
Disabling the XMP component - Once the XMP has been disabled, exit the BIOS or UEFI settings and allow your PC to boot up normally.
- Launch Destiny 2 once again and see if the Marmot Error code is now fixed.
9. Reinstall Steam (if applicable)
If you’re using Steam to launch the game when you get the Marmot error code, you should consider an issue with the Steam app – especially if you experience these types of fatal error crashes with other games.
In this case, you might be able to fix the issue by reinstalling Steam and forcing the launcher to re-download the game. This method will be effective in situations where the Steam installation folder is affected by file corruption.
Here’s a quick guide on installing Steam:
- Press the Windows key + R to launch the Run dialog box.
- Next, type “appwiz.cpl” followed by the Enter key to access the Programs and Features panel.
Open up the Programs and Features menu - In the Programs and Features window, locate Steam by scrolling down the list of apps.
- When you locate the Steam client, right-click it and select Uninstall. Click Yes if prompted by the User Account Control (UAC) to give administrator access.
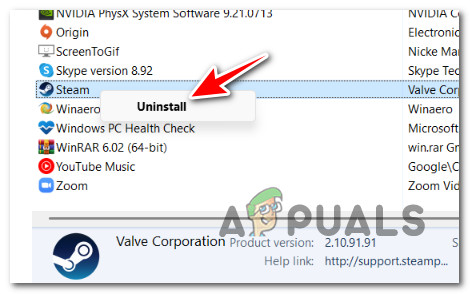
Uninstalling Steam - Click Uninstall to confirm the uninstallation, then wait for the procedure to finish.
- After uninstalling the Steam client, restart your computer.
- When the next startup sequence is complete, visit the official Steam download home page and click on Install Steam to get the newest Steam client.
Download and install Steam - Follow the subsequent on-screen instructions to reinstall the client.
- Once the Steam client has been installed, launch it and reinstall Destiny 2 before checking if the Marmot error code has been fixed.
10. Run SFC, DISM & CHKDSK scan (PC Only)
The ‘Marmot’ error code can also be a symptom of an underlying system file corruption or a scenario where the disk that’s storing the Destiny 2 game installation is beginning to fail.
Fortunately, Windows ships with a series of built-in tools (SFC & DISM) that will allow you to troubleshoot common system file corruption. Even more, you can use the CHKDSK (Check Disk) tool to extend the life of a failing drive by replacing a failing sector with an unused equivalent.
Here’s a quick guide to running the System File Checker, Deployment Image Servicing and Management, and the Check Disk tool to troubleshoot common system file and disk issues:
- Press Windows key + R to open up a Run dialog box.
- Next, type ‘cmd’ and press Ctrl + Shift + Enter to open up an elevated Command Prompt.
Open up a CMD window - At the User Account Control (UAC), click Yes to grant admin access.
- Inside the elevated CMD prompt, type the following command and press Enter to initiate an SFC scan:
sfc /scannow
Note: SFC has a tendency of freezing in the middle of the scan, but in reality, the scan is still running. If you notice this behavior while performing the scan, do not close it as this might cause logical errors on your drives. Instead, wait it out and the utility should unfreeze after a while.
- Once the SFC scan is complete, let’s deploy a DISM scan next. To do this, type the following command and press Enter:
Dism /Online /Cleanup-Image /CheckHealth
Note: DSM uses a sub-component of Windows Update to download healthy copies to replace corrupted system files, so an internet connection is required when running this type of scan.
- Finally, paste the following command in the same CMD prompt and press Enter to initiate a CHKDSK scan:
chkdsk D: /f /x
- Once all 3 scans have finished, reboot your PC and launch Destiny 2 again to see if the problem has been fixed.
11. Investigate your RAM (and replace if required)
If you’re playing on a PC and this issue is occurring sporadically, you should take the time to investigate for a faulty RAM or RAM slot.
Other users that we’re experiencing the ‘marmot’ error code on and off while playing Destiny 2 have managed to fix this issue by replacing the faulty RAM after running a MemTest86 utility and discovering a bad stick of ram or DIMM slot on their motherboard.
Our advice is to perform the same investigation and make sure that your RAM is not actually causing this problem.
Here’s how to investigate your RAM with Memtest86 and replace it if necessary:
- To download MemTest86, launch your usual web browser and visit the download page.
- Once you are on the correct page, click Download to obtain the free version of MemTest86.

Download the Memtest utility - Use an extraction application such as 7 Zip, WinZip, or WinRar to unpack the memtest86-usb archive after the download is complete.
- Follow the instructions in the official manual to build a USB device that will be utilized for RAM stress testing.
- Follow the instructions for MemTest86 to determine if your RAM sticks are causing the issue.


