Best NVIDIA Control Panel Settings: High FPS & Low Latency!
Optimize NVIDIA Control Panel for Maximum Performance and Lowest Latency!
If you have an NVIDIA Graphics Card installed in your PC/laptop, chances are that you know about the NVIDIA Control Panel, but have never properly dived into its settings and tweaked them for your own needs.
The NVIDIA Control Panel gives users the ability to customize their graphics settings according to their preferences. Not only can you improve gaming performance using this tool, but you can also enhance video playback quality and increase the overall performance of your system.
To help you get the most performance out of your NVIDIA GPU, this guide will show you the best NVIDIA Control Panel settings that will improve the framerate of your games and reduce input lag while maintaining visual quality.
Before we start, Update your NVIDIA Graphis Drivers
Before we dive into the best NVIDIA Control Panel settings for gaming, you should check whether your GPU drivers are up to date.
Using the latest GPU drivers is very important, as these new drivers provide better performance in the latest games, and are usually more optimized than older drivers.
To check whether you are using the latest drivers, follow the steps we’ve listed below:
- Press the Windows Key to open the Start menu.
- Type “GeForce Experience” and press enter.
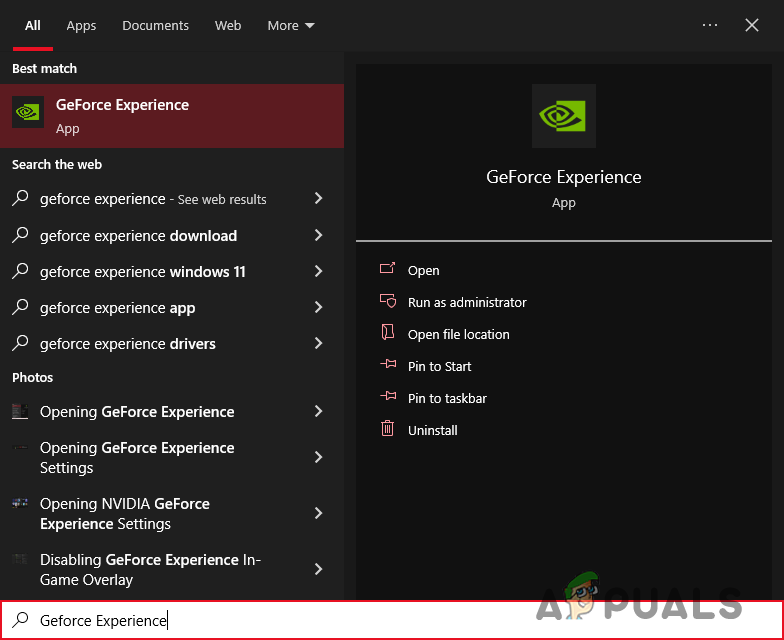
Opening GeForce Experience - Click on the “Driver” option at the top-left corner of the Window.
- Click on the “Check for Updates” option.

Updating GPU Drivers
If the Check for Updates option shows no new drivers on the page, it means that you’re already using the latest drivers for your GPU. But if you see a new driver appear, you should download and install it on your system before proceeding to the next section of this guide.
Best NVIDIA Control Panel Settings for Maximum Performance
| Setting | Best Option |
|---|---|
| Image Scaling | ON (Unless using DLSS) |
| Ambient Occlusion | OFF |
| Anisotropic Filtering | OFF |
| Antialiasing - FXAA | OFF |
| Antialiasing - Gamma Correction | ON |
| Antialiasing - Mode | Application-controlled |
| Antialiasing - Setting | Application-controlled |
| Antialiasing - Transparency | OFF |
| Background Application Max Frame Rate | 30 |
| CUDA - GPUs | All |
| DSR - Factors and Smoothness | OFF |
| Low Latency Mode | ON |
| Max Frame Rate | User-specific |
| Multi-Frame Sampled AA (MFAA) | OFF |
| Monitor Technology | Fixed Refresh Rate for low latency; GSYNC for more smoothness |
| OpenGL Rendering GPU | Auto-select |
| Power Management Mode | Prefer Maximum Performance |
| Shader Cache Size | Driver Default |
| Texture Filtering - Anisotropic Sample Optimization | ON |
| Texture Filtering - Negative LOD Bias | Allow |
| Texture Filtering - Quality | Performance |
| Trilinear Optimization | ON |
| Threaded Optimization | ON |
| Vertical Sync | OFF |
| Triple Buffering | OFF |
| Virtual Reality Pre-Rendered Frames | 1 |
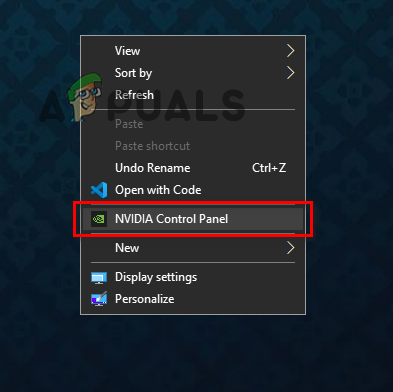
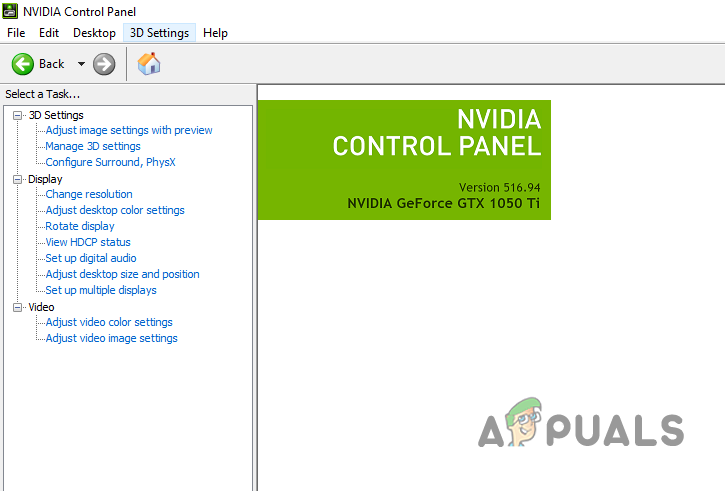
To open the Control Panel, simply right-click on an empty space on your desktop and select “NVIDIA Control Panel”.
If you do not see the Control Panel in the menu, your NVIDIA Display Container service is likely not running. You can easily fix this issue by following this guide.
Once the panel has opened, you’ll see many different options in the column on the left side of the menu. Below, we’ll be guiding you through all of the settings in each of the three categories: 3D Settings, Display, and Video.
1. Best 3D Settings
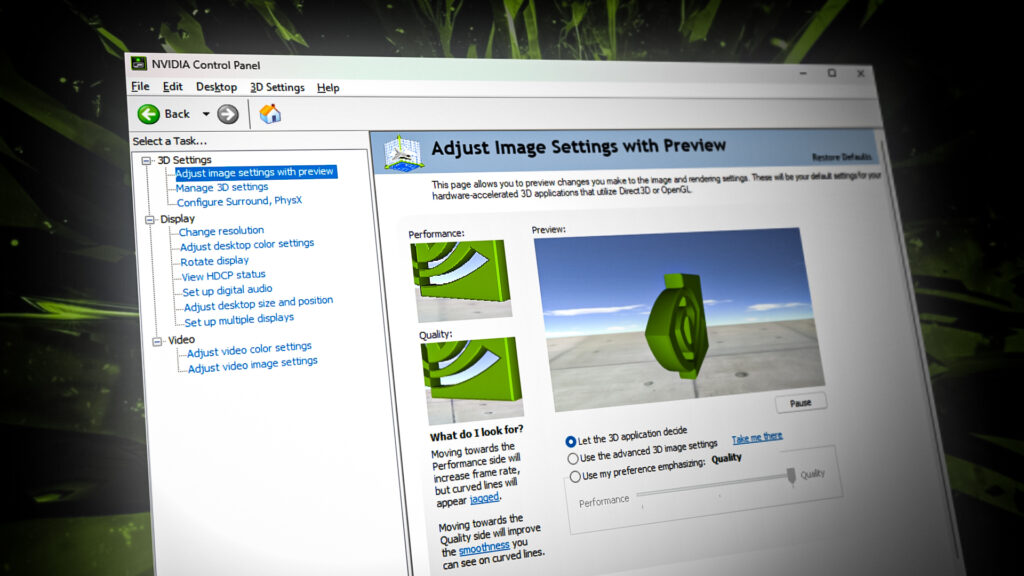
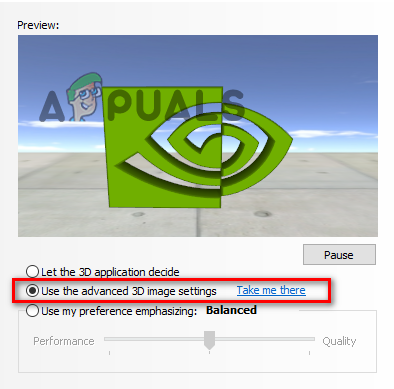
The first option in the 3D Settings category is “Adjust image settings with preview”. This option allows you to quickly adjust the quality-to-performance ratio of the Direct3D and OpenGL applications on your system.
When you have the “Use my preference” option selected, you can move the slider to the left to increase performance (and decrease quality) or to the right to increase quality (and decrease performance). The 3D model will give you an idea of how much the quality is increasing/decreasing as you move the slider.
While this is a quick and easy way to improve performance, it is highly inefficient, as it does not allow you to tweak the individual settings to squeeze the most performance out of your GPU. So instead of using the slider, click on the “Use the advanced 3D image settings” option and then click on “Take me there” to view all the settings.
In the Manage 3D Settings menu, you’ll see a whole list of graphics settings under the “Global Settings” tab that you can tweak according to your preference. The settings in this tab will affect each and every program on your PC. Whereas in the “Program Settings” tab, you can opt to tweak settings for only a specific program.
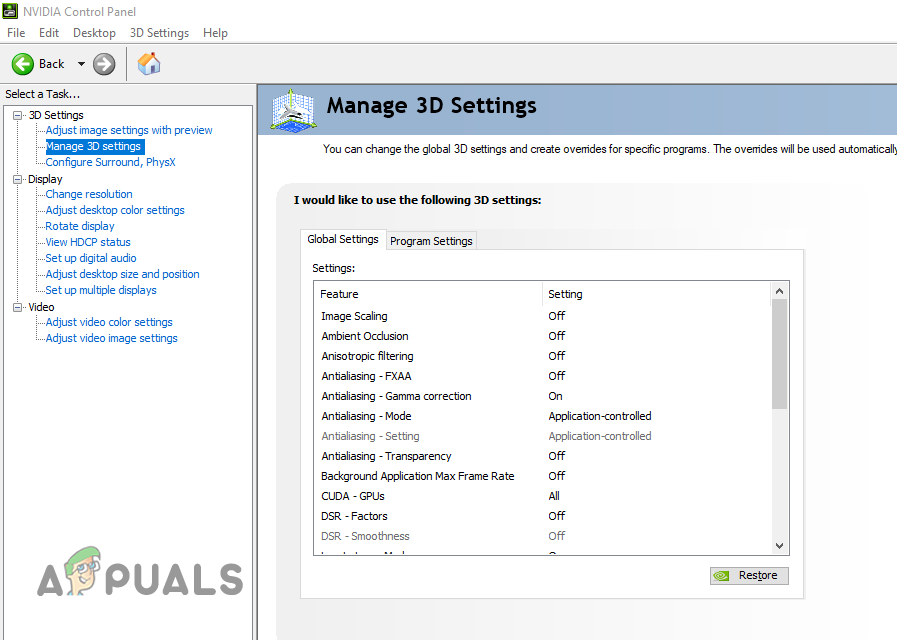
The list below covers the purpose of each setting in this list and the optimal configuration for achieving an ideal balance between performance and visuals.
Note: Some settings are not available on certain Graphics Cards, and some are exclusive to PC GPUs only – so laptop users may not see certain settings in their NVIDIA Control Panel application.
Image Scaling
The Image Scaling setting upscales the resolution of your games by using a complex algorithm. This algorithm analyzes the image on your screen and fills in the missing pixels, making the image appear as if it were rendered at a higher resolution than it actually was.
So if you are running a game on a resolution that is lower than your monitor’s native resolution (for example, 720p instead of 1080p), Image Scaling will upscale the image to 1080p without sacrificing the framerate of the game.
Image Scaling is similar to the NVIDIA DLSS technology but one advantage it has over DLSS is that it is supported by a lot more NVIDIA GPUs. However, even Image Scaling may not work on certain GPUs.
If you are playing graphic-intensive games and have a low to medium-end GPU, it is recommended to turn Image Scaling ON. This will allow you to increase the visual quality of your games without sacrificing performance.
If you are using a high-end GPU, Image Scaling will likely have little to no effect on the visuals and performance of your games. Additionally, if you prefer to see a pixel-perfect image with no artifacts or added effects, it’s best to keep this setting OFF.
Another thing to keep in mind is that if you are already using DLSS in a game, there’s no point in using Image Scaling. This is because DLSS is already doing the same job, and doing it much better than Image Scaling can.
Ambient Occlusion
The Ambient Occlusion setting is responsible for the lighting of objects in games. When you have this setting turned on, it will make the lighting and shadows of your games much more realistic, but there will be a noticeable effect on the game’s performance.
If you have a low to medium-end GPU, it is recommended to turn this setting OFF, as it will give you a considerable boost in performance. However, if you want to improve the visuals in the game, set it to Performance to enhance the game’s lighting and shadows without completely tanking your FPS.
Anisotropic Filtering
Anisotropic Filtering improves the clarity and sharpness of the textures in games. When you play a game at a high resolution, this setting will help eliminate blurriness and distortion in the textures. The more you increase this setting, the sharper the textures will be.
It is recommended to leave this setting turned OFF (or set to a very low value, such as 2x or 4x) in the NVIDIA Control Panel, as most games come with built-in Anisotropic Filtering controls which are much more efficient. Furthermore, this setting has a massive effect on the framerate of games, so leaving it turned on will significantly reduce your FPS.
Antialiasing
There are 5 unique Antialiasing settings in the Control Panel:
- Antialiasing – FXAA.
- Antialiasing – Gamma Correction.
- Antialiasing – Mode.
- Antialiasing – Transparency.
- Antialiasing – Setting.
Out of these 5 settings, the ones you actually need to care about are Antialiasing – FXAA and Antialiasing -Setting.
Both of these settings work to reduce jagged edges in the images displayed on your screen. However, they work in different ways.
Antialiasing FXAA is a unique Antialiasing technique that eliminates jagged edges while maintaining a minimal effect on performance. However, this setting does not give you much control, as it can only be turned on or off, instead of giving you the option to adjust its intensity.
Antialiasing – Setting, on the other hand, combines different techniques, such as Multisampling and Supersampling. It gives you a range of values to work with, giving you much more control over its intensity. However, it generally has a bigger impact on performance.
It is recommended to turn both of these settings OFF as most modern games come with these settings built-in. It is much more efficient to use the built-in Antialiasing settings of games instead of using these ones.
That said, if you have a very powerful PC and wish to squeeze the most visuals out of your game, you should turn Antialiasing FXAA on.
As for Gamma Correction, Mode, and Transparency, Gamma Correction should be turned ON as it improves the color of 3D images without having any noticeable effect on performance. The Mode setting should be set to Application-controlled and Transparency should be turned OFF or to Multisampling (depending on the power of your GPU).
Background Application Max Frame Rate
This is a very important, yet often overlooked setting in the Control Panel. This setting will allow you to limit the framerate of your games while you’re switched over to a different application.
You should keep this setting ON and set it to 20-30 FPS, as this will significantly decrease the power consumption of your PC and reduce fan noise. This will be very beneficial to your PC in the long run.
CUDA – GPUs
This setting is for those people who have multiple GPUs installed on their computers. This setting allows you to choose how many GPUs you want to use for CUDA applications, such as PhysX. If you want to use all of your GPUs, set this setting to All.
If you only have one GPU installed on your computer, you should just leave this setting set to its default value. It will have no effect on your system’s performance.
DSR – Factors and Smoothness
Dynamic Super Resolution (DSR) is a setting that’s catered towards players who purely care about visuals. When you have this setting enabled, it renders the game at a high resolution (of your choice), and then downscales it to the native resolution of your monitor. This results in an incredibly sharp and clear image, but it severely reduces your FPS.
If you care about performance, you should always keep DSR – Factors OFF. This setting should only be enabled if you have an extremely powerful system, and want to maximize a game’s visual quality. If you choose to enable DSR – Factors, you can use the DSR – Smoothness setting to adjust the smoothness of the downscaled image.
Low Latency Mode
When Low Latency Mode is enabled, it restricts the number of frames that the CPU can prepare before they are given to the GPU for processing. In layman’s terms, this stops the CPU from preparing too many frames in advance, which leads to decreased input lag and faster response times.
Low Latency Mode should be kept ON, especially if you play competitive games like CS:GO and Valorant where low latency is key. You can even set this setting to Ultra, as it does not have any effect on your framerate.
Do note that some games come with this setting built into their settings menu. It is named “NVIDIA Reflex” and has two values: ON or ON + Boost.
If you’re already using the NVIDIA Reflex setting in a game, it will override the Low Latency Mode setting of the Control Panel. Therefore, you don’t need to change this setting for each individual game – you can just set it to ON in the Global Settings tab.
Max Frame Rate
The Max Frame Rate setting is a tricky one to discuss. This setting allows you to limit the framerate of a program to as many FPS as you want.
The first thing to note about this setting is that you should never set it in the Global Settings tab. Instead, you should be changing it individually for your games.
If you’re playing a competitive game where decreased input lag and low frametimes are key (such as CS:GO or Warzone), your game will benefit from having an uncapped (unlimited) framerate. Keeping the FPS uncapped will decrease the frametimes as much as possible, resulting in low input lag. However, this can lead to screen tearing if your FPS stays above your monitor’s refresh rate.
If you’re bothered by screen tearing, it’s best to keep your FPS limited/capped. And if you’re facing stutters while playing a game where your FPS quickly drops from a very high number to a very low one, and then back up (for example, from 120 to 60, then back to 120), limiting your framerate could fix your issue.
It will fix it by preventing your FPS from going up too high, so when you experience the stutters, they will not feel as jarring.
Furthermore, if you’re playing a slow-paced game where input lag and frametimes aren’t an issue, it’s a good idea to cap your framerate. This will reduce GPU usage and prevent overheating, and can also decrease screen tearing and other visual artifacts that occur when your GPU usage is very high. However, this will increase frametimes, so your gameplay may feel slightly sluggish.
The number you should set the Max Frame Rate to mostly depends on your specific situation. But generally, it’s best to set it to the refresh rate of your monitor. You should experiment with different Max Frame Rate settings for each game and find the sweet spot that balances performance, visual quality, and response times.
Multi-Frame Sampled AA (MFAA)
The Multi-Frame Sampled AA (MFAA) setting is essentially an advanced version of the anti-aliasing setting. When enabled, it takes multiple samples of each pixel in an image and then combines them to significantly decrease jagged edges in the final result.
This setting should generally be turned OFF, as it is not as optimized as the built-in anti-aliasing setting of most games. Therefore, it can potentially decrease your FPS quite a bit.
Monitor Technology
The Monitor Technology setting is only visible to those users who have monitors with variable refresh rates. If you see this setting, you’ll notice that it has three options: G-SYNC, ULMB, and Fixed Refresh Rate.
If you mostly play competitive games where latency matters, then you should choose Fixed Refresh Rate. However, if you like playing slow-paced games where you aren’t worried about latency, you should select G-SYNC.
G-SYNC matches your monitor’s refresh rate with the frame output of your GPU. This (generally) results in less screen tearing and stuttering, but your FPS will be much lower.
OpenGL Rendering GPU
This is another setting for those people who have multiple GPUs installed in the system. It allows you to select a specific GPU to be used by OpenGL applications. If you only have a single GPU, leave this setting to its default value.
Power Management Mode
If you want to squeeze the most performance out of your NVIDIA GPU, you should select the “Prefer maximum performance” option for this setting. However, keep in mind that this can lead to overheating issues with your GPU in the long run and it also results in increased power consumption.
If you care about your GPU’s lifespan and your system’s power consumption, you should select the “Adaptive” option instead. This will allow your GPU driver to control your GPU’s usage, resulting in lower power consumption and fewer overheating issues.
Shader Cache Size
This setting allows you to control the maximum amount of disk space used by your GPU driver for saving shader compiles. Your GPU saves these shader compiles so that it doesn’t need to re-compile the shaders the next time they’re needed. This results in fewer stutters and quicker startup time for games.
The “Driver Default” option for this setting generally works best for most users. But if you want to ensure that you’re reserving enough space for the shaders of all of your games, you can set a custom value. Make sure to allocate at least 10 GB for the Shader Cache Size.
Texture Filtering
There are 4 unique Texture Filtering settings in the Control Panel:
- Texture Filtering – Anisotropic Sample Optimization.
- Texture Filtering – Negative LOD Bias.
- Texture Filtering – Quality.
- Texture Filtering – Trilinear Optimization.
When enabled, the Anisotropic Sample Optimization setting improves performance but results in a slightly less sharp image. When disabled, it improves image quality at the cost of a slight decrease in performance. This setting should be turned ON as it gives a noticeable boost in performance without having a significant effect on visuals.
The Negative LOD (Level of Detail) Bias setting improves the quality of stationary images on your screen. This setting should always be set to “Allow” as it leads to higher performance.
The Quality setting allows you to adjust the texture filtering of your games to either improve performance or visuals or find a balance of both. This setting depends on your system’s performance. If your system struggles to load textures in graphically-intensive games, choose the “Performance” or “High Performance” option. And if you have a powerful GPU that can handle all kinds of textures, you can choose the “Quality” or “High Quality” option.
And finally, Trilinear Optimization adjusts the use of bilinear and trilinear filtering in games in real-time, improving performance but slightly decreasing image quality. This setting should always be turned ON as it gives a noticeable increase in FPS, and the loss in image quality is almost negligible.
Threaded Optimization
Threaded Optimization should always be set to ON or Auto as it allows applications to use the multiple cores in your CPU. If you disable this setting, you’ll immediately notice a decrease in your FPS.
Vertical Sync
Vertical Sync, aka VSYNC, matches the FPS of the application to your monitor’s refresh rate to reduce screen-tearing and other display issues, just like GSYNC. However, VSYNC is much less optimized than its GSYNC counterpart, as it results in a noticeably high increase in input lag and FPS.
Therefore, VSYNC should always be turned OFF if your monitor supports GYNC. But if it does not, then you can use VSYNC to fix screen tearing issues. But keep in mind that this will noticeably increase input latency and frametimes.
Triple Buffering
This setting is contingent on VSYNC. If you choose to enable VSYNC, you can turn this setting on to improve performance. But if you have VSYNC disabled, make sure to disable this setting as well.
Virtual Reality Pre-Rendered Frames
As the name suggests, this setting is purely designed for Virtual Reality games. It allows you to limit the number of frames the CPU can generate before the GPU processes them. This results in improved performance, but also increases latency. You can experiment with this setting to find the perfect balance between performance and latency.
Note: After you’ve finished tweaking the settings, remember to click the Apply button at the bottom to save them – otherwise, your settings will not be saved! And if you face any errors when trying to apply the setting, take a look at our guide to solve the issue.
2. Best Display Settings
The settings in the display tab allow you to tweak the display settings of your monitor. You can adjust its resolution, refresh rate, color settings, image orientation, and also set up multiple monitors.
Note: If you do not see the Display tab, there could be an issue with your GPU drivers or BIOS settings. Check out our guide to solve the issue.
Resolution, Refresh Rate, and Color `
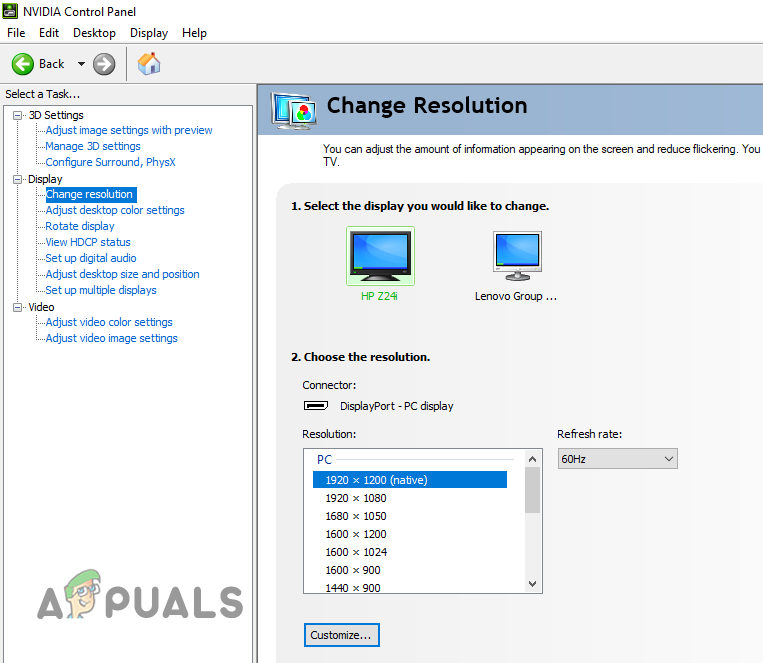
In the “Change resolution” menu, make sure that it is set to your monitor’s native resolution. The list will show you what your monitor’s native resolution is.
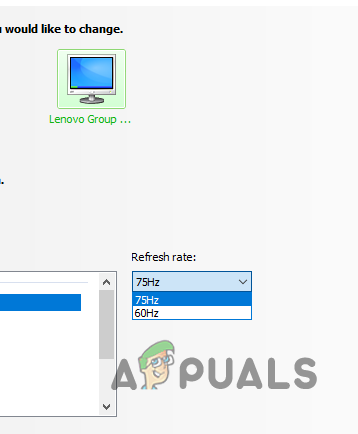
For the Refresh Rate, make sure that the highest value is selected. The higher the refresh rate of your monitor, the more times it will refresh the image on the screen per second. This will result in a smoother and more fluid output. But keep in mind that the benefit of a high refresh rate may be limited by the capabilities of your graphics card.
If you have a 60 Hz monitor, you can generally overclock it to 75 Hz in the Control Panel. But if you don’t see any option for 75 Hz in the menu, you can follow this guide to overclock your monitor through other methods.
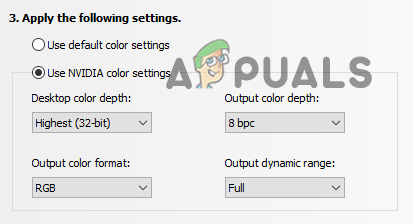
While still in the “Change resolution” menu, scroll down to the color settings and select “Use NVIDIA color settings” and ensure that the following options are selected:
- Desktop color depth: Highest (32-bit)
- Output color depth: 8 bpc
- Output color format: RGB
- Output dynamic range: Full
After that, you can move on to the “Adjust desktop color settings” menu. This menu will allow you to further tweak the color settings of your monitor. You can adjust its brightness, contrast gamma, digital vibrance, and hue to your liking. This is all completely up to your personal preference.
Desktop Size and Position
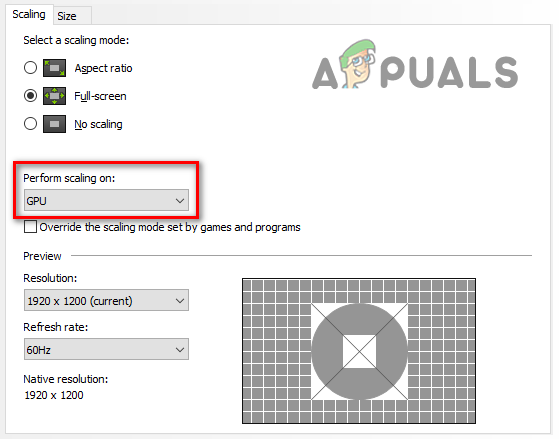
In the “Adjust desktop size and position” menu, navigate to the Scaling tab. If you want to use the famous 4:3 aspect ratio, also known as “Stretched” in games like CS:GO and Valorant, ensure that “Full-screen” is selected as the Scaling Mode.
But if you do not play games at a stretched resolution, and want as little input latency as possible, change this option to “No Scaling”. This will give you a slight improvement in performance.
After that, set the “Perform Scaling on” option to GPU. The GPU Scaling option will instruct your GPU to perform the scaling instead of your monitor, which will result in more precise and accurate scaling, and may even increase your FPS.
Set up Multiple Displays
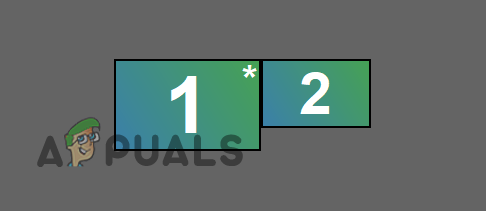
If you have more than 1 monitor, this menu will allow you to configure their layout. Firstly, you can select which monitor to use as your main one. Ensure that your using the monitor with the higher resolution and refresh rate as your main.
After that, you can drag the icons of your monitors around to set their layout. Set the layout according to your preference.
3. Best Video Settings
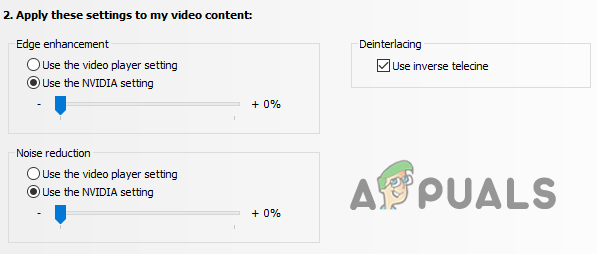
Finally, in the Video tab, you can tweak the video color and image settings of your monitor(s). But to do so, you’ll have to first select the “Use the NVIDIA setting” option.
Once you’ve done that, you can adjust the brightness, contrast, hue, saturation, gamma, and dynamic range of the videos displayed on your screen, and can even perform edge enhancement (to increase sharpness) and noise reduction.