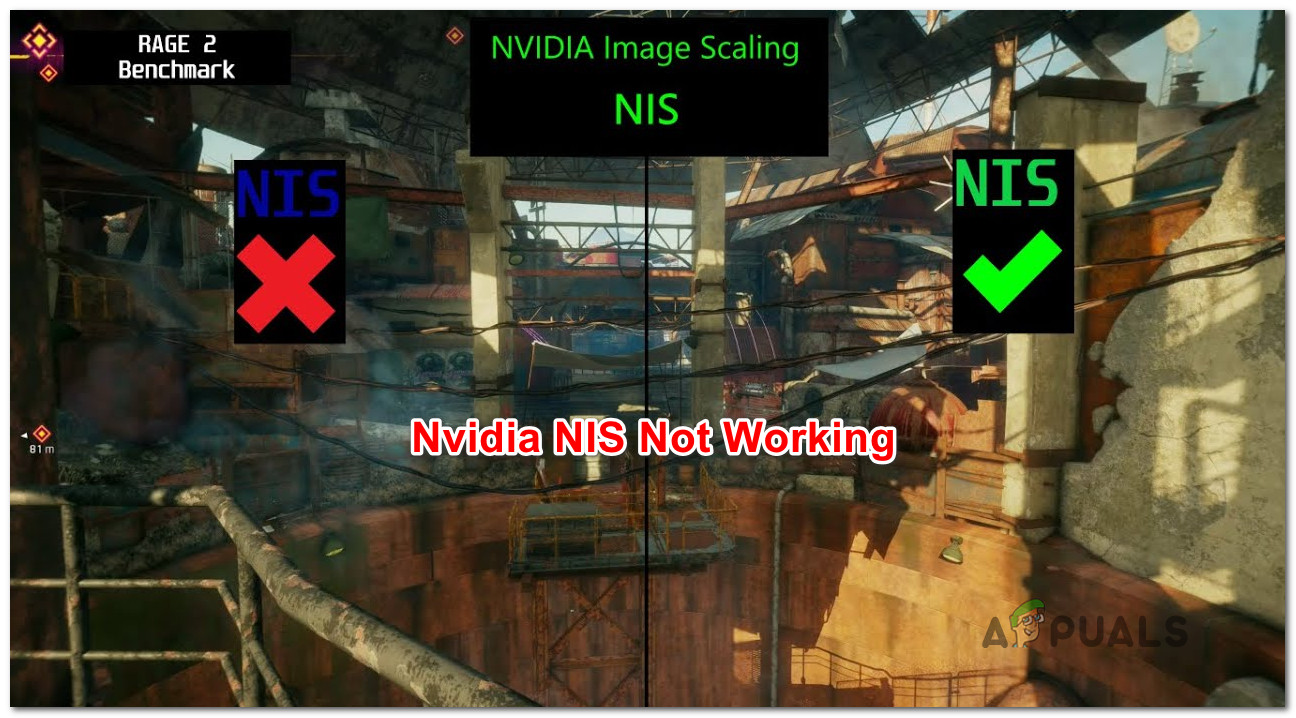
NIS (NVIDIA Image Scaling) Not Working? Here’s How to Fix It
For all the excitement around Nvidia’s new Image scaling (NIS) feature, the PC gaming community has been disappointed by how unreliable this feature is in reality. A lot of PC users running on several different Windows versions are reporting that they can’t really enable NIS as the top-left indicator is now showing – even on exclusive fullscreen games.
What is Nvidia NIS?
Nvidia Image Scaling (NIS) is one of the newest graphic innovations from the GPU manufacturer. It’s quite similar with similar image scaling features like DLSS (from Nvidia) and FidelityFX from AMD.
The general consensus is that in its current state, NIS is not as good as DLSS, but it’s still a feature that will allow you to boost the in-game framerates (FPS) by rendering games at low resolution, then upscaling them to match the current monitor resolution.
If you’re having trouble enabling Nvidia NIS on your PC, there are several potential causes that might be responsible. Here’s a list of potential culprits that you should troubleshoot against if you’re experiencing this issue:
- NIS is not supported on your configuration – The first thing you need to do when troubleshooting this issue is to make sure that NIS is supported by your GPU configuration. Although Nvidia advertises seamless integration, the reality is a lot of legacy GPUs are not able to support this feature
- Nvidia Image scaling is disabled – By far the most common scenario that might cause this behavior is when Image scaling is actually disabled from the Nvidia Control Panel menu. If this scenario is applicable, you can fix the problem by enabling Image Scaling from the Manage 3D settings menu (under 3D settings).
- The game or app is not configured to run in full-screen mode – Nvidia Image Scaling will not kickstart along with the application or game you’re currently rendering unless the app is configured to run in full-screen mode. NIS will not kick into action if you’re in borderless mode, window mode or ‘fake fullscreen’ mode.
- The game or application doesn’t support full-screen mode – You might experience this problem if you’re trying to force NIS on an application or game that doesn’t support full screen. In this case, you can force NIS to kick into action by ensuring that the application or game is using the same resolution as your desktop.
- NIS is deprecated for your Windows versions – As it turns out, Nvidia is slowly beginning to deprecate the NIS feature for newer models (particularly with GPUs where DLSS is supported). Fortunately, if you are a fan of Nvidia Image Scaling, there is a registry tweak you can use to re-enable Nvidia Image Scaling.
- NIS is unavailable at the motherboard level – Keep in mind that depending on your PC, your motherboard might not be directly connected to the Nvidia GPU. Thee are cases where the monitor connects via Integrated graphics and the NVIDIA GPU is used explicitly for rendering processes. Unfortunately, DELL and a few other manufacturers won’t provide an option to change this for some laptops, so you might not be able to use NVIDIA Image scaling even if your GPU technically supports it. If you are suffering from this motherboard design limitation, there’s really nothing you can do to enable NIS manually.
- HDR is enabled – As it turns out, there are situations where Nvidia Image Scaling conflicts with the HDR feature. This is highly dependent on your GPU and display. If this scenario is applicable, you should try disabling the HDR function and see if NIS kicks into action.
- Integer Scaling is enabled – As it turns out, this problem often occurs on a PC where Integer Scaling is enabled. This is a feature that scales low-resolution to increase image crispness but oftentimes ends up conflicting with Nvidia Image Scaling. To make sure this is not an issue in your case, make sure to disable integer scaling.
- Outdated or Deprecated GPU driver – Another reason why you can expect to deal with this issue is a scenario in which you’re actually using a deprecated or updated GPU driver that facilitated this inconsistency with NIS. A lot of users affected by this problem have confirmed that the NVIDIA Image Scaling feature started working normally after they’ve updated their driver to the latest version available.
- Optimus is Enabled – If Nvidia Optimus is enabled on the PC experiencing this problem and you don’t actually use it to freely switch between your GPUs, disabling it might resolve the issue automatically as a lot of affected users have reported.
- The game is running on integrated graphics – Before you dismiss this scenario from your culprit list, another scenario that you should investigate is a case where your PC actually prefers to render the game using the integrated graphics instead of the NVIDIA discrete GPU. This might occur with certain legacy games. In this case, you can resolve the issue by forcing the dedicated GPU via the Nvidia Control panel.
1. Make sure that NIS is supported on your PC configuration
Keep in mind that even if Nvidia advertises that NIS will seamlessly enable on your GPU, in practicality that’s not the case.
As you’ll see below, there are a series of limitations to Nvidia Image Scaling (NIS) – and not all of them are related to your GPU (some are display related). If you’re affected by one of them, you might not be able to utilize this feature on your PC.
First, let’s cover the requirements:
- NIS requires a display that is driven by an Nvidia GPU (the handling of the scan-out of the display needs to be done by an Nvidia GPU).
- If you are using an MSHybrid or Optimus configuration, you will need to set your notebook mode away from MSHybrid to discrete GPU mode in order to be able to enable Nvidia Image Scaling.
- NIS will only work when the game or application you’re running is configured to run in Full-Screen mode – NIS will remain disabled if the game or application is set to run in ‘fake fullscreen’ or borderless.
- If the game/app you’re attempting to use NIS on doesn’t support fullscreen mode, you can only enable Image Scaling by ensuring that the desktop resolution is the same as the game or app resolution.
Next, let’s cover the limitations of Nvidia Image Scaling:
- Nvidia Image Scaling is not supported for Maxwell and Pascal GPUs when used in conjunction with HDR.
- Nvidia Image Scaling is not supported for Pre-Ampere GPUs if you use the YUV 420 color format.
- Nvidia Image Scaling is not supported for Pre-Pascal GPUS while using the YUV 422 color format.
- Nvidia Image Scaling is not supported in SLI Mode and Surround Multi-Monitor Clone / Duplicate mode.
- Nvidia Image Scaling is not supported in Title Display, Direct Display, VR, and Integer Scaling mode.
If you went through every requirement and limitation of Nvidia Image Scaling and none of them should affect your particular scenario, move down to the next method below.
2. Enable NIS in Nvidia Control Panel or Ge-Force Experience
Once you’ve made sure that Nvidia Image Scaling is not hindered by any requirement that you don’t meet or by a limitation that applies to your particular legacy GPU, the next thing you should do is make sure that NIS is enabled from the Nvidia Control Panel menu.
Note: NIS is actually a driver-based spacial upscaler and sharpener that works for the vast majority of GeForce GPUs for all games that support full-screen mode. It will work for all DirectX versions including DirectX 9, DirectX 10, DirectX 11, DirectX 12, Vulkan and OpenGL.
However, you won’t see this feature starting automatically unless you begin by configuring it via Nvidia Control Panel or GeForce Experience.
Since there are two ways of activating Nvidia Image Scaling on Windows PCs, we’ve created two different sub-guides that will walk you through the process of enabling NVidia Image Scaling on:
- Nvidia Control Panel
- GeForce Experience
Follow the sub-guide below that you feel most comfortable with:
Enable NIS from Control Panel
This is the more rudimentary approach as you’ll have to make these changes manually to every resolution that you’ll use when upscaling via the NIS feature.
Here’s what you need to do:
- First things first, start by ensuring that the game you’re having trouble enabling NIS for is closed and not running in the background.
- From your desktop, right-click on an empty space, then click on Nvidia Control Panel.

Accessing the Nvidia Control Panel Note: If you’re on Windows 11, you’ll need to click on Show more options first before you can see the context menu where you can click on Nvidia Control Panel.
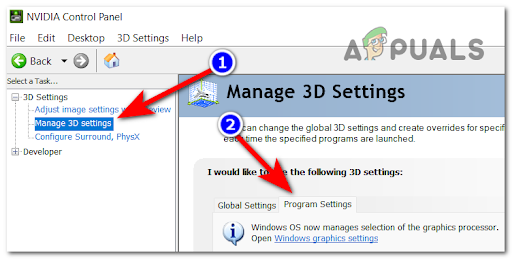
- Once you’re inside Nvidia Control Panel, use the menu on the left to click on Manage 3D settings.

Access the Nvidia Control Panel settings - From the Manage 3D settings menu, go over to the right-hand side menu and go to Global Settings.
- Next, change the toggle associated with Image Scaling to On from under the Settings menu.
- After you enable Image Scaling, the driver will generate 5 additional scaling resolutions by keeping in mind your native monitor resolution – you can select these from the in-game menus to use Nvidia Image scaling.
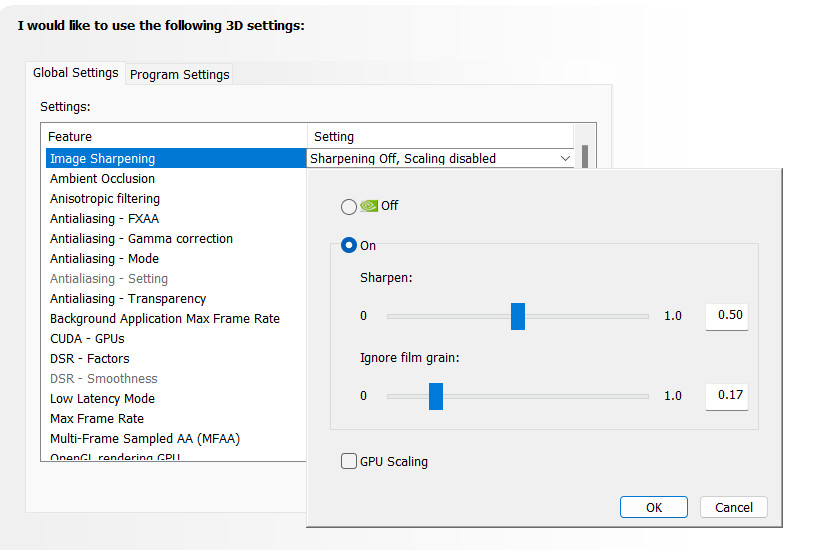
Enable Image Scaling Note: You will need to do a system reboot in order to ensure that your games will start recognizing these new resolutions.
- Additionally, you can set custom values for the global sharpness settings or manage them per game by using the Program Settings tab instead.
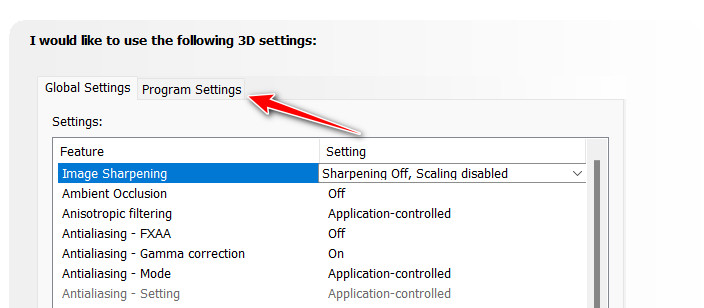
Accessing the Program Settings menu - After you have enabled Nvidia Image scaling, the next thing you should do is to ensure that the game is using the correct resolution.
- Do this by ensuring that the game is running in full-screen mode.
- From the in-game settings, select the desired resolution – after selecting the resolution, the NIC feature will automatically upscale the lower render resolution to your display native resolution, then apply a sharpening effect.
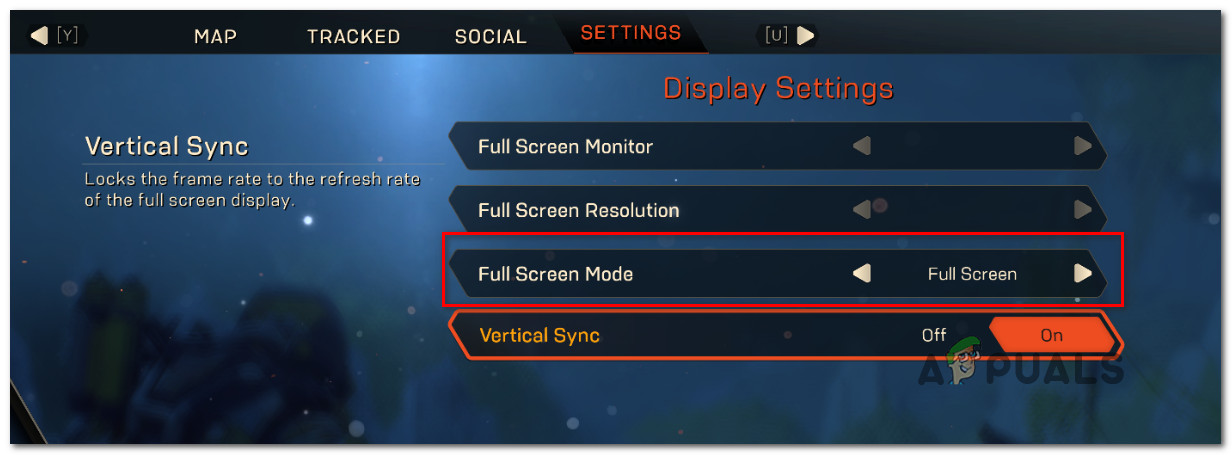
Note: You can confirm that NIS is active by checking the overlay indicator for the NIS text label. A green text color will indicate that NIS is currently active and scaling and sharpening the game.
Enable NIS from GeForce Experience
If you want an easier approach, you’ll be pleased to know that GeForce Experience automates the manual process of changing resolutions per game. On top of this, you can also use GeForce Experience to easily adjust the in-game sharpness slider for real-time customization.
Follow the instructions below for the step-by-step guide to enabling NIS via GeForce Experience:
- First things first, you need to ensure that you have no game capable of leveraging NIS running in the background.
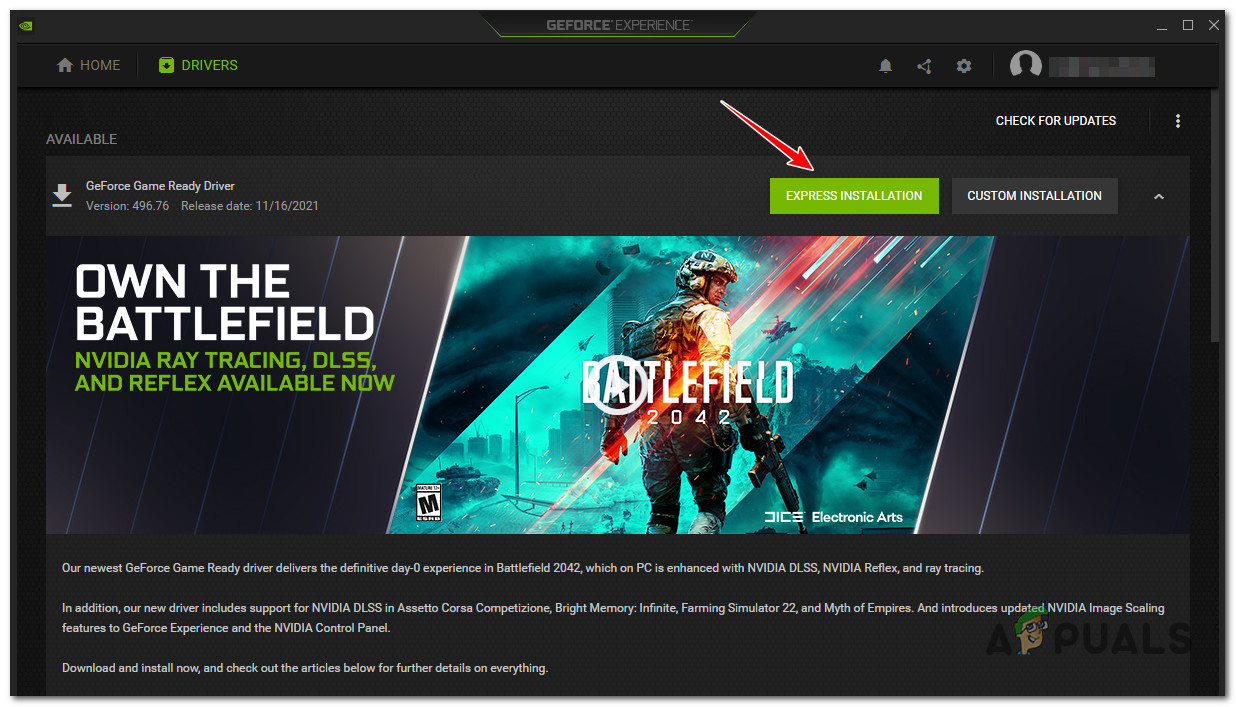
- Next, open Nvidia Experience and make sure that Experimental Features are enabled. To do this, click on the About box, then check the box associated with Enable experimental features.
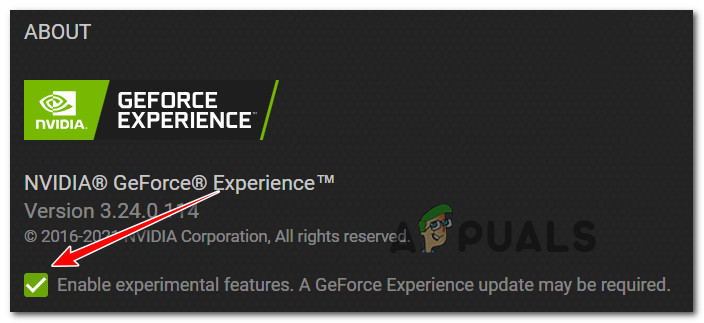
Enable Experimental Features in Nvidia Experience Note: After you make this change, you will need to restart as GeForce Experience might need to update itself in order to make the Nividia Image Scaling solution available.
- Once the experimental version of GeForce Experience is downloaded, reboot the application one final time before accessing the Settings menu.
Accessing the Settings menu of Nvidia Experience - Once you’re inside the Settings menu, you should see a new Image Scaling tab option on the bottom part of the screen.

Accessing the Image Scaling tab Note: If it’s not enabled by default, you can make the Image Scaling tab visible from the Settings button of the ‘In-Game overlay’ section.
- Once the NVIDIA Image Scaling option is activated, click on Optimize popup that appears on the bottom-left screen right after you enable the option.
- Click on Optimize to instantly optimize your in-game settings for NIS.

Enable Image Scaling - Going this route will ensure that you instantly optimize all NIS-supported games (1000+) that are currently installed on your system.
Note: If you have an RTX-ready GPU, GeForce Experience will also enable NVIDIA DLSS in supported games instead of NIS since it’s the better scaling solution and will improve the visuals and performance of the games that you render with the Nvidia GPU.
Alternatively, you can also enable the NIS solution from the in-game menu (if the game supports it). By pressing Alt +F3 while playing the game, you can manually adjust the degree of sharpening during your gameplay sessions. This will enable you to spot the difference in image clarity between different values.
3. Set the game to Full-Screen mode
If none of the methods above have allowed you to enable NVIDIA Image scaling, you should proceed by ensuring that the game you are attempting to play via the NIS solution is actually running in full-screen mode.
IMPORTANT: The Image Scaling feature will only work natively when the game is set to run in Full-Screen mode. You will not be able to get this NIS to enable automatically if the game is set to run in Borderless, Windowed, or Fake Full-screen mode.
So in order to ensure that Nividia Image Scaling is made available, access the in-game settings and switch the game mode to Full Screen.
Alternatively, you can force Full-Screen mode at the game executable level by doing the following:
- Navigate to the location where the game is installed or to the desktop shortcut.
- Right-click on the desktop shortcut or the game executable and choose Properties from the context menu.
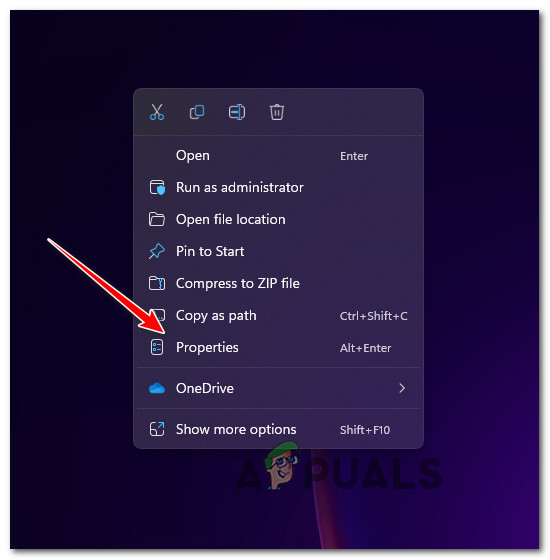
Accessing the Properties screen for the game - Once you’re inside the Properties screen of the game, access the Shortcut tab from the menu up top.
- Next, expand the drop-down menu associated with Run and change it from Normal window to Maximized.
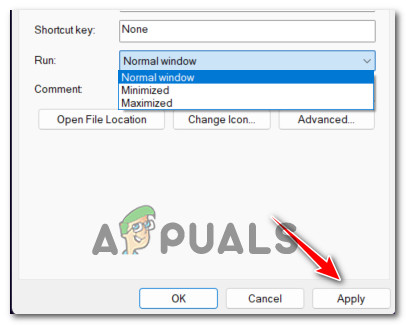
Force Fullscreen on the game executable - Click Apply to save the changes.
- Launch the game once again and see if the NIS icon appears at the top section of your overlay bar.
Note: Some game developers (particularly Microsoft studios) will actually use a modified (fake) version of fullscreen that’s actually borderless fullscreen. This is the preferred option for some game developers in order to facilitate seamless transitions when gamers use the Alt + Tab functionality.
If the game you are attempting to play with NIS enabled uses ‘fake fullscreen’, the NIS feature will remain disabled unless the game and the desktop use the same resolutions.
For step-by-step instructions on ensuring that the desktop resolution & in-game resolution are equal, follow the next method below.
Set desktop resolution equal to the in-game resolution
In case the game you are attempting to play with NIVIDA Image scaling does not support the classic Full-Screen mode, the feature won’t start natively.
In this case, the only way to force NIS into enabling itself is to make sure the resolution is the same as the in-game resolution.
If none of the methods above worked in your case, this is the last resort method that won’t require you to get technical.
Follow the instructions below to ensure that the desktop resolution and the in-game resolution are equal:
- First, right-click on a free space on your desktop and click on Display Settings.

Access the Display Settings menu - Once you’re inside the Display screen, scroll all the way down to the Scale & Layout category and set the highest resolution available.
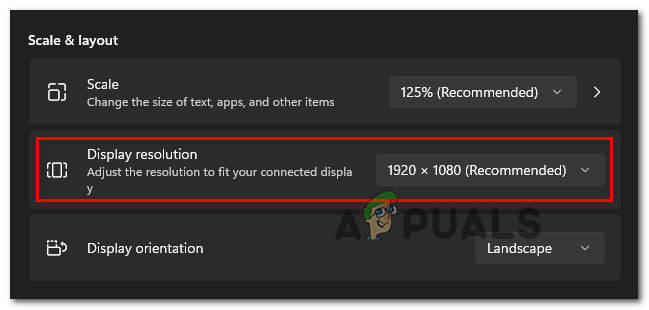
Changing the Display resolution Note: Take note of the resolution that you set at this stage since you’ll use it in the steps below.
- At the confirmation prompt, confirm as instructed and wait until the resolution is changed accordingly.
- Next, open the game and access the Settings tab and adjust the resolution (typically under the Graphics tab) to the same resolution as your desktop.
- Save the changes, then restart the game and test to see that NIS is now enabled.
In case the NIS functionality used to work but after an update, it no longer enables automatically, try the next method below.
5. Restore NIS after GPU Update (if applicable)
As it turns out, NIS (Nvidia Image Scaling) was partially discontinued for some NVIDIA GPUs after a driver update was released at the end of 2021.
In case you followed every method above and none of them allowed you to enable the NIS functionality, there’s one more thing you can try.
As some affected users have pointed out, you can actually get the old NIS functionality back even on GPU models where it’s deprecated by doing a small modification via Registry Editor.
Note: If you decide to go for this method, our recommendation is to back up your Registry in advance. This will save you from reinstalling Windows in case you make a mistake during this procedure.
Follow the instructions below to restore the NIS functionality for GPUs where it’s deprecated:
- Press Windows key + R to open up a Run dialog box.
- Next, type ‘regedit’ inside the Run dialog text box, then press Ctrl + Shift + Enter to open Registry Editor with admin access.
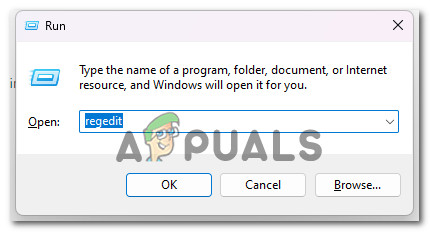
Accessing the Regedit screen - When you are prompted by the User Account Control, click Yes to grant admin access.
- Once you’re inside the Registry Editor, use the left-hand menu to navigate to the following location:
HKEY_LOCAL_MACHINE\SYSTEM\CurrentControlSet\Services\nvlddmkm\FTS
Note: Additionally, you can paste the path directly into the navigation bar at the top and press Enter to get there instantly.
- Once you’re inside the correct location, make sure that the FTS key is selected, then move over to the right-hand section and double-click on the EnableGR535 value.
- Inside the EnableGR535 value, set the Base to Hexadecimal and the Value data to 0 before clicking Ok to save the changes.
- Once this change has been restored, close the Registry Editor and reboot your PC in order to allow the changes to take effect.
- After your PC boots back up, start the game and see if NIS is now running normally.
If this method is not applicable as NIS is not deprecated in your situation, move down to the next method below.
6. Disable HDR (if applicable)
If the methods above haven’t fixed your screen flickering issue, HDR might be the problem. If you have a low-end display, partial HDR support might be causing this behavior.
Some users who were also having this issue found that the NIS feature finally started automatically after they disabled HDR in the Settings menu.
It seems that Nvidia Image Scaling can interfere with HDR in some cases. This varies depending on your GPU and display. If you think this might be the problem, try turning off HDR and see if NIS works properly.
If you think this scenario applies to you and you have HDR enabled, follow the instructions below to turn it off and see if that solves the screen flickering issue:
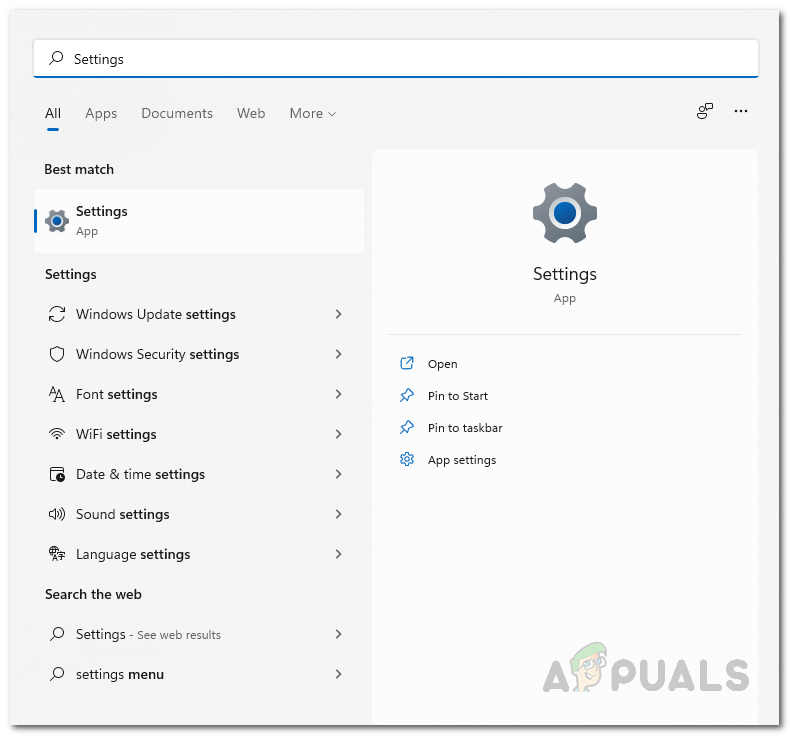
- Start by finding the Windows icon in your taskbar.
- Click on it to open up the Start menu.
- From the next menu, locate and click Settings from the list of available options.
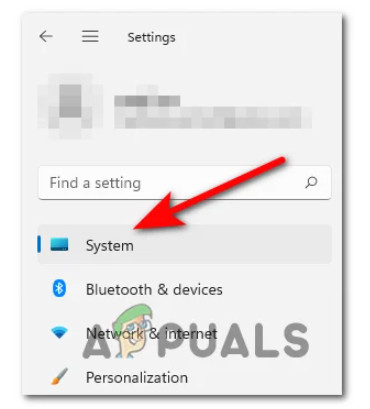
Accessing the Settings menu - Clicking on System from the side menu will take you to the next page.
Accessing the System menu - Find the System tab, then look for the Display menu from the menu on the left-hand side of the screen.
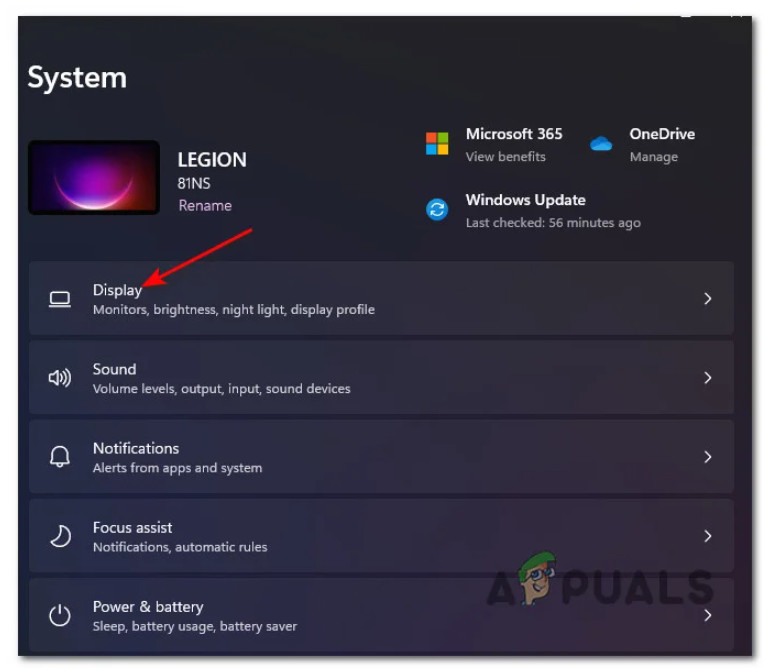
Opening up the Display tab from the Settings menu - Finally, scroll down to the bottom of this page and click on HDR.
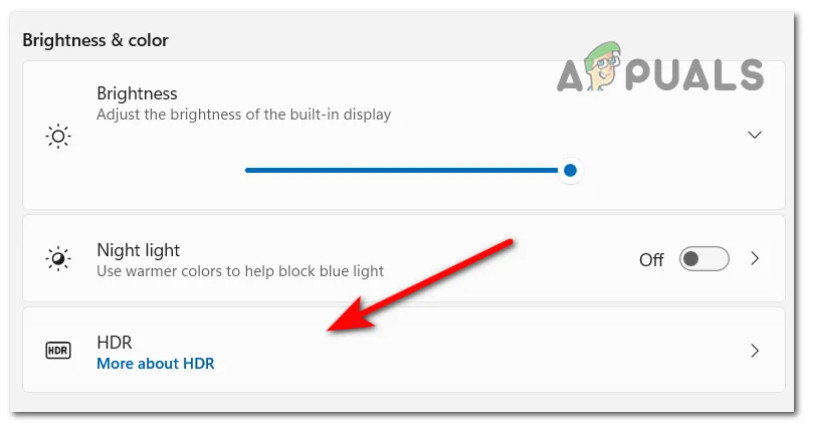
Accessing the HDR menu - When you’re inside the HDR menu, change the setting to OFF, then save your changes.
- Remember to close the Settings menu and restart your computer to see if these changes have restored the Nvidia Image Scaling feature on your PC.
If this method didn’t fix the problem in your case, move down to the next potential fix below.
7. Disable Integer scaling
If you’ve come this far without a viable fix, another feature that you should investigate whether it’s conflicting with NIS (Nividia Image Scaling) is Integer Scaling.
Note: Integer Scaling is a scaling method available on both Nvidia and AMD GPU that works by scaling low-resolution on-screen images from one pixel to four pixels or more. The result is a crisper, yet the still pixelated image that’s scaled up to fit the display. Although Integer Scaling should not be the preferred approach when gaming, this scaling technology still produces good results with legacy games.
If you already have Integer Scaling enabled and you are looking for ways to enable NIS, chances are you’ll need to let go of one of them.
Typically if you’re playing legacy games (classic games), you should use integer scaling. If you’re playing modern games, NIS is the better option in case DLSS is not an option for your GPU.
If Integer Scaling is already enabled on your PC and you’re looking for a way to disable it in order to prevent a potential conflict with NIS, here’s what you need to do:
- Right-click on a free space on your desktop and select Nvidia Control Panel from the context menu.

Accessing Nvidia Control Panel Note: In case you are on Windows 11, you need to click on Show More Settings before you’ll see the classic Context menu where Nvidia Control Panel is accessible.
- Once you’re inside Nvidia Control Panel, use the menu on the right to expand the Display cluster of options.
- Next, if Integer Scaling is supported, you’ll find it as the fourth option.
- Simply click on Integer Scaling once, then set its associated toggle to OFF in order to disable it.
- Once Integer Scaling is disabled, reboot your PC and see if Nvidia Image Scaling starts working for your games the next time you boot up your computer.
If this method didn’t fix the problem in your case or this guide was not applicable, follow the next potential fix below.
8. Update GPU Drivers & remove remnant data
This problem can also arise if you’re using an outdated or deprecated GPU driver that is incompatible with NIS. Many users who have experienced this issue have reported that the NVIDIA Image Scaling feature began working properly after they updated their driver to the latest version available.
You might expect to start dealing with this issue after a false positive end up forcing your Antivirus to quarantine some files or dependencies belonging to the GPU driver or after you’ve neglected to update your GPU driver for a long time.
Some users that we’re also having trouble getting the NIS feature to enable automatically for their Nvidia GPU have confirmed that the issue went away entirely after they uninstalled every Nvidia component, then used Display Driver Uninstaller + CCleaner (or similar tool) to remove any dependency before clean installing the latest compatible GPU driver version.
If you’re looking for step-by-step instructions on how to do this, follow the instructions below:
- First things first, press the Windows key + R to open up a Run dialog box.
- Inside the dialog box that just appeared, type ‘appwiz.cpl’ inside the text box and press Ctrl + Shift + Enter to open up the Programs and Features menu with admin access.
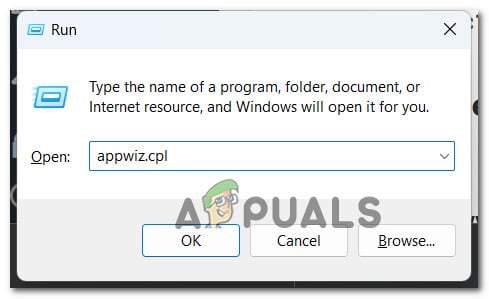
Open up the Programs and Features menu - Once you are promoted by the User Account Control (UAC) menu, click Yes to grant admin access.
- After you’re finally inside the Programs and Features menu, go ahead and click on the Publisher column in order to sort every installed program properly.
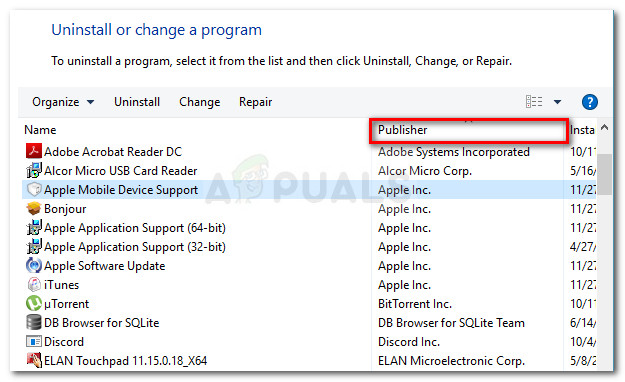
Sort programs via their Publisher - Next, go ahead and uninstall every Nvidia component (published by Nvidia Inc) including GeForce Experience PhysX System and everything else published by NVIDIA. You can prompt an uninstall by right-clicking on every NVIDIA item and choosing Uninstall from the context menu.
Uninstall every NVIDIA dependency Note: During the process of uninstalling every associated NVIDIA dependency, you’ll see your screen flickering a bunch of times. Don’t stress it as this process is completely normal.
- Once you successfully manage to remove every NVIDIA program and associated dependency, go ahead and restart your PC in order to allow the generic GPU drivers to click into action.
- After your PC boots back up, use software like CCleaner or BleatchBit in order to ensure that you don’t have any program dependencies from NVIDIA that might interfere with the new driver installation.

Using CCleaner - Next, it’s time to ensure that there are no driver-specific dependencies left behind by the previous NVIDIA drivers. To ensure that’s not the case, download and install the latest version of Display Driver Uninstaller.
Using DDU Note: This is a tool that will allow you to remove any trace and dependency left-over by a previous GPU driver installation.
- Follow the on-screen prompts to deploy it on your system. Keep in mind that you will be pointed to reboot in Safe Mode at some point in order to increase the likely hood of success. Do so as instructed by opening the Start menu and clicking on the Power button, then holding the Shift key while clicking on the Restart button.
Restart in Safe Mode - After your PC finally boots in Safe Mode, open the Display Driver Uninstaller once again and click on Clean and Restart. After a few moments, your PC will restart again and begin cleaning the necessary files.
- Once the DDU utility has finished cleaning all your previous GPU files, visit the official Nvidia Driver Download page and download the latest compatible driver for your GPU.
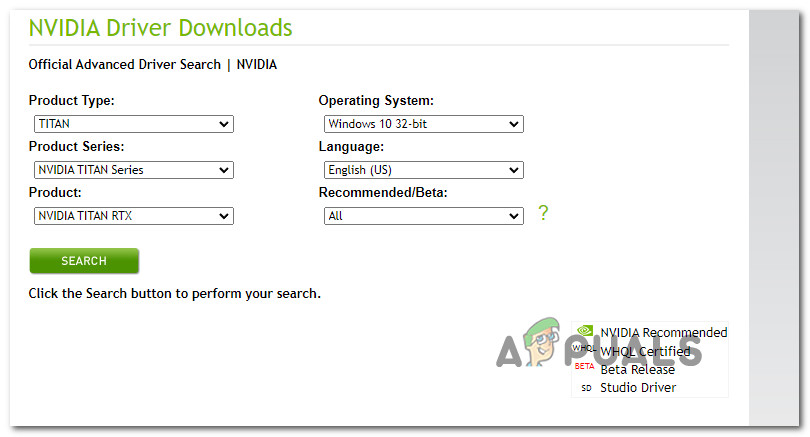
Downloading the latest Nvidia Driver - Make sure to select the correct Product Type, series, and operating system. Stay away from Recommended or Beta drivers unless you are playing legacy titles.
Note: Additionally, you can use Nvidia Experience in order to automate this process and leave the utility to pick the best driver according to your GPU model. - Once the executable of the driver that needs to be installed is downloaded locally, open it with admin access, then follow the on-screen instructions to complete the installation of the driver.
Install the Nvidia Driver - Once the new driver version is installed, launch a game and see if NIS (Nividia Image Scaling) now starts automatically.
If the same kind of issue is still occurring despite uninstalling the latest driver (or you already had the latest version installed), move down to the final potential fix below.
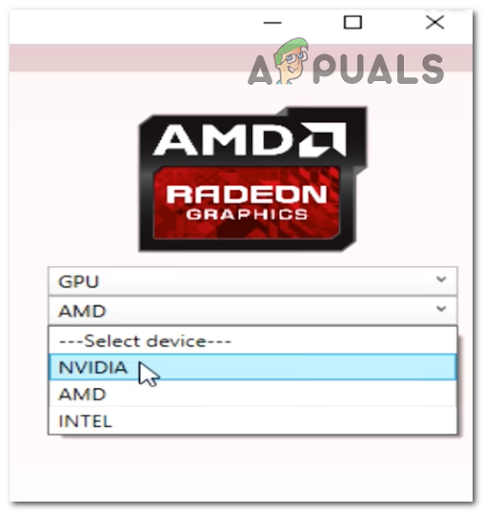
9. Force the game to be rendered in discrete mode
Before you write this scenario off as an impossibility, another potential explanation is that your PC is actually configured to run the game using integrated graphics rather than the NVIDIA discrete GPU. This might happen with certain older games. If that’s the case, you can fix the problem by changing the settings in the Nvidia Control panel to force it to use the dedicated GPU.
It appears that this problem is quite common for users who are trying to start the game from a gaming laptop using an Nvidia dedicated GPU. In this case, the inability of NIS to start is most likely due to the fact that the Nvidia Control Panel is labeling the game executable as a utility app and decides to use the integrated GPU to run it (instead of the dedicated option).
If this scenario applies to you, you can fix the problem by accessing your Nvidia Control Panel window, going to the 3D Settings menu, and forcing the usage of the dedicated GPU every time you launch that particular game:
Here’s a quick guide on ensuring that you’re using the high-performance GPU for the game where NIS remains disabled:
- On your desktop, right-click on free space and choose the Nvidia Control panel from the newly appeared context menu.

Access the Nvidia Control Panel - Once you’re inside the Nvidia Control Panel, expand the 3D Settings and select Manage 3D Settings.
Managing the 3D settings - Move over to the right-hand pane and start by clicking on the Program Settings tab.
- Click on the Add button, then use the Browse button to find and select the game executable that is giving you trouble. With the correct executable selected, click on Add Selected Program.
- Next, under ‘Use Selected Graphic Processor for this program‘, choose High-Performance Processor (Dedicated GPU).
- Save the changes, then restart your PC and see if the problem is fixed once the next startup is complete.
If the problem is still not resolved, move down to the next method below.
10. Disable Optimus (if applicable)
If you have Nvidia Optimus enabled on your PC and you don’t actually use it to switch between your GPUs, disabling it might resolve the issue automatically as many affected users have reported.
Note: Nvidia Optimus is a proprietary Nvidia GPU switching technology that facilitates instantaneous and seamless switching between different GPU solutions while an application is opened. This technology is typically reserved for gaming laptops that have both an integrated (battery-saving GPU) and a dedicated (gaming GPU).
While this technology is very good in theory, a lot of users are reporting that it ends up conflicting with the Nividia Image Scaling technology.
If you have Nvidia Optimus enabled on your laptop and NIS insists on remaining disabled despite the fact that you tried every method above, try disabling the Optimus software and see if the problem is fixed.
Now, depending on which gaming laptop you use, the instructions on disabling Optimus will be different. To make matters easier for you, we’ve put together a list of sub-guides that should guide you through this process.
Razer Laptops
If you’re experiencing this issue on a Razer laptop, the way to disable Nvidia Optimus is via the Razer Synapse Software.
Open it and go to the System menu at the top, then click on the Performance tab. Once you’re inside, change the setting under GPU mode to Dedicated GPU Only.
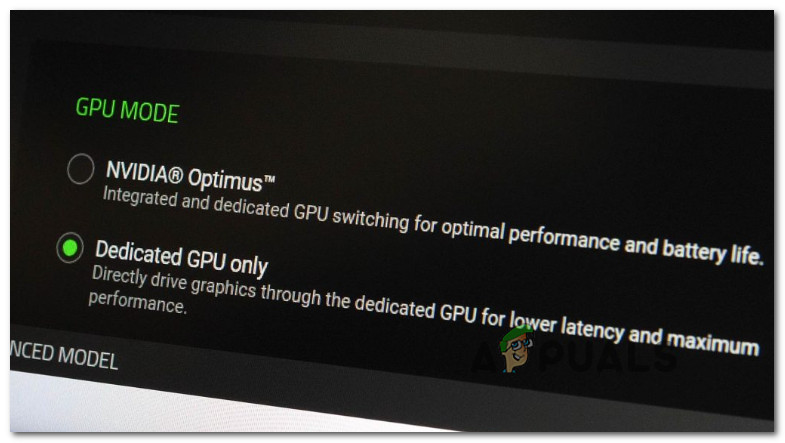
Once you’ve made this change, a reboot is required in order to complete the process.
Tongfang / Eluktronics / XMG / Aftershock Laptops
All of these laptop brands use the same Control Center software. Among other things, you can use the Control Center software to access the General Settings and you’ll find an option named Disable Nvidia Optimus (among the bottom section of the screen.

Once you make this change, reboot your PC in order to allow these changes to take effect.
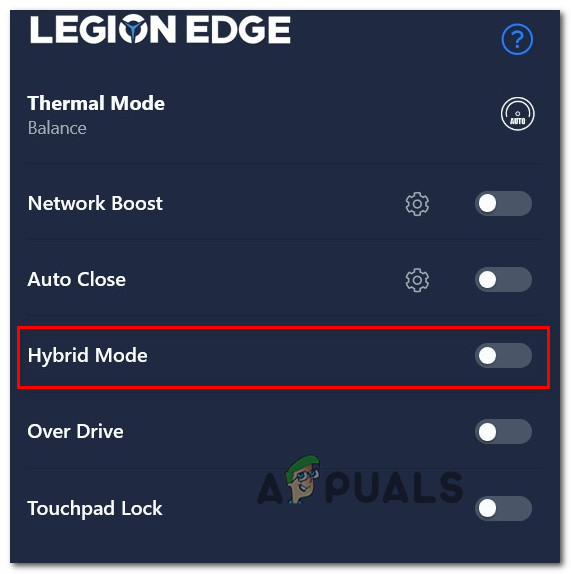
Lenovo Laptops
If you’re using a Lenovo laptop, you’ll need to use the Lenovo Vantage software in order to disable Nvidia Optimus. Open up the utility, then use the right-hand bar on the right section.
This might be a bit confusing since the setting that allows you to disable Nvidia Optimus is actually called Hybrid Mode – Hybrid Mode OFF means that Nvidia Optimus is disabled.
Once you have disabled Hybrid Mode (Nvidia Optimus) on your Lenovo laptop, reboot your PC and allow the changes to take effect.
MSI Laptops
MSI laptops will use a proprietary tweaking software called MSI Dragon Center. This is the one tool that will allow you to disable Nvidia Optimus from kicking into action.
To do so, open MSI Dragon Center and access the General Settings from the menu on the left. Next, move over to the right-hand pane and expand the GPU Switch drop-down menu, and set it to Discrete Graphics Mode.
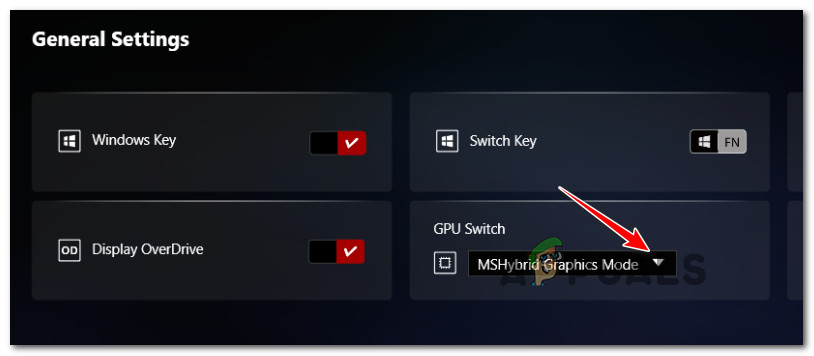
Note: If the GPU Switch menu is set to MSHybrid Graphics Mode, it means that Nvidia Optimus is enabled.
Once you make this change, reboot your PC in order to allow the changes to take effect.
HP Laptops
HP is no stranger to forcing gamers to use their proprietary tools. In order to disable Nvidia Optimus from an HP gaming laptop, you need to install the Omen Gaming Hub software.
Once you’re inside the utility, access the Graphic Switcher tab (from the ribbon bar at the top), then you’ll have the option to choose between Hybrid and Discrete modes.
Hybrid means that Nvidia Optimus is Enabled while Discrete means that Nvidia Optimus is always Disabled as the dedicated GPU is always preferred. You need to choose Discrete.
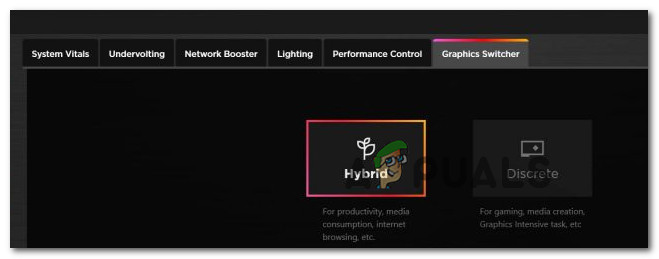
After you’ve made this change, reboot your PC in order to allow the changes to take effect.
Dell Laptops
Unlike every other gaming laptop manufacturer featured so far, Dell does NOT have a front end software that will allow you to quickly disable the Nvidia Optimus functionality.
The only way to do it if you’re using a Dell laptop is to boot into your BIOS (power on and keep pressing F2) as soon as you see the initial screen.
Once you’re finally inside the BIOS settings of your Dell laptop, access the Advanced tab and set the Enable Hybrid Graphics / Advanced Optimus (when available) to Disabled.
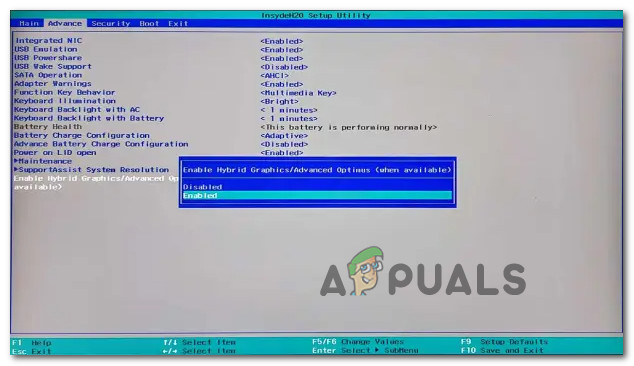
Once you’ve followed the instructions above, save the changes, then boot normally in order to allow your Dell laptop to enforce the changes you’ve just operated.
ASUS Laptops
If you’re using an ASUS laptop, you should install the ASUS Armory Crate Software (if you don’t already have it installed). This is the front-end software that will allow you to toggle Nvidia Optimus OFF in order to prevent it from conflicting with the NIS feature.
Open the ASUS Armory Crate Software and go under the System Configuration section. From there, toggle the GPU mode to Discrete Graphics and away from Optimus in order to disable Nvidia Optimus.
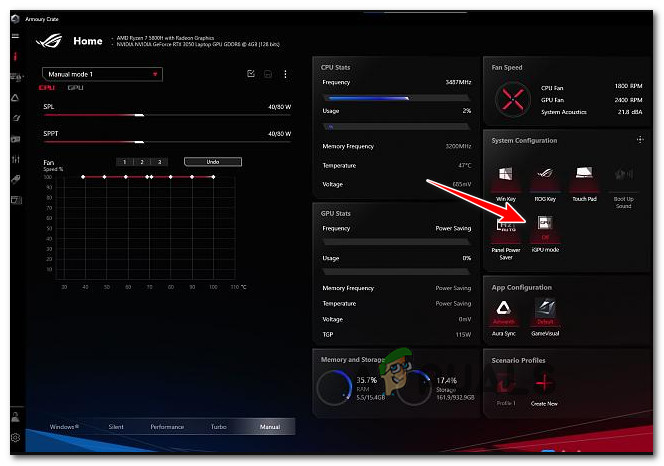
Once you’ve enforced this change, reboot your PC in order to allow the changes to take effect.
Aorus Laptops
Even if Aorus is a lesser-known gaming laptop manufacturer in the west, they do have proprietary front-end software that will allow you to freely toggle Nvidia Optimus On and Off.
What you need to do is open the AORUS Control Center Software and access the Manager tab from the ribbon bar at the top.
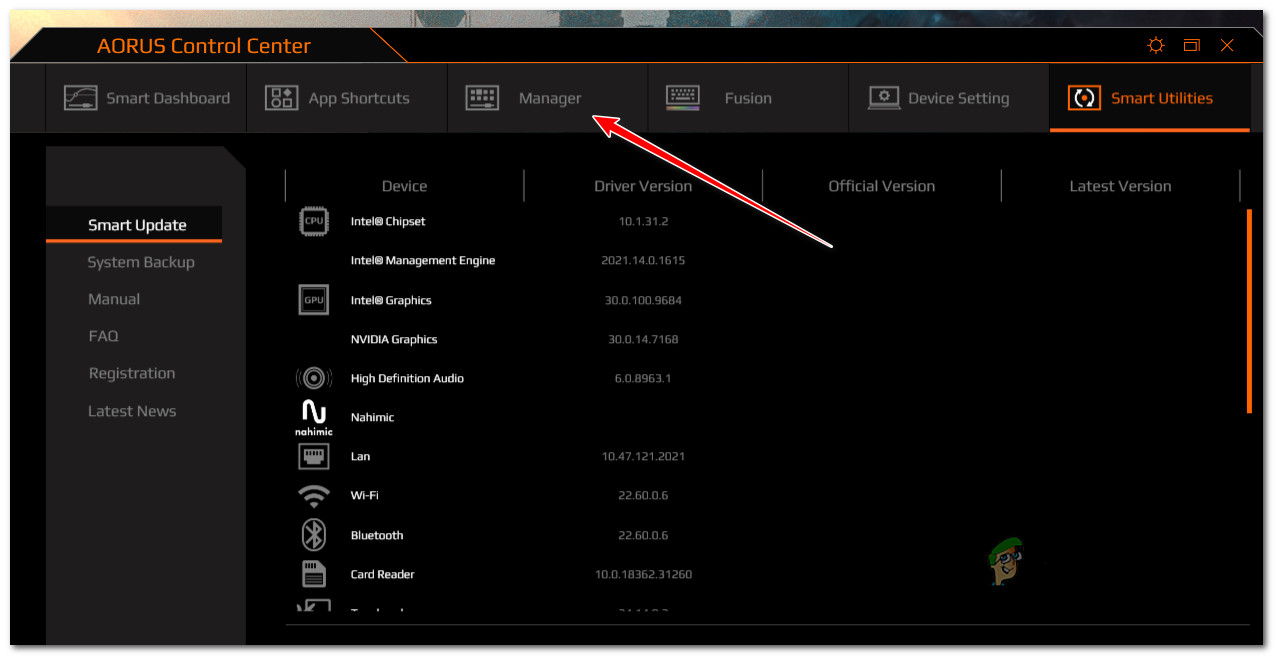
Once you’re inside the Manager tab, access the Graphic Switch option and change it to Discrete GPU in order to disable Nvidia Optimus.
After you make this change and effectively disable Nvidia Optimus, a restart is required in order to enforce the new GPU behavior.
Alienware Laptops
Surprisingly, most Alienware laptops will not be able to use front-end proprietary software in order to disable Nvidia Optimus.
This means that in case you’re using an Alienware gaming laptop, the universal way of ensuring that Nvidia Optimus stays Off is to access the BIOS settings.
Do this by booting your computer and pressing the F2 key as soon as you see the initial screen.
Once you have successfully entered the BIOS settings, access the Advanced tab from the menu at the top. Next, scroll down to the bottom of the screen and Disable the option named as Enable Hybrid Graphics / Advanced Optimus (when available).
Once you’ve made this change, save the BIOS changes, then boot normally and see if the problem is now resolved.
Acer Laptops
If you’re using an Acer gaming laptop, the quickest way of disabling the Nvidia Optimus feature is to use the Predator Sense software.
Open up the front-end software and click on the settings (cog icon) from the top-right corner of the screen.
From the context menu that just appeared, ensures that the Discrete GPU Only setting is turned ON.
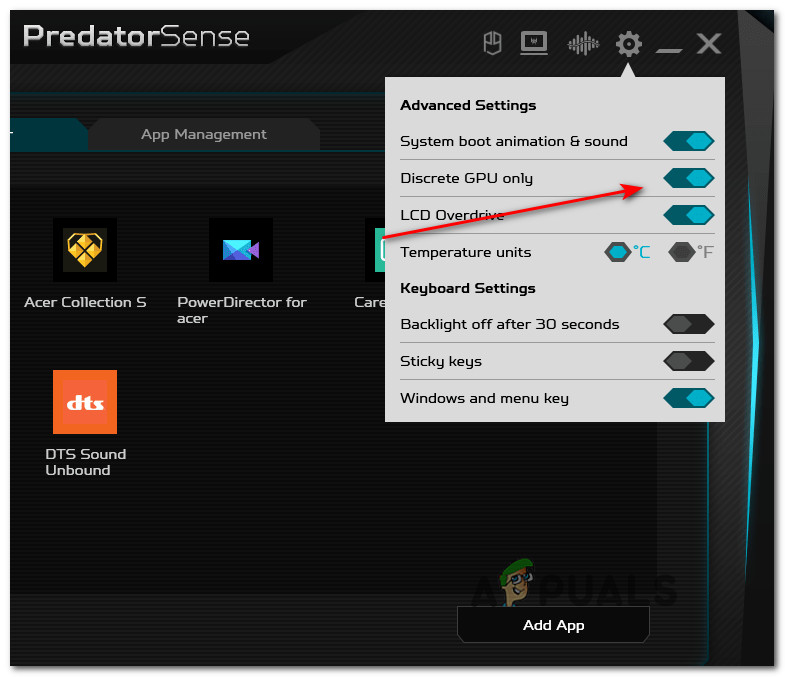
Note: By enabling Discrete GPU Only setting, you’ll ensure that Nvidia Optimus remains disabled.
After you’ve made this change, reboot your PC in order to allow the changes to take effect.
In case disabling Nvidia Optimus did not work for you (or it was already disabled), the only option left is to try an alternative to Nvidia Image Scaling.
ALTERNATIVE: Use a Lossless scaling app
In case none of the methods above have worked or NIS is not directly available due to our motherboard, one alternative is to use an app like the Lossless scaling app.
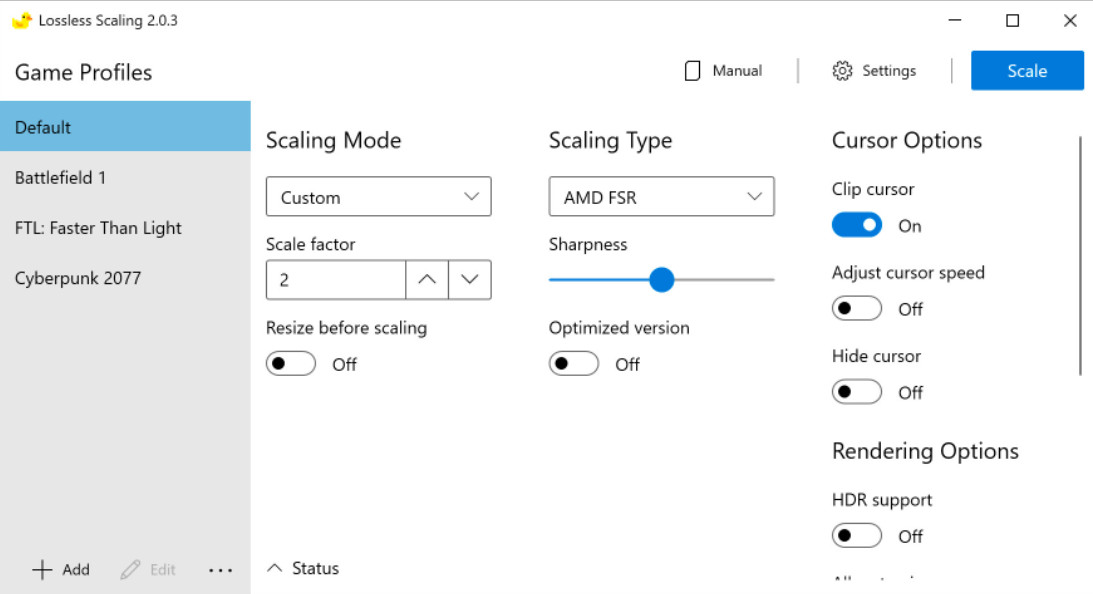
Note: This app lets you scale windowed games to full screen using the same technology made available via NIS (Nividia Image Scaling). Its’ particularly effective when having to do spatial scaling, pixel art scaling, and algorithm-powered sharpening.
This app is available via Steam and it’s the perfect alternative if NIC is not available natively.
But, as with everything, there are a few drawbacks:
- The app consumes more resources and will take away some FPS from your games.
- This scaling solution is basically identical to NIC, but it’s not happening on the driver itself which means that the performance will be lower.
- The app is only available as a free trial – if you want to use it indefinitely, you’ll have to pay $3.99.


