How to Overclock The Refresh Rate of Your Ordinary Old Monitor
As with many of the components in your PC, your monitor can be overclocked by boosting its refresh rate beyond the standard 60 Hz stock settings to enable it to draw more frames per second on the screen. This boosts the display performance of your monitor, making for a pleasurable gaming experience. Those who are in the process of overclocking other components such as the processor and GPU, overclocking the monitor will complement the other overclocking well so that the efforts are not bottlenecked due to a standard operating monitor. Let’s get right to it!
1. Understanding Monitor Overclocking: How Does It Work?
When overclocking a monitor, the aim is to increase the refresh rate beyond the stock 60 Hz setting. Most monitors can be overclocked to a maximum of 80 Hz due to the presence of scalers. QNIX displays, notably, can reach 96 Hz in their refresh rates due to the lack of a scaler in their setup. Note that different GPUs and DIV-D cables can affect the overclocking potential of your device, limiting the maximum refresh rate you may be able to achieve.
Overclocking a monitor is not entirely like the processor or GPU overclocking that most are familiar with. While the two are noticeably similar, there are significant differences to note. Taking a look at the similarities first, an unstable overclock of a monitor will result in distorted displays or the lack of an image altogether. When a processor or GPU is overclocked, such fatal errors signifying improper overclocking are also observed. A key difference in this process, however, is that sometimes a monitor can appear to be displaying properly, giving you an impression of having performed a stable overclock, but behind the scenes, the monitor will in fact be skipping frames.
2. Checking Your Device: Can Your Monitor Be Overclocked?
In short, any monitor can be overclocked. The extent to which its overclocking can be achieved depends upon the specific monitor that you own. As with GPU overclocking, a universal fact to accept is that not all monitors are created equal even if they’re the exact same model and have the exact same specs. This is why overclocking is possible, because due to slight hardware to hardware differences, manufacturers create the hardware with a small adjustable range to account for error, setting a standard operation value within this range which dictates how well your monitor functions.

Your monitor will have the same standard-setting as all other monitors of the same model, but the ranges of each in which that standard value lies will be different. Hence, depending upon the upper bound of that range in your particular monitor, you will be able to overclock it to a maximum accordingly.
Due to this reality of the matter, you should not read success stories of other users and expect your monitor to be able to overclock the same way even if the model and specs of both devices match exactly.
3. Safety Considerations To Keep In Mind
While overclocking a monitor is a fairly simple process that can be executed effectively if you follow all the steps, the procedure does require manipulations to the AMD and NVIDIA drivers on your computer. This is why it is important to be mindful of the actions you’re taking to avoid permanently changing a setting that your computer relies upon to function. For example, such driver manipulations can result in a piece of hardware failing or not working entirely so it is advised to understand the consequences and permanent nature of the steps taken before executing them. This guide is designed with all safety precautions in mind to keep you from making any such fatal errors.
One thing to check in your panel before overclocking is whether the manufacturer has already overclocked your device. If this is the case, overclocking it further puts you at more risk of permanently damaging it or running into a fatal error.
Potential errors or damages to keep in mind include the darkening of the screen, artifacts, lower gamma, and nullification of the warranty on your device (check with your monitor manufacturer or have a look at the warranty terms and conditions to be certain). The impact that overclocking a monitor can have is something that convinces most users to proceed ahead with the overclocking knowing these risks.
Now that you’ve understood how the overclocking works, how it will work on your particular monitor, and acquainted yourself with the potential safety risks involved, let’s get into the overclocking procedure. There are two primary ways to do this. You can either opt for a third party software such as the Custom Resolution Utility or you can overclock it with the built in applications for AMD, NVIDIA, or Intel. All the softwares are free and easy to use. We will discuss all methods in this guide; you may elect to use whichever is more convenient for you.
4. The Custom Resolution Utility Method

The Custom Resolution Utility is one of the oldest softwares used to overclock monitors. Because of this, it is not always compatible with all GPUs, particularly not the integrated Intel graphics cards. It has been seen to work with the AMD graphics cards well, however. You should check the compatibility of your GPU with this software prior to opting for this method.
The first step is to download CRU from here and install it on your PC. Once the installation completes, carry out the following:
- Launch the Application
- There will be two boxes displayed for detailed and standard resolutions. In the detailed resolutions box, click on “add.”
- Click “timing” and select “LCD standard.”
- Now, change the refresh rate to a value that is above the set standard value (likely the stock 60 Hz value). Increment it by 5 Hz to begin and click “OK.”
- Reboot your PC.
- Open Display Settings in Windows 10 by right-clicking on the desktop screen and selecting that option from the menu.
- Click on advanced display settings and find display adapter properties. Click on this.
- Open the drop-down menu in the monitor tab and select your refresh rate.
- At this point, if your overclocking was unsuccessful, your monitor will display a black screen and will automatically change back to the previous settings after 15 seconds. If your adjustment was successful, repeat steps 4 onwards again until you reach the max overclocking refresh rate value if you feel that it has not been reached already. Be mindful to do this in small increments.
5. The AMD Radeon Settings Method
If you have AMD Radeon installed on your device to facilitate your GPU, right click on the desktop and open the AMD Radeon Settings. Perform the following steps:
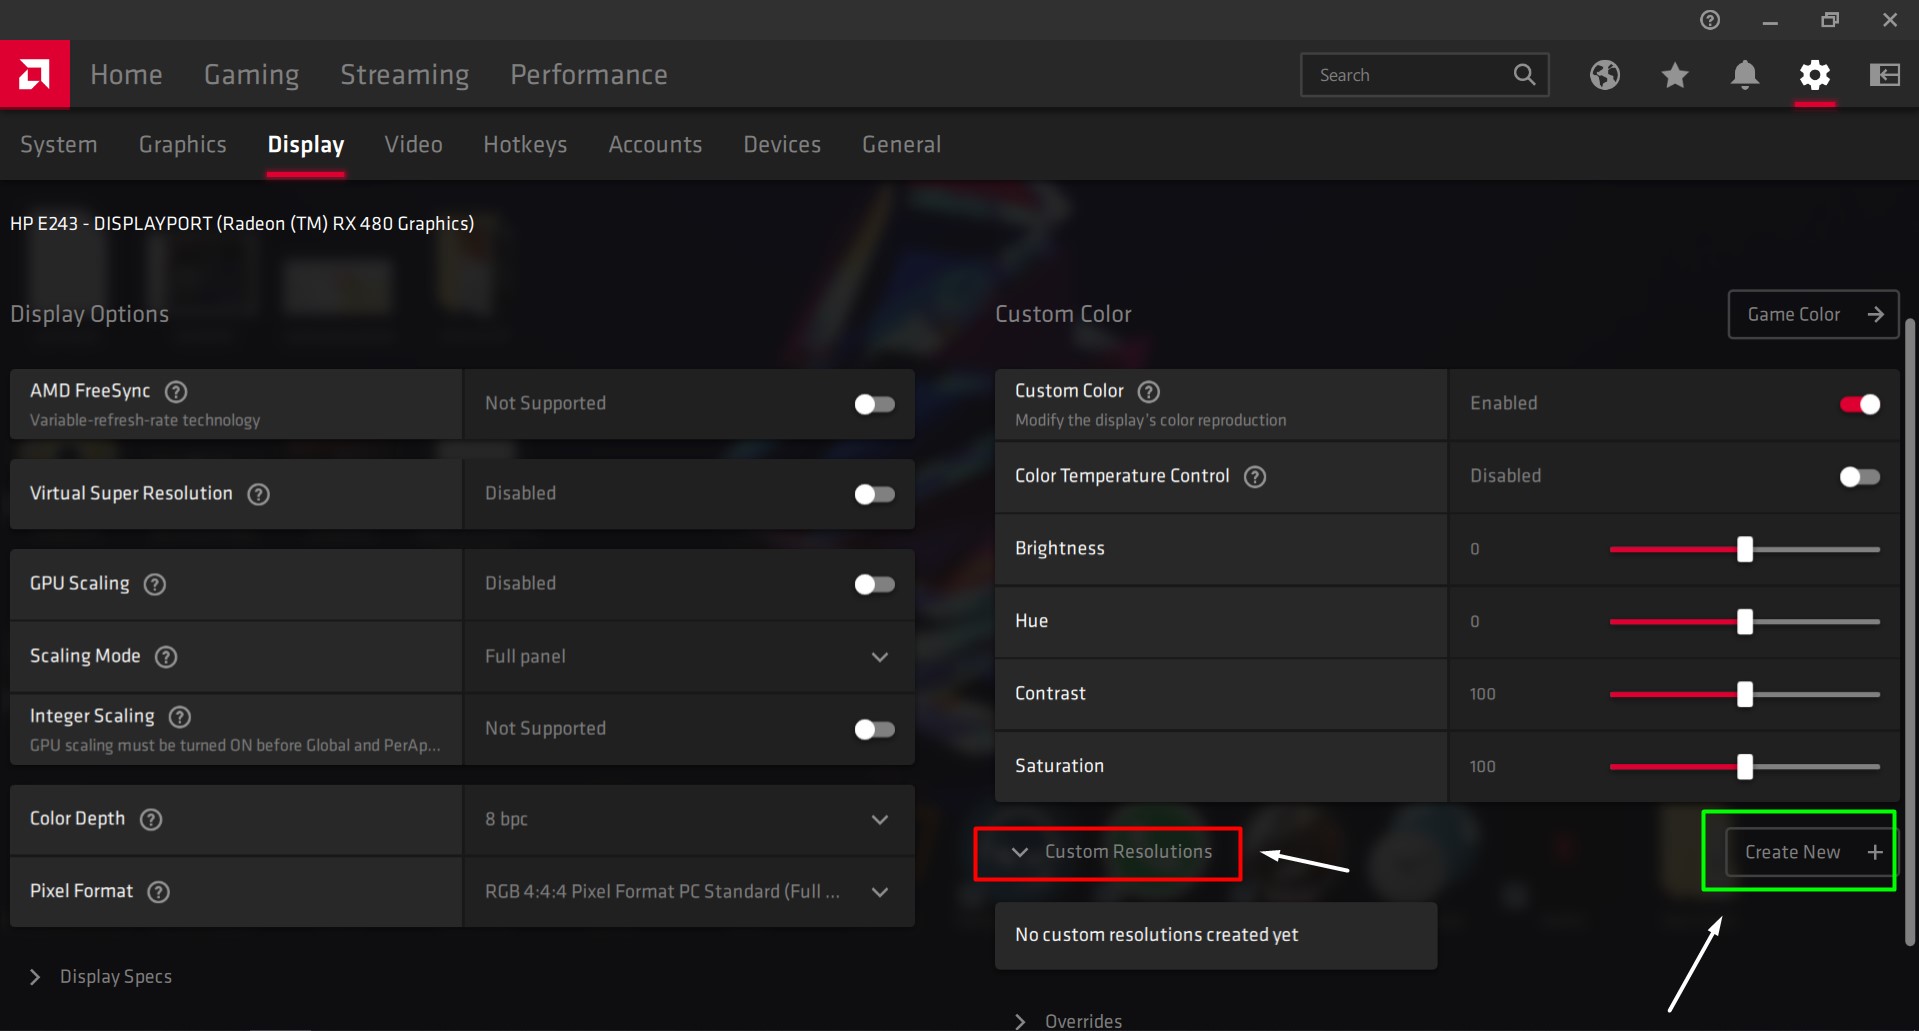
- Open the display tab.
- Click Create. This will be located beside “custom resolutions.”
- Adjust your refresh rate to the value you would like. It is again recommended to increment in 5 Hz adjustments beyond the value that is already in effect.
- Save these settings.
- Reboot your PC.
- Open Display Settings in Windows 10 by right-clicking on the desktop screen and selecting that option from the menu.
- Click on advanced display settings and find display adapter properties. Click on this.
- Open the drop-down menu in the monitor tab and select your refresh rate.
- At this point, if your overclocking was unsuccessful, your monitor will display a black screen and will automatically change back to the previous settings after 15 seconds. If your adjustment was successful, repeat steps 4 onwards again until you reach the max overclocking refresh rate value if you feel that it has not been reached already. Be mindful to do this in small increments.
6. The NVIDIA Control Panel Method
If you have NVIDIA Control Panel installed on your device to facilitate your GPU, right-click on the desktop and open its settings. Perform the following steps:
- Open the display menu.
- Click on change resolution.
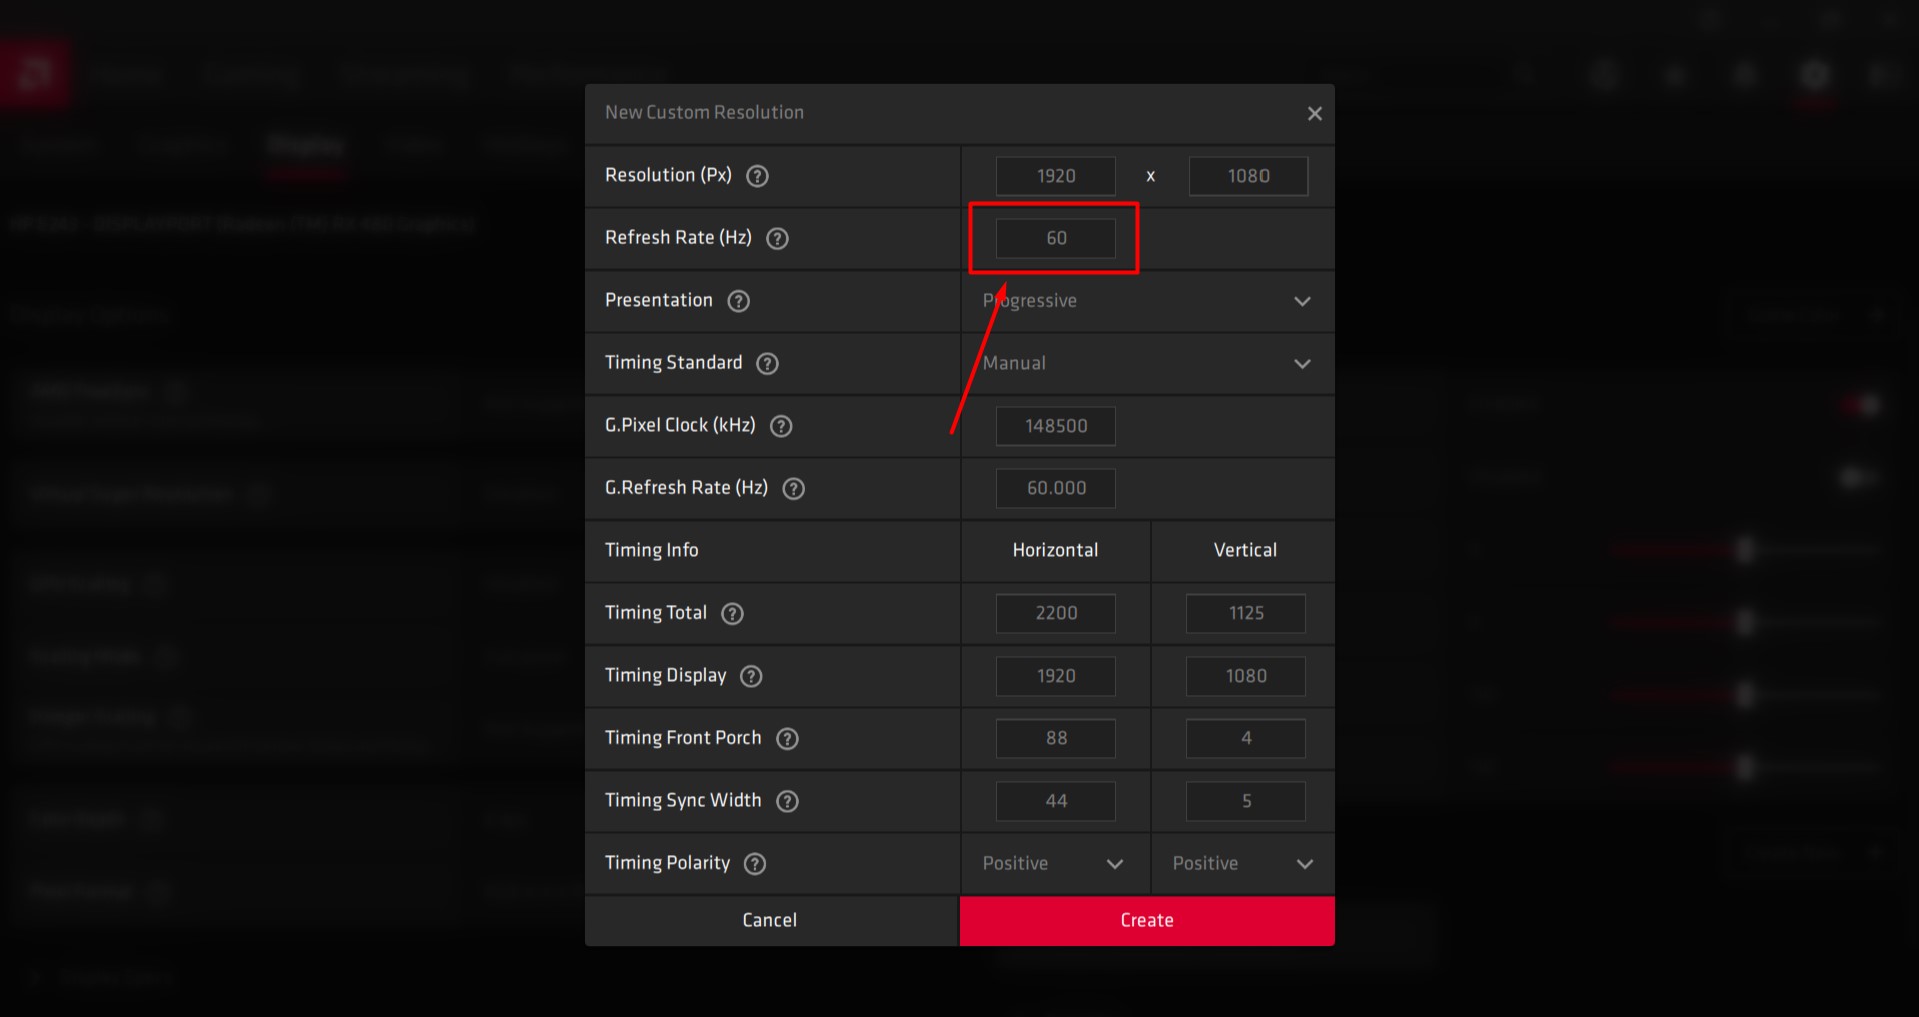
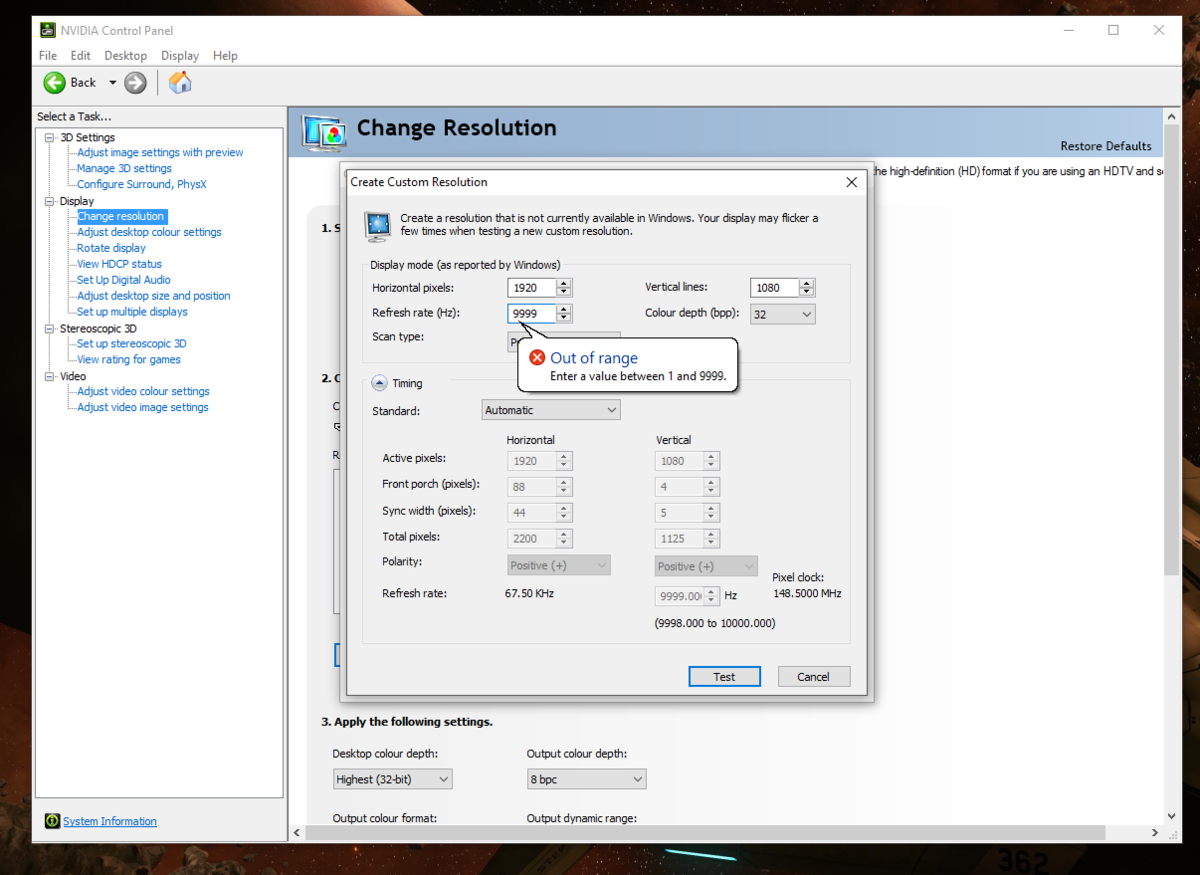
- Click on create custom resolution.
- Adjust your refresh rate to the value you would like. It is again recommended to increment in 5 Hz adjustments beyond the value that is already in effect.
- Save these settings.
- Reboot your PC.
- Open Display Settings in Windows 10 by right-clicking on the desktop screen and selecting that option from the menu.
- Click on advanced display settings and find display adapter properties. Click on this.
- Open the drop-down menu in the monitor tab and select your refresh rate.
- At this point, if your overclocking was unsuccessful, your monitor will display a black screen and will automatically change back to the previous settings after 15 seconds. If your adjustment was successful, repeat steps 4 onwards again until you reach the max overclocking refresh rate value if you feel that it has not been reached already. Be mindful to do this in small increments.
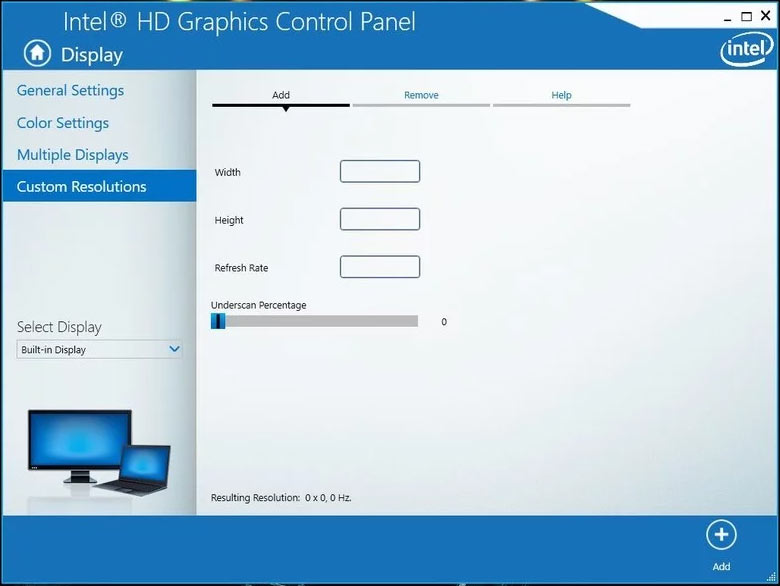
7. The Intel Graphics Control Panel Method
If you have an Intel Graphics Control Panel application installed on your device to facilitate your GPU, press CTRL + ALT + F12 on your desktop to launch the Intel Graphics Control Panel. Perform the following steps:
- Open the display menu.
- Click on custom resolution.
- Add in the width, height, and refresh rate value you would like for this custom profile. Increment the refresh rate no more than 5 Hz from the rate already in effect to carry this procedure out safely.
- Save these settings.
- Reboot your PC.
- Open Display Settings in Windows 10 by right-clicking on the desktop screen and selecting that option from the menu.
- Click on advanced display settings and find display adapter properties. Click on this.
- Open the drop-down menu in the monitor tab and select your refresh rate.
- At this point, if your overclocking was unsuccessful, your monitor will display a black screen and will automatically change back to the previous settings after 15 seconds. If your adjustment was successful, repeat steps 4 onwards again until you reach the max overclocking refresh rate value if you feel that it has not been reached already. Be mindful to do this in small increments.
8. Checking Your Overclock: Did It Work?
To ensure that your overclocking was carried out effectively, open your web browser and run the online test at this link. The steps for carrying this out will be displayed on your browser screen to follow. The test will automatically detect the refresh rate that you have applied.
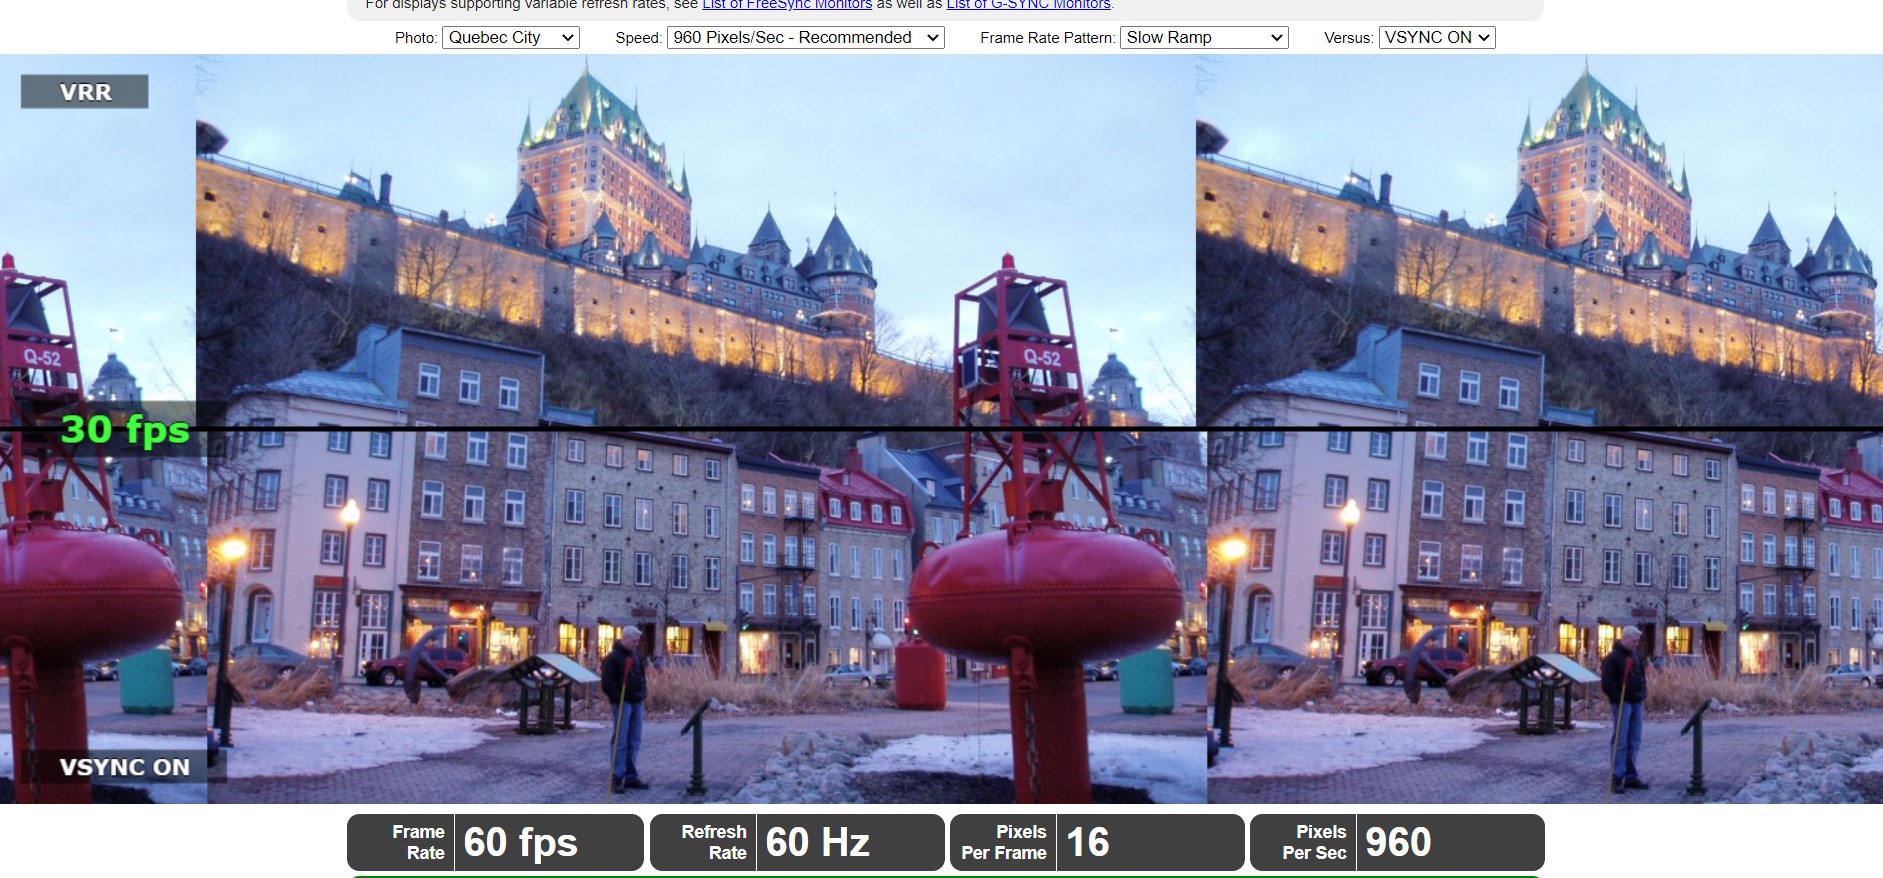
A moving graphic will appear on your screen. Using a camera with low shutter speed, take a photograph of this screen. It will look like the image below. If the grey shaded boxes are in a line and unbroken, then your overclocking has been successful. If the boxes are not in line or are separated, this means that your display is skipping frames and despite it appearing to work find (not running into a fatal black screen), the overclocking is unstable and unsuccessful.
Final Thoughts
As with any overclocking activity, how far you’re able to overclock your device and how well it works depends entirely on your system and varies from device to device even if two are of the same model and specifications. On the whole, this procedure is very simple to execute and relies on the adjustment of a single variable: the refresh rate, unlike processor or GPU overclocking which rely on voltage and multiple clock factors.
Monitor overclocking does not give the same boost in performance as processor and GPU overclocking does. However, having overclocked those other components, overclocking your monitor can enable their potential to shine through. Monitors that do not have scalers, like the QNIX, can be overclocked significantly and will display more notable results.