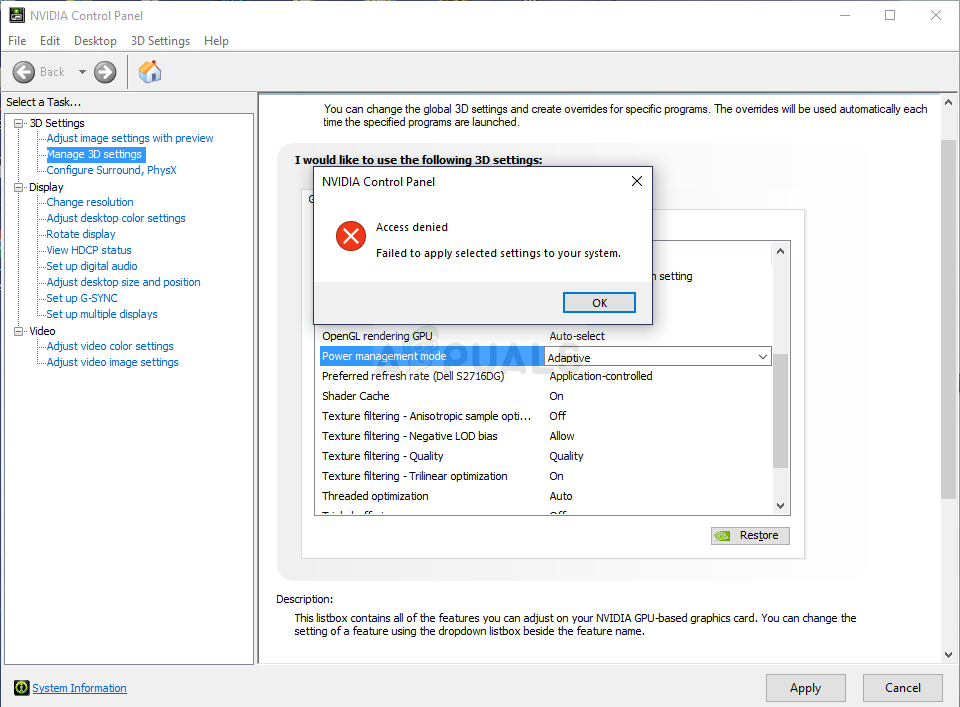
Fix: Access Denied in NVIDIA Control Panel
This problem usually appears when users open the NVIDIA Control Panel but are unable to apply changes they have made within the program. It mostly occurs when trying to change things in the Manage 3D Settings section. Also, it’s highly present when trying to set the default graphics processor for a game on your computer.
There have been many different solutions to the problem over the years and we have decided to gather the most helpful ones and put them together in this article. Follow the methods below in order to resolve the problem!
What Causes the Access Denied error in NVIDIA Control Panel?
There aren’t plenty of issues which may cause this error to occur on your computer. The problem is almost exclusively driver-related and there are several things you can do in order to try to resolve it. Check out the list below:
- The drive may be outdated and in need of an update. Also, if you already have the latest driver installed, you should try to simply reinstall it as its installation may have broken.
- You may be lacking administrator permissions for the NVIDIA Control Panel client. Make sure you provide them for its main executable.
Solution 1: Clean Install of NVIDIA’s Driver
This is quite a straightforward way of resolving the problem and it’s definitely something you should try immediately. Reinstalling the driver won’t do you any harm and it’s recommended that you always have the latest drivers installed. Follow the steps below in order to perform a clean install of the latest NVIDIA driver.
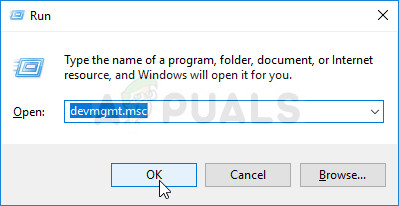
- Click the Start menu button, type in “Device Manager” afterwards, and select it from the list of available results by simply clicking the first one. You can also tap the Windows Key + R key combo in order to bring up the Run dialog box. Type in “devmgmt.msc” in the dialog box and click OK in order to run it.
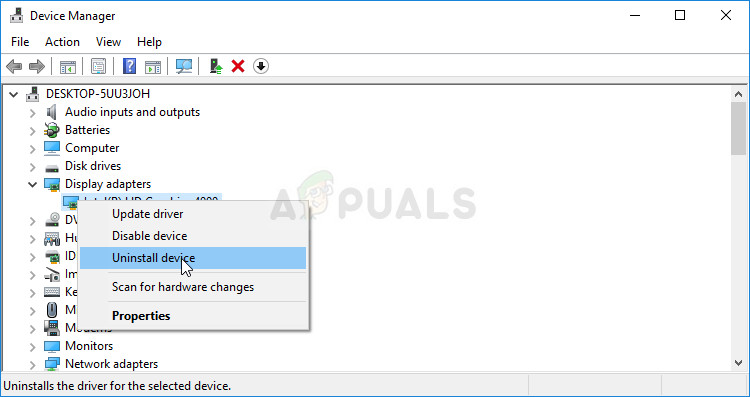
- Since it’s the video card driver you want to update on your computer, expand the Display adapters section, right click on your graphics card and choose the Uninstall Device
- Confirm any dialogues or prompts which may ask you to confirm the uninstallation of the current graphics device driver and wait for the process to complete.
- Look for your graphics card driver on NVIDIA’s official website. Input the required information about the card and your operating system and click on Search.
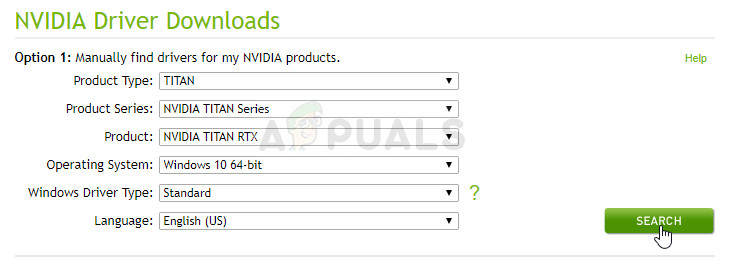
- A list of all available drivers should appear. Make sure you scroll down until you reach the required entry, click on its name and the Download button afterwards. Save it to your computer, open it, and follow the instructions on-screen.
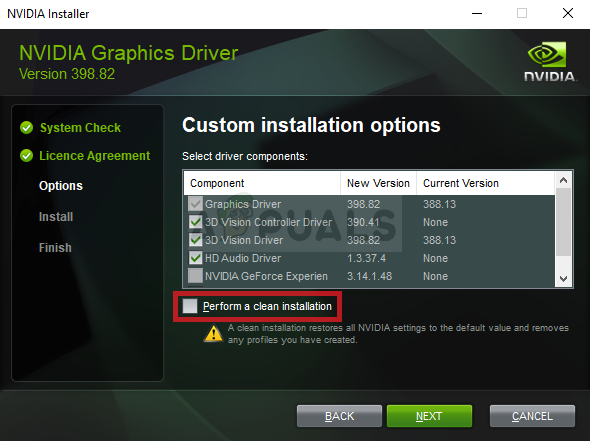
- When you reach the Installation options screen, choose the Custom (Advanced) option before clicking Next. You will be presented with a list of components which will be installed. Check the box next to the Perform a clean installation box and click Next and install the driver.
- Check to see if the problem has been resolved and if NVIDIA Control Panel still displays the Access Denied message!
Alternative: Rollback the Driver
For those who feel uncomfortable looking for the drivers as it can be confusing for casual users since you need to input information about your computer can use an alternative. It involves rolling back the graphics card driver.
This process will look for backup files of the driver which was installed before the most recent update and that driver will be installed instead.
- First of all, you will need to uninstall the driver you currently have installed on your machine.
- Type “Device Manager” into the search field next to the Start menu button to open the device manager window. You can also use the Windows Key + R key combination in order to open the Run dialog box. Type devmgmt.msc in the box and click OK or Enter key.
- Expand the “Display Adapters” section. This will display all network adapters that the machine has installed at the moment.
- Right-click on the display adapter you want to rollback and select Properties. After the Properties window opens, navigate to the Driver tab and locate the Roll Back Driver
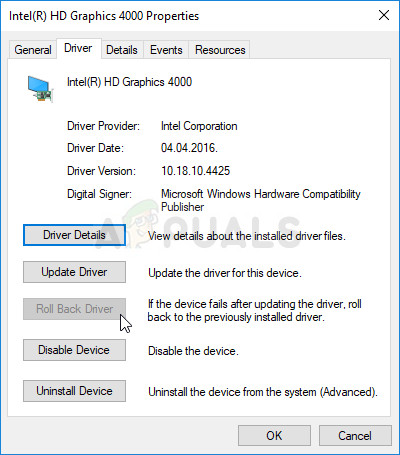
- If the option is grayed out, it means that the device wasn’t updated recently or it has no backup files remembering the old driver.
- If the option is available to click on, do so and follow the instructions on-screen to proceed with the process. Restart the computer, navigate back to the graphics card adapter in Device Manager, right-click on it, and choose Update Driver. Follow the instructions on-screen and check to see if the problem still appears.
Solution 2: Run the Control Panel with Administrator Permissions
Another way of resolving this problem is simply by running the NVIDIA Control Panel client as an administrator. This should prevent the Access Denied problem as the access may be revoked if the program is run without admin permissions. Try it out below.
- Locate the .exe file on your computer by opening File Explorer and navigating to C:\Program Files\NVIDIA Corporation\Control Panel Client. Open its properties it by right-clicking its entry either on the Desktop, Start menu or the Search results window and choose Properties from the pop-up context menu.
- Navigate to the Compatibility tab in the Properties window and check the box next to the Run this program as an administrator option before saving the changes by clicking OK or Apply.
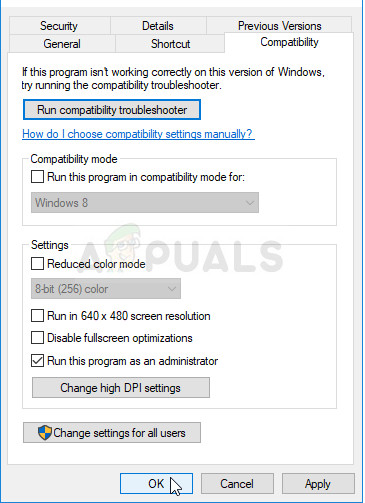
- Make sure you confirm any dialogs which may appear so NVIDIA Control Panel can launch with admin privileges from the next startup. Check to see if the problem still appears afterwards.
Solution 3: Replace the Previous Driver (for users who use System Protection/System Restore)
If you are using System Protection or System Restore on your Windows PC, chances are that the last known working driver files for the NVIDIA graphics card may still be around and you can access them easily. This may not work for everyone if the files aren’t backed up but it can be a good alternative rolling back the driver.
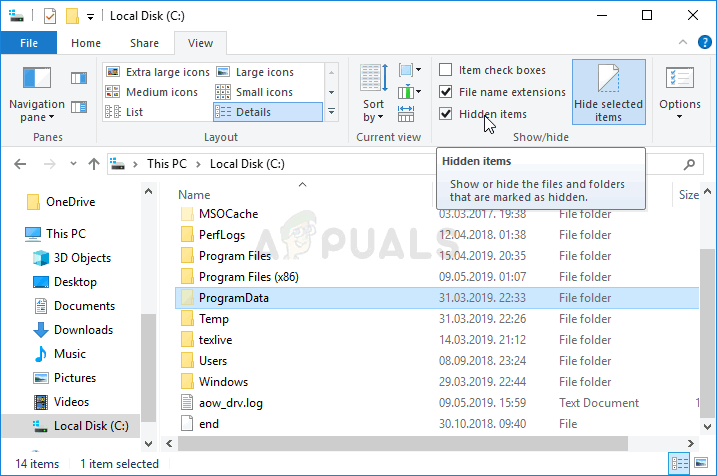
- Open File Explorer by opening any folder and click the This PC option at the left navigation menu. Locate your Local Disk C and navigate to this location:
C:\ProgramData\NVIDIA Corporation\DRS
- If you are unable to see the ProgramData folder, you may need to turn on the option which enables you to view hidden files and folders. Click on the “View” tab on File Explorer’s menu and click on the “Hidden items” checkbox in the Show/hide section.
- Right-click the DRS folder and choose the Properties option from the context menu. Navigate to the Previous Versions tab and look for various folder versions. Choose some of the most recent ones but make sure they date from before the error started to occur.
- Click the Restore button, follow the instructions, and wait for the process to finish. Check to see if the problem regarding Access Denied message in NVIDIA Control Panel has been resolved.


I have a sticker in my laptop saying “Nvidia GeForce 750M”, so, naturally, I went to install that version after trying the uninstalling tip. The installation keeps failing, saying it’s not compatible with this Windows version, when I have Windows 10 (64x) and I’m downloading the supposedly correct version… what am I doing wrong?