Fix: “Unable to join the network” Ring Doorbell Issue
 Reviewed by Muhammad Zubyan
Ring video doorbells won’t work if they are unable to join a WiFi network. This means that you can neither stream live audio and video feeds, nor will you receive any security alerts or notifications.
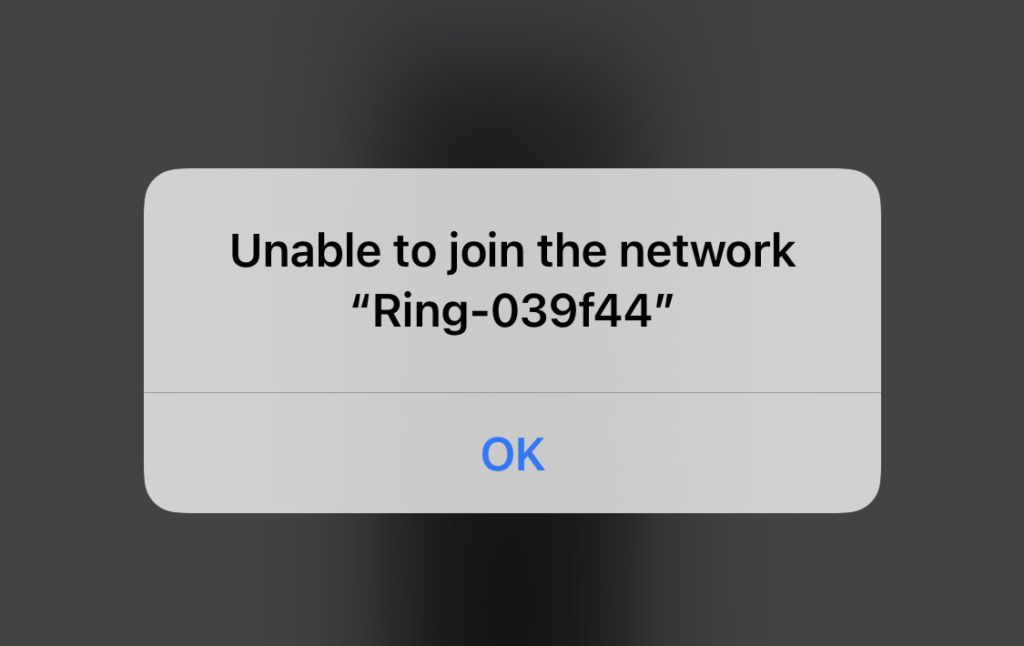
This, without a doubt, is an issue that needs to be addressed as soon as possible. Generally, the issue occurs when your router is too far away, there’s a glitch in the Ring app itself, or you’re using an incompatible network connection band.
There are a total of 10 fixes which include disabling the VPN, fully charging the Ring doorbell, rebooting the router, resetting the doorbell, and more.
In the next section, we’ll look at how these methods can help you get your Ring doorbell connected to your network again. Afterward, I’ll list down the step-by-step guide for each fix.
How Do I Fix a Ring Doorbell that Won’t Connect to WiFi
- Connect to Ring Setup Access Point: While the initial setup, your Ring video doorbell will broadcast a WiFI network for a temporary period which you need to connect to on your mobile device. Make sure you do this as this is an important part of the setup process and will help you connect the Ring device to your WiFi afterward
- Move your Router Closer to the Ring Doorbell: If the router is too far away, then the signals might not reach the Ring doorbell and it will be unable to connect to your WiFi network. Therefore, make sure your router is closer to the bell, or use network extenders.
- Disable VPN on Your Phone: Enabling VPN changes your IP address and it’s a problem in connecting a Ring device to the network. So, turn the VPN off on your mobile device and connect to the doorbell again.
- Uninstall Android Apps that Conflict with the Ring App: Some particular applications interfere with the Ring app and hinder its performance and connectivity to the doorbell itself. I’ll list all of them in the following section.
- Use Another Mobile Device: If a mobile device is not able to connect to Ring, then try a different mobile for this purpose. Simply install the Ring application and see if the secondary phone can connect with the bell.
- Reinstall the Ring App: A potential error in the Ring application can be the reason why connectivity issues are happening. In such cases, it’s a good idea to reinstall the app and connect your WiFi to the video doorbell again.
- Fully Charge the Ring Doorbell: Make sure the Ring doorbell is fully charged. Because if it’s not, then it won’t join the WiFi network no matter what you do. It takes around 5-10 hours for the doorbell to charge 100%.
- Use a 2.4 GHz Network Band if the Ring Doorbell is Incompatible with 5 GHz: All Ring doorbells are not compatible with the 5 GHz band. Check your bell and see if it uses 2.4 GHz or 5 GHz. If it’s the former, then change your WiFi band from 5 GHz to 2.4 GHz and the bell will connect to the network now.
- Reboot Your Router or Modem: WiFi networks can freeze sometimes and rebooting the router fixes this problem. So if the Ring doorbell isn’t connecting to your WiFi, then reboot your router or modem and try again
- Reset your Doorbell: Resetting the Ring doorbell is the last resort. If nothing else works, then most probably there’s an issue with the bell itself. In such a case, reset the device and then see if it connects to the network.
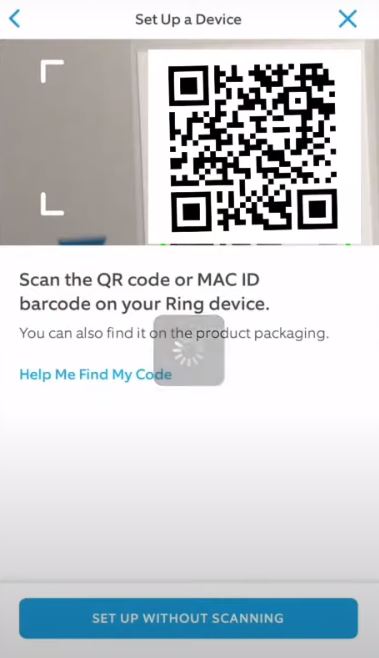
1. Connect to Ring Setup Access Point
- Download the Ring – Always Home application.
- Create your account or sign in if you’ve got an existing one.
- Select Set up a Device and tap on Doorbell.
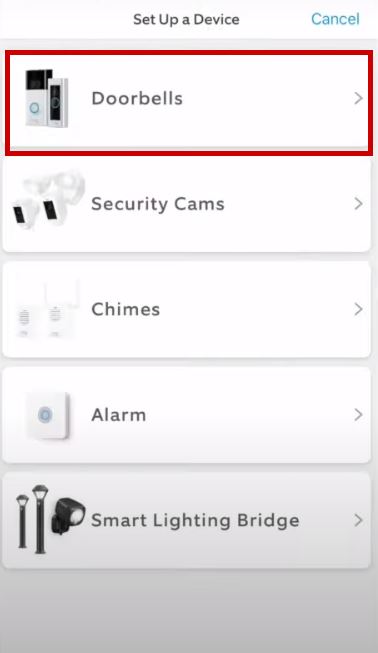
- Scan the QR code or MAC ID barcode on the doorbell or instruction manual.
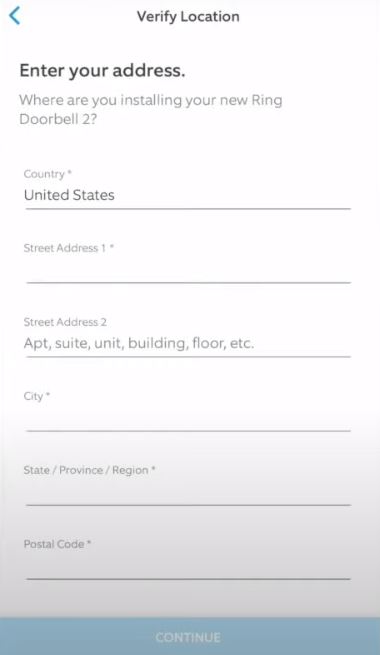
- Enter the location info.
- Select the doorbell’s name and turn on two-factor authentication.
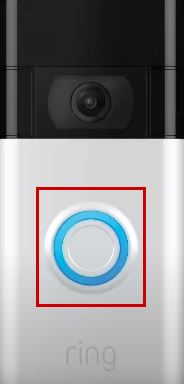
- Now the Ring device will be in setup mode and you’ll be able to see a blinking or spinning white light. If you don’t see it, then press and hold the setup button on your doorbell to put it into setup mode. If the light still doesn’t turn on, then charge the battery.
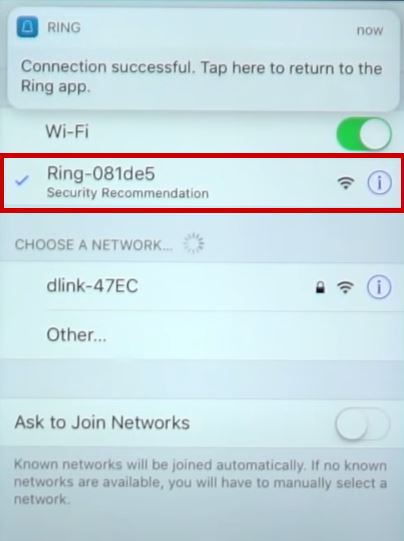
- Now go to Settings > WiFi on your mobile.
- The Ring access point will be showing up as ‘Ring’ and the last 6 digits of your MAC ID will be written. Or, it will be labeled as ‘Ring Setup’ and the last two digits of your MAC ID will be written.
- Select the access point for connection.
- Now go back to the Ring app and connect to your WiFi.

- Once done, see if the doorbell functions now.
2. Disable VPN on Your Phone
- Open your VPN application.
- Select Disable/Off to turn it off.
- Now reconnect your WiFi to the Ring device.
3. Uninstall Android Apps that Conflict with the Ring App
The following apps interfere with the Ring app and you should uninstall them if you don’t use them often:
- 360 Security
- 360 Battery Plus
- AdGuard
- All-In-One Toolbox
- Avast Clean-up and Boost
- AVG AntiVirus
- Booster Kit
- Clean Master
- CM Security
- DFNDR: Antivirus & Cleaner
- Droid Optimizer
- DU Battery Saver
- ES File Explorer File Manager
- Fast Cleaner
- Free Shield
- Lookout
- McAfee Mobile Booster
- Network Master
- Power Clean
- Purify
- Samsung Max
- Security & Privacy
- Storage Analyzer
- Super Cleaner
- Super Fast Charger
- Supo Optimizer
- Zedge
4. Reinstall the Ring App
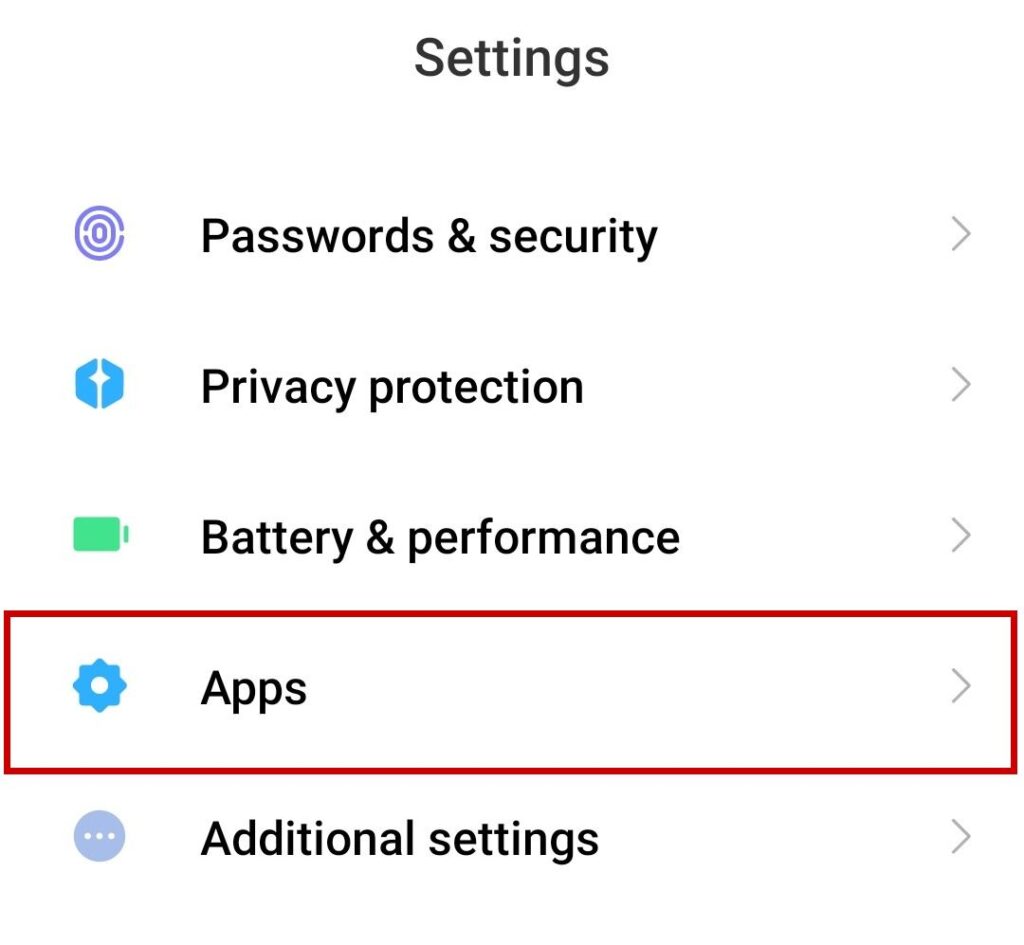
- Go to Settings > Apps/App Management on your mobile.
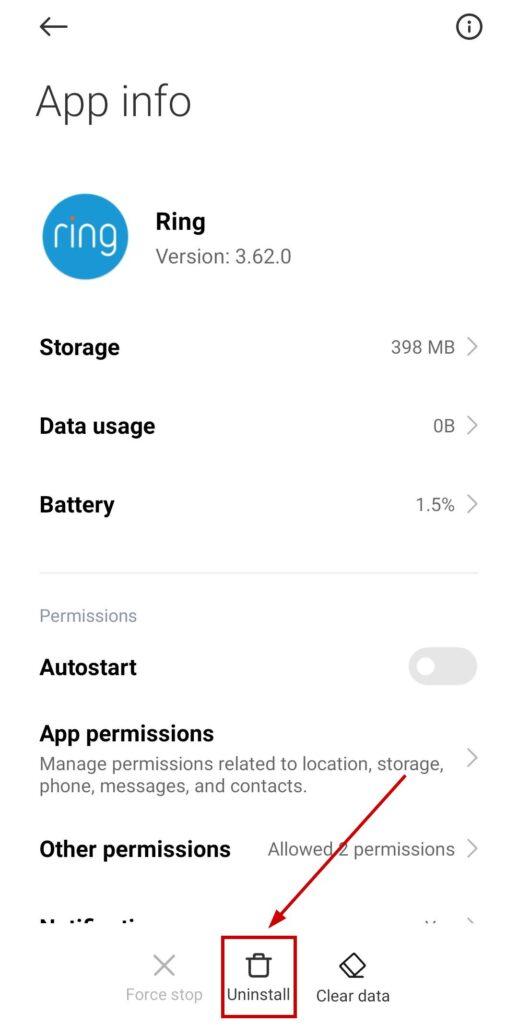
- Look for the Ring app and tap on it.
- Now select Uninstall.
- Go to the Google Play Store or Apple App Store and search for Ring – Watch Home.
- Install the app and set up your doorbell again.
- Connect the doorbell to the WiFi network now.
5. Fully Charge the Ring Doorbell
Firstly, check the battery level of your Ring doorbell as follows:
- Open the Ring app and tap on the hamburger menu.
- Tap Devices > Your doorbell.
- Select Device Health.

- Check the Battery Level.

Now to charge 1st and 2nd Generation Ring Video Doorbells, follow the steps below:
- Remove the security screws fit at the doorbell’s base.
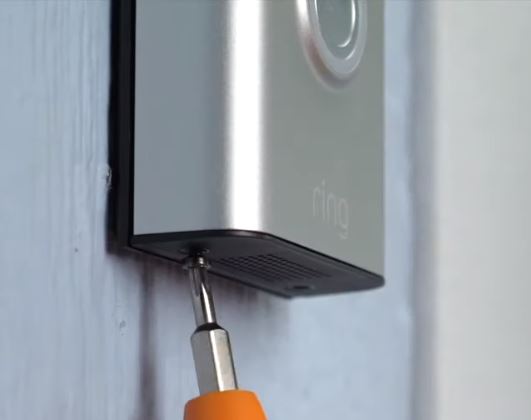
- Now take out the doorbell from the mounting bracket by lifting it.
- Plug in the micro-USB cable in the charging port on the back of the doorbell.

- Once the battery is completely charged, you will see the blue LED fully lit.
- Reattach the doorbell to the mounting bracket using the security screws.
- Now connect it to your WiFi again.
Here’s how to charge Ring Video Doorbell 2, 3, 3+, 4, and Battery Doorbell Plus:
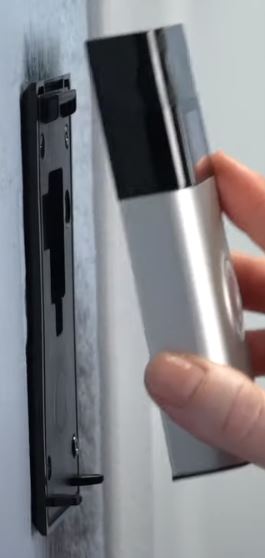
- Remove the security screw fit in the faceplate’s base.
- Now gently squeeze both sides of the faceplate ridges and lift off the faceplate.

- Release the battery by pressing the black tab.

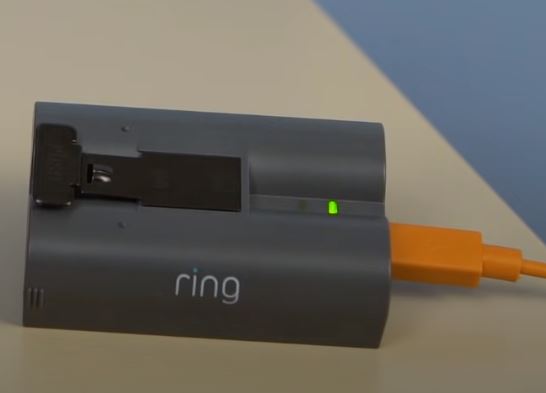
- Connect the doorbell with your micro-USB cable and let it charge. While charging, both red and green lights will be lit up. And once the charging is done, you will only see the green LED fully lit.
- Now slide the battery back into the doorbell. You’ll hear a click sound if it’s placed correctly.
- Wait a minute for the doorbell to power up and boot.
- Now reattach the faceplate and the doorbell.
- Fit it with the security screw.
- Now connect the doorbell to the network again.
6. Use a 2.4 GHz Network Band if the Ring Doorbell is Incompatible with 5 GHz
- Enter your default IP address or your router’s login URL.
- Enter the username and password.
- Now click on Wireless > Advanced.
- Change the band from 5 GHz to 2.4 GHz.
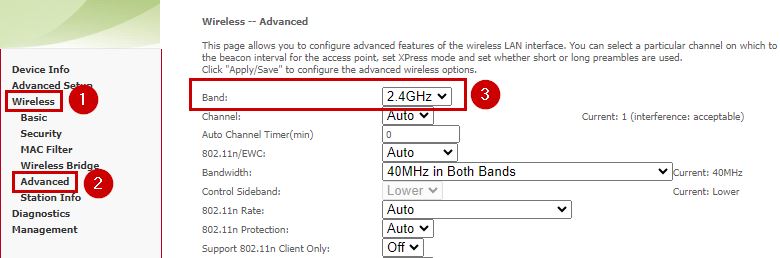
If you have a 5 GHz compatible doorbell but it’s still not connecting to the network, then again, shift to 2.4 GHz and connect the bell. Once done, shift back to 5 GHz again.
7. Reboot Your Router or Modem
- Turn off your router/modem.
- Wait for 30 seconds.
- Now plug in the router and modem and wait for 30 seconds.
- Turn them on now and wait for the internet lights to appear.
- Reconnect the Ring doorbell to the network now.
8. Reset your Doorbell
The resetting procedure varies with the doorbell’s model as follows:
For 1st & 2nd Generation Ring Video Doorbells
Press the orange button on the doorbell’s back.
For Ring Video Doorbells 2, 3, 3+, and 4
Press the small black button under the faceplate on the front.
For Ring Video Doorbell Plus and Wired
Press the small black button having an orange dot located under the faceplate.
For Ring Video Doorbell Pro and Pro 2
Press the small black button on the doorbell’s right side. Wait 30-60 seconds until the light goes off.
For Ring Video Doorbell Elite
Press the small black button on the doorbell’s front.
Each of these methods has worked for many different users and they should work at your end as well. But if your Ring doorbell is still unable to join a network, then I suggest contacting Ring Support as there can be a hardware failure or something else. They will suggest some steps or replace your doorbell with a working one.
Reviewed by Muhammad Zubyan