How to set up a VPN Connection in Windows 10
A Virtual Private Network (VPN) is essentially an add-on that enhances the security of public networks such as WiFi hotspots and the internet, making them less vulnerable to third-party exploitation. Virtual Private Networks are excellent tools for anyone wishing to secure their transmitted data from being accessed by those who have access to the public network. To access information transmitted over a Virtual Private Network, one must possess the necessary credentials to connect to the VPN. Typically, corporations, businesses, and other institutions employ VPNs to prevent third-party access to their internal communications.
In a Virtual Private Network (VPN), the Point-to-Point Tunneling Protocol (PPTP) is used to ensure the messages transmitted between VPN nodes over the internet are secure and inaccessible to anyone who isn’t authorized. All active iterations of the Windows Operating System, including the latest version, Windows 10, come with the built-in ability to set up and use VPNs. If you are looking to set up a VPN connection on a Windows 10 computer, you first need to acquire the necessary credentials to access your desired VPN server. This includes the server’s name or IP address and the username and password that you are registered with on the server. Once you have this information, you can proceed with setting up a VPN connection.
Click on the Network connection icon in the computer’s System tray. If the computer is connected to a WiFi network, the icon will look like a WiFi signal. If the computer has an Ethernet connection, the icon will look like a computer with an Ethernet cable on its left side. In the menu that pops up, click on the blue Network settings link at the bottom.

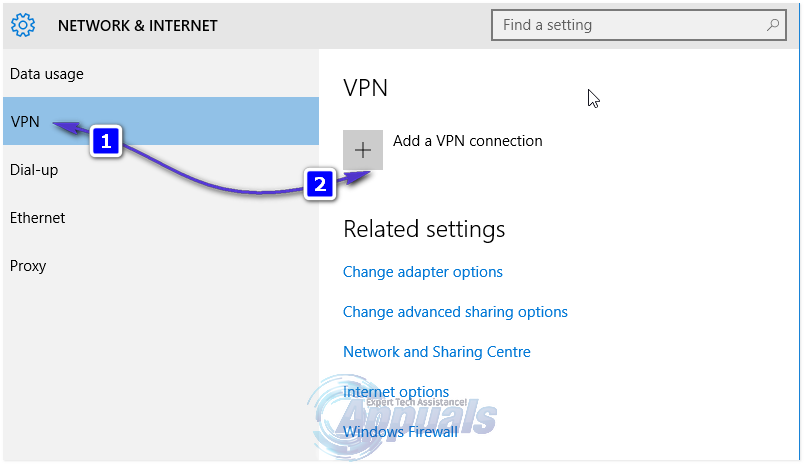
Open the Network & Internet settings. Navigate to the VPN tab in the left pane of this window. In the right pane, click on ‘Add a VPN connection’.
Populate the Add a VPN connection window as follows:
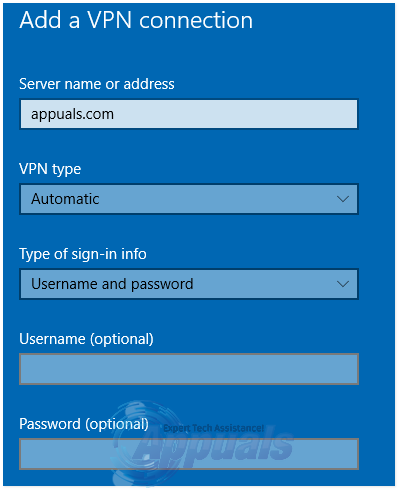
The VPN provider for Windows is built-in. Connection name: <Type in the name you want to give your VPN connection>
Server name or address: <The name or IP address of the VPN server you want to connect to>
VPN type: Point-to-Point Tunneling Protocol (PPTP)
Type of sign-in info: User name and password
User name (optional): <The user name you have registered on the VPN server>
Password (optional): <The password for your account on the VPN server>
Enable the Remember my sign-in info option by clicking on the empty checkbox beside it and checking it.
Click on Save.
Once you click on save, the VPN connection will be created. After that, all you need to do to connect is to simply navigate to the VPN tab in the Network & Internet settings window. Click on the VPN connection that you created and hit the ‘Connect’ button.
To enable the VPN connection you created and connect to the VPN server quicker, click on the WiFi or Ethernet icon in your System tray. From the list of available connections, select the VPN connection you want to enable and click ‘Connect’.