What is an IP Helper address and How to Configure it?
What is an IP Helper-address?
An IP helper-address, also known as a DHCP relay agent, this is a feature that forwards DHCP broadcast packets to a specific DHCP server on a different network segment. When a client device on a network segment requests an IP address through DHCP, it sends out a broadcast packet.
Normally, DHCP servers only listen for and respond to broadcast packets on the local network segment. However, if there is a DHCP server on a different network segment, the client device will not receive a response and will not be able to obtain an IP address.
How IP Helper can help in Forwarding DHCP Packets?
An IP Helper-address is used to forward DHCP broadcast packets from the client device to the DHCP server on the different network segments. This allows the DHCP server to respond to the client’s request and assign an IP address.
In summary, the IP helper-address helps in forwarding DHCP broadcast packets to a DHCP server on a different network segment, thus allowing client devices on the local network segment to obtain IP addresses from the DHCP server on the different network segment. This is particularly useful when there are multiple VLANs or subnets on a network, and a central DHCP server is needed to assign IP addresses to devices on all the VLANs or subnets.
Let’s explore the configuration of IP Helper-Address through a hands-on scenario using Packet Tracer Lab. Follow along as we demonstrate step-by-step instructions for setting up IP Helper-Address in a simulated multi-segment network environment.
How to Configure IP Helper-Address in a Multi-Segment Network
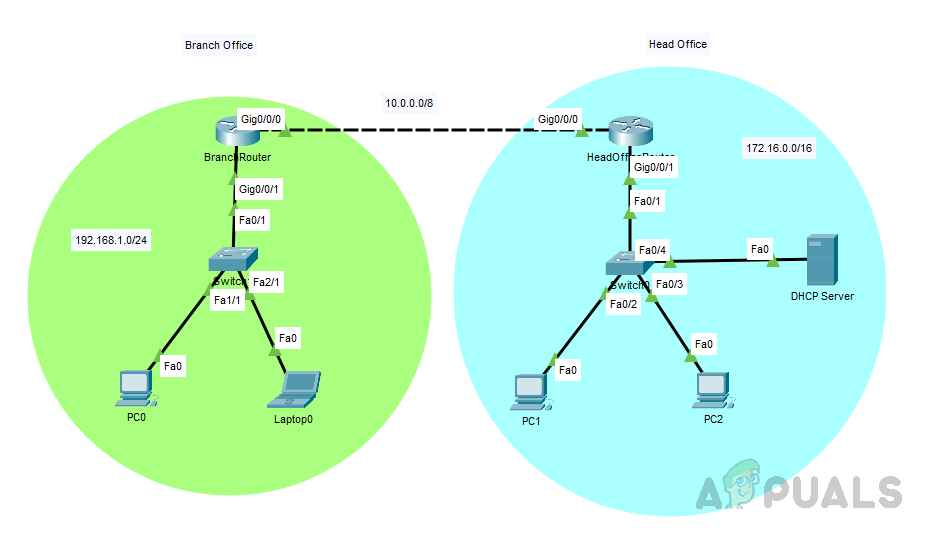
Let’s use the following scenario for this demo. This simple topology consists of a head office with a router, switch, DHCP server, and user computers, and a branch office with a router, switch, and user computers.
IP Configuration:
- Routers connecting between Head and Branch offices are configured with a 10.0.0.0/8 network. The branch office router interface Gig0/0/0 has 10.0.0.1/8 and the Head office router interface Gig0/0/0 has 10.0.0.2/8.
- The branch router’s interface Gig0/0/1 is configured with 192.168.1.1/24.
- The head office router’s interface Gig0/0/1 is configured with 172.16.0.1/16.
- OSPF routing protocol is used in this topology.
Head Office Router Interface Configuration:
Click on the router and go to CLI and enter the below commands to configure the router’s interfaces.
HORouter(config)#interface GigabitEthernet0/0/0
HORouter(config-if)#ip address 10.0.0.2 255.0.0.0
HORouter(config-if)#no shutdown
HORouter(config-if)#exit
HORouter(config)#interface GigabitEthernet0/0/1
HORouter(config-if)#ip address 172.16.0.1 255.255.0.0
HORouter(config-if)#no shutdown
Head Office Router OSPF Configuration:
Use the below commands to configure OSPF on the router.
HORouter(config)#router ospf 1
HORouter(config-router)#network 10.0.0.0 0.255.255.255 area 0
HORouter(config-router)#network 172.16.0.0 0.0.255.255 area 0
Branch Office Router Interface Configuration:
Click on the router and go to CLI and enter the below commands to configure the router’s interfaces.
BranchRouter(config)#int gigabitEthernet 0/0/0
BranchRouter(config-if)#ip address 10.0.0.1 255.0.0.0
BranchRouter(config-if)#no shutdown
BranchRouter(config-if)#exit
BranchRouter(config)#int gigabitEthernet 0/0/1
BranchRouter(config-if)#ip address 192.168.1.1 255.255.255.0
BranchRouter(config-if)#no shutdown
Branch Office Router OSPF Configuration:
Use the below commands to configure OSPF on the router.
BranchRouter(config)#router ospf 1
BranchRouter(config-router)#network 192.168.1.0 0.0.0.255 area 0
BranchRouter(config-router)#network 10.0.0.0 0.255.255.255 area 0
We have successfully configured the routers, let’s move on to configuring the DHCP server.
DHCP Server Configuration:
Follow the below steps to configure the DHCP service on the server.
- Select the server, click on “Services,” and then click on “DHCP.”
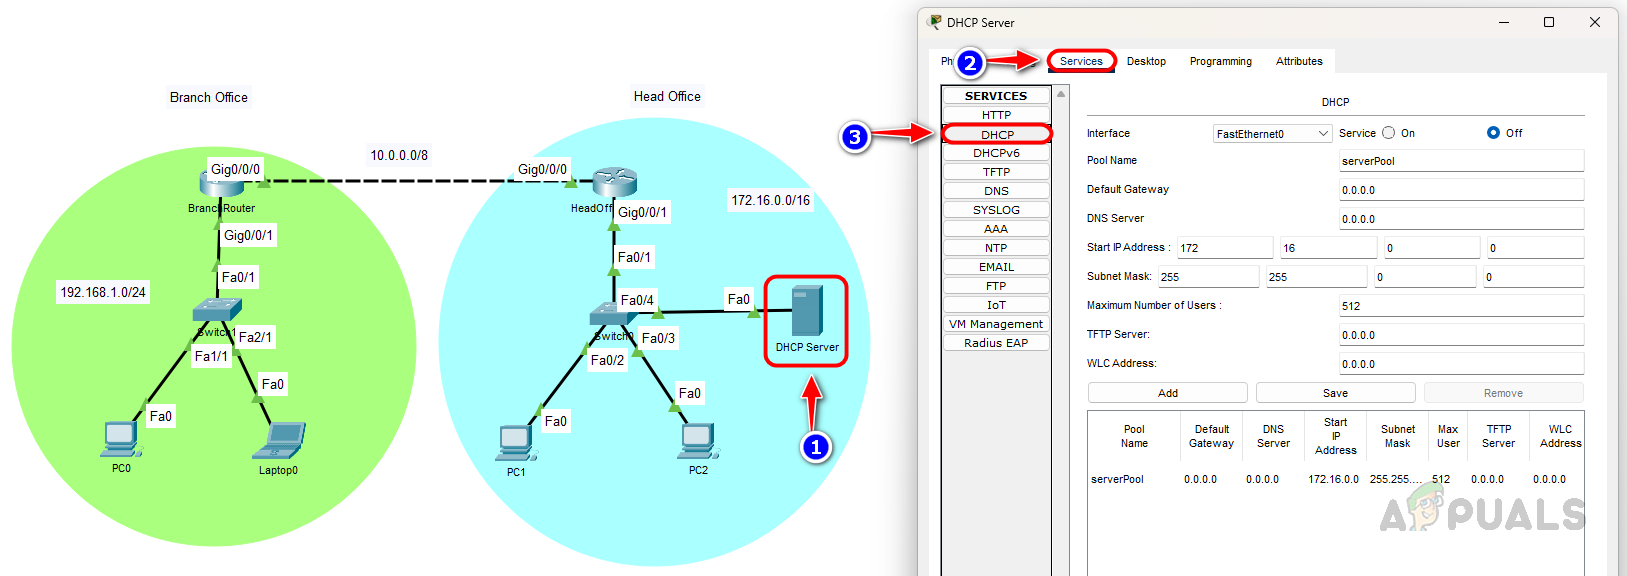
- To configure a DHCP pool, give it an appropriate name, set the default gateway, start IP, and other necessary details, to enable the service select the ‘On‘ radio button, and then click “Add.
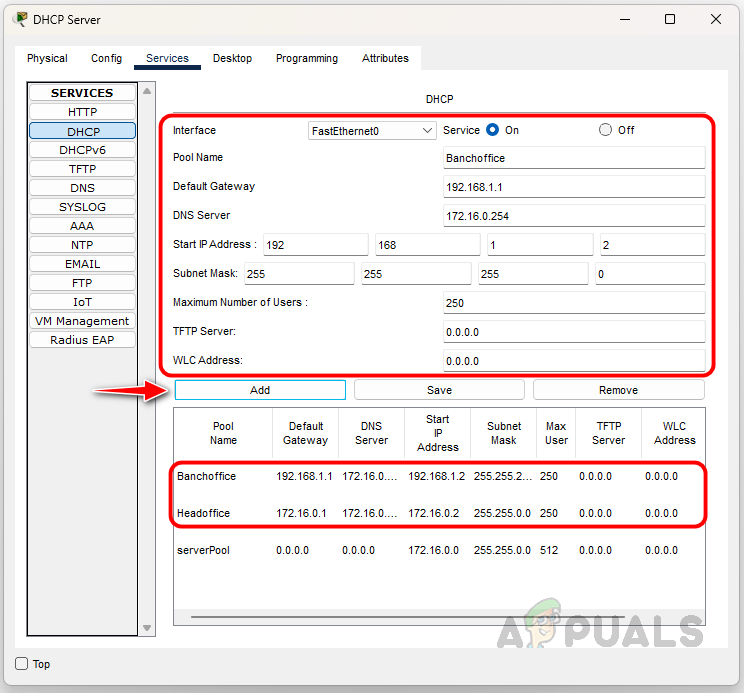
- Configure all the required DHCP scopes.
We have successfully set up our routers and DHCP server. Let’s proceed to the devices to verify if all have received an IP address from the DHCP server.
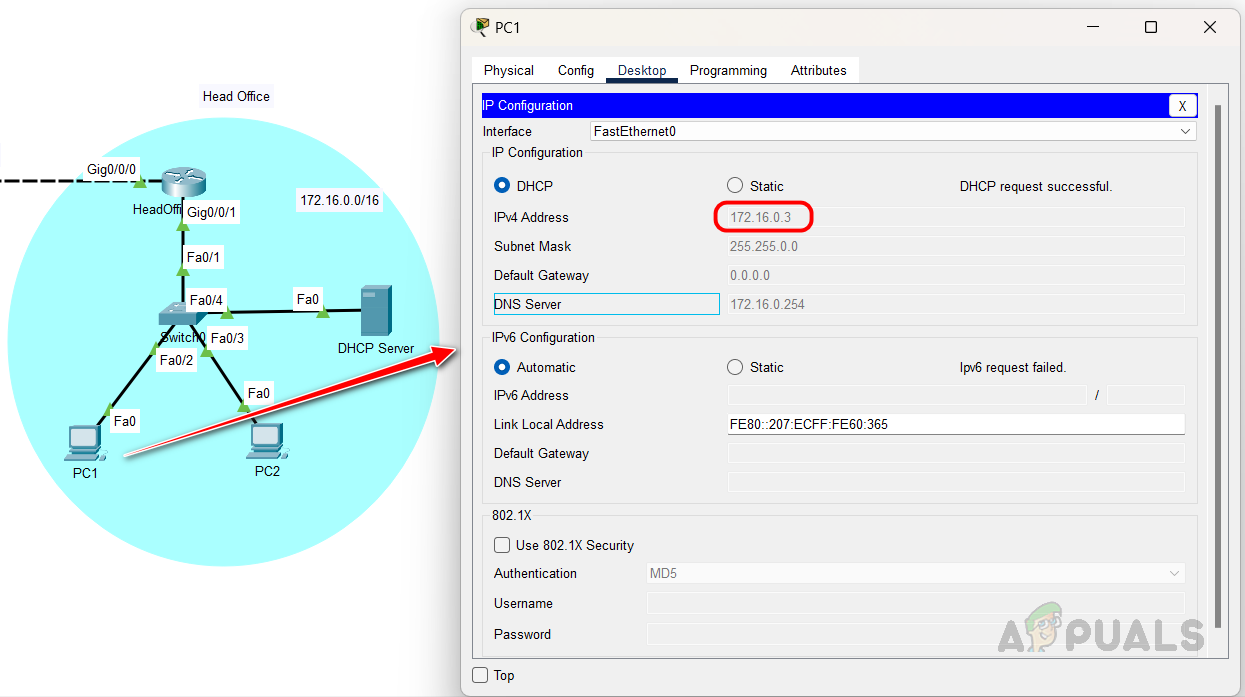
PC1 from the head office network received the IP address from the DHCP server.
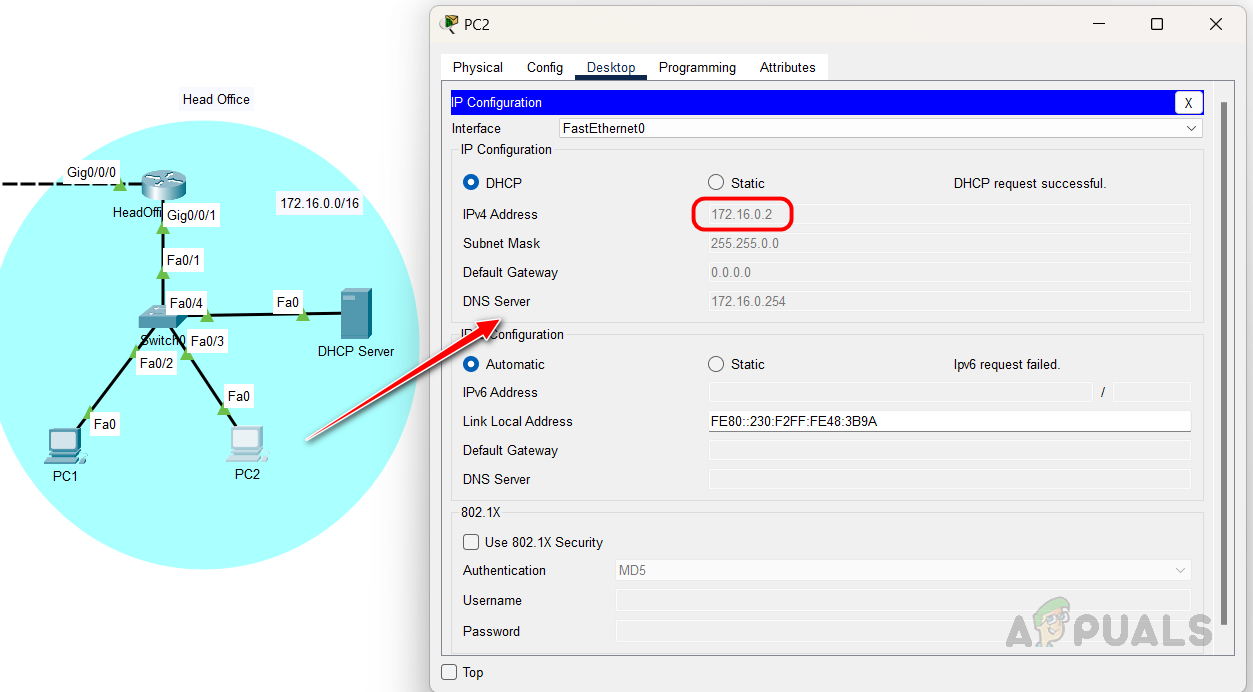
PC2 also received an IP address from the DHCP server.
Let’s now head to the branch office and assess the user devices. PC0 at the branch office has been assigned an APIPA IP address as it was unable to receive an IP from the DHCP server.
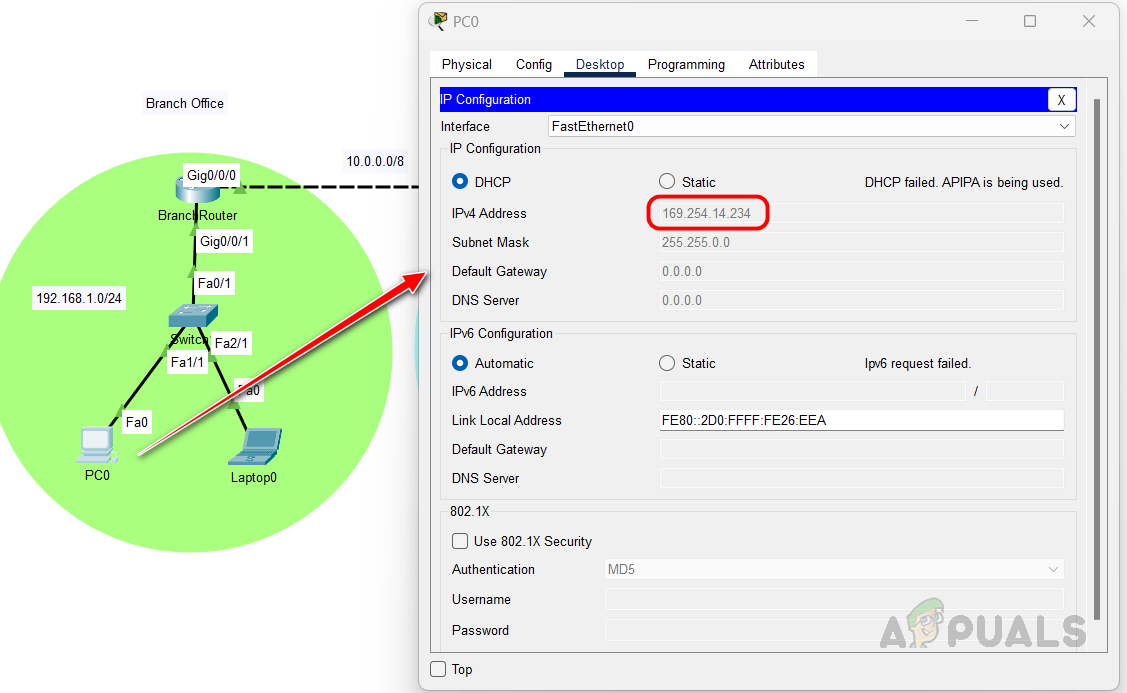
The outcome for all user devices at the branch office is likely to be the same, as the DHCP broadcast packets are unable to reach the DHCP server. This is where we need to utilize the IP helper-address command. Let’s see how to configure the IP helper-address command on the router.
How to Configure IP Helper-Address on Branch Router
The IP helper address needs to be configured on the router interface that receives the broadcast packet. In this case, it should be configured on Gig0/0/1. Follow the below steps to configure the IP helper-address command.
Go to the branch router’s CLI page and enter the below commands. Replace the IP address with your DHCP server’s IP address.
BranchRouter(config)#interface gigabitEthernet 0/0/1
BranchRouter(config-if)#ip helper-address 172.16.0.254
BranchRouter(config-if)#exit
We have set up the IP helper address on the router. If there are additional routers in your network, please ensure the IP helper address is configured on all of them. Now let’s check the user devices in the branch office network.
PC0 at the branch office is now received the IP address from the DHCP server. If the IP address is not updated, select static and then switch back to DHCP to prompt the device to request an IP from the DHCP server again.

This is how we can use the IP helper-address command to broadcast the DHCP requests from the DHCP clients, the IP Helper-address serves as a solution for DHCP clients to obtain an IP address from a DHCP server located on a different network segment. By forwarding DHCP broadcast packets from the client to the DHCP server, the IP helper-address ensures that the DHCP server can respond to the client’s request and assign an IP address, making it possible for clients to communicate on the network.