How to Fix SearchUI.exe Suspended on Windows 10
SearchUI.exe suspended is often caused by your third-party antivirus software which usually interferes with your background processes. Search User Interface or SearchUI is a component of Microsoft’s search assistant called Cortana. If your searchUI.exe process is suspended, this means you won’t be able to use Cortana. Some people like to make use of Microsoft’s search assistant by giving it commands through their microphones. Though, some certain things or apps will stop you from utilizing it.
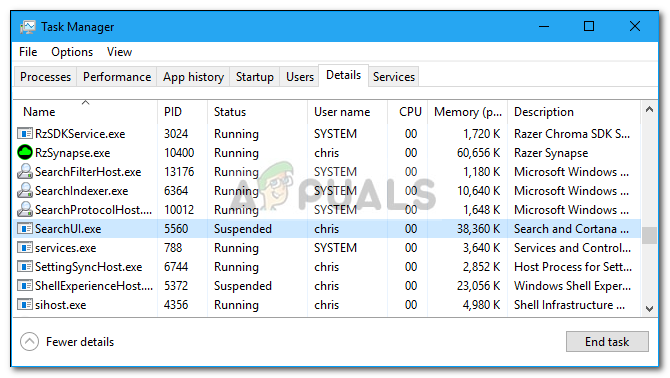
This doesn’t pop up as an error dialog notifying you that the searchUI.exe file has been suspended but rather it can be found when you open your Task Manager and go through the processes listed there. This issue is not critical and can be solved via some easy and potent solutions. However, before we get into that, let’s have a look at the causes.
What causes SearchUI.exe suspended on Windows 10?
Well, the suspension of searchui.exe can be caused by numerous factor such as –
- Third-party antivirus. If you are using a third-party antivirus, you are most likely to see the file suspended because your antivirus is trying to stop it.
- Outdated windows. If you haven’t updated your Windows for quite some time, then this could potentially be the factor of the file being suspended. The UI is not perfect and it needs constant updating.
- Corrupt package folder. Occasionally, the reason the file is being suspended is a corrupt Cortana package folder which means you’ll have to delete it.
Before proceeding with the solutions, restart your system. Also, run the SFC command and then the DISM command.
Now, it is time to get into the solutions:
Solution 1: Update Windows to the Latest Build
As we mentioned earlier, an outdated Windows could be the cause of this. The User Interface has not been perfected yet and it requires constant updates from its manufacturer which it’ll only get if you update your Windows. Therefore, starting with the easy task, try updating your Windows if you haven’t. To check for updates, do the following:
- Press Winkey + I to open Settings.
- Click on ‘Update and Security’.
- Hit ‘Check for updates’.
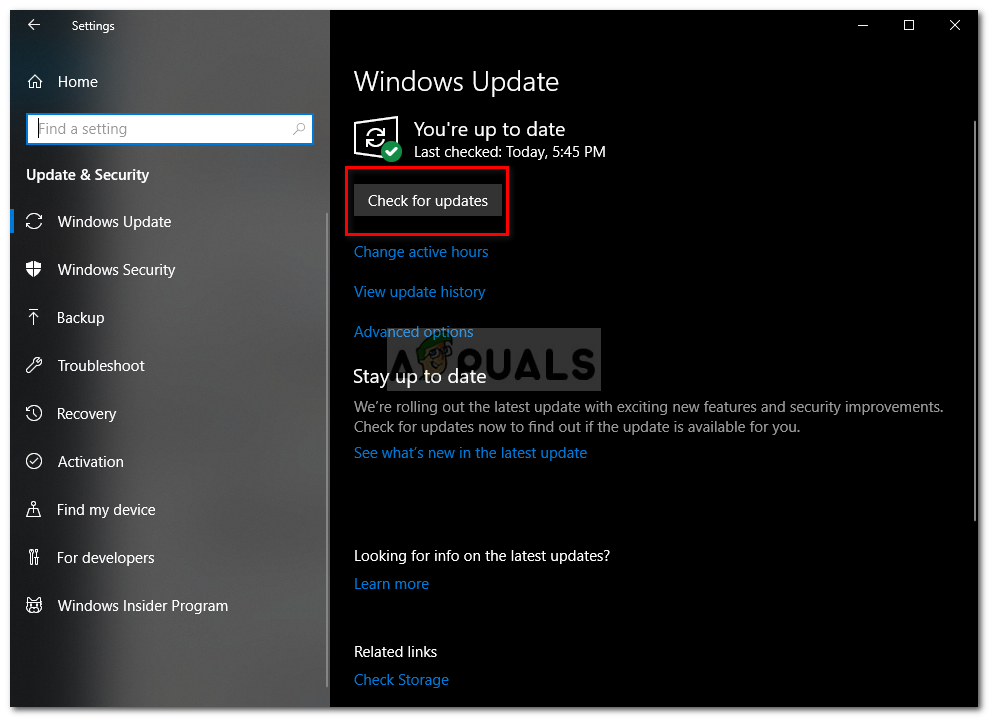
Check for Windows Update
If it prompts you with an update, do update your system.
Solution 2: Fixing Cortana’s Package Folder
A corrupt package folder might be stopping the file from running. In such a case, you’ll have to delete the folder in Safe Boot. Once you’ve booted up your system, do the following:
- Press Winkey + X and select ‘Command prompt (Admin)’ or ‘Windows Powershell (Admin)’.
- Once that loads up, enter the following command (replace {USERNAME} with your system’s username).
-
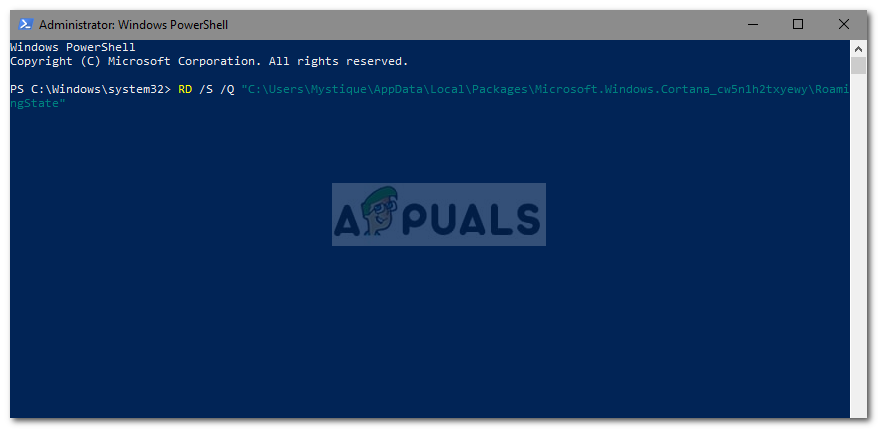
Reset Cortana’s Package Folder through PowerShell
RD /S /Q “C:\Users\{USERNAME}\AppData\Local\Packages\Microsoft.Windows.Cortana_cw5n1h2txyewy\RoamingState” -
- Now, open up Windows Powershell (Admin) if you used the command prompt to enter the above-mentioned command.
- Once Windows Powershell loads up, enter the following command:
Get-AppXPackage -AllUsers |Where-Object {$_.InstallLocation -like “*SystemApps*”} | Foreach {Add-AppxPackage -DisableDevelopmentMode -Register “$($_.InstallLocation)\AppXManifest.xml”} 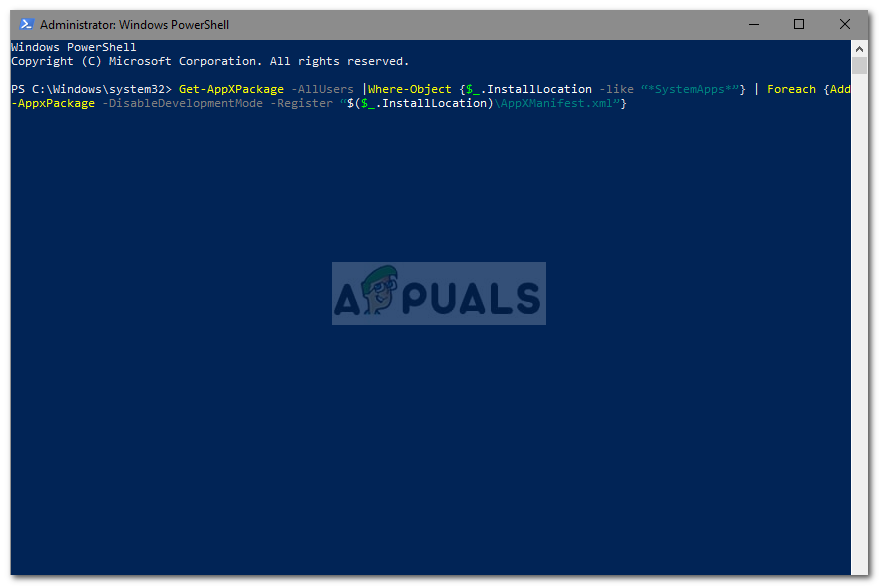
Solution 3: Disable the Antivirus
Some users have reported that their third-party antivirus was interfering with the process due to which it was listed as suspended. This was mostly caused by Avast antivirus — so if you are using an Avast antivirus or any other, please turn off your antivirus and then reboot your system to see if the file is still listed as suspended or not.
Solution 4: Delete Roaming User Profile
If you are using a Roaming User profile on your system then the problem might be occurring because of your user profile as it can generate certain issues with SearchUI.exe file. If this is the case for you, you’ll just have to delete the Roaming User Profile. Here’s how to do it:
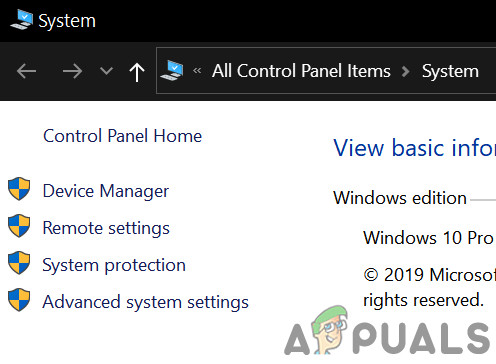
- Go to your Desktop, right-click ‘This PC’ and select ‘Properties’.
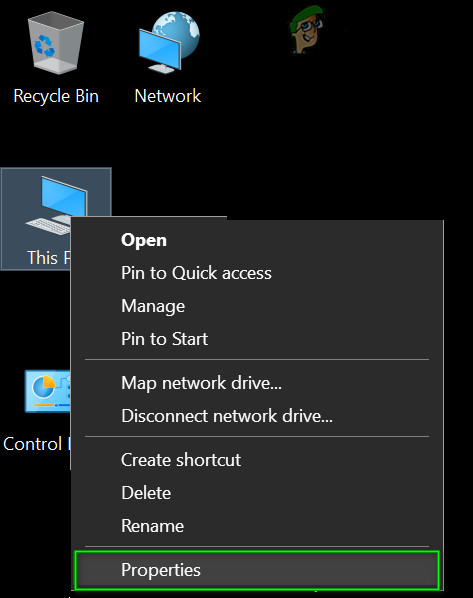
Open PC Properties - On the left-hand side, click ‘Advanced system settings’.
Open Advanced System Settings - A window will pop up, there click ‘Settings’ under User Profiles.

Click Settings and delete roaming profile - Locate your Roaming profile and delete it.
Solution 5: Reinstall iCloud
Lastly, another reason can be your iCloud installation. Your iCloud process might be interfering with the SearchUI.exe process in which case you’ll have to uninstall and then reinstall iCloud.
Solution 6: Use Cortana Troubleshooter
Microsoft has included many troubleshooters to help users in troubleshooting common Windows issues. There is also a troubleshooter for Search and Indexing. This troubleshooter first checks for issues Cortana configurations and if it sees any discrepancies, it automatically tries to reinitialize that specific module. Running the search and indexing troubleshooter may solve the problem.
- Press Windows key and type “Troubleshoot“. Now in the resulting list, click on “Troubleshoot Settings“.

Open Troubleshoot Settings - Now in the right pane of the window, find Search and Indexing and click on it. Then click on “Run the Troubleshooter“.
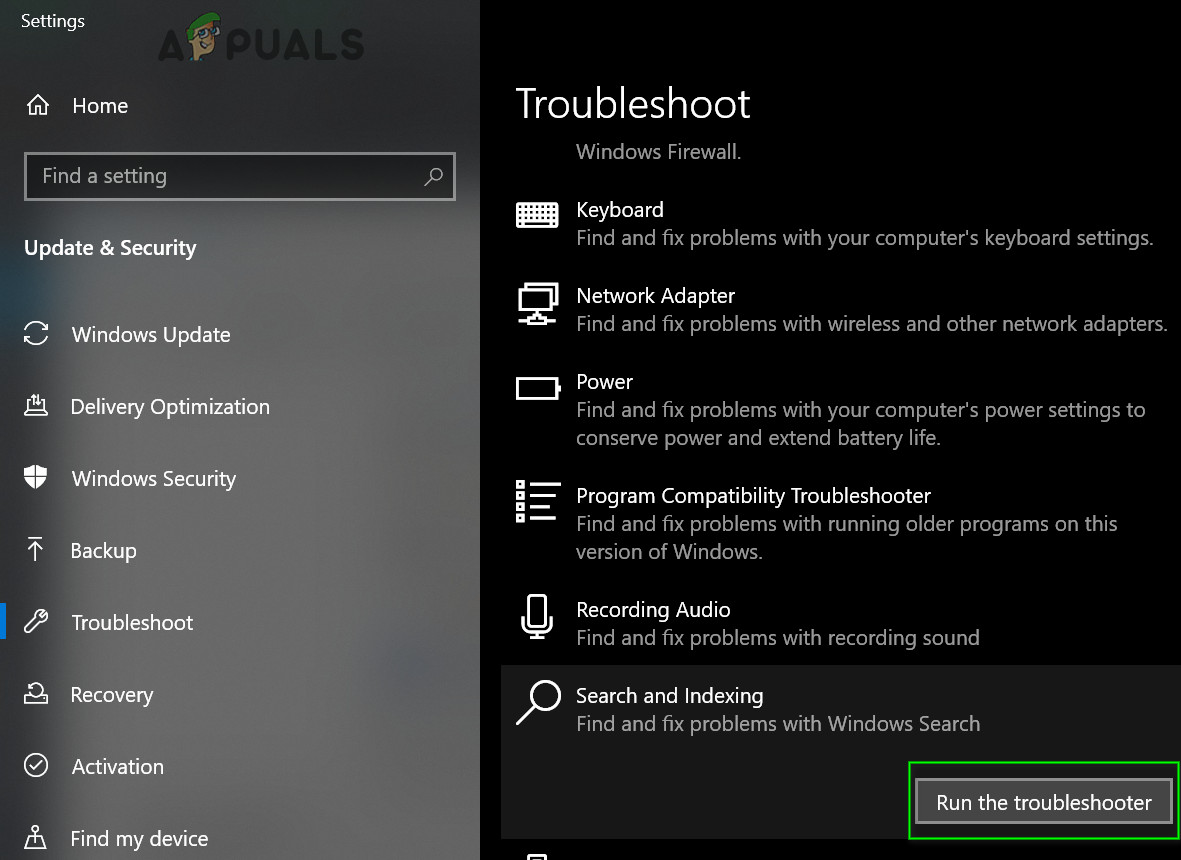
Run the Search and Indexing Troubleshooter - Now follow the instructions displayed on the screen to complete the troubleshooting process.
Solution 7: Create Another User Account And Rename UsrClass.dat File of the Effected Account
If nothing has helped you so far, then creating a new local administrator account and using it to rename Cortana files/folders of the affected account may solve the problem. We can also rename the files directly when logged in the affected account but this will not completely reintialize the file because a part of it is already in a running state. When we use another account, we can completely change it because it will not be loaded onto the system.
- Create a new local user administrator account.
- Log-in to that newly created account.
- Now navigate to
C:Users/(the effected account )/AppData/Local/Microsoft/Windows
where C is your system drive.
- Now find UsrClass.dat and rename it to UsrClass.dat.old.
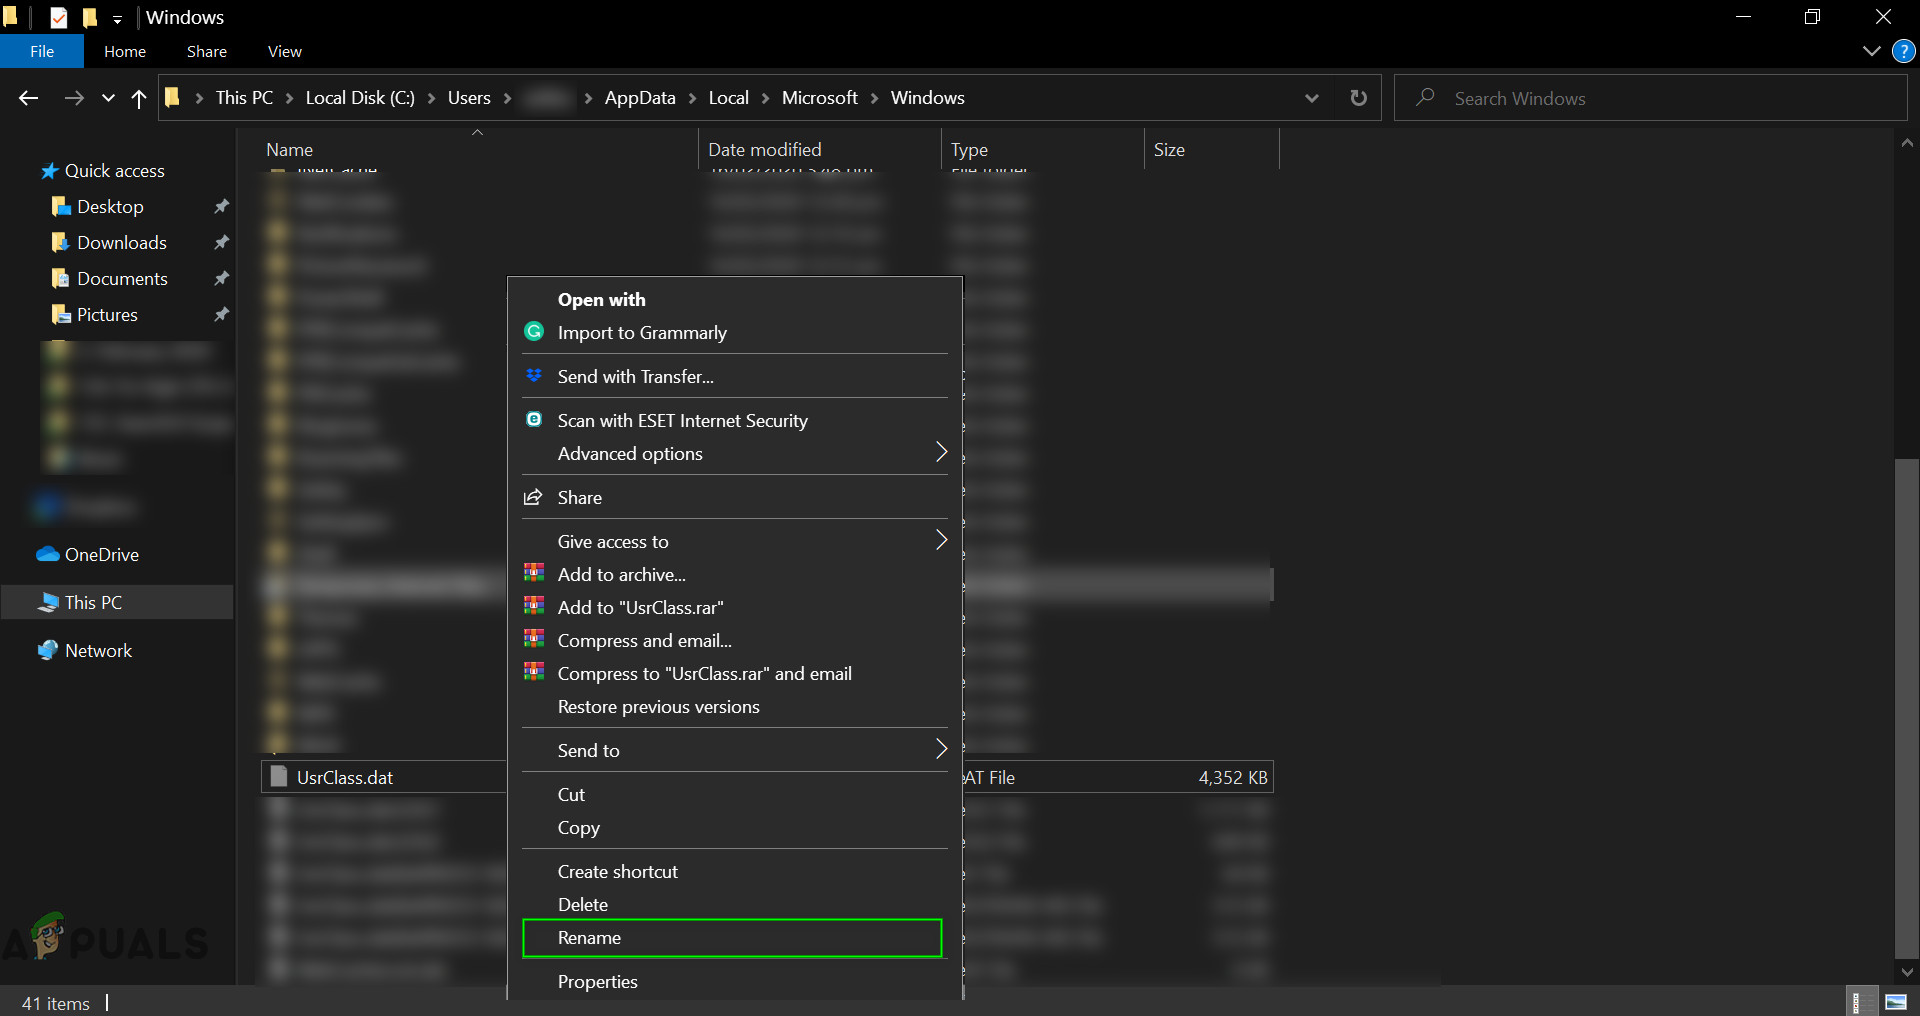
Rename UsrClass.dat - Now log-out of the new account and log back into the affected account.


Thank you SO MUCH!!! FINALLY I SOLVED THIS NOW AFTER MONTHS AND MONTHS OF DEALING WITH UI HANGS!!! You deserve an award!!!