How to Uninstall iCloud on Windows 10
Using iCloud is usually associated with Apple products and their respective operating systems such as Mac OS X and iOS. However, there is a Windows version of iCloud which works just as it should.
All you need to do is download its installer from Apple’s official site, install it, and use your Apple ID in order to sign in to use it and select just which features would like to sync across your devices. Also, you will need to use and setup iCloud on all of the devices you would like to keep synced. However, certain issues may arise with this program so let’s see just what can happen.
Uninstalling iCloud on Windows
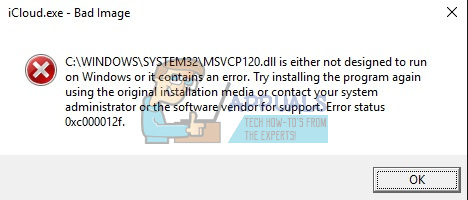
A lot of users have reported that they have uninstalled iCloud on their Windows PCs but they are still receiving iCloud related error messages such as:
“The Shared library “Cloud Music Library” is not responding”
“iCloud music library can’t be enabled”
“iCloud Verification Failed / The request timed out”
“iCloud Error: A critical syncing error with iCloud has been detected. iCloud syncing with Day One has been disabled.”
This shouldn’t happen because people have uninstalled it using its uninstaller but somehow pieces of it have remained on their computer. These pieces are not impossible to remove but make sure you follow the instructions from below carefully and do try each one before giving up.
Solution 1: Uninstalling Through Control Panel/Settings
This is probably the first thing you tried yourself but let’s try this again in order to make sure we tried to uninstall it the conventional way. If this method helps you deal with iCloud-related error messages, you don’t have to continue with other solutions.
- First of all, make sure you are logged in with an administrator account as you won’t be able to delete programs using any other account.
- Backup the data you want to save because deleting iCloud will remove it.
- Open iCloud and check the boxes next to data you want to backup and click Apply.
- As soon as your data has been uploaded to iCloud, click on the Sign out button located in the lower left corner.
- Click on the Start menu and open Control Panel by searching for it. Alternatively, you can click on the gear icon in order to open settings if you are using Windows 10.
- In Control Panel, select to View as: Category at the top right corner and click on Uninstall a Program under the Programs section.
- If you are using the Settings app, clicking on Apps should immediately open a list of all installed programs on your PC.
- Locate iCloud in Control Panel or Settings and click on Uninstall.
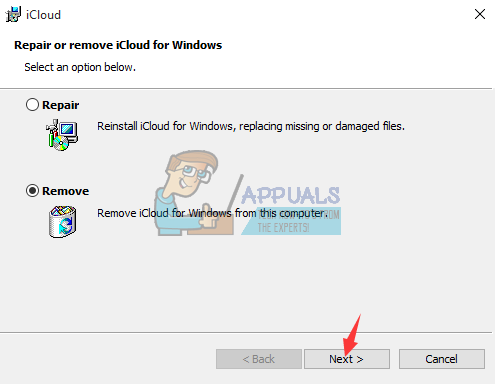
- iCloud’s uninstall wizard should open with two options: Repair and Remove. Select Remove and click Next in order to uninstall the program.
- A message will pop up asking “Do you want to completely remove iCloud for Windows?” Choose Yes.
- Click Finish when the uninstalled completes the process and restart your computer to see whether errors will still appear.
Solution 2: Running the Downloaded Installer
There has been a discussion at Apple Forums where users stated that uninstalling using Control Panel or Settings won’t get the job done properly. Instead, people said that you need to run the installer you downloaded in order to install the program to your PC. This is definitely something you should try and it won’t take a long time.
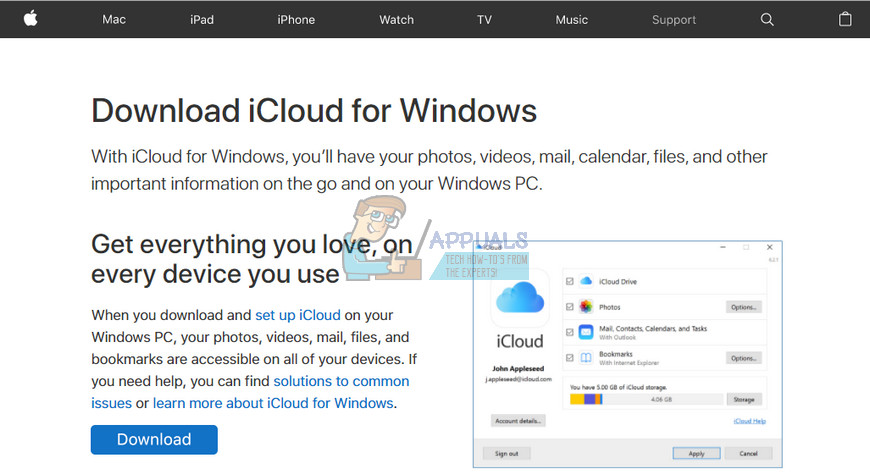
- Open your Downloads folder or the folder you used to download the iCloud installer to. You can also try and search for the file by typing “iCloudSetup.exe” in your Search bar.
- If you have already deleted the file, you can redownload it by visiting Apple’s site.
- Run the file you located or downloaded and you should again be prompted with Remove and Repair options just like in the Solution 1.
- Follow steps 6-8 in order to uninstall iCloud from your computer.
- Restart your computer and wait to see if everything is okay now.
Solution 3: Locating the Hidden Uninstaller
There is also a way to find the uninstaller and delete iCloud from your computer permanently by locating it on your hard drive. However, if previous installers failed to load properly or if they opened an error message, this solution might not work either but it’s worth giving it a show since this helped a couple of people get rid of iCloud.
- Open My Computer (or This PC) and navigate to your Local Disk C: drive.
- Click on the View tab at the top of the window and check the box next to Hidden Items.
- Navigate to ProgramData >> Apple >> Installer Cache >> iCloud Control Panel #.#.#.## where hashes represent the installed version of the program and it depends from computer to computer.
- Locate the icloud64.msi if your Windows version is 64 bit or look for icloud32.msi if your OS is 32 bit.
- Run this file and the installer should appear.
- Follow the steps 6, 7, and 8 from Solution 1 in order to uninstall iCloud.
- Reboot your computer and check for errors.
Solution 4: Using Advanced Uninstaller Pro to Remove iCloud
There are a lot of different uninstallers designed to replace Control Panel and Settings as they often get unresponsive and they sometimes freeze in the middle of the uninstallation process. You don’t have to use this particular uninstaller but this one was able to help people who were dealing with this problem in particular and that is exactly why we recommend it.
- Download Advanced Uninstaller Pro from their official website
- Locate the file you downloaded, double-click on it, and follow the instructions on screen in order to uninstall it. Be careful not to install any additional programs you might be prompted to install and uncheck them all. Select Custom Installation and uncheck everything except Advanced Uninstaller Pro.
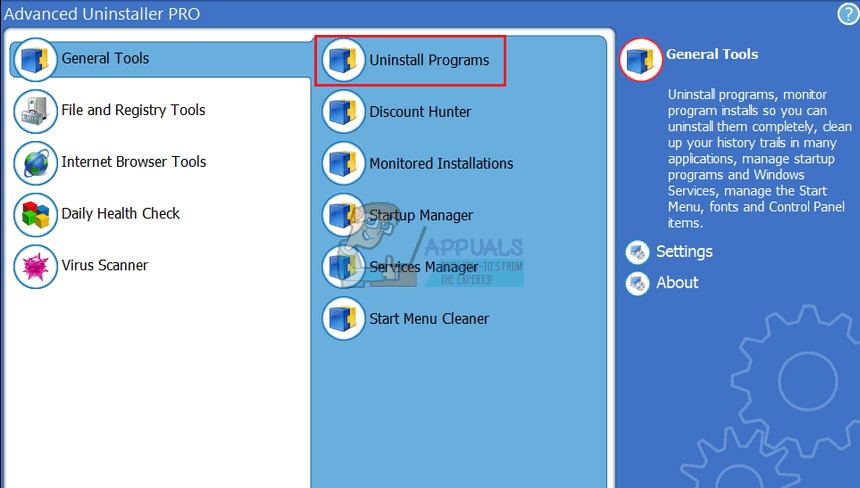
- Open the program and open General Tools.
- Under General Tools, click on Uninstall Programs and a list of all your installed programs should appear.
- Select iCloud and click the Uninstall button located to the left under the information about the program you selected.
- After clicking on the Uninstall button, the uninstaller will probably fail since it’s either displaying an error message or it has already been used or deleted.
- However, this program implements a scanner whose purpose is to scan your hard drive and your registry for leftovers. It will locate these files and you can click on Select All and remove them.
- Reboot your PC and check to see if your issue persists.
Solution 5: Using Windows PowerShell
Windows PowerShell is a powerful tool which can help you automate tasks using a command-line shell and a scripting language which was built using .NET Framework and .NET Core. It used to be exclusive to Windows but it was made open-source and now it’s available to all platforms. You can use PowerShell to uninstall various apps and you can even use it to delete preinstalled Windows Apps such as Photos, Video, Calculator, etc.
- Type PowerShell in your Search bar, right-click on the first result, and select Run as administrator.
- Copy and paste the following command in order to receive the full list of the apps you have installed along with detailed info regarding every single one: Get-AppxPackage
- Wait for the list to load and try to search for iCloud. This might take a while but be patient while you look through the installed apps.
- When you find it, copy everything next to the PackageFullName line by selecting the entire text and using the Ctrl + C key combination.
- Use the following command in order to uninstall iCloud from your PC. Replace the bolded PackageFullName with the actual name you just copied and click Enter.
Remove-AppxPackage -package PackageFullName
- Restart your computer and see if there are any changes regarding the error messages.
Solution 6: The Aftermath
This solution includes deleting the leftover files after completing any of the solutions above or after completing all of them. However, since we have used several different methods, you shouldn’t be able to find many files related to iCloud. Still, it’s worth to check just in case as these leftover files may simply be the ones which are causing all of these iCloud-related errors even though iCloud is not even installed on your Computer.
- Navigate to following folders and delete everything related to iCloud. Be careful not to delete anything related to other Apple software you may have installed:
My Computer >> C: >> Program Files (x86) >> Common Files >> Apple
My Computer >> C: >> Program Files (x86) >> Apple Software Update
My Computer >> C: >> Program Files (x86) >> Bonjour
My Computer >> C: >> Program Files (x86) >> Common Files >> Apple >> Internet Services
My Computer >> C: >> Program Files >> Common Files >> Apple >> Internet Services
- Check from iCloud entries in registry by typing “regedit” in the Search bar and opening the Registry Editor.
- Backup your registry by clicking on File >> Export… and save the current state of your registry somewhere.
- Look under HKEY_CURRENT_USER\Software and HKEY_LOCAL_MACHINE\Software for folders related to iCloud and delete them.
- Click on Edit >> Find and search for “iCloud” and delete everything you can find related to iCloud.
- Restart your computer and your problems should be gone by now.
I my case you couldn’t run “Uninstall”; it was grayed out. I had to choose “Modify” which then gave the the repair/remove dialog shown in the article.