How To Configure Dameware Ports to Allow Remote Connections
Dameware by SolarWinds is one of the most complete Remote Desktop Software you can use in your business. Especially if you are looking for something to deploy IT support and services such as software and patch installations, computer troubleshooting and problem resolution. It can even be integrated into the SolarWinds Web Help Desk which allows you to remotely address your customer tickets and requests directly from the Help Desk interface.
How the Dameware Remote Connections Work
To initiate a remote session, you need to install the Dameware client on your machine and then install the client agent on the remote machine. Then you also need to configure the three server components that come included in the installation package. Of course, you can choose to deploy Dameware in Standalone mode and then you wouldn’t have to install the server components. But that is all dependent on the type and size of your organization. If this is a little confusing for you then you may want to check our full review of the Dameware Remote Support to get up to date.
You can download Dameware Remote Support using this link (here).
So, when you want to connect to a remote computer you simply enter their IP address on the Dameware client and send the connection request. The client agent on the host computer will then receive the request and you can begin the remote session. If you are connecting to computers on your network, then the process is as easy as that. However, if the remote computer is on a different network then you won’t be able to reach them until you have opened some specific ports on their routers. The Dameware client agent uses ports 6129, 6130, 6132, and 6133 to listen for incoming connection requests and these ports will most definitely be closed for most routers.
Why are the ports closed in the first place
Well, your router is a gateway. You use it to connect to external networks including the internet but it can also be used to access your network from outside. Which is a major risk because if malicious people access your network they can exfiltrate important business data. So to avoid this, the router acts as a firewall and comes with only a few ports open to allow you access to the internet. For most of the other connections that you may want to start, then you will need to manually open the ports. Including the Dameware remote connections that we are addressing.
All the Important Dameware Ports and Why they should be open
Port 443 (HTTPS) – This is the port that the Dameware Internet Proxy uses to communicate with the Mini Remote Control and the client agent on the end-user machine. It’s the port that is used to transmit the internet session requests. Also, in the event that the end-computer does not have the Dameware client agent installed, then this it’s the port that will be used to download the necessary components.
Port 6129 (Dameware Mini Remote Control Port) – This is the port that the Dameware client agent on the host computer uses to listen for incoming remote connection requests.
Port 6130 (Mobile Gateway Communication Port) – This is the port that the Mobile Gateway server uses to listen for incoming requests from the mobile client so that it can, in turn, forward the request to the client agent on the host computer.
Port 6132 – This port is bi-directional and is used to transmit the internet session data between the Dameware Mini Remote control and the Dameware Internet proxy.
Port 6133 (Dameware Service Port) – This port is also bi-directional and is used by the Dameware Server components to communicate with each other.
If you have port forwarding knowledge then this may be all the information you need. If not then stick around as we go through the step by step process of how to open ports in your router and also on your firewall.
How to Port Forward on Your Router to allow Remote Connections
The process will vary depending on the router so think of this as a general guide. I will try and highlight how the process varies with some of the common routers but if your router is not mentioned you can still use your intuition to make the guide work.
Step 1: Log in to your router’s web interface
To do this, open your preferred browser, enter the router’s IP address on the address bar and press enter. Most routers use 192.168.0.1 or 192.168.1.1 as their IP addresses but if these two do not work for you, you can do a quick check through the command prompt.

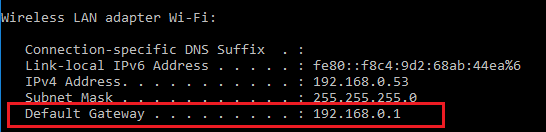
If you are using Windows, open the command prompt and use the command ipconfig. A number of options will appear and among them, you will see Default Gateway. This is your router’s address.
If you are using a Mac computer open the Terminal and use the command netstat –nr and if you are using Linux again open the terminal and then use the command ip route | grep default.
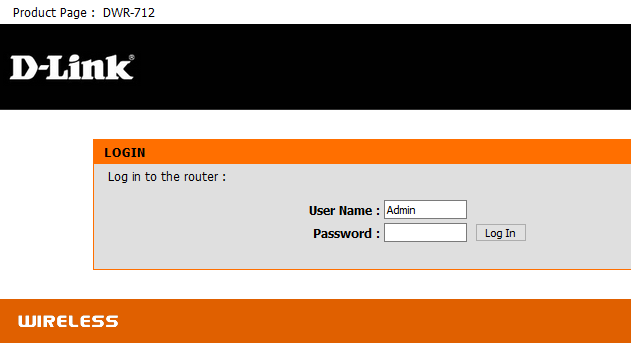
Now you should be on your router’s login page where you will be prompted to enter the login details. Again, these details will vary depending on the router. For D-Link and Belkin routers use Admin as the username and then leave the password field blank. If you are using Linksys, Asus, DrayTek, TP-Link or a TRENDnet router use admin as both your username and password. For other types of routers, do an online search to establish the default login details.
Step 2: Set Up the Ports
But first, you will need to find the port forwarding settings. In my case, am using a D-Link router so I will just go to the advanced settings and the option will be available as Advanced Port Forwarding Rules. For others, the option may be available as Virtual server while others will candidly be labeled as port forwarding. If it has both options you can use any of them.
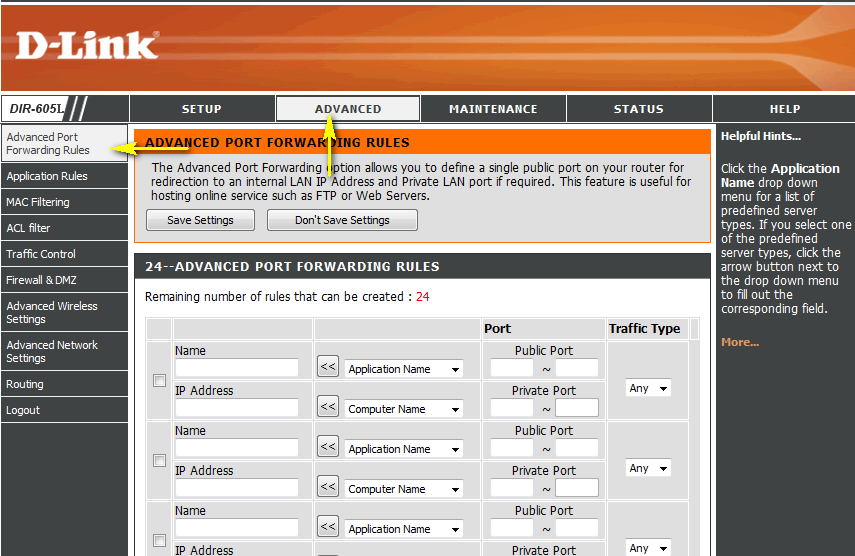
Also, for some routers like Linksys, the option will not be available under Advanced setup but rather under Apps and Gaming. I have included screenshots for most of the major routers.
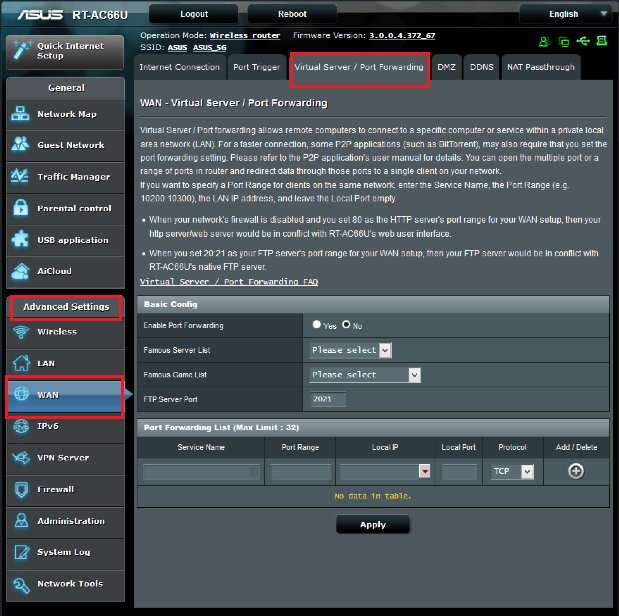
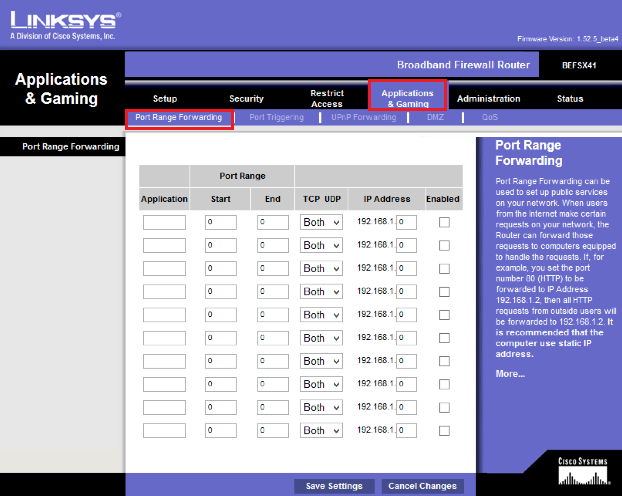
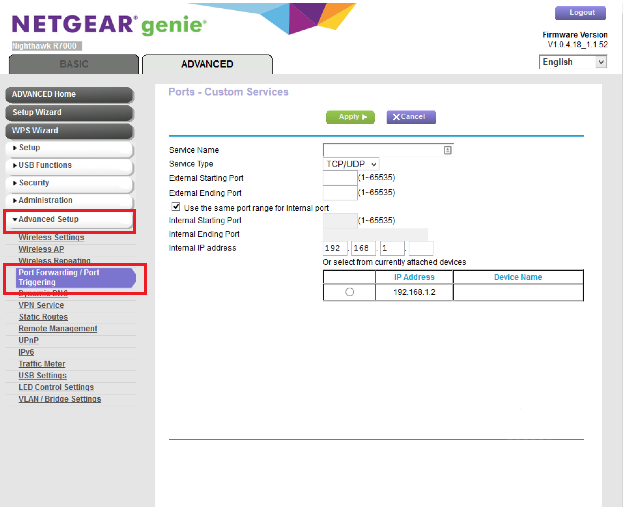
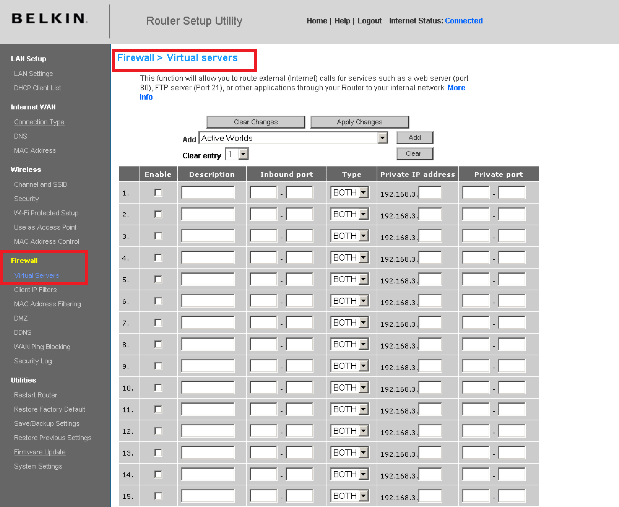
You have arrived at the port forwarding section. Next step is to fill in the required fields which are almost the same for every router. These are; the service name/port name, the port number, protocol to be used (TCP/UDP) and of course the internal IP address you are forwarding to.
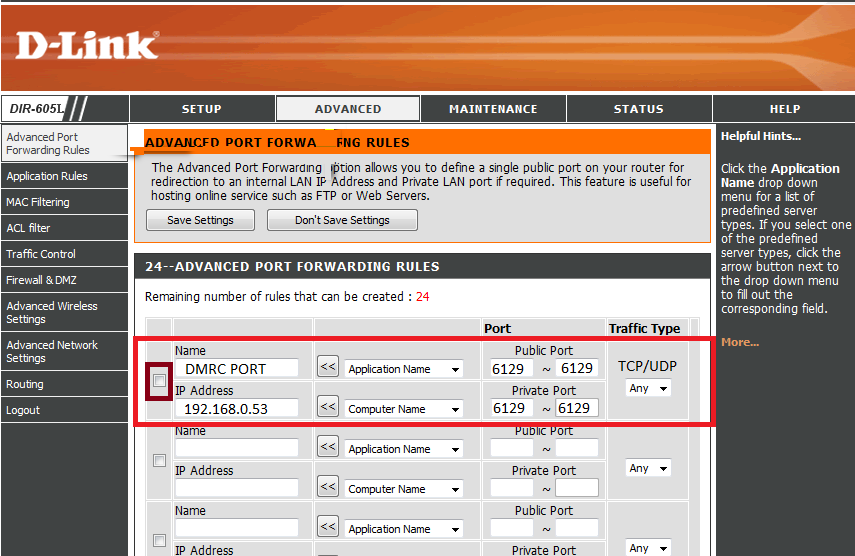
Once the details have been filled, save the settings and you are good to go. Make sure to tick the enable button if it is there. The ports should now be open unless they are being blocked by the computer’s built-in firewall. In this case, you will need to follow the next steps.
How to Enable Port Forwarding in Windows Firewall
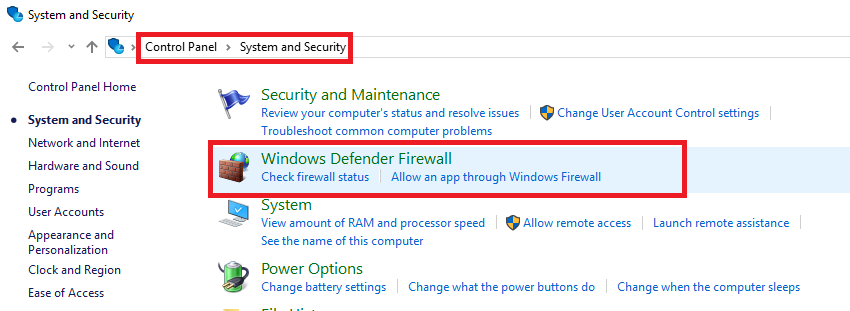
1. Open the control panel, navigate to the System and Security section and open Windows Defender Firewall. Or simply search Firewall on the search bar and it will still take you there.
2. Go to the advanced settings and on the left pane, you will see the Inbound Rules option. Right-click on it and select the New Rule option. Or alternatively, navigate to the Actions pane on the right side of the window and click on New Rule. You will be asked to select the type of rule you want to create and in our case you need to click on port and then Next.
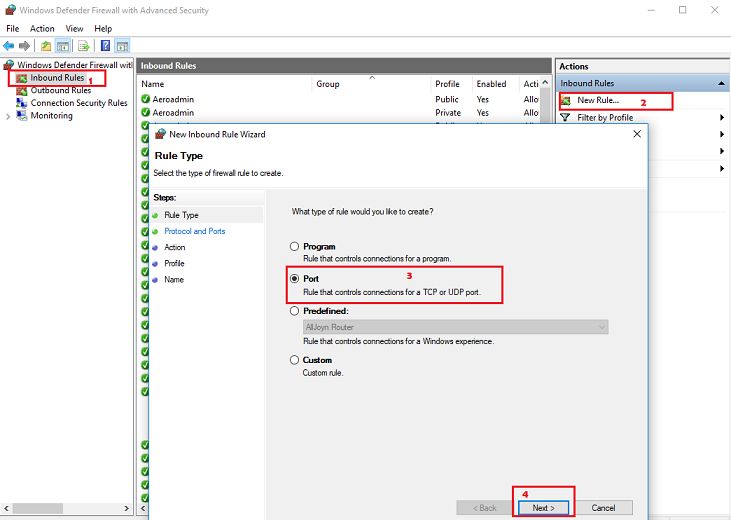
3. Enter the port numbers that you want to allow. But first, specify whether the rule applies to TCP or UDP connections. Dameware Remote Support uses TCP connection.

When listing a number of ports like in our case, use commas to separate them. Or you can use the range option where instead of listing a number of consecutive ports you just specify the range. For instance, you can use 500-512 instead of listing all the ports in between.
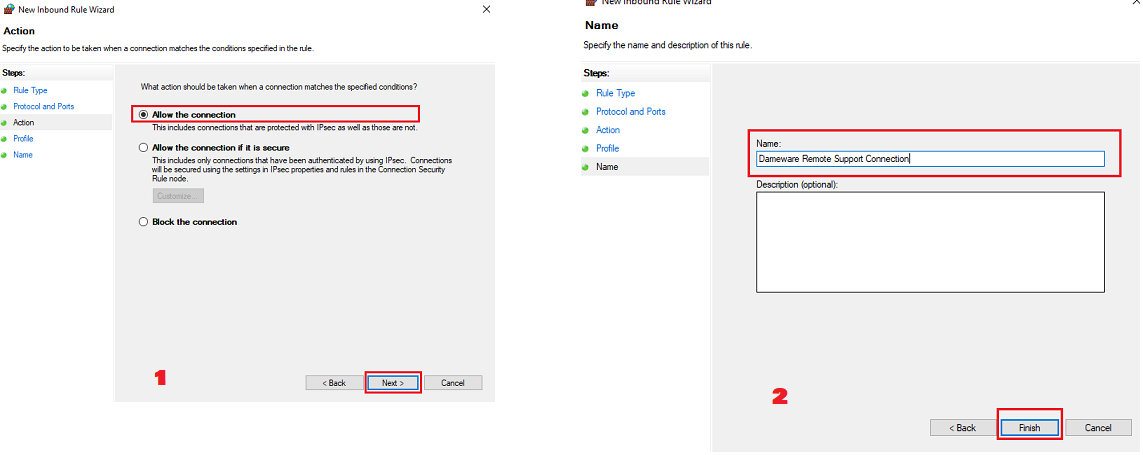
4. Select the Allow the connection option in the next tab and check all the boxes when prompted to select where the rule applies. Next, give the rule a name and finish the process. And you are done. To remove the rule click on it from the list of rules in the middle pane and on the right pane you will see the delete option.
At this point, you should now be able to successfully initiate a remote connection with computers outside your internal network. However, there is just one more step that many forget but one which is crucial. Am talking about changing the internal IP address where you have forwarded the ports from dynamic to static.
If you are using DHCP to assign IP addresses to your devices then at some point it will assign a new address to the remote computer. Which then means you have to go through the whole port forwarding process again using the new address. This next step is meant to ensure that the remote computer’s IP address does not change after a while.
How to Assign Static IP address to Your Device
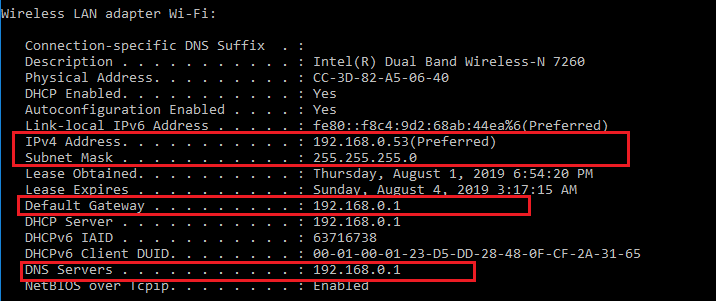
Static IP assignment can be done using two methods. The first is through the router interface which is perfect for devices such as cameras and gaming consoles that lack a direct way to interact with their firmware and software. But if you are assigning an IP for a computer then you can do it directly from its interface. It is easier and it’s the method we will be using. But first, there is some information you need which you will get from the command prompt.
1. Open the command prompt, enter the command ipconfig /all and note down the following information. Your IPv4 address, Subnet mask, Default gateway, and DNS servers.
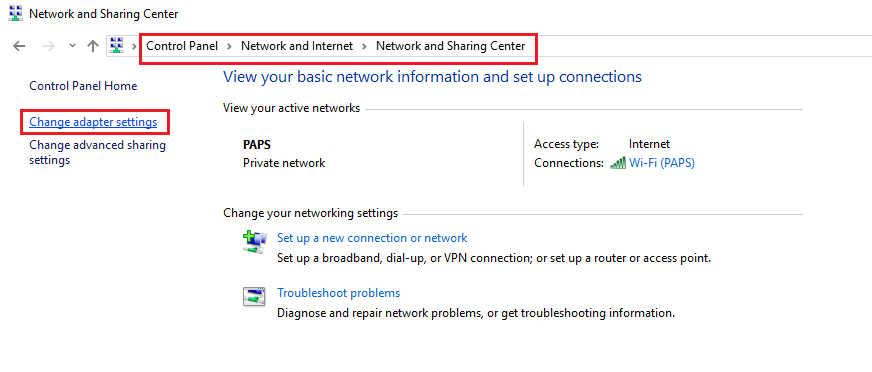
2. Open the control panel, navigate to the Network and Internet section and click on Network and Sharing Center. Once that is done, click on the Change Adapter Settings option that is on the left pane.
3. Right-click on the Ethernet option and go to properties. From the listed items, look for the option labeled Internet Protocol Version 4 (TCP/IPv4), select it and then click on properties.
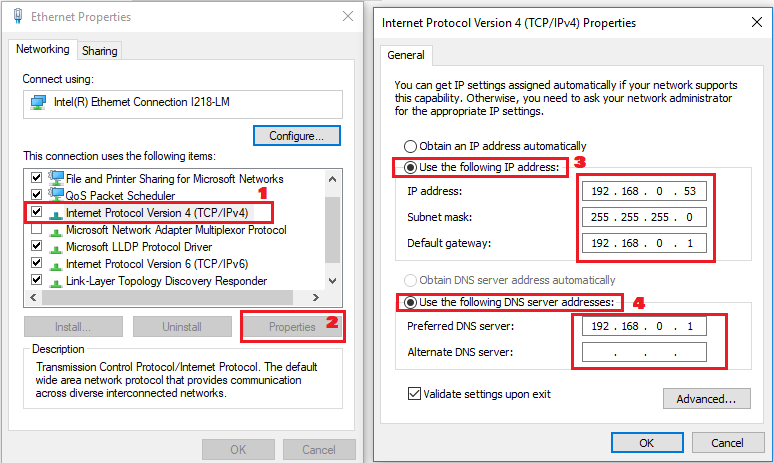
4. Fill in the information you collected from step 1 in the appropriate fields and then click OK.
And you are done.