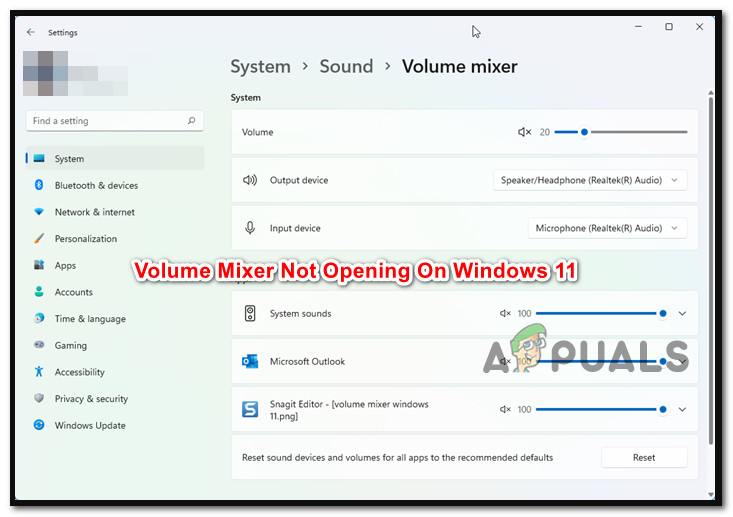
How to Fix ‘Volume Mixer Not Opening’ on Windows 11?
Several Windows 11 users report that since installing a pending Windows update, the volume mixer is no longer opening for them, regardless of how they attempt to open it. This problem affects every Windows 11 edition, including Home, Pro, Education, and N versions.
After investigating this issue, it turns out that there are several different underlying causes that might be producing this type of problem on Windows 11. Here’s a list of potential culprits that you should be aware of:
- Frequent inconsistency – It turns out that many of the issues that may be causing Windows 11’s Video Mixer function to stop working are already fixed automatically by the Windows Audio troubleshooter. Because of this, running the Audio troubleshooter and implementing the suggested remedy is the best method to begin addressing this issue.
- Outdated generic audio driver – If your audio driver hasn’t been updated in a while and Windows Update cannot do so, you probably have this issue because you are running an outdated audio driver version. In this situation, you may use Device Manager to force the driver version to update.
- The generic driver is incompatible to a certain extent – If you’re using a generic update (migrated after upgrading to Windows 11), it’s highly probable that the broken Video Mixer component will be fixed if you take the effort to install the specific sound card driver for the motherboard you’re using.
- Driver or app conflict – There are several moving elements in every operating system, including Windows 11, and they may potentially obstruct the sound output. Drivers and third-party processes may eventually be at fault for this strange behavior. If this issue arises, consider using the most recent System Restore snapshot to restore your computer to a previous state where the issue did not exist.
- Bad Windows Update – This issue was first brought on by a flawed update that was only accessible to members of the insider program. Fortunately, Microsoft ultimately released a solution with the cumulative update that addressed the issue. Therefore, you must apply the most recent outstanding updates accessible through Windows Update to resolve an update-related issue.
- Corruption affecting system files – Some afflicted users claim that this problem may also be caused by a specific system file corruption. Other customers experiencing identical issues with the volume mixer have attested that running SFC and DISM scans in short succession solved the issue. In more ser
Now that we have gone over every potential reason why you could be experiencing this problem on Windows 11 let’s go over a series of fixes that other affected users have successfully used to fix the functionality of the Volume Mixer.
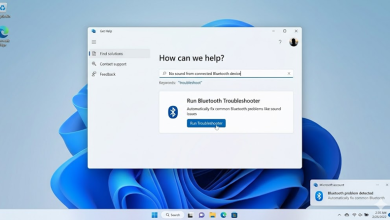
1. Run the Audio Troubleshooter
The first thing you should check when resolving this specific issue is whether your Windows 11 installation can resolve this problem automatically.
It turns out that Microsoft is already aware of this issue, and the developers have already released a few automatic solutions to address the volume mixer issue on Windows 11.
You must run the Audio Troubleshooter and implement the suggested remedy to benefit from these automatic fixes.
Many impacted customers have validated this repair, especially those that updated from Windows 10 to Windows 11 rather than completely installing the newest operating system.
To launch the Audio Troubleshooter and carry out the suggested repair on Windows 11, adhere to the steps listed below:
- To begin, hit Windows key + R to see the Run dialog box.
- To access the Troubleshooting tab of the Settings app, type “ms-settings:troubleshoot” and hit Enter.
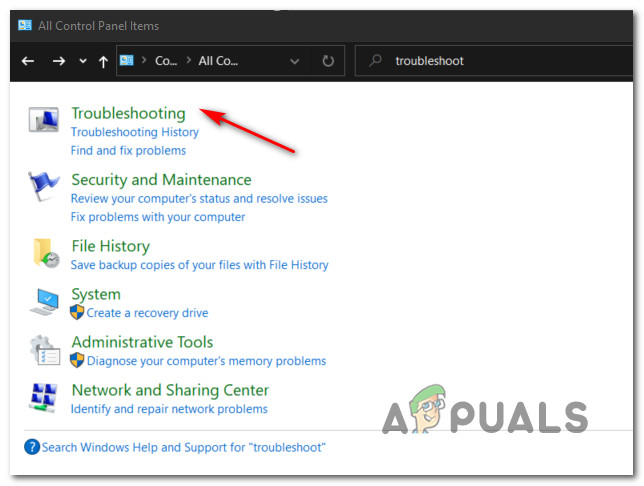
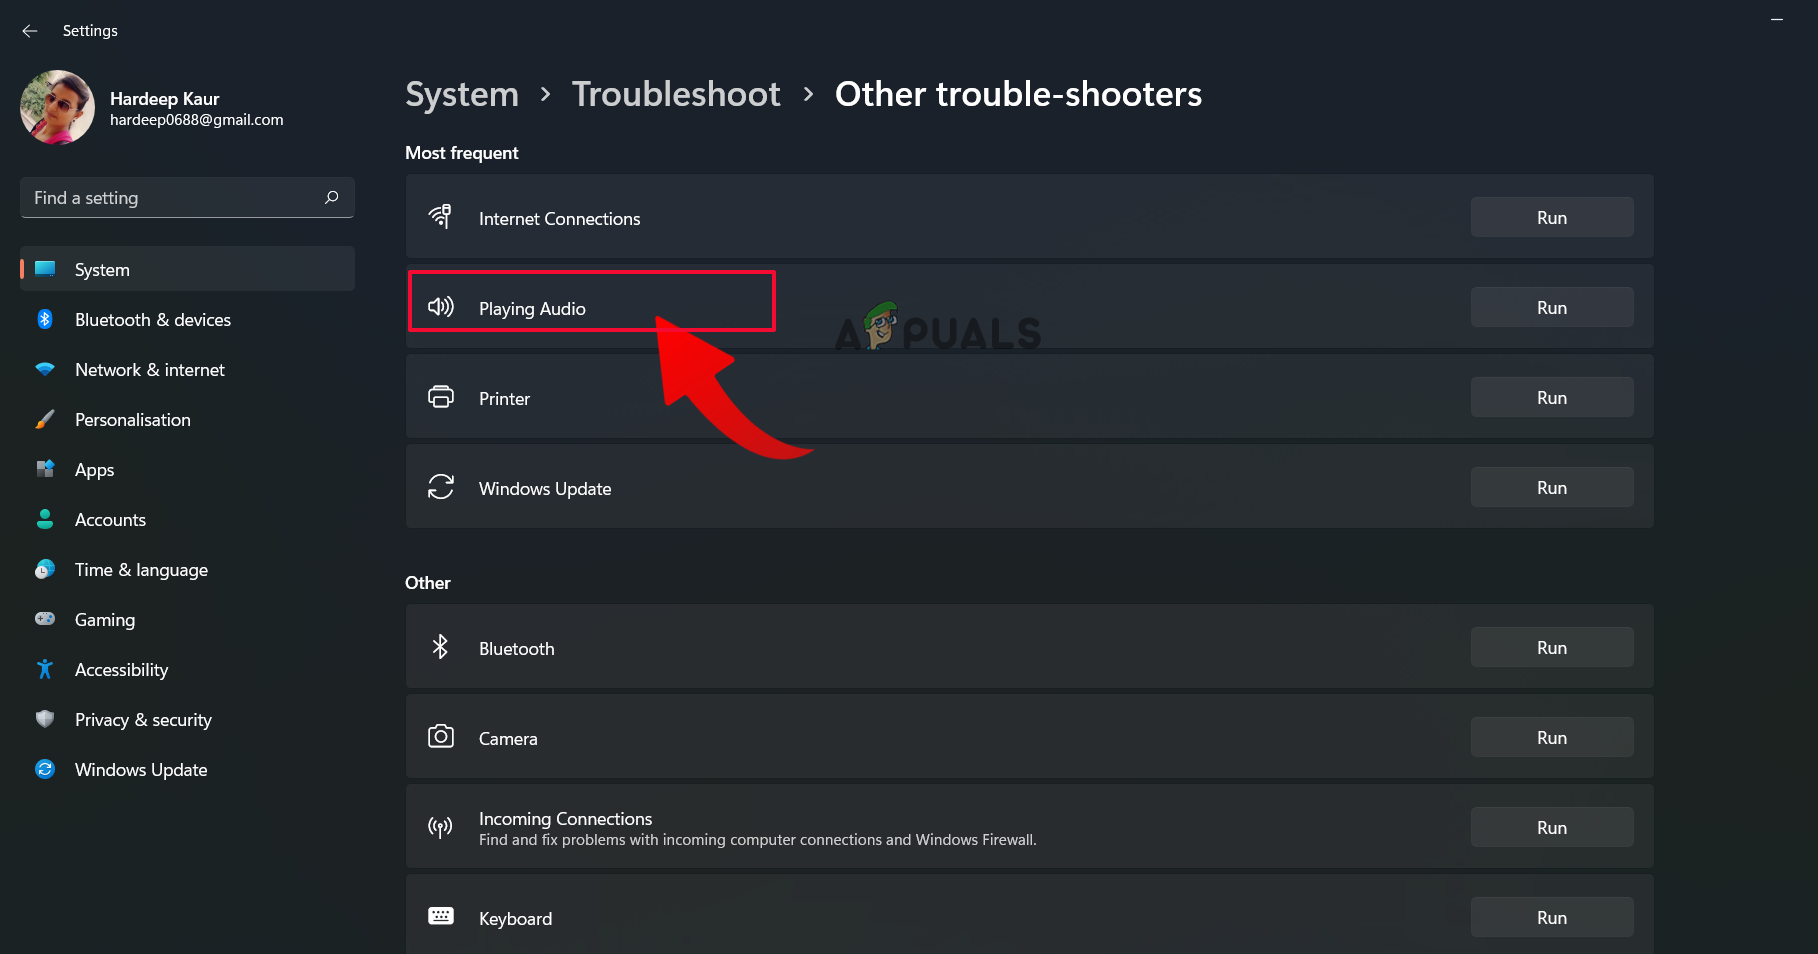
Access the Troubleshooting tab - Click on Other Troubleshooters (under Options) on the Troubleshoot tab’s right-hand corner to access it.
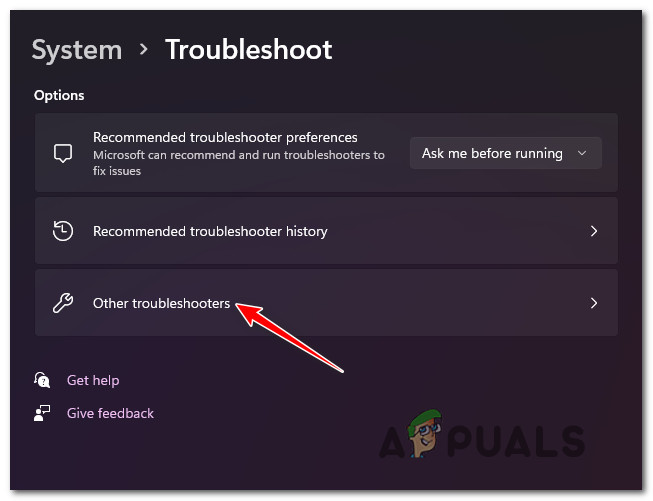
Access the Other Troubleshooters - The Run button connected to Playing Audio can be found on the following menu’s Most often section. Click on it to initiate the procedure.
Run the playing audio troubleshooter - After launching this troubleshooter, be patient and wait until the preliminary investigation is finished.
- Selecting the default audio device is the next step. Make sure you choose the device that you’re actively using.

Select the default audio device - Wait until the tool has finished analyzing your Audio device for issues once you have deployed this scan.
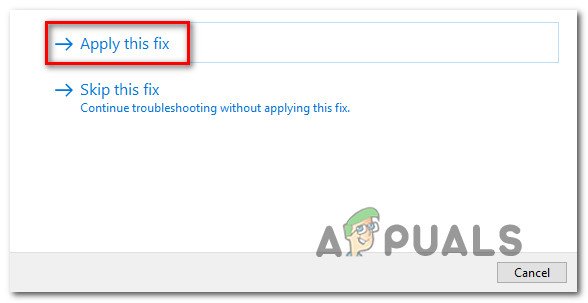
- If an issue is found, you will be given advice on how to fix it. Apply the suggested patch by clicking “Yes, Apply fix” or “Yes, Open *menu” when prompted by the on-screen prompts.
Applying the recommended fix - Once the subsequent startup is finished, restart your computer to determine if the problem has been resolved.
If the problem is still not fixed, move to the following method below.
2. Update the Generic Audio Driver
The next thing you should do is make sure that the audio driver you’re presently using is updated to the most recent version of the troubleshooter didn’t help your situation.
Windows Update should automatically update and maintain this driver. However, there are times when an out-of-date audio driver that is incompatible with your current OS version leaves you helpless.
It has been reported by several Windows 11 users that the issue was ultimately resolved when they utilized Device Manager to compel your OS to update the driver.
What you must do is as follows:
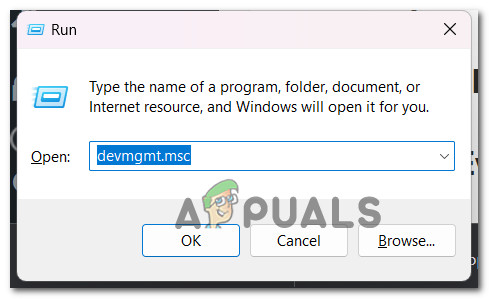
- To begin, hit Windows key + R to see the Run dialog box. Next, launch Device Manager by typing “devmgmt.msc” and pressing Enter.
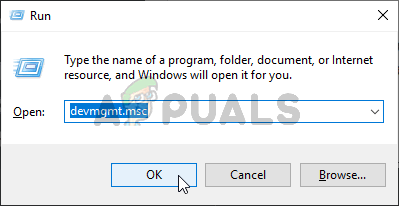
Access the Device Manager tab - Select Yes if the User Account Control popup asks you to provide admin access.
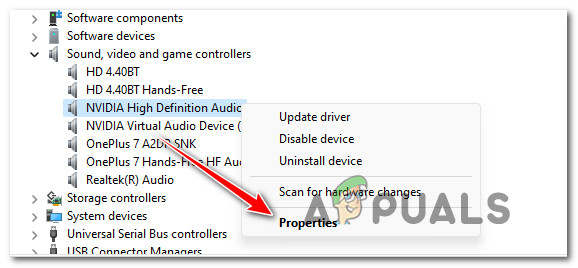
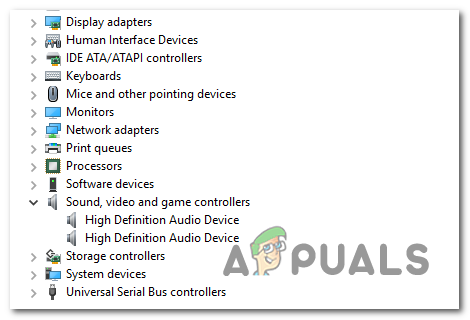
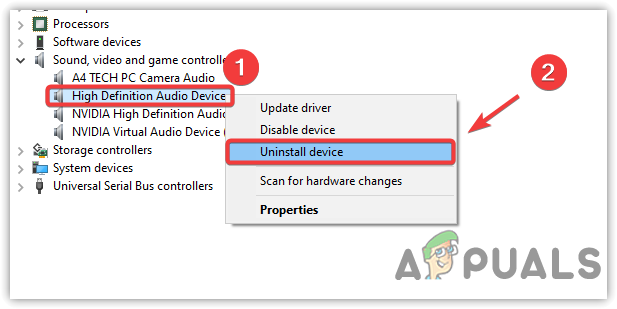
- When you are in Device Manager, extend the Sound, Video, and Game Controllers drop-down menu by navigating through the list of installed applications at the bottom of the screen.
- Select your high-definition audio driver by right-clicking inside the Sound, Video, and Game Controllers menu.
- From the context menu that just appeared, click on Properties.
Accessing the Properties screen - Use the top menu to choose Driver from the Properties screen, then select the Update Driver button.
- Click on Search automatically for drivers on the following screen.
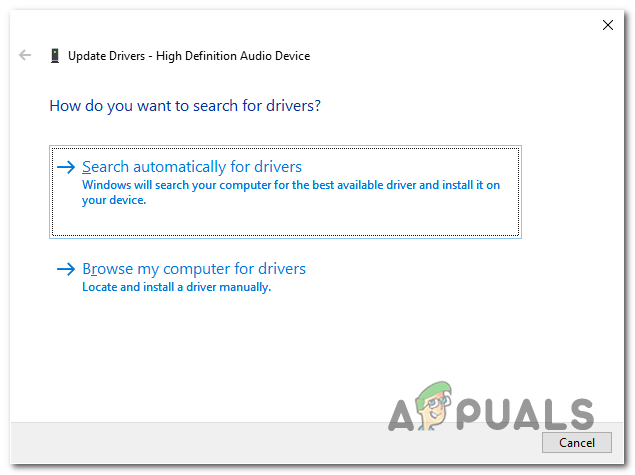
Update the audio driver - See if a new audio driver version is found by waiting. Install the new driver version by following the on-screen instructions if a new version is found.
Note: If Device Manager was unsuccessful in locating a new driver version, go to Windows Update and select Search for updated drivers. This approach is sometimes more successful than a straightforward driver search using Device Manager.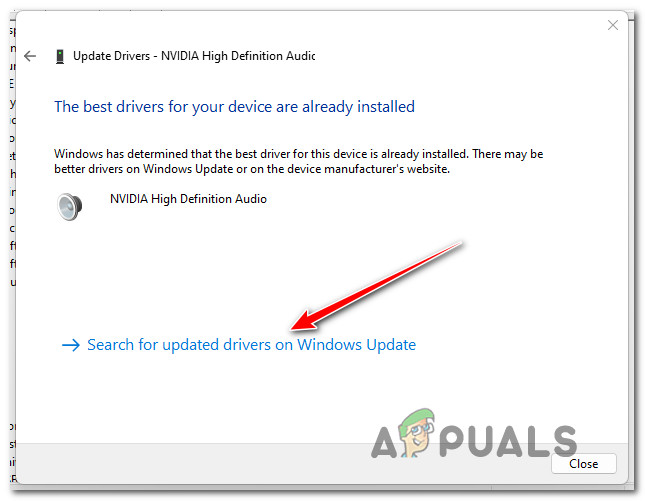
Search for updated drivers on WU - The next time your Windows 11 computer boots up, reboot it if a new audio driver has been installed to see whether the Volume Mixer problem has been resolved.
If you’re still unable to access the Volume Mixer on your Windows 11 computer, move down to the next method below.
3. Uninstall the Realtek driver
One additional circumstance that is prevalent might be harming Windows 11’s Volume Mixer component. If you’re utilizing a dedicated audio disk that was transferred from Windows 10 or Windows 8.1 after you upgraded the OS to the most recent version rather than performing a clean installation of Windows 11, you may anticipate dealing with this issue, according to other impacted customers.
In this situation, it’s likely that your specialized driver does not completely support Windows 11. To solve this issue, you must delete the existing specialized driver and switch to a generic audio counterpart.
The steps listed below should help if you’re seeking explicit instructions on how to achieve this:
- To bring up the Run dialog box, press the Windows key + R.
- Next, launch Device Manager with administrator access by typing “devmgmt.msc” and pressing Ctrl + Shift + Enter.
Access Device Manager - Select Yes when prompted by User Account Control (UAC) to give admin access.
- Expand the drop-down selection for Sound, video, and gaming controllers by scrolling down the list of installed drivers in Device Manager.
Access the Audio adapter settings - To access the context menu, right-click the dedicated audio driver and select Properties.
- Navigate to Driver and select Uninstall Device from the Properties menu of your audio driver.
- Check the box next to “Try to delete the driver for this device” and click “Uninstall” when prompted for confirmation.
Uninstall the audio driver - Simply restart your computer after the driver has been removed. Your Windows 11 installation will detect that there isn’t an active audio driver on the subsequent startup and will immediately install and enable a generic driver.
- Check whether the Volume Mixer issue is resolved once your computer restarts.
If the same problem is still occurring, move to the next method below.
4. Disable Exclusive Mode
This problem arises in some instances because a volume mixer-managed program is intended to transport DTS or DOLBY bitstreams across HDMI or SPDIF.
These streams are impermeable because the audio has already been encoded; no audio can be added to them as they travel to a receiver like a TV.
This is the cause of your inability to use the volume mixer interface if you are utilizing DTS or Dolby bitstreams over HDMI or SPDIF. Fortunately, turning off Exclusive Mode for the Playback device you’re using right now will fix the problem in this instance.
When Exclusive Mode was turned off, and the computer was rebooted, according to several impacted users, the problem was fixed.
What you must do is as follows:
- To bring up the run dialog box, press the Windows key + R. The Sound window will appear once you type “mmsys.cpl” and hit Enter. Click Yes to provide admin access if the UAC (User Account Control) prompts you.
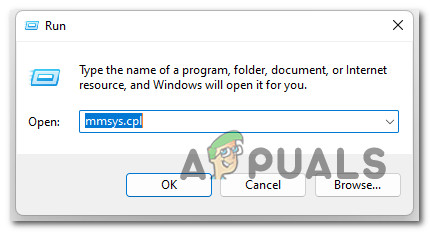
Access the Sound Properties screen - Once there, choose the Playback tab, after which you should right-click on the active playback device and select Properties from the context menu.
Note: It’s crucial that you choose the appropriate playback device. Find the gadget whose icon has a green checkmark next to it. That’s the one that is currently active. - Select the Advanced tab from the window’s horizontal menu once you’re on the Device Properties page.
- Go to the Exclusive Mode section of the Advanced tab and uncheck the option next to Allow programs to assume exclusive control of this device.
- Restart your computer after clicking Apply to save it to make the modification take effect.
- Open the Netflix app once more to see if the problem has been fixed when the subsequent startup procedure is finished.

Disable Exclusive mode
If the problem is still not fixed and you cannot access the volume mixer frame, move down to the next method below.
5. Install pending Windows Updates
Make sure you are using the most recent build of Windows 11 before attempting any of the other fixes below. As briefly described above, this issue was initially brought on by a flawed Windows Update made available for the Windows 11 development build.
Microsoft has now issued several hotfixes that ultimately fixed this issue (if it was caused by a bad update in the first place).
For step-by-step instructions on installing each upcoming Windows 11 update to bring your build up to date, see the instructions below:
- By hitting Windows key + R, a Run dialog box will be shown. To access the Windows Update page of the Settings menu, type “ms-settings:windowsupdate” into the text box and click Enter.
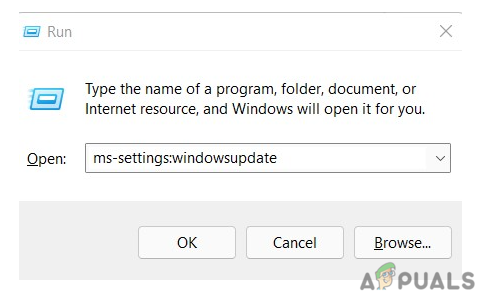
Open the Windows Update component. - To check for new Windows 11 updates, navigate to the Windows Update screen and select Check for Updates from the right-side menu.

Checking for updates on Windows 11 - Wait till the initial scan is finished before asking WU if there are any new updates. Install Windows 11 updates if any new ones are available by clicking Download now, waiting until they have finished downloading, and then clicking Install Now (if the installation doesn’t begin immediately).
- When Windows 11 prompts you to restart your computer, wait until all updates are installed.
Note: Keep in mind that you might be asked to restart your PC before each update is done if you have a lot of outstanding updates that need to be installed. If this occurs, follow the instructions, but be sure to come back to this screen when the subsequent restart is finished and finish installing the remaining updates. - Once you’ve applied every update available and upgraded your Windows 11 version, keep an eye on the situation to see if the volume mixer problem has been resolved.
If the problem is still occurring, try the next potential fix below.
6. Deploy DISM and SFC Scans
If you’ve reached this point without finding a workable solution, you should look into a possible instance of system file corruption that adversely affects your audio outputs.
The sensible decision would be to employ a few built-in tools unless you wish to take the third-party way (SFC and DISM).
Note: The system file corruption that can impair your OS’s capacity to address dependencies utilized by Windows Update can be fixed using these two built-in programs.
Note: The two built-in utilities, System File Checker and Deployment Image Servicing and Management, can resolve the most frequent types of corruption that might result in this problem.
A System File Checker scan is the best place to start because it doesn’t need a steady internet connection.
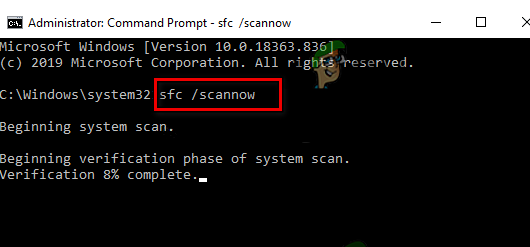
Note: To replace damaged system file components with working ones, System File Checker employs a locally held cache. This procedure shouldn’t be stopped until it’s complete to prevent more logical mistakes.
Depending on your read and write speeds, this procedure might take up to an hour or longer if you’re using an old-school HDD rather than a more recent SSD.
Important: If the System File Checker scan briefly freezes while running in your case, wait for the real-time tracking to resume before closing the window.
Restart your computer when the SFC scan is finished to determine whether the voice mixer problem has been resolved.
Continue by doing a DISM scan if the issue is still present.
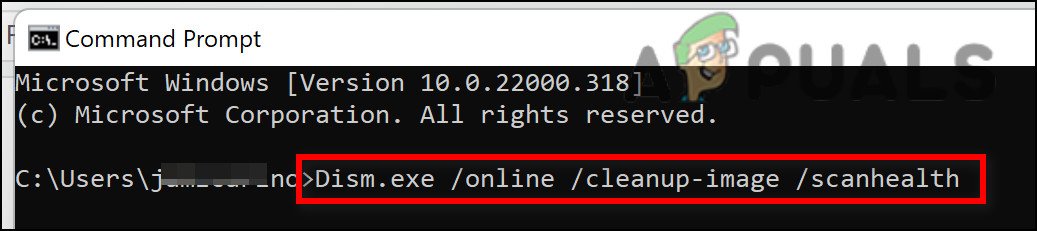
Note: Ensure your Internet connection is steady before beginning this operation since DISM uses a sub-component of Windows Update to replace damaged files with counterparts free of corruption.
Restart your computer after completing the SFC and DISM checks to determine whether the audio problems with your Windows 11 machine have been resolved.
Continue to the final suggested solution below if the issue is still present.
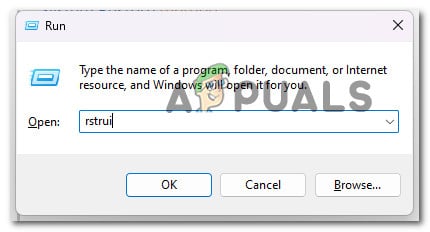
7. Use a system restore point
If you’ve gone this far without finding a workable solution, you should investigate the possibility of driver compatibility (especially if this problem started occurring after you installed or updated an app).
It wouldn’t hurt to start utilizing System Restore to return your computer to a time when this conflict was not there if you only recently became aware of this problem after making a specific modification (a new driver installation, a driver swap, the installation of new software, etc.).
IMPORTANT: System Restoration is set up to produce and save fresh restore snapshots in response to significant system events. You ought to have a ton of restoration snapshots to pick from unless you change this default behavior.
By deploying a previously saved System Restore point described in this tutorial, you will receive detailed instructions on applying this repair. With this procedure, you can return your PC to a prior condition when this problem was not present.
Once the operation is complete, check whether the Windows 11 volume mixer problem is still there after using the previous approach to get your PC back to a working state.
Change to the technique below if the issue is still not fixed.
8. Deploy a clean install or repair install procedure
If none of the earlier suggestions in this article were successful in aiding you in solving your issue, there is one last fix at your disposal. At this point, you should think about the possibility of your incapacity to connect your headset due to corrupted sound requirements.
Since numerous system files, in this case, fit the offender’s profile, the best course of action is to just replace every system file with a counterpart that you know is healthy and untouched by corruption.
You may achieve this using any of two methods:
• Clean install – Give this a shot if you’re looking for a quick fix. The biggest drawback of clean installing Windows is that it will delete all of your personal files and applications that are now stored on the same drive as your operating system unless you have a backup of your data beforehand. This is because a clean installation of Windows will enable you to replace all system files without the usage of installation discs.
• In-place repair vs. repair install – If you have some free time, we suggest using an in-place repair. The essential advantage of this process is that your personal data, games, and apps are kept intact, even though it is a little more time-consuming and requires appropriate Windows 11 installation DVDs.