[FIX] ‘Shell Infrastructure Host’ High CPU Usage on Windows 11
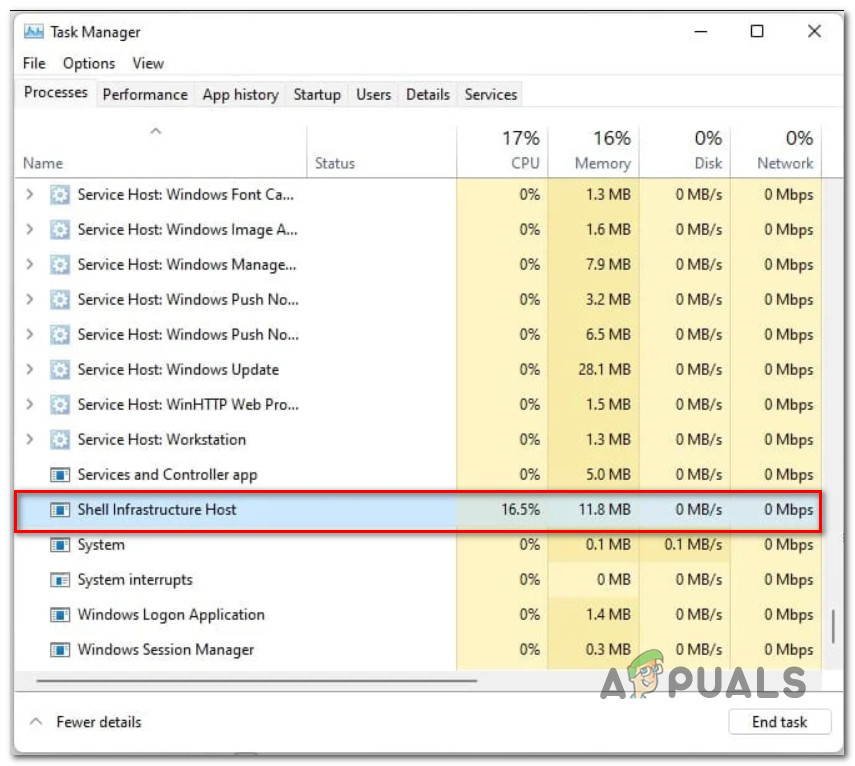
A lot of Windows 11 users are reporting that the Shell Infrastructure Host process is using a lot of CPU resources in situations where it shouldn’t. For example, affected users are reporting that the Shell Infrastructure Host is hogging all available CPU resources when performing mundane tasks like viewing photos on internal or external SSD.
After we’ve investigated this particular issue, we realized that there are actually several different underlying causes that might directly or indirectly cause this type of behavior in Windows 11. Here’s a list of culprits that you should be aware of:
- Cached System Maintenance data – More often than not, this particular issue is brought forward by some kind of bug affecting the cache folder that your WIndows installation accumulates. Several users dealing with the same kind of issue have confirmed that the problem was entirely resolved in their cases after they ran the System Maintenance Troubleshooter and applied the recommended fix.
- Hotfixes are not installed – This issue dates back to Windows 10, so Microsoft has had plenty of time to deal with this issue (albeit not successfully). Their latest attempts have been with a series of hotfixes that arrived via cumulative updates on both Windows 10 and Windows 11. If these hotfixes are missing on your Windows PC, install them and see if this fixed the issue in your case.
- Corrupted Photos installation – If you’re only experiencing this issue while your PC is busy using the Photos app (or a sub-component) the first thing you need to do is to reset or uninstall the Photos app from the App & Features screen. This will force your OS to default to a different photos app and avoid the high CPU usage brought about by the Shell Infrastructure Host process.
- Corrupted Default Photos app – As it turns out, another quick way to get rid of this problem is to manually make the switch from the currently defaulted Photos app to a different program. A lot of affected users have confirmed that this allowed them to take care of the issue swiftly.
- 3rd party program interference – You shouldn’t rule out a 3rd party program from your potential culprit list. As it turns out, there are certain program types (particularly photo editing apps) that might contribute to the CPU usage by running in the background. To make sure this is not the case, perform a clean boot and see if the issue disappears.
- Failing drive – If you’re still using a traditional (HDD) drive, the first thing you need to do is run a CHKDSK scan and figure out if this behavior is not actually related to a failing drive sector that is beginning to fail. Running this type of scan will replace the corrupted sectors with unused equivalents.
- Recent system change – If you only started to experience this problem recently, it might be due to a recent system change (a new driver installation, and installed Windows Update, an installed app, etc.). In this case, you can use System Restore to bring your Windows PC back to a state in which this problem was not occurring.
- Virus infection – Under certain circumstances, you might be actually dealing with this problem due to some kind of malware that has made its way onto your system and it’s hogging your available CPU resources. In this case, you can get the problem resolved by running a deep Malwarebytes scan in order to eliminate the virus infection.
- System file corruption – There are certain scenarios where this problem was proven to originate from some kind of system that is currently affecting your OS installation. In order to fix it, begin by deploying SFC and DISM scans in quick succession and move on to a clean install or repair install if the issue persists.
Now that we went over every potential cause that might directly or indirectly cause this problem, let’s go over every verified fix that other affected users have successfully used to get to the bottom of this Windows 10 & Windows 11 issue.
1. Run the System Maintenance Troubleshooter
This particular problem is typically caused by a bug that affects the cache folder that your Windows system accumulates. After running the System Maintenance Troubleshooter and implementing the suggested remedy, a number of users experiencing the same type of issue have confirmed that the issue was completely fixed in their circumstances.
Note: The Run System Maintenance job examines factors that could slow down your computer, like how many people are currently signed in, whether many programs are running concurrently, and which software is consuming the most CPU.
Keep in mind that if you’re on Windows 11, the System Maintenance Troubleshooter is buried under the old troubleshooting interface and you won’t be available to start it via the regular troubleshooting menu.
Instead, you need to open the Classic Control Panel menu and access the old Troubleshooting tab before being able to open the Run maintenance, task troubleshooter.
Here’s what you need to do:
- Press Windows key + R to open up a Run dialog box.
- Next, type ‘control’ inside the run dialog box, then press Ctrl + Shift + Enter to open up the classic Control Panel with admin access.
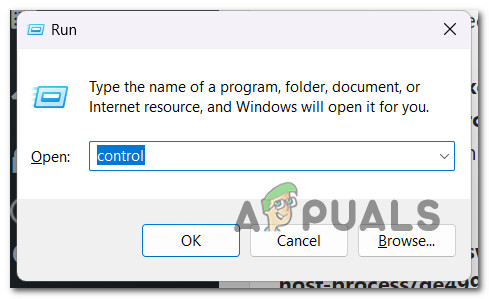
Open up the Classic Control Panel menu - At the User Account Control (UAC), click Yes to grant admin access.
- Once you’re inside the classic control panel menu, use the search function at the top to type ‘troubleshooter’, then press Enter to get the results.
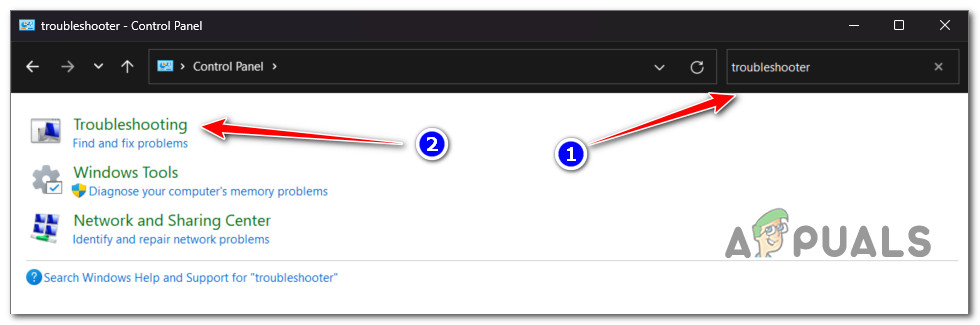
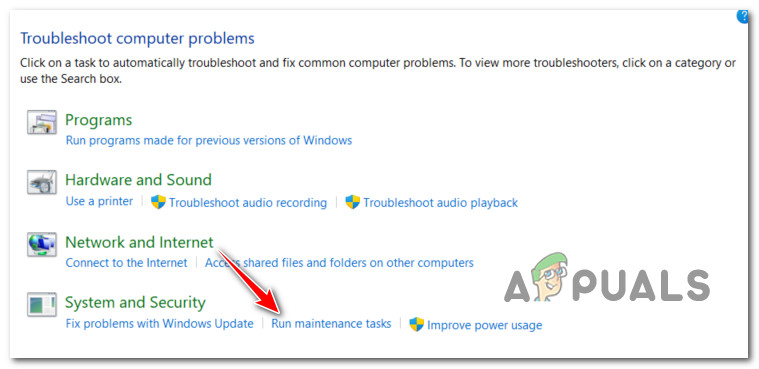
Access the Troubleshooting menu - Next, under the Troubleshooting section, go under System and Security and click on Run maintenance tasks.
Running the maintenance tasks - At the first screen of System Maintenance, click on the Advanced hyperlink, then check the box associated with Apply repairs automatically.
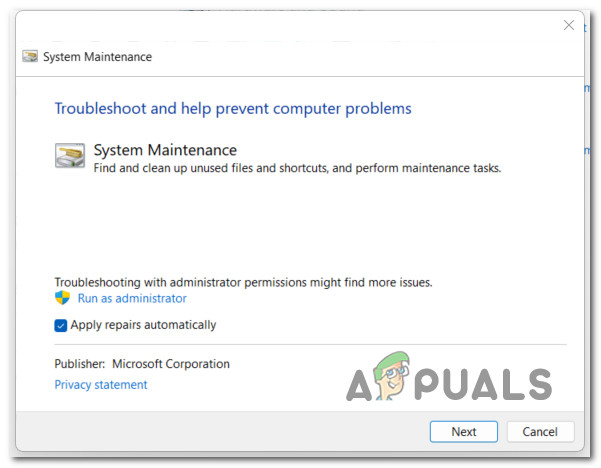
Run as administrator Note: If you see the Run as administrator hyperlink, click on it to re-open the utility with admin access. This will boost your chances of fixing the issue.
- Once you are ready to begin the troubleshooter, click on Next, then click on Try troubleshooting as an administrator (if required), and wait until the utility is complete.
- If the troubleshooter identifies a problem and claims to have fixed it, reboot your PC and see if the problem is now fixed.
In case the problem persists despite running the System Maintenance utility, move down to the next method below.
2. Install every pending Windows update
Microsoft has had plenty of time to address this issue, which dates back to Windows 10. (albeit not successfully). Their most recent efforts involved a number of hotfixes that were made available via cumulative updates for both Windows 10 and Windows 11. Install the missing hotfixes on your Windows computer to see if that resolves the problem for you.
Many users reporting the Shell Infrastructure Host CPU resource hogging issue claim that applying all pending Windows updates would frequently entirely resolve the issue.
In light of the fact that Microsoft has already released a few upgrades aimed at reducing this kind of issue, this is the potential solution you should try first.
You should use the Windows Update feature to check that you’re using the most recent build of your version of Windows 11 in order to solve this issue.
Here’s how to update Windows Update to the most recent version of Windows 11 in order to reduce the Shell Infrastructure Host process’ extremely high resource usage:
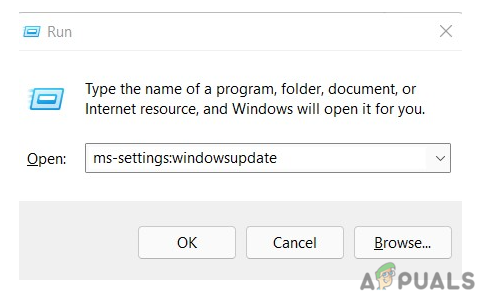
- To bring up the Run dialog box, press Windows key + R.
- To access the Windows Update tab of the Settings program, type “ms-settings:windowsupdate” into the text field and hit Enter.
Checking for updates Note: If you haven’t changed the default UAC settings, you might now see an account control prompt. To allow admin access in this situation, click Yes.
- After that, go to the right side of the screen and select Check for Updates.
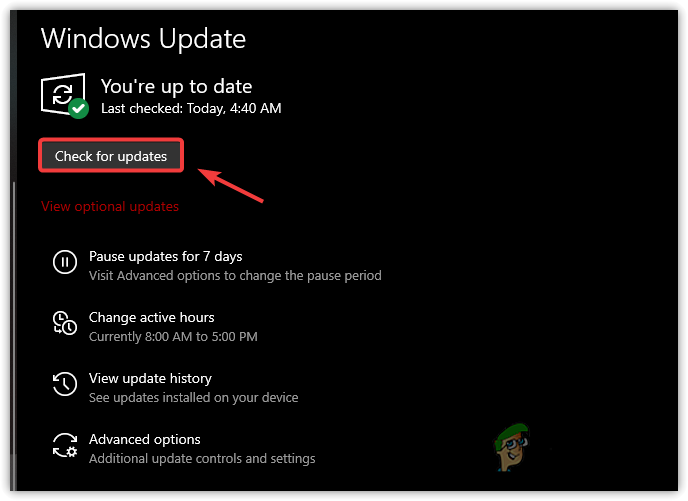
Access the Windows Update menu - When the update has finished downloading locally, select Install Now to begin the local installation.
- Restart your computer to see if the issue has been resolved.
Continue to the next possible solution below if you still experience the same kind of problem even after installing every pending Windows update.
3. Reset or Uninstall the Photos app
If none of the methods above have proven to be efficient, the very next thing you should do is reset or delete the Photos app from the App & Features panel if you only experience this problem when your PC is actively running the Photos app (or a sub-component). By doing this, you can prevent the Shell Infrastructure Host process’s high CPU utilization and force your OS to use an alternative pictures app by default.
It makes sense to start by trying to fix the Photos app from the Installed Apps menu item in Settings. If this doesn’t work, you can try a reset method.
This is the best option for fixing the Photos app because it thoroughly scans each of the app’s component parts (including the video editor). To fix the Photos app completely and stop the “Shell Infrastructure Host” from using a lot of CPU power, adhere to the method below:
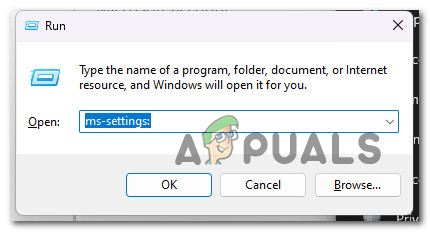
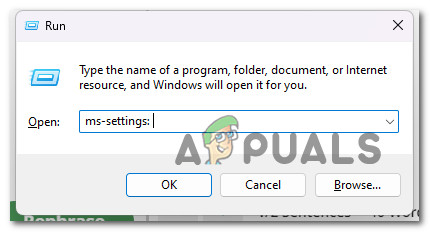
- To bring up the Run dialog box, press Windows key + R. The Settings menu will then appear when you type “ms-settings:” and hit Ctrl + Shift + Enter.
Ms-settings - After entering the Settings menu, select Apps from the side menu on the left.
Note: To bring the side menu forward if it is not already visible, click on the three-line icon in the top-left corner of the screen. - Next, select Installed programs from the right-side menu by clicking there.
- To discover the Photos app, put “photos” into the search box at the top and hit Enter.
- Select the action icon for Microsoft Photos in the list of results.
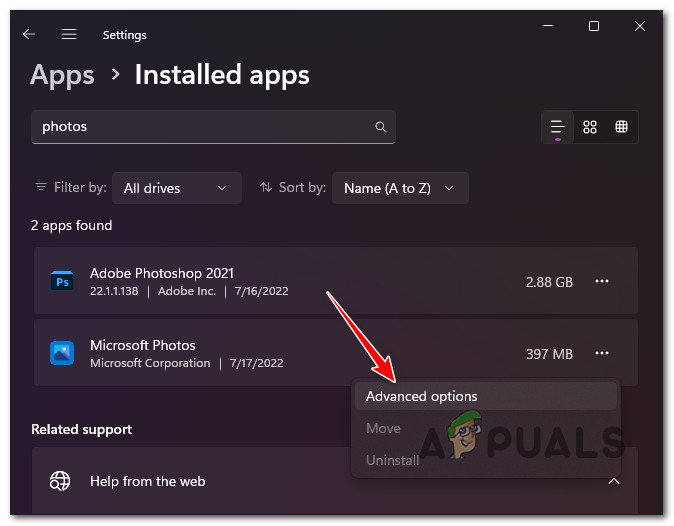
Access the Advanced menu - Next, hit the Repair button next to Reset at the bottom of the screen.
- After the repair process is finished, restart your computer and wait for the subsequent startup to finish.
- If the same kind of issue is still occurring, go under the Reset tab once again (by following the instructions above once again) and click on Reset to trigger a reset procedure.
- Wait until the operation is complete, then reboot your PC once again and see if the Shell Infrastructure Host process is still using a lot of CPU resources.
If this problem still didn’t improve the CPU usage, move down to the next method below.
4. Use a Different Default Photos App
It turns out that manually switching from the currently set default Photos app to another software is another easy fix for this issue. Many impacted consumers have attested that it made it possible for them to resolve the problem quickly.
If you want to make this change without installing a 3rd party app, the only way to do it is to replace Microsoft Photos with Windows Photo Viewer – this is known to improve CPU usage by a big margin.
If you are prepared to go this route, follow the instructions below to access the Default apps tab and make the change away from Microsoft Photos to Windows Photo Viewer.
Here’s how to do this:
- Press Windows key + R to open up a Run dialog box. Next, type ‘ms-settings:’ inside the Run box, then press Ctrl + Shift + Enter to open up the Settings menu.
Access the Settings menu - At the User Account Control (UAC), click Yes to grant admin access.
- Once you’re inside the Settings menu, click on Apps from the vertical menu on the left, then click on Default apps from the menu on the right.
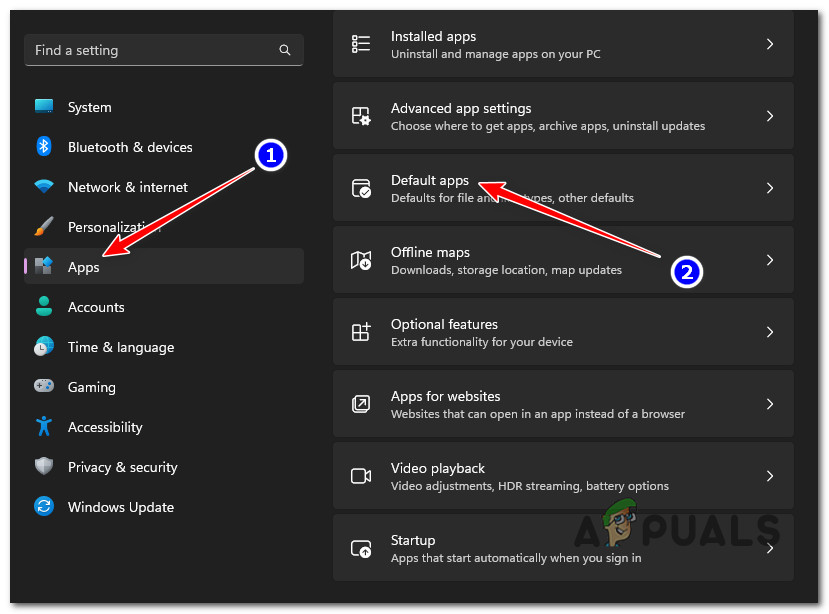
Access the Default apps menu - Next, inside the Default apps, scroll down through the list of default apps and locate Photos.
- From the Photos menu, click on every entry that has the default program set as Photos and change it to Windows Photo Viewer.
- Save the changes, restart your PC and see if the high CPU usage issue has been resolved.
If you’re still experiencing high CPU usage brought about by the Shell Infrastructure Host process, move down to the next method below.
5. Perform a clean boot
You shouldn’t eliminate a third-party program from your list of potential offenders. It turns out that some software (especially photo editing apps) may increase CPU consumption by continuously operating in the background. Perform a clean boot and check to see if the problem goes away to be sure this is not the cause.
If you’ve reached this point without finding a workable solution, you should start focusing on a potential third-party offender who may be contributing to the instability of your Windows 11 computer.
Users who have experienced similar problems claim that an overly defensive antivirus suite or a system optimizer tool that adversely affects CPU use is to blame.
If you frequently experience this high CPU usage behavior, you should clean boot your computer and see if the same kinds of critical crashes still happen.
It is evident that a third-party processor starting service is the problem if you obtain a clean boot state and the error stops happening. Finding the problem is now just a matter of progressively re-enabling every previously deactivated item until you see the error reoccurring.
On the other hand, proceed to the next potential fix below if the same type of problem persists even after a clean boot state.
6. Deploy a CHKDSK scan
The first thing you should do if you’re still using a traditional (HDD) drive is deploy a CHKDSK scan to see if this behavior isn’t truly connected to a failing drive sector that is starting to fail. The corrupted sectors will be replaced with their unused counterparts after running this type of scan.
This problem, according to many users who have encountered it, might also arise if the HDD or SSD that is currently housing your OS installation starts to malfunction. This situation can be verified and the lifespan of your storage hardware increased by executing a CHKDSK scan to replace bad storage sectors with good ones (for a few more months).
These persistent Event Viewer problems would occur if you were still utilizing a normal HDD and portions of the storage sectors used to retain system files were starting to deteriorate.
Running a Check Disk Scan in this situation will help you prolong the life of your HDD by replacing damaged sectors with healthy ones. To rule out this scenario, try running a CHKDSK scan from an elevated CMD prompt.
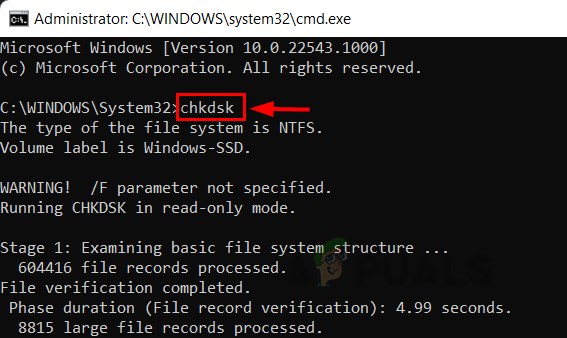
Note: Fortunately, Windows’ built-in CHKDSK tool can scan for errors and corruptions as well as correct any logical mistakes and damaged data that might have been left behind by a forcible deletion attempt.
To grant CHKDSK the permissions it requires to repair damaged files, open it in an elevated CMD window. The steps ought to work regardless of the Windows version you’re using.
Once the CHKDSK scan is complete, restart your computer to see if the excessive CPU utilization problem has been fixed.
If the issue continues, try the next method below.
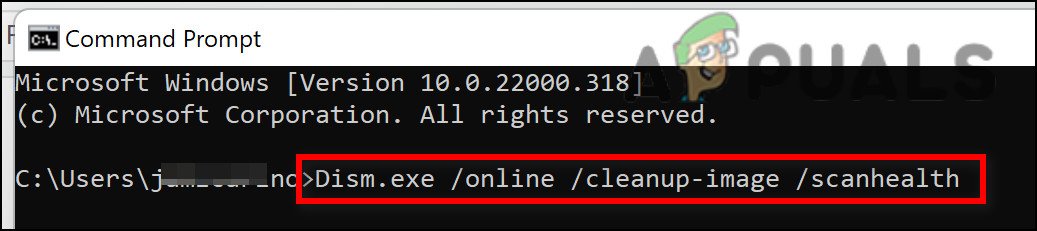
7. Deploy SFC and DISM Scans
If you’ve reached this point in your search for a solution without success, it’s likely that you’re dealing with a system file corruption that keeps reoccurring and leading to significant CPU utilization from the Shell Infrastructure Host process.
Launching SFC (System File Checker) and DISM (Deployment Image Servicing and Management), two built-in tools that can handle the most typical causes of system file corruption, should be the next step.
SFC and DISM are essentially equal, but to increase your chances of fixing the corruption problem, I recommend executing both of them quickly after one another.
It should be noted that DISM receives files from Windows Update in order to replace corrupt counterparts, but SFC gathers healthy system files from a local location.
You may check for system file corruption by running an SFC scan from an elevated CMD prompt.

It is best to continue with this process even if the tool seems to have frozen in mid-use (or prematurely quit the CMD window). After the transaction is complete, you will finally receive the success notification.
Restart your computer after the SFC scan is finished. Next, run a DISM scan after the subsequent startup has finished.
IMPORTANT: Make sure your Internet connection is strong before beginning this process.
After correctly completing the DISM command, restart your computer to verify if the issue has been resolved.
After running both of these scans, if the Shell Infrastructure Host process is still using a lot of CPU power, move on to the next possible remedy below if the problem is still not fixed.
8. Use System Restore
If you have only lately begun to experience this issue, a recent system change may be to blame (a new driver installation, an installed Windows Update, an installed app, etc.). In this situation, you can use System Restore to return your Windows computer to a time when this issue was not present.
Because there are several underlying issues that could be causing this problem, the simplest way to fix it is to use System Restore to restore your PC to a state in which it was working normally.
This tool allows you to restore your entire Windows installation to a stable state where the problem never occurred in order to fix major problems. Your operating system must have previously taken a snapshot that may be used to roll back the Windows installation in order to apply this update, though.
If you haven’t changed the default configuration, Windows should be set up to often preserve System Restore Snapshots (after every installed Windows update).
Before using this technique, it’s important to understand that it will essentially reverse any modifications made after the initial snapshot was made. After the snapshot was taken, all user preferences, game downloads, and application installations would have been lost.
Use the procedures listed below to see how to restore your system if you choose to do so:
- The Recovery Menu should be opened first. When your computer restarts, hit F11 or the key that was designated by the manufacturer of your motherboard.
- After the Recovery Menu displays on your screen, you must click with the mouse or use the keyboard arrows to pick the System Restore option.
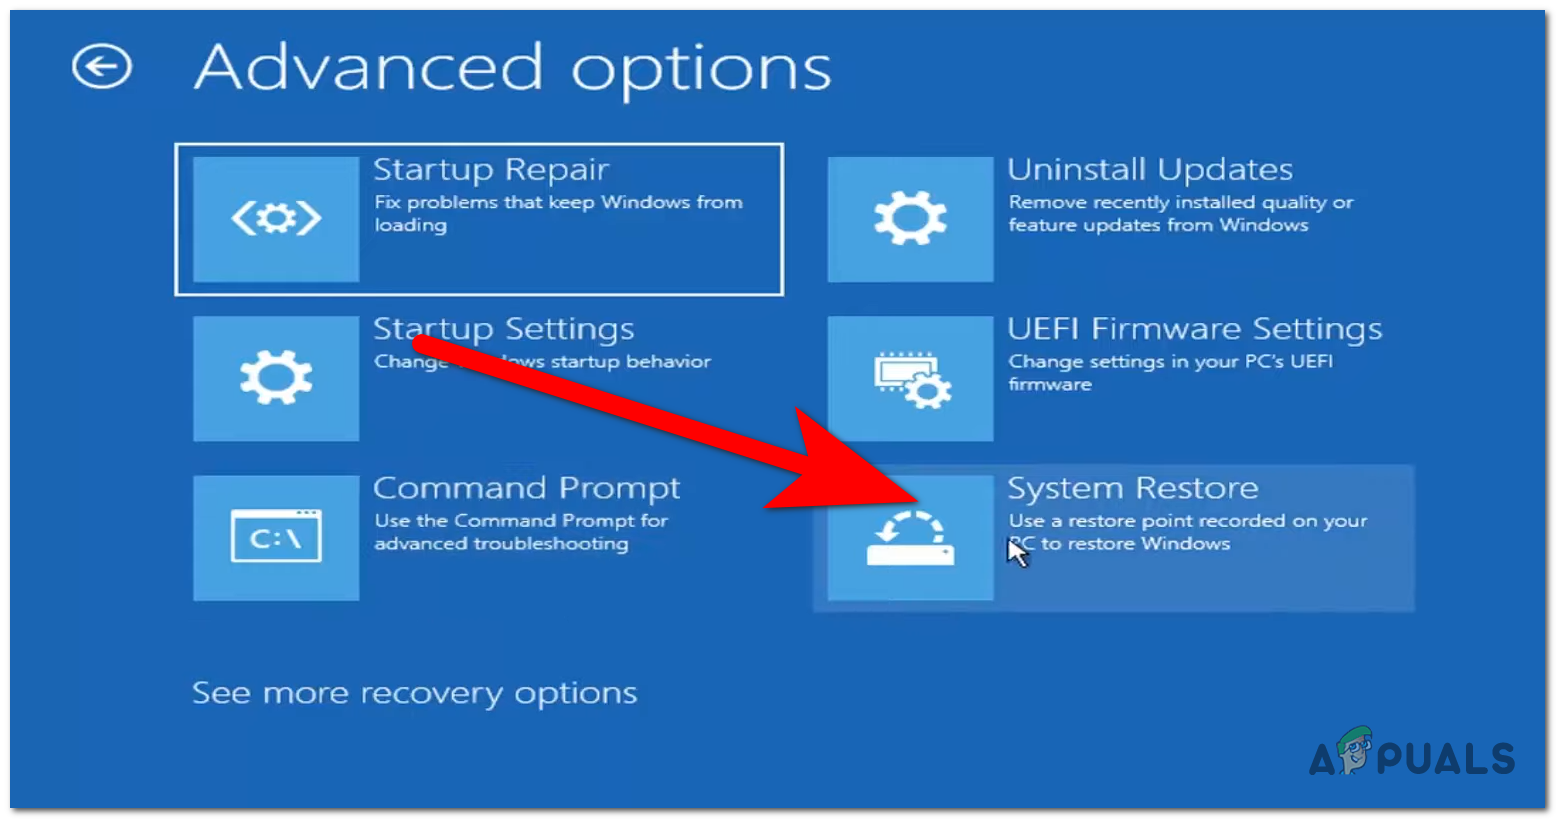
System Restore menu - By doing this, you’ll have access to the System Restore panel. Choosing Next will advance you. Click the most recent restoration point when it shows up on your PC.
- Select Finish to launch the System Restore procedure after finishing the previous step. In order to continue, you must confirm your choice.
- Depending on your PC, the process will take a few minutes to complete.
- Run a test on the PC to see if Windows is still sluggish as a result of the Shell Infrastructure Host’s excessive CPU use.
Continue to the method below in the event that the issue is still not resolved.
9. Deploy a Malwarebytes scan
In other cases, you may be suffering from this issue as a result of malware that has gained access to your system and is using up all of your CPU resources. In this situation, you can solve the issue by performing a thorough Malwarebytes scan to get rid of the virus infestation.
Ironically, a virus infection can also be indicated by a high CPU utilization by the Shell Infrastructure Host process. The Shell Infrastructure Host file may be malware in disguise that is attempting to access system resources by impersonating a system process.
You should use a trustworthy anti-malware tool to do a deep scan in order to verify that this is not the case.
There are many solutions available when it comes to accomplishing this, but since Malwarebytes is one of the most powerful security scanners and is equally successful with malware as it is with adware, we advise using it.
Use this guide to deploy a deep scan with Malwarebytes.
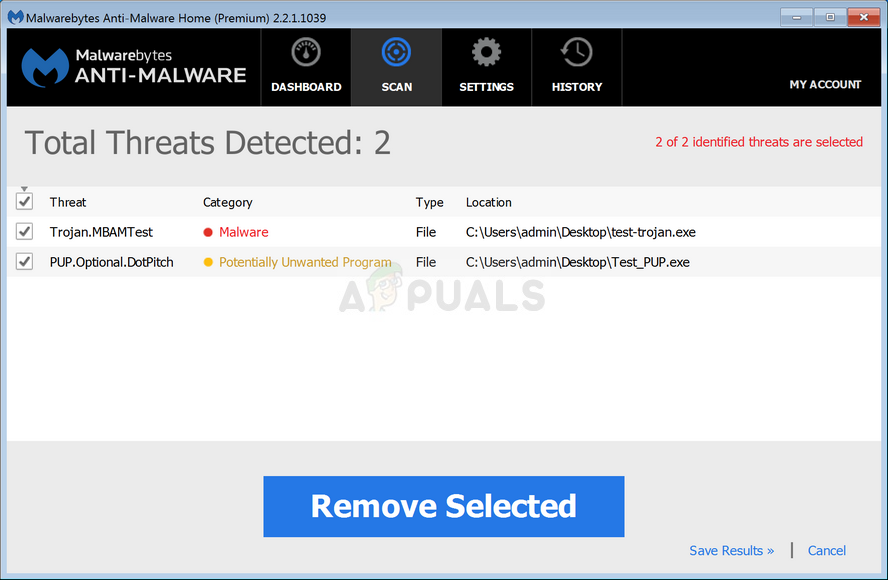
Once the scan is finished, eliminate all instances of infection as directed, restart your computer, and use Task Manager once more (Ctrl + Shift + Esc) to see if the CPU usage is due to the Shell Infrastructure Host process has decreased.
Move on to the procedure below that is listed next if the same type of problem is still present.
10. Perform a clean install or repair install
The only solution left for you is to completely replace all of the impacted system file dependencies with healthy replacements if none of the aforementioned methods have worked for you.
Your only options at this stage are to carry out a clean install or a repair install (in-place upgrade). If you experience problems, we strongly suggest opting for an in-place update (repair installation), if available:
- Repair install (in-place upgrade) – During a repair install, only the system files will be modified (while keeping your personal files, user preferences apps & games).
- Clean install – While this option may be the best if only a few kernel processes are affected, it has the drawback of erasing all user data from the OS disk. All of your personal information will be deleted if you do this, so you should be aware of that.


