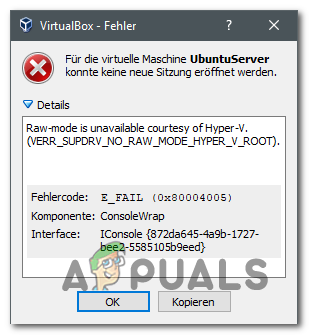
The “Raw-mode is unavailable courtesy of Hyper-V (VERR_SUPDRV_NO_RAW_MODE_HYPER_V_ROOT)” error appears for VirtualBox when they try to launch a virtual machine. For some users, this error happens despite the fact that Hyper-V technology is disabled on their machines.
Raw-mode is unavailable courtesy of Hyper-V (VERR_SUPDRV_NO_RAW_MODE_HYPER_V_ROOT)
When trying to fix this error, your first stop would be at ensuring that Hyper-V is not enabled under Windows Features. If it’s already disabled, other potential culprits might be an enabled hypervisor check, an enabled Device Guard (Credential Guard) or some kind of interference facilitated by a Windows Defender security feature called Core Isolation.
However, on older machine configurations, you might also see this error due to the fact that hardware virtualization is disabled at a BIOS or UEFI level.
1. Disable Hyper-V Management Tools
The number one cause that will cause the “Raw-mode is unavailable courtesy of Hyper-V” error is the fact that Hyper-V is enabled on your machine. This proprietary Microsoft virtualization technology enables the creation of virtual machines on x86 and x64 systems running a Windows version in a native way.
But none of the 3rd party alternatives like VirtualBox or VMware are using it for stability reasons. Even more, they specifically refuse to work when this technology is enabled. However, Windows 10 is now programmed to prioritize Hyper-V over a similar virtualization technology.
As you can imagine, this has the potential of creating a lot of issues, including the VERR_SUPDRV_NO_RAW_MODE_HYPER_V_ROOT error code. To fix it, you will need to disable Hyper-V in order to let the 3rd party alternative to taking over.
And when it comes to doing this, you have two ways forward. You can either do it directly from the terminal, or you can do it from the Programs and Features GUI menu. Feel free to follow whichever approach you prefer:
Disable Hyper-V via GUI
Press Windows key + R to open up a Run dialog box. Next, type ‘appwiz.cpl’ and press Enter to open up the Programs and Features menu. Type appwiz.cpl and Press Enter to Open Installed Programs List
Once you’re inside the Programs and Features menu, use the menu on the right to click on Turn Windows features on or off from the left-hand pane. Accessing the Windows features menu
From inside the Windows Features menu, go ahead and expand the Hyper-V folder. Then, make sure to uncheck the box associated with Hyper-V Management Tools and Hyper-V Platform before finally clicking OK. Disabling Hyper-V via the Windows Features screen
Wait until the procedure is completed, then restart your computer and see if the issue is resolved after the next startup.
Disable Hyper-V via CMD terminal
Press Windows key + R to open up a Run dialog box. Next, type ‘cmd’ inside the text box and press Ctrl + Shift + Enter to open up an advanced Command Prompt. When you finally see the UAC (User Account Control), click Yes to grant administrative privileges. Running the Command Prompt
After you manage to make your way into the elevated CMD terminal, type or paste the following command and press Enter to disable the Hyper-V function:
Once the command is processed successfully, close the CMD window and restart your computer.
At the next startup, repeat the action that was causing the Raw-mode is unavailable courtesy of Hyper-V error and see if the problem is now resolved.
In case this operation didn’t allow you to fix the issue, follow the instructions below for a different way of fixing the problem.
2. Disable Hypervisor check
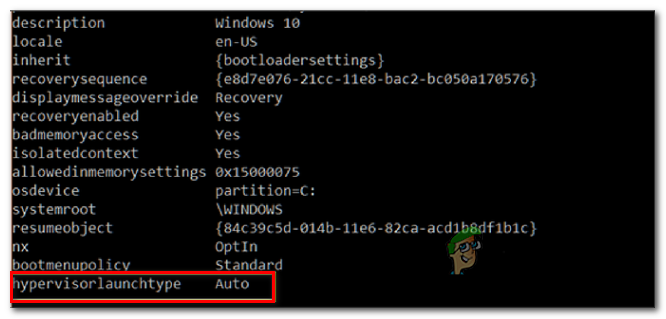
As it turns out, you might encounter this issue even if Hyper-V is disabled. One popular scenario that might cause this issue is an instance where HyperVisorLaunchType service is set to AUTO. This will end up forcing your system to check for applications that use VT-x before every virtual machine launch.
Several affected users have managed to get this issue resolved by running the Bcdedit utility to check the status of HyperVisorLaunchType and disable it in case it’s set to Automatic.
Here’s a quick guide on how to do this on any Windows computer:
Press Windows key + R to open up a Run dialog box. Next, type ‘cmd’ inside the text box, then press Ctrl + Shift + Enter to open up an elevated CMD terminal. Running the Command Prompt
Note: When you arrive at the UAC (User Account Control), click Yes to grant admin access.
Once you’re inside the elevated CMD terminal, type the following command and press Enter to check on the status of HyperVisor:
bcdedit
Note: In case the status of hypervisorlaunchtype set to Disabled, skip the next steps below and move directly to Method 3.
Once the results are in, scroll down to the hypervisorlaunchtype section and see if the status is set to Auto. An example where HyperAdvisor is set to auto
In case the status of hypervisorlaunchtype shows Auto, type or paste the following command and press Enter to set the status to Disabled:
bcdedit /set hypervisorlaunchtype off
After the command is succesfully processed, close the elevated CMD terminal, then restart the host machine.
At the next startup, launch a VirtualBox virtual machine and see if the problem is now resolved.
In case the same issue is still persisting, move down to the next potential fix below.
3. Disable Device Guard / Credential Guard
Other affected users have managed to fix the Raw-mode is unavailable courtesy of Hyper-V error by using the Gpedit (Local Group Policy Editor) to disable Device Guard (also known as Credential Guard).
As it turns out, this combination of enterprise-related software and services geared towards security might end up conflicting with certain VirtualBox VM features. If this is the culprit behind the VERR_SUPDRV_NO_RAW_MODE_HYPER_V_ROOT, you can get the issue resolved easily by disabling Device Guard via the Local Group Policy Editor.
But keep in mind that not all Windows versions have the Gpedit utilities by default. Windows 10 Home and a couple of other associated sub-versions will not include it. However, there are steps that you can take to install gpedit.msc on Windows 10.
Once you’ve made sure that the Local Group Policy Editor is accessible on your Windows version, here’s a quick guide on disabling the device guard:
Press Windows key + R to open up a Run dialog box. Next, type ‘gpedit.msc’ and then hit Enter to open up the Local Group Policy Editor. Running the Local Policy Group Editor
Note: If you are prompted by the UAC (User Account Control) prompt, click Yes to grant administrative privileges.
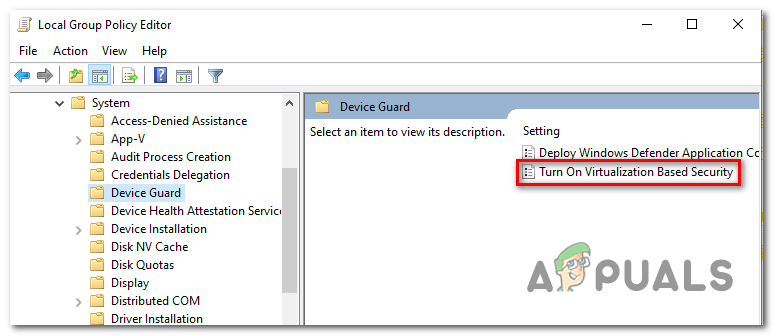
Once you’re inside the Local Group Policy Editor, use the left-hand side menu to navigate to the following location:
Local Computer Policy > Computer Configuration > Administrative Templates > System > Device Guard
After you manage to arrive at the correct location, move over to the right-hand section of the Gpedit utility and double-click on Turn on Virtualization Based Security. Turn on virtualization-based security
Once you’re inside the Turn On Virtualization Based Security window, simply change the status to Disabled and click Apply to save the changes. Disabled virtualization technology
After you manage to do this, DO NOT restart your computer yet. Instead, open up an elevated command prompt by pressing Windows key + R, type ‘cmd‘ and then press Ctrl + Shift + Enter. Running the Command Prompt
Note: When you see the UAC (User Account Control) prompt, click Yes to grant the CMD terminal admin clearance.
Inside the CMD window, paste the following commands and press Enter after each one to delete the related EFI variables that might still cause this problem:
Note: Keep in mind that X is a placeholder for an unused drive. Adjust the value accordingly.
After every command is processed successfully, restart the host machine and see if the problem is resolved at the next startup.
In case you’re still encountering the same “Raw-mode is unavailable courtesy of Hyper-V” error, move down to the next method below.
4. Disable Core Isolation in Windows Defender
As it turns out, a security feature from the default AV can also be responsible for this issue. On Windows 10, Windows Defender has a feature colled Core Isolation – it’s essentially an extra layer of virtualization-based security that’s designed to repel more sophisticated attacks.
However, this security feature is known to interfere with the well-functioning of virtual machines (especially the ones facilitated by 3rd-party alternatives.
Several affected users that were also encountering the “Raw-mode is unavailable courtesy of Hyper-V” error have confirmed that they were finally able to fix the issue by enforcing some modifications that allowed them to disable Core isolation from the settings menu of Windows Security.
Here’s a quick guide on disabling Core Isolation from the settings menu of Windows Defender:
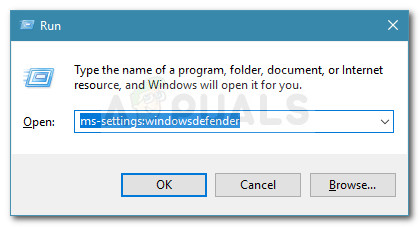
Press Windows key + R to open up a Run dialog box. Next, type “ms-settings:windowsdefender” inside the text box and press Enter to open up the Windows Security tab (former Windows Defender) of the Settings app. Run dialog: ms-settings:windowsdefender
Once you’re inside the Windows Security tab, move over to the right-hand section and click on Device Security under Protection areas.
Next, scroll down through the list of available options and click on Core isolation details (under Core isolation).
Inside the Core isolation menu, ensure that the toggle associated with Memory integrity is set to Off.
Once the modification is enforced, restart your computer and see if the problem is fixed at the next startup.
Disabling Core Isolation via Settings menu
In case the toggle associated with Core Isolation is greyed out or you get an error message when you try to set it to OFF, here’s a quick guide on achieving the same result via Registry Editor:
Press Windows key + R to open up a Run dialog box. Next, type ‘regedit’ inside the text box and press Enter to open up Registry Editor. Then, click Yes at the UAC (User Account Prompt) to grant administrative privileges. Running the Registry Editor
Inside Registry Editor, use the left-hand section to navigate to the following location:
Note: You can either navigate there manually or you can post the location directly into the navigation bar and press Enter to get there instantly.
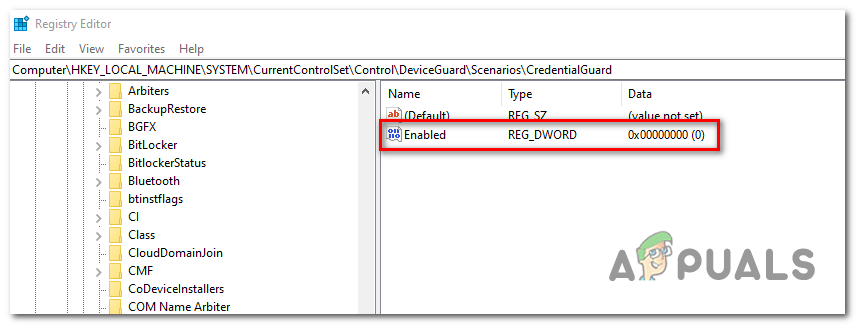
After you manage to arrive at the correct location, move over to the right-hand section and double-click on the Enabled key. Accessing the Enabled key
After you manage to open the Enabled Value, leave the base to Hexadecimal and change the Value data to 0. Setting the value data of Enabled to 0
Click Ok to save the modification, then close Registry Editor and restart your computer to see the changes.
At the next machine startup, repeat the action that was previously causing the VERR_SUPDRV_NO_RAW_MODE_HYPER_V_ROOT error code and see if the problem is still occurring.
In case the issue is still not resolved, move down to the next potential fix below.
5. Enable Virtualization in BIOS or UEFI
Another potential reason that might cause this problem is an instance where hardware virtualization is disabled from BIOS or UEFI settings. Keep in mind that virtualization is enabled by default on every piece of new hardware nowadays, older computer configurations might not have this option enabled by defaults.
If you have an older PC configuration, you might need to enable hardware virtualization manually from your BIOS or UEFI settings. Several affected users have confirmed that the issue was completely resolved after they did this.
Here’s a quick guide on enabling Virtualization from your BIOS or UEFI settings:
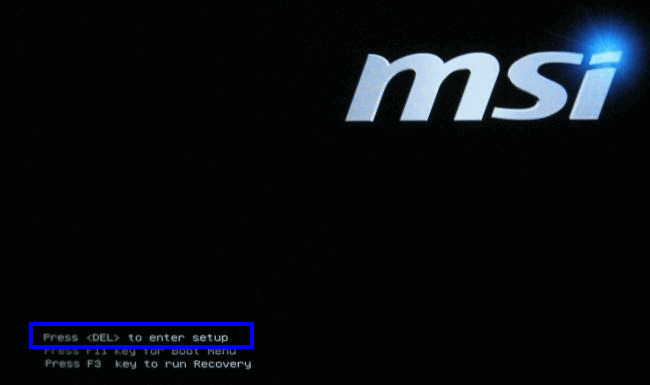
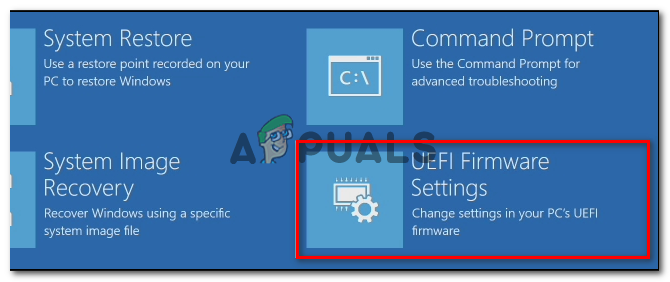
In case you have a BIOS-powered computer, start it up and start pressing the Setup key repeatedly as soon as you see the startup screen. With most configurations, the Setup key is either one of the F keys (F2, F4, F6, F8) or the Del key. Press [key] to enter setupNote: If you’re using a UEFI-based computer, follow the steps (here) to boot directly into the Advanced Startup options menu. Once you’re there, you can access the UEFI firmware settings directly from that menu. Accessing the UEFI firmware settings
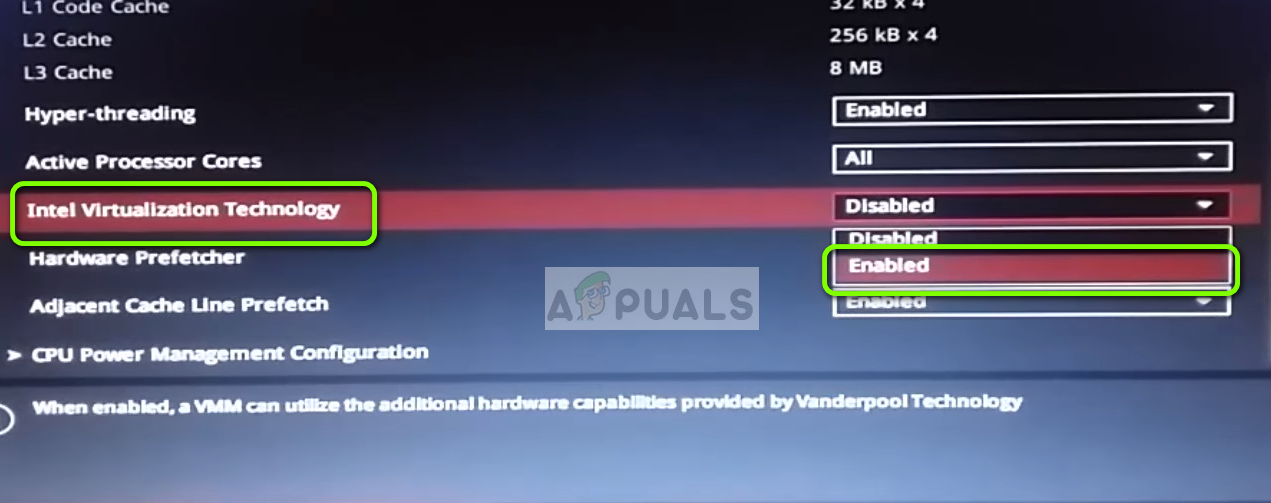
As soon as you land in your BIOS or UEFI settings, start browsing the menus to find your motherboard equivalent to the virtualization technology (Intel VT-x, Intel Virtualization Technology, AMD-V, Vanderpool, etc.)
When you manage to locate it, ensure that you set it to Enabled.Enabling Intel Virtualization Technology
Note: In most cases, you will find this option under Processor, Security, Chipset, Advanced, Advanced Chipset Control or Advanced CPU configuration. But keep in mind that your screen might be wildly different from ours depending on the motherboard that you’re using and the CPU manufacturer. In case you’re not able to find the option by yourself, search online for specific steps according to your configuration.
After you manage to enable the virtualization technology, save the changes you made to your BIOS or UEFI settings and restart your computer to allow it to boot normally.
At the next startup sequence, repeat the action that was causing the “Raw-mode is unavailable courtesy of Hyper-V” error and see if the problem is now resolved.
In case the same problem is still persisting, move down to the next potential fix below.
Kevin Arrows is a highly experienced and knowledgeable technology specialist with over a decade of industry experience. He holds a Microsoft Certified Technology Specialist (MCTS) certification and has a deep passion for staying up-to-date on the latest tech developments. Kevin has written extensively on a wide range of tech-related topics, showcasing his expertise and knowledge in areas such as software development, cybersecurity, and cloud computing. His contributions to the tech field have been widely recognized and respected by his peers, and he is highly regarded for his ability to explain complex technical concepts in a clear and concise manner.