How to Boot Into Advanced Startup Options in Windows 10
The Advanced Startup Options menu is a built-in Windows menu that comes with all versions of the Windows Operating System in one form or another. This menu contains a ton of different tools and utilities that can be used to troubleshoot Windows and to attempt to repair a computer running on the Windows OS.
In Windows 10, the Advanced Startup Options menu can be accessed during the boot sequence of a computer by bringing up the Advanced Boot Options menu and then choosing to be taken to the Advanced Startup Options menu.
However, it’s getting to the Advanced Boot Options menu is the problem as this menu is not enabled by default on all Windows 10 computers and needs to be enabled in order for the user to be able to boot directly into the Advanced Startup Options menu.
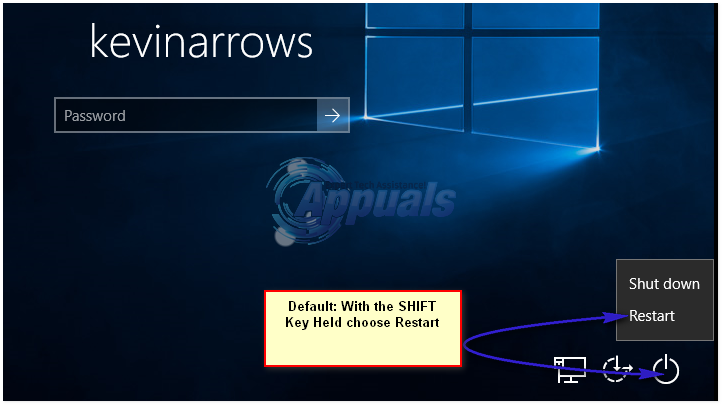
By default, a user can go to the login screen and with the SHIFT Key held, Restart the system to get to the advanced mode but this isn’t effective when there are issues with logging in or getting to the login screen, therefore i highly recommend every one to enable F8 option to get to the Advanced Start Up Menu.
The following are the two methods – both of which attempt to enable the menu using an elevated Command Prompt while logged into Windows – that can be used to enable the Advanced Boot Options menu in Windows 10:
Method 1:
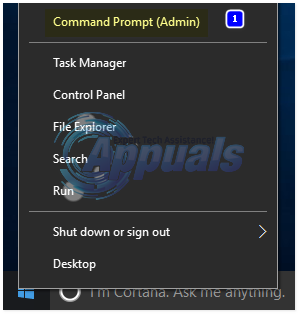
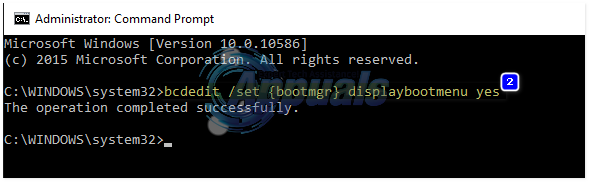
Right-click on the Start Menu button to open the WinX Menu. Click on Command Prompt (Admin) to open an elevated Command Prompt. Type the following command into the elevated Command Prompt and then press Enter:
bcdedit /set {bootmgr} displaybootmenu yes
Exit the elevated Command Prompt.
After it has been enabled, you can reboot and repeatedly press the F8 key to get to the advanced start up options. To Exit, press ESC and choose your Operating System.
If you ever want to disable the Advanced Boot Options menu, repeat this same process, but this time type the following command into the elevated Command Prompt and press Enter:
bcdedit /set {bootmgr} displaybootmenu no
Method 2:
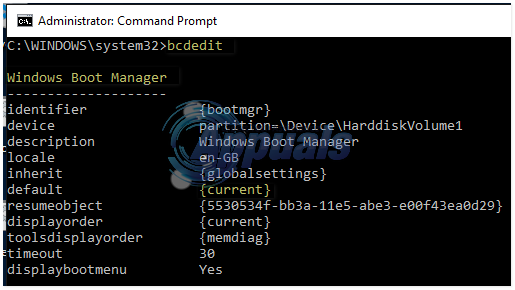
Right-click on the Start Menu button to open the WinX Menu. Click on Command Prompt (Admin) to open an elevated Command Prompt. Type bcdedit into the elevated Command Prompt and press Enter.
Look for the value of the identifier for default – which will be located right in front of where the default – under the Windows Boot Manager An example for the value of the identifier for default is {current}. Make note of the identifier for default.
Type the following command into the elevated Command Prompt, replacing {identifier} with the identifier for default under Windows Boot Manager in your case, and press Enter:
bcdedit /set {identifier} bootmenupolicy Legacy
Once the command has been executed, exit the elevated Command Prompt.
If you wish to disable the Advanced Boot Options menu in the future, simply repeat the steps listed above, but this time, type the following command into the elevated Command Prompt, replacing {identifier} with the identifier for default under Windows Boot Manager in your case, and press Enter:
bcdedit /set {identifier} bootmenupolicy Standard
Once you have enabled the Advanced Boot Options menu, you need to perform the steps listed below in order to boot into the Advanced Startup Options menu. It should be noted that you cannot boot into the Advanced Startup Options menu if you have a UEFI feature known as Fast Boot enabled (as this feature significantly cuts down a computer’s startup time), so if you have Fast Boot enabled, you are going to have to get into your computer’s UEFI firmware or Boot settings by pressing a specific key at the first screen you see when your computer boots up (the key that needs to be pressed will be displayed on the screen) and disable it.
Boot up your computer.
As soon as your computer starts booting up, start continuously and rapidly pressing the F8
If you continue to rapidly press the F8 key, you will be taken to the Advanced Boot Options menu sometime during the computer’s boot sequence. If you do not succeed in getting to the Advanced Boot Options menu the first time, keep on trying and trying until you do succeed.
Once you are in the Advanced Boot Options menu, make sure that Windows 10 is highlighted (not Windows 10 Safe Mode) and press F8 (only once, this time).
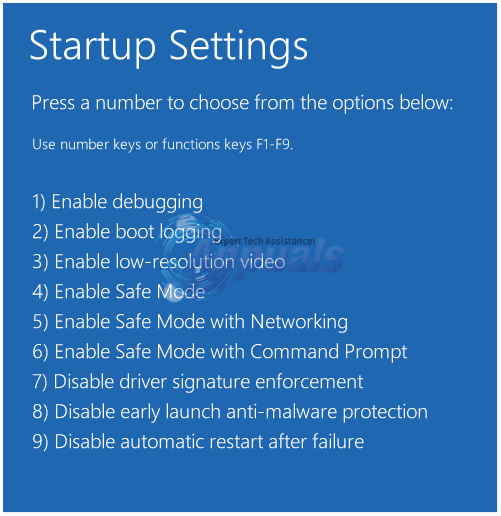
On the next screen, use the arrow keys on your keyboard to highlight Repair your computer or Advanced Startup Options (whichever the Advanced Startup Options menu has been labeled in your case).
Press Enter.
Once you press Enter, you will be taken to the Advanced Startup Options