How to Fix ‘Invalid partition table’ Error when booting PC?
Invalid partition table error: Explained & Resolved!
The invalid partition table error occurs when attempting to boot your computer or install Windows via a bootable USB drive. This can happen when there is a mismatch between the partition type of the hard drive on your computer and the bootable USB drive, incorrect selection of the boot mode in your BIOS, and more.
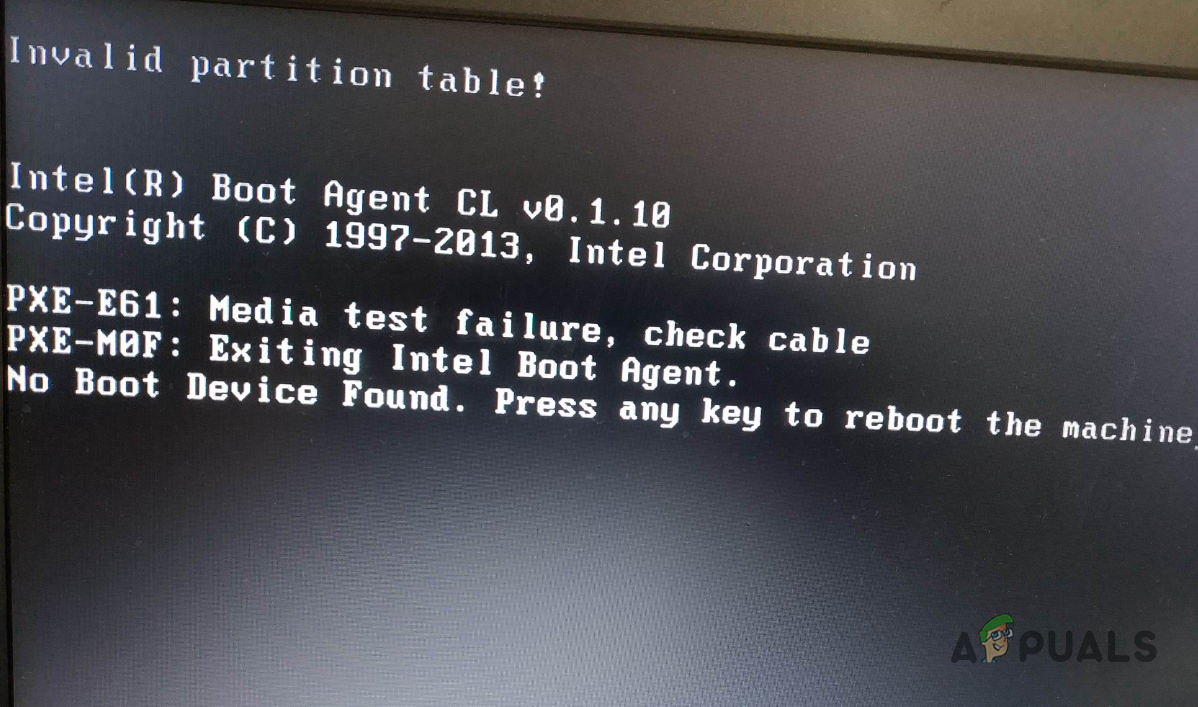
In some scenarios, the BIOS firmware on your computer can also result in the error message in question. If your BIOS uses an invalid boot order to boot up Windows on your system, it can trigger the error message along with a corrupted partition table. In this article, we will guide you through several methods to resolve the issue.
1. Change the Boot Order
One of the main reasons you may encounter the error message in question is when you have an incorrect boot order selected in your BIOS configuration. This results in the BIOS attempting to use the wrong drive on your computer to perform a bootup.
Boot order determines the sequence of boot devices on your computer. The hard drive on your computer serves as a device for the BIOS to use during boot-up. If an incorrect drive is given priority, the error message is likely to occur.
In such a scenario, you will need to change the boot order through your BIOS configuration to resolve the issue. This is relatively simple to remedy. You can immediately select the device you wish to boot from using the boot manager menu.
To do this, first power on your computer and press F12. This will take you to the Boot Device Manager menu. There, select the correct drive from which you want to boot. If you wish to change the boot order, boot into your BIOS setup and modify the boot order from there. Check if that resolves the issue.
2. Change the Partition Scheme
If you are encountering an error message while trying to install Windows on your computer via a bootable USB drive, it is likely that the problem is due to conflicting partition schemes. This occurs when the partition tables of your hard drive and your USB drive do not match.
Due to this mismatch, the error message occurs, and you are unable to boot from the USB drive. In such a scenario, you will need to change the partition scheme of your bootable USB drive to match your hard drive’s partition table.
You can also choose to change the partition table of your hard drive, but that will result in losing all of the data present. In addition, to achieve that, you will have to change the partition table of your USB drive first to be able to boot into the Windows setup. After that, you can access a command prompt window and use the diskpart utility to convert the partition table of your hard drive.
Finally, you will need to change the partition table of your USB drive back to the converted partition scheme and proceed with the Windows installation.
To change the partition scheme of your USB drive via Rufus, follow the instructions below:
- First, insert the USB drive into a computer and open the Rufus utility.
- The USB drive will be automatically detected. Click the Select option and open the Windows installation ISO image.
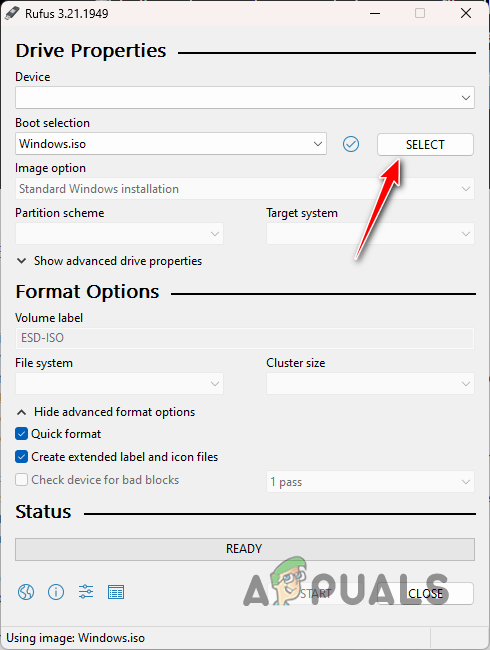
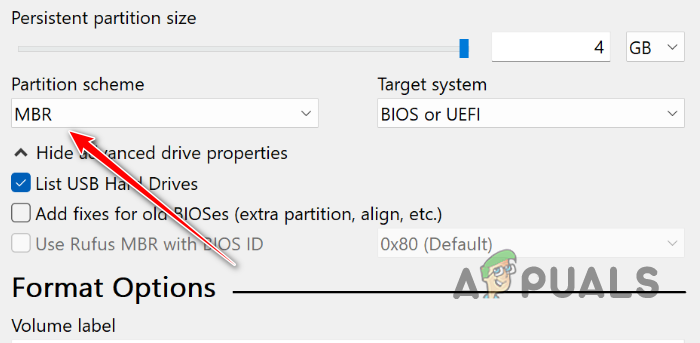
Selecting ISO Image - After that, change the partition scheme using the drop-down menu. If you previously created the bootable USB drive with a GPT partition scheme, select MBR from the drop-down menu and vice versa.
Changing Partition Scheme - Finally, plug the USB drive into the problematic computer and boot into it to see if the problem occurs.
In addition, if you wish to change the partition scheme of your hard drive to GPT from MBR, you will need to access the command prompt utility via the ‘Repair this computer’ option on the Windows Setup screen. Follow the instructions below to convert the hard drive to GPT using the command prompt utility:
- In the command prompt window, type diskpart and press Enter.
- Then, enter the list disk command and hit Enter.
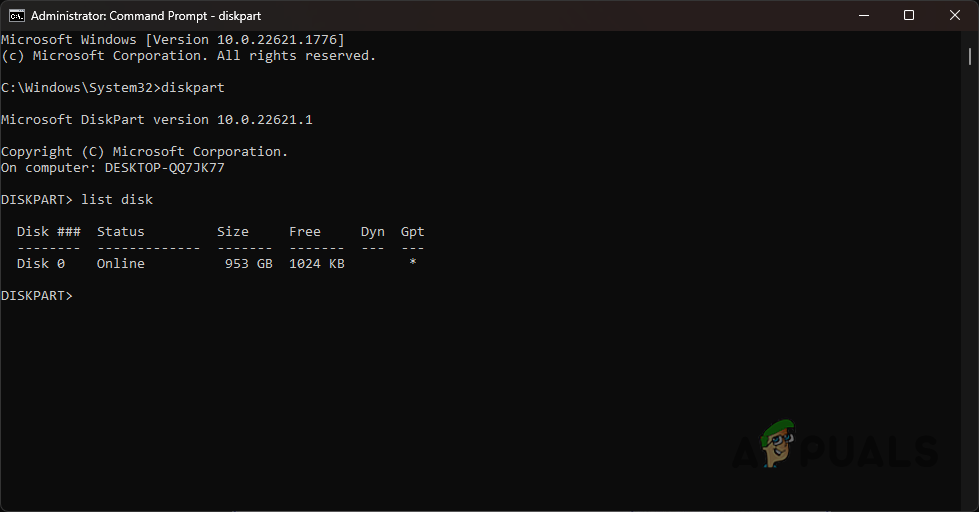
Listing Disk - The number of disks on your computer will now be listed. Here, you will need to select the hard drive of your computer. Use the provided size as a reference.
- To select a disk, type in select disk [number] and press Enter. For example, select disk 0 to select the first disk. The numbers are provided next to the disk in the command prompt window.
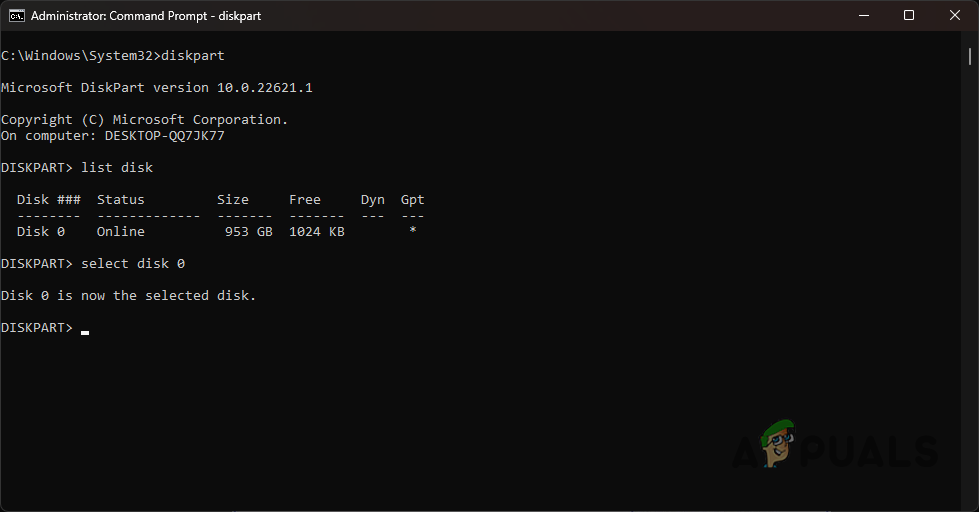
Selecting Disk - Next, you need to type clean and hit Enter. This will remove all of the volumes and partitions on your drive.
- Finally, type “convert to gpt” without quotation marks and press Enter.
- That’s it. A new GPT partition table will be created on your drive. You can now continue installing your Windows operating system, and you won’t encounter the invalid partition table error again.
3. Change the Boot Mode
Another reason you might encounter this error is that you are booting from the live environment in BIOS mode, not UEFI mode. Modern operating systems, particularly Windows, now only support UEFI mode and have discontinued support for BIOS mode starting with Windows 10.
As such, you will have to change the boot mode in your BIOS settings to resolve the issue. The instructions can differ from manufacturer to manufacturer; however, we will provide a simple set of instructions that you can follow on almost all of the boards available. Follow the instructions below to do this:
- First of all, boot into the BIOS menu. To do this, press the respective shortcut key shown as your PC boots up. This is often F2, F8, F9, F10. If you are unsure about your BIOS key, visit our detailed article on What key to press to access the BIOS.
- In the BIOS menu, navigate to Boot Manager.
- There, click on Advanced Boot Options and select the Boot Mode option.
- If it’s set to BIOS (Legacy), change it to UEFI.
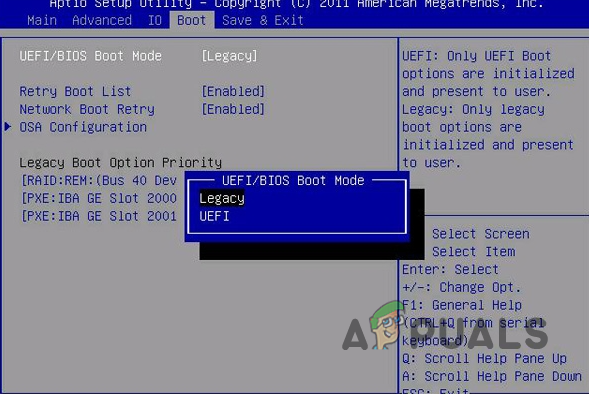
Changing Boot Mode - Next, press F10 to exit the BIOS Setup and save your settings.
- Once you do that, see if that fixes the issue.
4. Create Bootable USB with DD Mode
In some scenarios, creating bootable USB drives in Rufus with ISO mode can result in various inconsistencies. In such a scenario, you can use DD mode to create a more consistent bootable USB drive. This is relatively simple to do. Follow the instructions below:
- First of all, open the Rufus utility on your computer.
- Plug your USB media into your PC.
- Under the device label, make sure your USB drive is selected.
- Under Boot Selection, select the Windows ISO file that you want to write or flash to the USB by clicking the Select option.

Selecting ISO Image - Leave other options as they are click on Start.
- Now, a dialog box will pop up asking you to write in ISO mode or DD mode. Select the DD mode option here.
- Wait for it to finish writing the image to the USB.
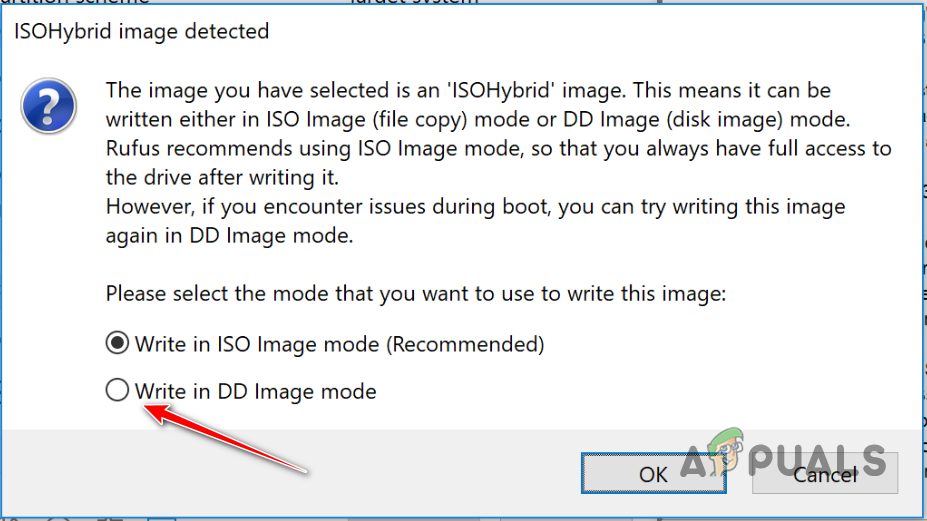
Writing in DD Mode - Finally, boot into your USB drive and see if your error has been fixed.
5. Upgrade the BIOS Firmware
The error message in question can also occur if the BIOS of your computer is obsolete. BIOS firmware is often overlooked, and you usually do not need to update it unless there is an issue.
BIOS is a vital part of your computer, as it is responsible for initializing all components and more. The process of updating your BIOS firmware can differ slightly depending on your motherboard manufacturer.
In this case, you will have to use the manual approach for updating your BIOS since you are unable to boot into Windows. This requires you to download the BIOS update onto a USB drive and then boot into the BIOS setup.
You can follow our guides on updating the BIOS for MSI, Dell, Lenovo, and HP manufacturers, respectively.
6. Repair Partition Table
In case you encounter an issue while trying to boot your computer normally, it is likely that the partition table on your drive has been damaged or corrupted. In such a scenario, you can attempt to repair the damaged partition table.
To do this, you will need to have a bootable USB drive. Create a bootable USB drive and boot into it. From there, you will need to access a command prompt window and use the chkdsk utility to repair your drive. Follow the instructions below to accomplish this task:
- First, boot into your bootable USB drive.
- On the Windows Setup screen, click on the Repair your computer option.
- After that, navigate to Troubleshoot > Advanced Options > Command Prompt.
- In the command prompt window, type in the following command and press Enter:
chkdsk C: /f
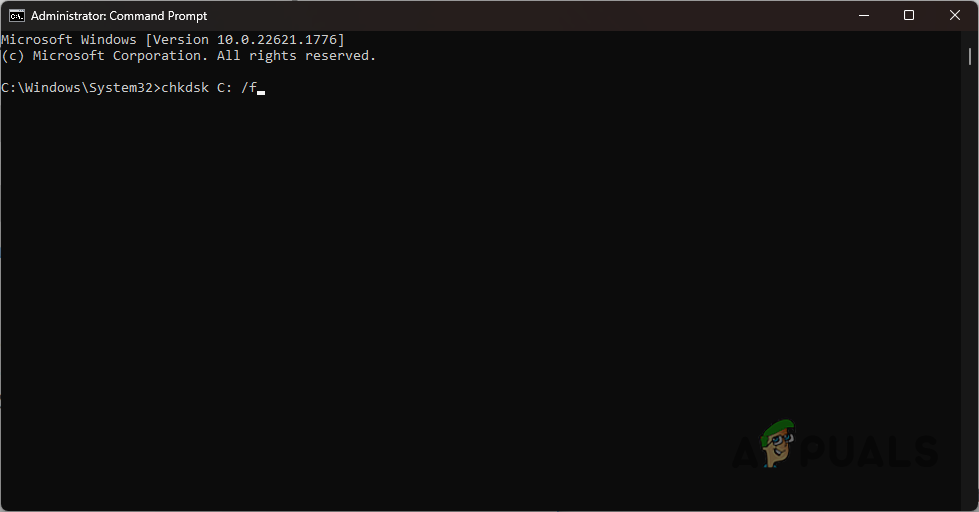
Checking Disk with CHKDSK - If your system drive is other than C, make sure to replace it accordingly.
- Follow this up by typing the command below:
chkdsk C: /r
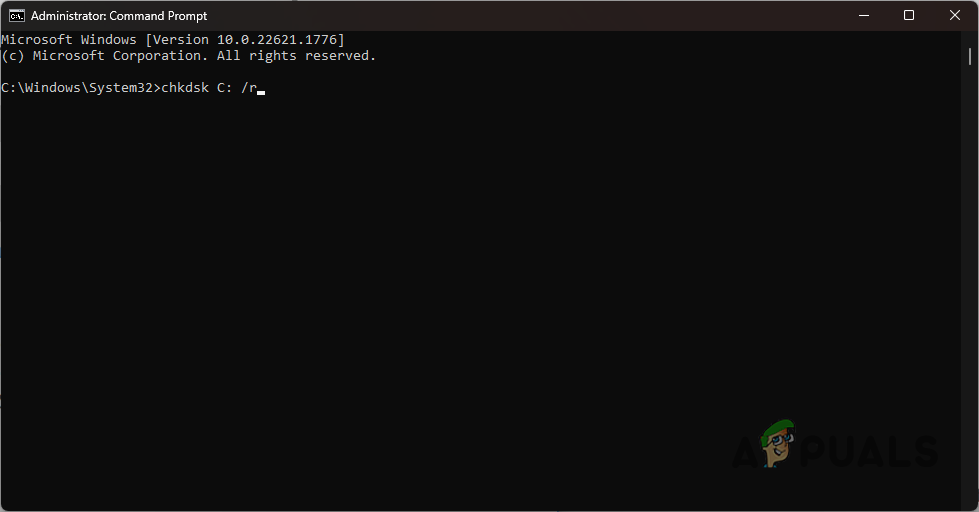
Repairing Disk - Replace C with your respective system drive in case of any difference.
- Wait for it to finish up. Once it does, restart your computer.
- See if that fixes the issue.
 Reviewed by


