Fix: Hyper-V Virtual Machine Stuck in Saved State
Hyper-V virtual machines have been reported to be stuck in the Saved state. This happens in various different scenarios like when you power down the virtual machines; one of the virtual machines may remain in a saved state if you have multiple running. In addition, if the host server reboots, some virtual machines go to the saved state. Now, this won’t generally be a problem if the virtual machines powered back on normally when told to do so. However, that does not happen and you are left with a virtual machine that is stuck in a saved state.
Hyper-V often uses the saved state as the default method for backups. So it could be that the virtual machine got stuck while performing a backup. There aren’t many reasons due to which this is caused but we have compiled a list of the possible reasons, depending on your scenario, which can trigger this. These are as follows.
- Low on Disk Space — As it turns out, one of the main reasons for this problem is if you are running low on disk space. This can often happen if one of your physical disks have been mistakenly unplugged. In such a case, you will have to check your physical drives to make sure everything is in order.
- Unavailable Drives — Another possible cause of the error can be a drive that you had previously installed and is no longer connected. This can happen often with USBs that have been installed in passthrough mode in which case the virtual machine looks for the drive but can’t find it. If this case is applicable to you, you will have to remove the physical drive from the settings of the virtual machine.
- System Resources — Finally, the problem that could be causing this issue can be your system’s resources, sometimes. It so happens that when your system is running low on resources, the virtual machine gets stuck permanently in a saved state. Therefore, in such a case, the solution is to delete the virtual machine but don’t worry, you won’t lose your data.
With that being said and out of the way, we can now get into the possible solutions that will help resolve your issue. So let us get started.
Method 1: Delete Saved State
The first thing that you need to do in case of stuck saved states is to delete the saved state and then start the virtual machine. Deleting saved states won’t make you lose any data so you don’t have to worry. It actually behaves as if you lost power suddenly and you will be able to boot right back in. Deleting the saved state is as simple as it gets. Follow the instructions below to delete the saved state:
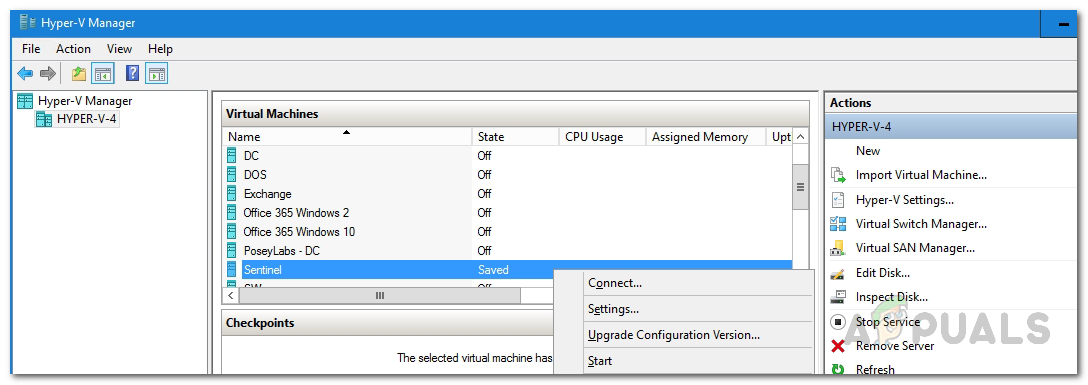
- First of all, open up the Hyper-V Manager.
- Right-click on the virtual machine that is having the issue to open up the drop-down menu.
- From there, click on the Delete Saved State option.
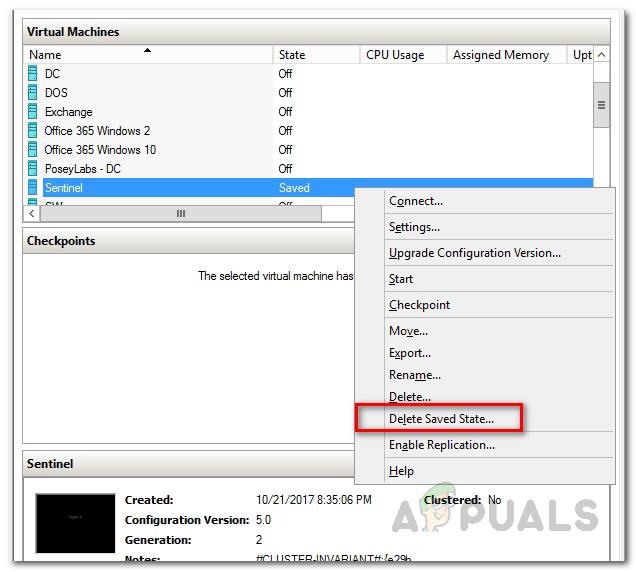
Deleting Saved State - Once the saved state has been deleted, try starting the VM again.
- If you face an error like “Operation cannot be performed while the object is in use“, restart the physical host and you should be good to go.
Method 2: Check Physical Drives
If the above method does not do the job for you, your issue could be due to your physical drives failing. If you had recently installed a USB device or if you tampered with the physical drives of your virtual machines, it would be helpful to see if the physical drives are plugged incorrectly. An easier way of ensuring that all the drives are functioning and only the drives currently plugged in are listed is to go to the virtual machine settings window. Follow the below instructions to do so:
- On your Hyper-V Manager window, right-click on the problematic virtual machine and select the Settings option.
- In the Settings window, expand the SCSI Controller list to see the drives that are being used.
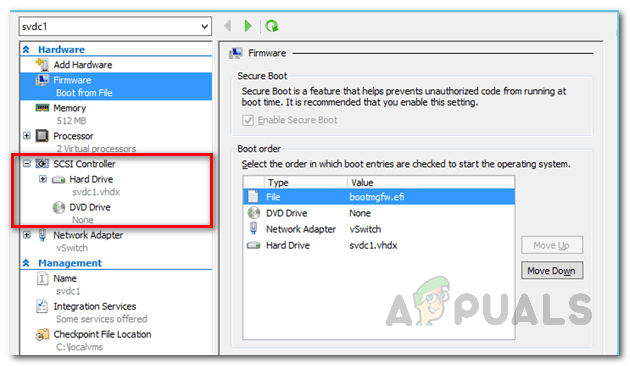
Virtual Machine Settings - If there is any drive that is no longer plugged in and the virtual machine is checking for it, you should remove it.
- That should fix the problem.
Method 3: Change Folder Permissions
As it turns out, the issue can sometimes be fixed by changing the folder permissions of the virtual machine. This has been reported by a user who was facing the problem himself once. If the above methods don’t fix the problem for you, what you can do is go to the folder where your virtual machine is located. From there, you will have to change the permission to Everyone.
To do this, follow the instructions below:
- Make your way to the folder of the plagued virtual machine.
- Right-click and then go to Properties.
- In the Properties window, switch to the Sharing tab.
- There, click on the Advanced Sharing option.
- Once you are in the Advanced Sharing window, check the Share this folder box. Now, you should be able to click on the Permissions button down below.
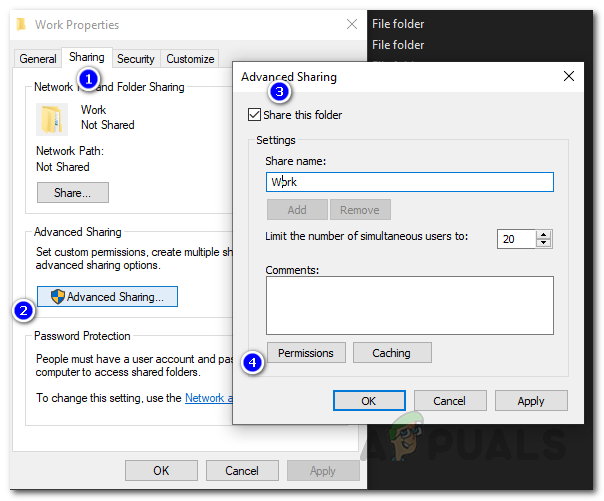
Folder Permissions - Click on it and then for Everyone, tick everything under Allow.
- Finally, click the Apply button and then hit OK. Do this for the rest of the windows as well.
- See if the issue is resolved.
Method 4: Delete the Virtual Machine
If none of the above solutions have worked out for you, the only option that you have left is to delete the virtual machine and then create a new one. However, we will ensure that you do not lose any data so it won’t be just getting rid of the virtual machine with the data. For this purpose, you will have to first copy the VHD file of the virtual machine and save it somewhere. Let us through the whole procedure in steps so that it is easier to follow through.
- First of all, copy the VHD file of the virtual machine that is having the issue and then save it somewhere else.
- After that, open up the Hyper-V Manager and delete the virtual machine. To do this, right-click on the said virtual machine and click the Delete option.
- Once the virtual machine has been deleted, copy the VHD file to its old location.
- After that, create a new virtual machine and when asked for a virtual hard disk, choose the Use an existing virtual hard disk option.
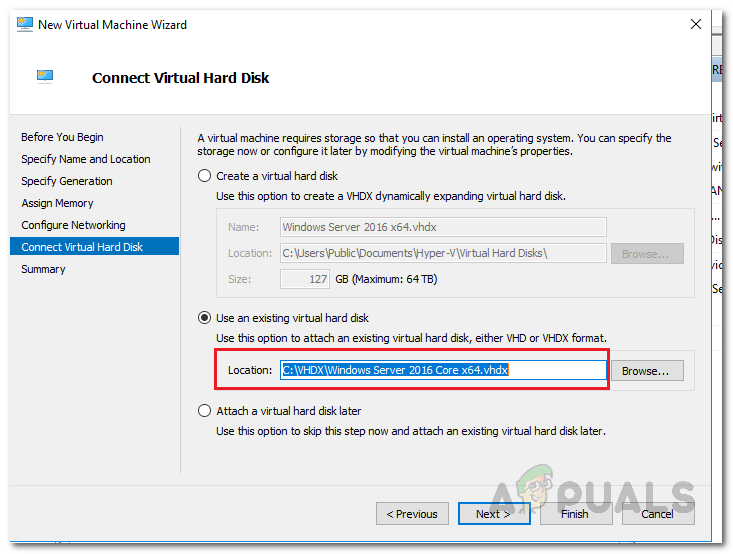
Creating New Virtual Machine - There, choose the location of the VHD that you saved.
- Finish the process of creating a virtual machine and you will be good to go.


Followed method 1 and I was able to start the vm.