How to Recover Data from a Faulty Hard Disk
Like all electronic devices, hard disk drives installed on your computer can run out of juice. But it’s the most important device as your data is stored in it, data whose backup may not exist anywhere else making it possibly the most crucial part of your personal and probably your professional life too.
Before a hard disk completely dies without any chance of recovery, it will show you a lot signs of its declining health. Your system will start getting sluggish, parts of your data may start getting corrupted and built in diagnostics in your system BIOS and even on Windows will start giving you alerts. You should probably then start moving your data to another hard disk.
But what if you can’t even log in to Windows or your computer won’t even boot up? Then follow this guide to recover your data before it’s too late.
Solution 1: Boot through Ubuntu Live On a USB
Like Windows 7, 8 or 10, Ubuntu is also a widely used operating system that can simply run on your USB alone.
You will need a 4GB USB to run Ubuntu on, a Windows PC with internet access, and an external hard drive or a USB on which you will store your recovered data.
First you will have to download Ubuntu. Download it by clicking here
It will be about 1GB. Save it to your desktop for convenience. Let the download complete.
Now download Rufus from this link. We will use it to make the USB bootable.
Make sure you have copied all the data from the USB as it will be deleted after the following steps.
Run the downloaded file (rufus-2.5p.exe). Confirm any security warning and click Yes when you get User Access Control warning dialog. Rufus window will now appear. In it, select your USB under Device.
Select FAT32 in the drop down menu under File system and select ISO Image next to “Create a bootable disk using”. Click the CD Icon to browse and select the Ubuntu iso you just downloaded (ubuntu-14.04.3-desktop-i386.iso).
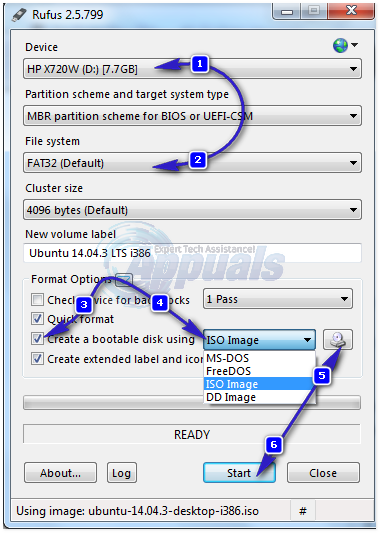
Click Start. Confirm any message that appears. Click close when the process is complete.
Now connect the Ubuntu USB to the target computer and power it on, and if it’s a Dell computer keep tapping F12 until you enter the Boot menu. If it’s an HP computer, tap F9. It can be Esc, F1 or F2 as well because it depends on your computer manufacturer. Once in the Boot menu, select USB Drive as the first boot option.
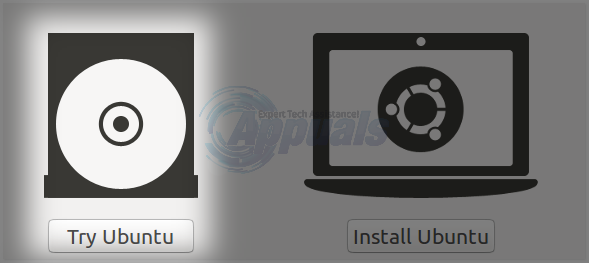
After a while, a brown loading screen with Ubuntu on it will appear. After loading, Click Try Ubuntu as we only want to use it to recover data, not install it.
After a few seconds, Ubuntu’s desktop will load and appear. On the left bar, in the bottom all your hard disk’s partition will be detected and displayed as a hard disk icon. You will have to open them individually and recognize them by the contents they have.
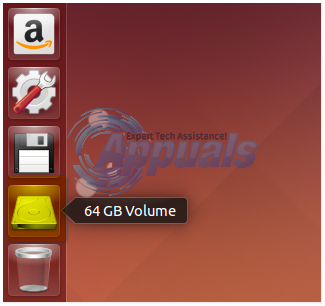
To open, click on it. Now connect the external hard disk or USB you want the data recovered to. Its icon will appear in the bar too once you connect it. Open each drive, and if a drive has a folder named Windows then it is the drive where your Windows operating system was installed. If you had any data you want to recover on your desktop or in the Documents folder, then in that drive open the folder named User.
Click on your account name you were using in Windows. Open Desktop for your desktop contents, and My Documents for the contents in My Documents folder, and Downloads for of course Downloads.
Select all content by pressing Ctrl + A. Right click on any file/folder and click Copy to…. A new Select Destination window will appear. Select your external hard drive or USB you just connected which will appear on the left bar under Devices and click Select. Copying will start.
If there is an error copying a file, you can skip it.
Follow the same process for all the other drives. All of your data will know be recovered.
Solution 2: Connect Hard Drive to another Computer
You can connect your faulty non-bootable hard drive to another computer using a SATA/IDE to USB adapter. It can connect your internal hard drive to another computer through a USB port as External Drive (which will allow you to browse it’s contents, and copy files).
Simply buy the adapter or enclosure depending on hard disk size (3.5″ or 2.5″ or 5″) (example: here).
Remove your hard drive and connect it to the adapter. You can figure out which side of adapter to connect to by its shape. Also insert the power cable into the hard disk which came with the adapter. Power the adapter on and connect the USB to a computer. Its plug and play and your hard disk will start showing up right away on that computer.
Copy all the data you want to that computer or to any media that you desire.