How to Flash the BIOS on an AMD GPU: A Comprehensive Guide
Graphics cards in modern gaming PCs are almost solely responsible for graphical rendering in 3D applications. Most of these applications thus demand a GPU that is capable of rendering the required assets with reasonable efficacy. Modern 3D applications like games have become more and more demanding in recent years so the graphics cards have also become faster to be able to handle these workloads. Since PC Gaming is on an all-time high, PC Hardware enthusiasts have also sprung up in considerable numbers, and they strive to get every last bit of performance from their hardware.
It is quite common among enthusiasts in the PC space to “overclock” their hardware, particularly the graphics card, to get better performance in their applications of choice, notably games. Overclocking is a quite simple, straightforward way to squeeze out more performance from your GPU with minimal risk. Most graphics cards have some headroom above their factory clock speeds, and the user can tinker with the card to get those extra megahertz.
But there’s only so much you can get out of overclocking using traditional methods. Yes, such overclocks do provide a decent gain over stock performance, but to go beyond that we have to turn to some… more creative methods. Enter, BIOS Flashing.
What is a Graphics Card BIOS?
A graphics card’s BIOS (also called VBIOS or VGA BIOS) is the firmware of the card, which contains all the necessary hardware settings for the card. It contains information about the clock speed, fan speed, voltages, and power delivery, etc. It also imposes the necessary limitations on voltage and power draw levels so that the card doesn’t malfunction and die with a careless overclock. These limitations are the reason why the Voltage offset is locked to a certain limit in tools like MSI Afterburner. With the help of BIOS Flashing, users can raise some of those limitations, thus allowing for higher overclocks and allowing more voltage to be fed to the core and the memory.
Reasons to flash the BIOS
BIOS Flashing is particularly helpful in extreme overclocking. Under normal circumstances, you should probably avoid tinkering with the BIOS of the card. But if you’re an enthusiast and you want to squeeze every last bit of performance from your graphics card, BIOS Flashing can help you. As we have established that the BIOS is the firmware of the card, a BIOS flash implies that you are overwriting the firmware with a new one, thus providing new values of core clock, memory clock, voltage limit, and power limit, etc. These values provide the necessary boost to the card’s overclocking potential.
Which cards are ideal for BIOS Flashing?
As you might have guessed, not a lot of cards will offer this much freedom to the end-user. Most of the cards can only be flashed to their own firmware, which is understandable. BIOS Flashing in these cards can only be used to fix a bricked BIOS and not for overclocking purposes as we want. There are some cards though, that have big potential for BIOS Flashing. Usually, the cards which use a cut-down version of the top GPU, offer the biggest improvements from this process. Both Nvidia and AMD’s lineups have cards like these, but in this guide, we will only focus on the AMD cards.
Graphics cards like the AMD Radeon RX Vega 56, and Radeon RX 5700 are very popular cards among enthusiasts for BIOS Flashing. The thing about these cards that makes them ideal for flashing, is that they have almost the exact same PCBs as their bigger brothers (the RX Vega 64 and RX 5700 XT respectively), bar the GPU core itself. Things like Compute Units (56 CUs in Vega 56, 64 CUs in Vega 64) can not be changed via flashing. The core clocks, memory clocks, and voltages however can be changed. This means that they are locked down in certain respects due to product segmentation, and thus offer a bigger headroom to the end-user. If you flash a Vega 64 BIOS on a Vega 56, or a 5700 XT BIOS on a 5700, it is possible to achieve the same core clocks and performance level as the higher tier GPU. This offers the biggest advantage to overclockers, and in-turn gives amazing value for the money if you’re willing to take the step.
Things to keep in mind before flashing
- Make sure you have a reasonably powerful PSU that is capable of handling the higher power draw. Ideally, you should have enough wattage to handle the card that you’re flashing to. For example, if you plan to flash the BIOS of a Vega 64 on a Vega 56, you should have a PSU capable of handling a Vega 56 (at least 750W).
- Make sure your case is well-ventilated and your temperatures are under control. BIOS Flashing increases power draw, and as we know more power equals more heat. If your temperatures are not comfortable as-is, you should probably avoid flashing and maybe consider undervolting your card instead. Learn how to optimize your case airflow by following this article.
- Make sure your particular graphics card has dual BIOS. Some high-end graphics cards and some reference models will offer a Dual BIOS implementation, which is operated by a BIOS switch. What this means is that the card has 2 firmwares, as opposed to the normal one. This can act as a safety net for you should you brick one BIOS. You can switch to the other BIOS and then the card is back to normal. This is not absolutely necessary, however, it is highly recommended.
- Make sure your graphics card can be flashed to a higher-performing one. Research your particular card. Only flash if the gains are worth the effort.
- It is also advised that you monitor the card’s performance parameters after flashing. Sometimes flashed cards can behave erratically, and if you have the habit of constantly monitoring your card’s values, the problem can be quickly identified and fixed.
- Always save the backup BIOS in more than 1 location. The process to make the backup BIOS is shown in the guide.
Now that we have established a reasonable understanding of the process, let’s begin.
Disclaimer: A word of caution is necessary here. While flashing the BIOS, you are lifting some of the limits set by the manufacturer, and going beyond the manufacturer spec. If done wrong, it is possible to brick your graphics card. Only flash the BIOS if you are familiar with overclocking and the risks associated with it. All responsibility is assumed by the user.
Step-by-Step BIOS Flashing Guide for AMD
Here is a simple and easy step-by-step guide on how to flash the BIOS on your AMD Graphics card. In this guide, we will be using the AMD Radeon RX Vega 56 as an example, and flashing it with the RX Vega 64 BIOS. First, we have to download the required tools and files for the process.
Required Tools
- ATIFlash, the flashing tool for AMD Graphics cards
- TechPowerUp GPU-Z
- Backup file of the existing BIOS (Vega 56 BIOS in this case)
- The new target BIOS (Vega 64 BIOS here)

ATiFlash (also called AMD VBFlash) is the tool of choice for this process when it comes to AMD Graphics Cards. The tool is simple and easy to use. It can be downloaded for free here. For Nvidia cards, the alternative is NVFlash.
GPU-Z is a fairly essential and helpful software when it comes to GPU Overclocking. Essentially it displays all the necessary information about the card in one convenient window. It can also be used to make a backup of your existing BIOS as explained later on in the guide. It can be downloaded here.
The backups for your existing BIOS are absolutely crucial since you might want to revert back to the original BIOS if your new one is not stable. GPU Z and ATiFlash both offer BIOS backup options.
The target BIOS file is the actual firmware file that you wish to flash to. As we are using a Vega 56 as an example, the target BIOS file will be the firmware of a Vega 64. Similarly, if we want to flash an RX 5700, the target file will be the BIOS of a 5700 XT. BIOS files can be downloaded from TechPowerUp’s BIOS database. It is absolutely necessary that you download the BIOS of the same vendor as your existing card. Since we have an XFX Radeon RX Vega 56, we will be downloading the XFX Radeon RX Vega 64 BIOS. The GPU BIOS Database can be found here.
STEP 1: Open GPU-Z and make a backup
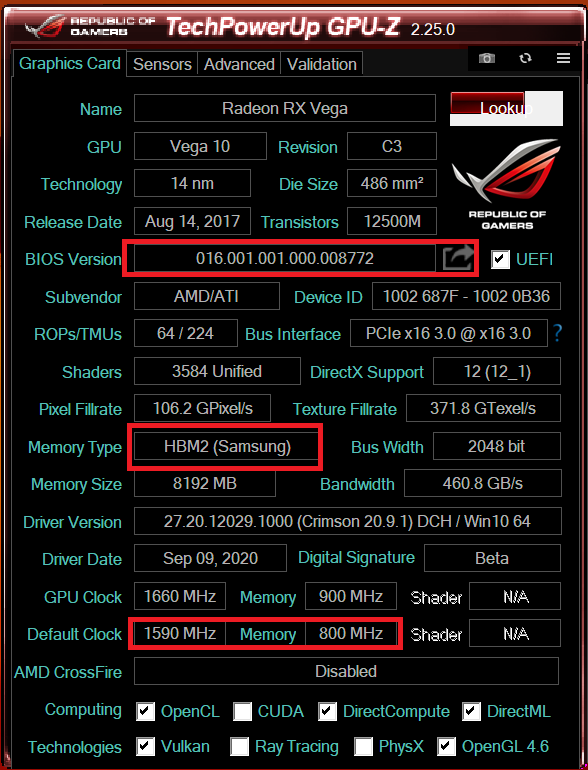
GPU-Z will display an array of information regarding your graphics card. We are not interested in all of it, but there are some things you should note. First, note the base and boost clocks of your GPU displayed near the bottom of the window. These values will change after a successful BIOS flash. Secondly, we need to make a backup of our existing BIOS here. Near the middle of the window, there is a section which displays BIOS Version. Next to it is a small arrow pointing towards the right. Click that arrow, and save the file somewhere on your computer. Ideally, you should make 2 backups and store them in different places.
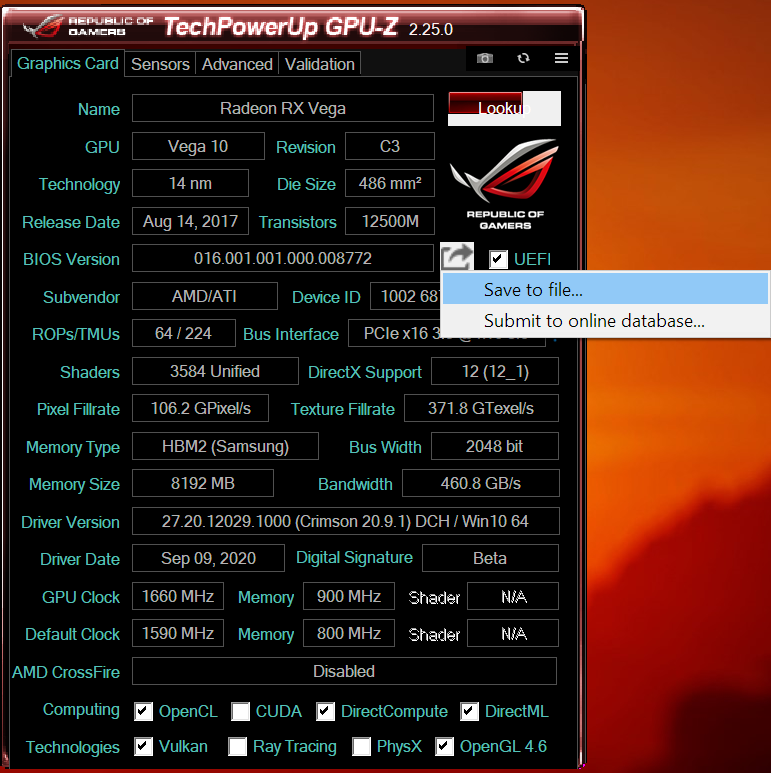
An additional step in this section only applies to Radeon RX Vega users. Since the Vega architecture uses HBM2 memory instead of the conventional GDDR, the memory is supplied by different manufacturers which varies between cards. Near the bottom half of the window, you will see a section on Memory which will say HBM2 and alongside it displays the particular manufacturer of the memory. It is absolutely crucial that you only flash the BIOS on a Vega card if it has Samsung HBM2. Memory chips made by other manufacturers like Micron or Hynix do not provide successful flashes.
If you are flashing with 5700 cards, you can skip the memory check since they all have conventional GDDR6 memory.
STEP 2: Extract and open ATiFlash as administrator
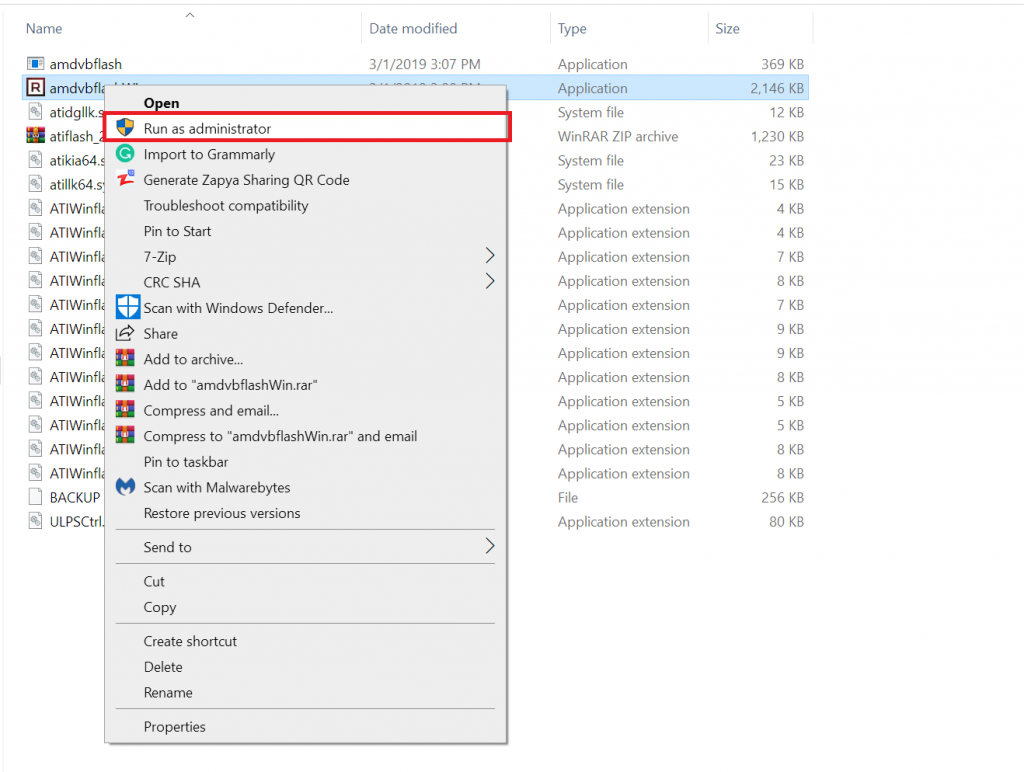
- Extract the downloaded ATiFlash compressed file.
- Open the file named “amdvbflashWin.exe” as administrator.
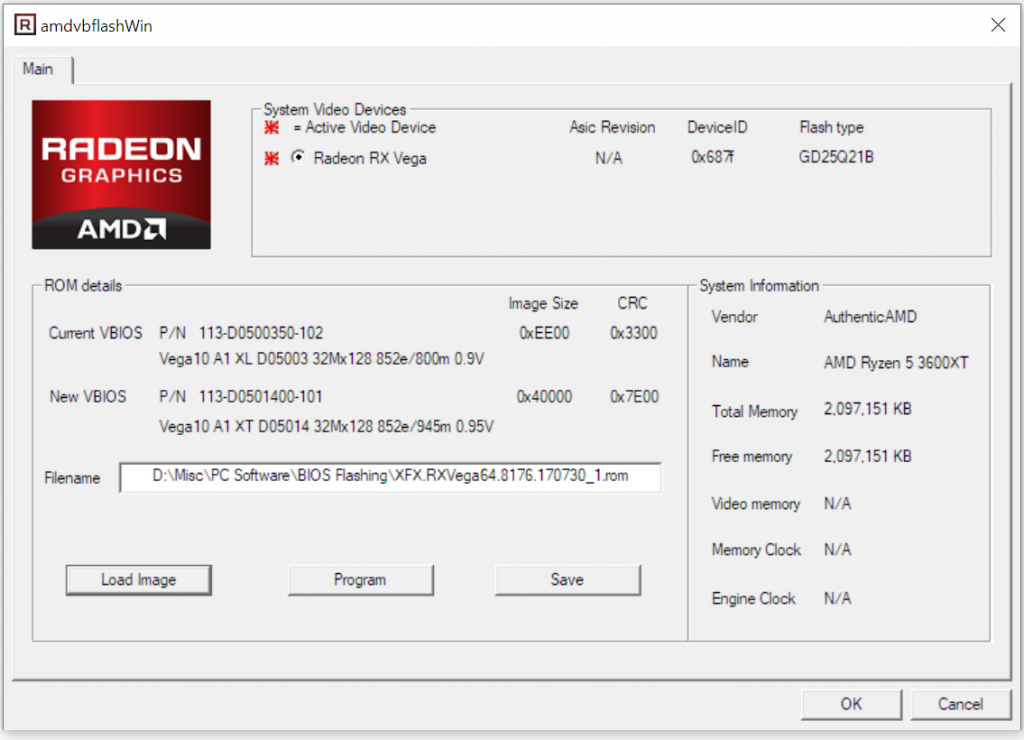
- The following window will be presented to you.

On the right-hand side, you can see some of your system specs. On the left is a section labeled “ROM Details” which is the same as BIOS details. Here you can see the version of your current BIOS and some related information. This software also provides a second opportunity to backup your BIOS. Click the “Save” button and make a second backup of your existing BIOS just to be on the safe side.
STEP 3: Flash the BIOS with the downloaded target BIOS
This is the key step in which we finally swap the existing BIOS with the new one.
- Click “Load Image”
- Select the downloaded target BIOS (in this case the XFX Radeon RX Vega 64 BIOS)
- The software will show the BIOS details under the section “New VBIOS”
- Click “Program”
- Wait for the progress bar to finish.
- Restart your PC
After your PC boots back up you should be successfully flashed to a new BIOS.
What to do after flashing the BIOS?
Initially, your card wouldn’t perform any differently than it previously did. Was it all in vain? Not at all. What the process of flashing has done is that it has essentially eased some of the limitations that the previous firmware imposed. Now you have more flexibility as the end-user to manipulate your card’s parameters. Here are a few things to do after flashing your BIOS
-
Test higher overclocks:
Since the main purpose of BIOS flashing is to squeeze every last bit of performance from the card, you should test out new overclocks and try to find the best stable configuration for your graphics card. Be sure to maximize the power limit in Wattman or Afterburner, and also provide additional voltage through voltage offsets. You may need to increase your fan speed via a more aggressive fan curve, to keep temperatures in check. Following our comprehensive overclocking guide can prove very helpful in this regard.
-
Keep an eye on temperatures:
Remember, higher power draw equals more heat output. If your temperatures after flashing and overclocking are not comfortable according to your ambient temperatures, you should consider either undervolting the card or reverting back to the old BIOS. Ideally, you do not want your card breaking the 80 degrees Celsius mark, however, there is no danger of any damage to your card at that temperature. Cooler is better though since it allows the card to boost higher, thus aiding performance. If the card crosses 85 degrees Celsius during normal gaming, consider reverting back to the older BIOS.
-
Stress-test your Graphics card:
After dialing in a suitable overclock, I would strongly suggest stress testing your graphics card in different scenarios. The worst thing for a gamer is to be in the heat of the battle and having your card crash you to the desktop or worse, your PC shutting down unexpectedly. Use a variety of benchmarks like 3DMark FireStrike, Unigine Superposition, Unigine Heaven, and Furmark. Furmark is specifically a torture test designed to make your card reach the absolute highest temperatures it can, so it can be useful in temperature testing. Unigine Suite and 3DMark Suite will provide the tests for your gaming stability. Keep an eye on max temperatures, but also for artifacts (blocks or batches of glitched pixels) which indicate a high memory clock. Be vary of crashes and dial back your OC if it is crashing regularly.
-
Revert back to the old BIOS if……
1- Your temperatures are out of control
2- Your GPU keeps crashing in stress tests and/or in games
3- Your GPU keeps artifacting due to a high memory clock
4- Your PC keeps shutting down unexpectedly which means that the PSU cannot handle the higher power draw -
If everything is successful….
Enjoy that extra performance but stay vigilant. Form a habit of monitoring your GPU’s clocks, memory frequency, temperatures, power draw, and fan speed, etc. RivaTuner paired with MSI Afterburner is a huge help in this regard.
Uh-oh… my card is unstable. What do I do?
You should flash your card back to the original BIOS. It is really simple to do.
- Open ATiFlash
- Load up the “Backup Vega 56 BIOS” that you made and saved
- Click “Program”
- Restart your PC.
Your card should be flashed back to its stock firmware.
Final Words
BIOS Flashing is a really interesting and effective way to increase your card’s performance. For enthusiasts, it is just another way they can tinker with the hardware they have. Most extreme overclockers love to play around with custom vBIOS’ with extremely high power targets which help them break world records. For normal consumers, it is a tool that can be really effective in certain scenarios. It can help them squeeze the maximum performance out of their cards, thus maximizing the value for the money. If done properly, it is a completely safe and fun process with some free performance gains to boot!


Mine froze at the mid of flashing the firmware and did nothing, i had to restart the PC though luckily nothing had damaged