How To Overclock Your GPU The Safest Way: The All-Encompassing Guide
Overclocking any component on your PC requires that you adjust two basic things: its clock speed to alter how quickly your component processes its computation (or pushes out pixels in the case of your GPU), and the voltage you’re supplying it to directly control the amount of power you’re allotting that component which in turn controls its computational performance as well. GPU overclocking follows this same basic principle as well and can be carried out to boost the speed that your graphical processing unit processes its graphics. (The name is quite self-explanatory!) For those who use their PCs to perform graphics-intensive tasks or graphics-heavy gaming, overclocking the GPU can improve its performance to allow for a more seamless and all-round enhanced graphical experience.
Understanding How To Overclock: It’s Easier Than You Think
As with other components inside your PC (such as its processor and RAM), your GPU is configured at a particular base or standard speed, determined by its clock, but the component itself is manufactured to tolerate a particular range of speeds which determine how far you can overclock that component. Another thing to keep in mind, yet again as with any overclocking activity, is to understand that there is a trade-off between performance and safety: the further you overclock your GPU, the more likely it is to heat up, which puts it at a greater risk of sustaining permanent heat damage and heating up your entire computer. This cause and effect relationship results in your entire system become relatively more unsafe.
You want to get the best performance while maintaining the safest temperature as well because while GPUs claim to be able to tolerate devastatingly hot temperatures, their performance sharply declines as they are put under intense loads regularly.
While with simple research and surveying of the manufacturer’s website for the GPU you have, you can get a sense of the speed range that your GPU can tolerate and whether it can be overclocked further at all, know that the ground reality of this varies from GPU to GPU. No two GPUs, despite being the same exact model and specs, are created exactly equal. The discrepancies in hardware are the reason that manufacturers create them with a tolerance range to account for positive or negative error. The standard configuration is what they set it at within that range to deliver the performance they aim to provide out of the box.
Not All GPUs Are Same
Thus, when overclocking your GPU, while you may refer to tutorials or articles such as this one for the how-to on these things, know that you may not be able to achieve the exact same speeds or temperatures as someone else who has overclocked the same GPU. Thus, it’s important to have a basic understanding of the trade-off and follow the general scheme of steps to find a satisfactory point of overclocking for your own in-house GPU.
To perform your overclocking, you will need to install the MSI Afterburner tool from the MSI website. This tool is all-encompassing for GPU overclocking and lets you tweak the clock and voltage parameters all in one. In case you push your GPU beyond a point where it is able to function properly, you may encounter glitches or a computer crash. The MSI Afterburner tool lets you tweak your values around to bring the overclocking back to a reasonable level in such a scenario. So, while you should be careful not to exceed this threshold, in case it happens, reverting back to a last known working value can help resolve the issue.
This is why with overclocking it’s important to increment the performance in very small steps so that you inch towards better performance but can revert back to the last known best performance in case of an error. If you take larger steps than the reverted settings may not be the best possible outcome and you may need to adjust the clocking further or back to achieve that point which can be a waste of time.
Prerequisites: MSI Afterburner & Heaven Benchmark
Before you begin, you will have to install the MSI Afterburner software to perform the overclocking tweaks as well as a stress testing tool for which we will use Heaven Benchmark 4.0. Both of these softwares can be downloaded from their respective manufacturer websites.
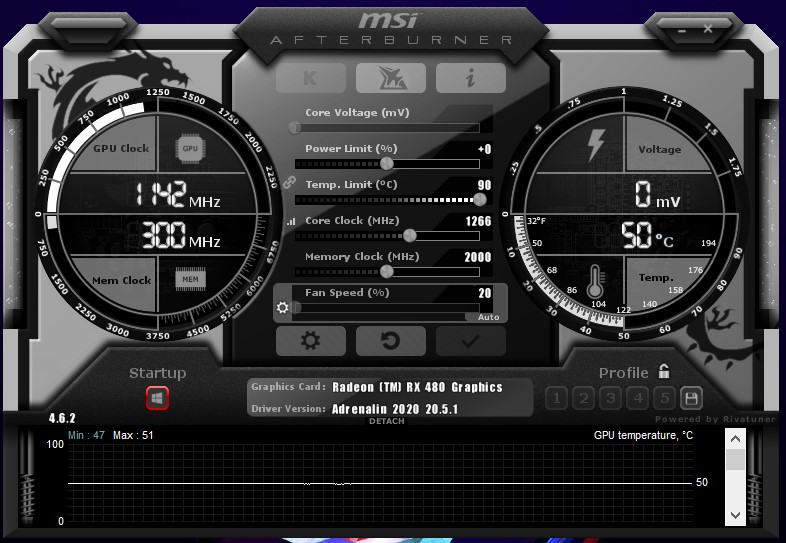
Download and launch the MSI Afterburner software, you’ll see:
- Your core clock speed displayed under “GPU Clock” in the left-hand dial
- Your memory clock speed displayed above “Mem Clock” in the same dial.
- On the right-hand side, you’ll see the GPU temperature displayed in a dial as well.
- In the center between the two dials, you’ll see sliders. This is your control panel section from where you can make your overclocking tweaks and all the recommended adjustments ahead will be performed here.
-
- “Core Voltage”
- “Power Limit”
- “Temperature Limit”
- “Core Clock”
- “Memory Clock”
- “Fan Speed”
-
In the Heaven Benchmark 4.0 software:
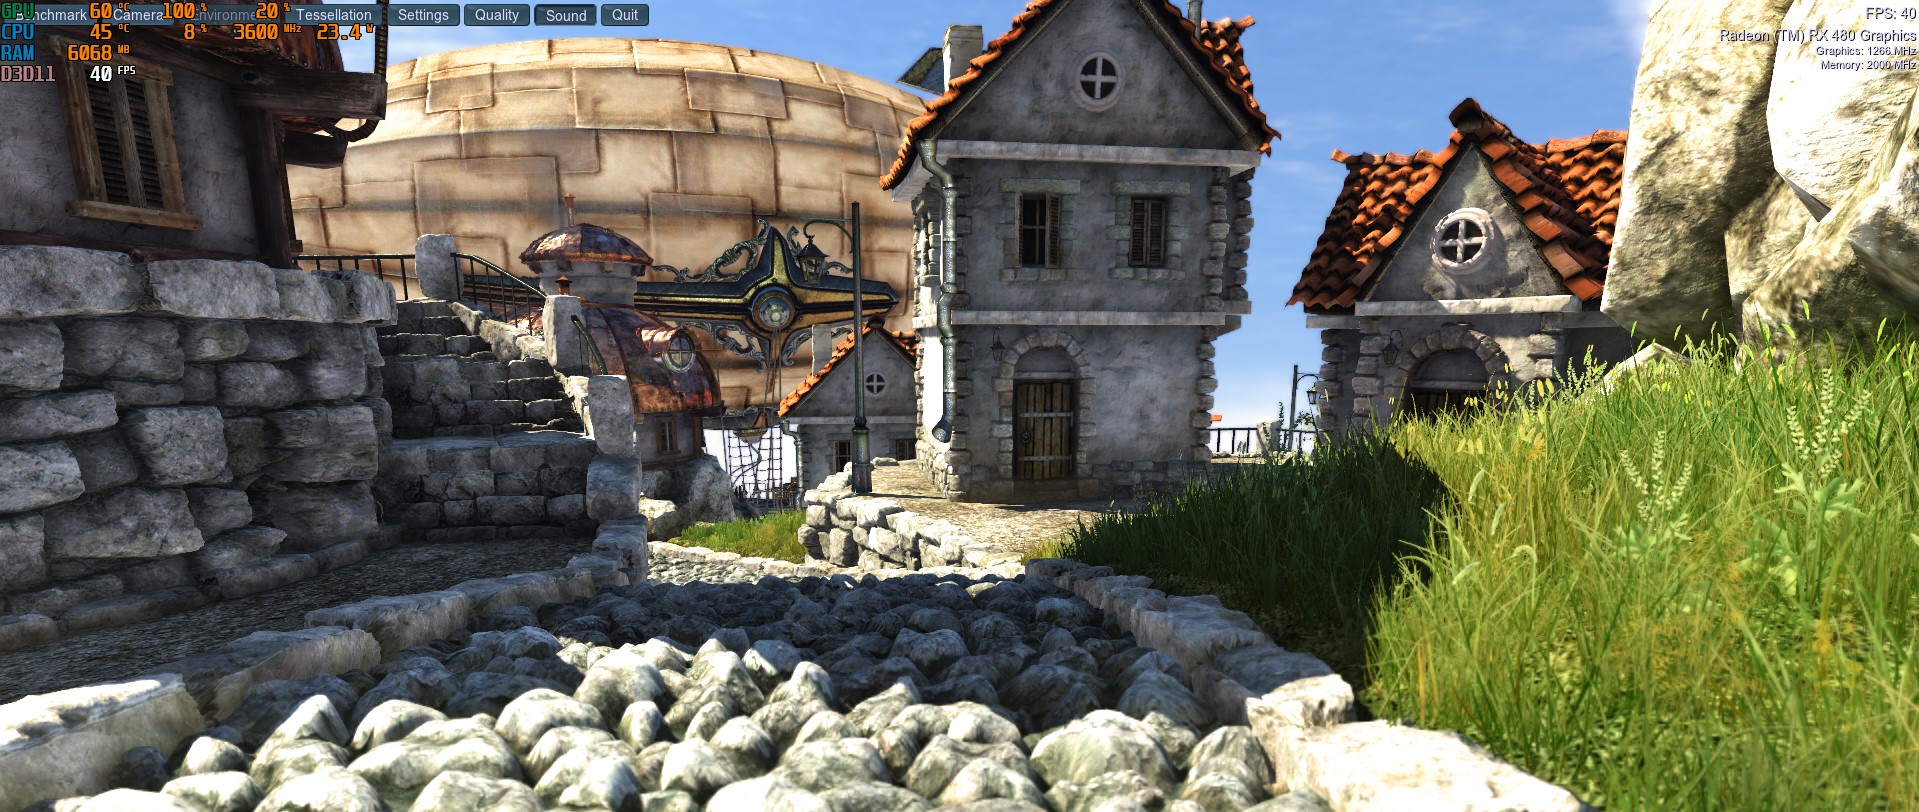
- Click “Run” at the home screen and then “Benchmark” on the top left corner. The software will now run through 26 scenes while displaying statistics on the top right portion of your screen. These are the figures you need to keep an eye on to gauge how much your overclocking has impacted your performance. Particularly, pay attention to the temperature.
- At the end of this test, you will be given average FPS statistics which you can save to look back on later. This stress test takes approximately 10 minutes which is the minimum recommended time for any stress test.
- Perform a base stress test to have an idea of your starting values before commencing with the overclocking regime. Screenshot the outcome or note down its values to refer back to them and compare as you go on with your overclocking tweaks.
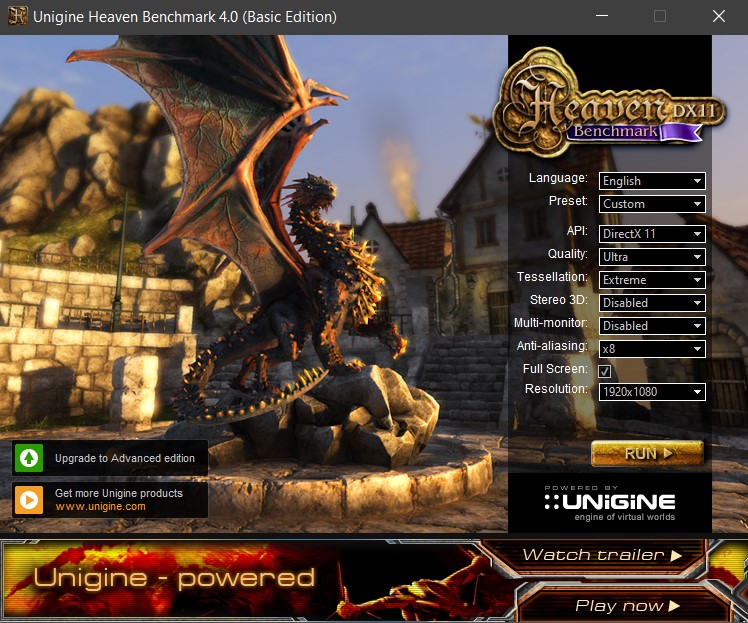
You can also use 3D Mark and FurMark to perform your stress tests. The latter software, especially, pushes your graphics card to its limit. These two work just as well as the Heaven Benchmark 4.0 software. For the purpose of this tutorial, we will be referring to the Heaven Benchmark 4.0 but the steps on the other two are similar as well in case you choose to opt for those.
Overclocking: Let’s Dive In
Now that you’re familiar with the interfaces of the two softwares you’ll be using, let’s get into the nitty-gritty of overclocking your GPU.
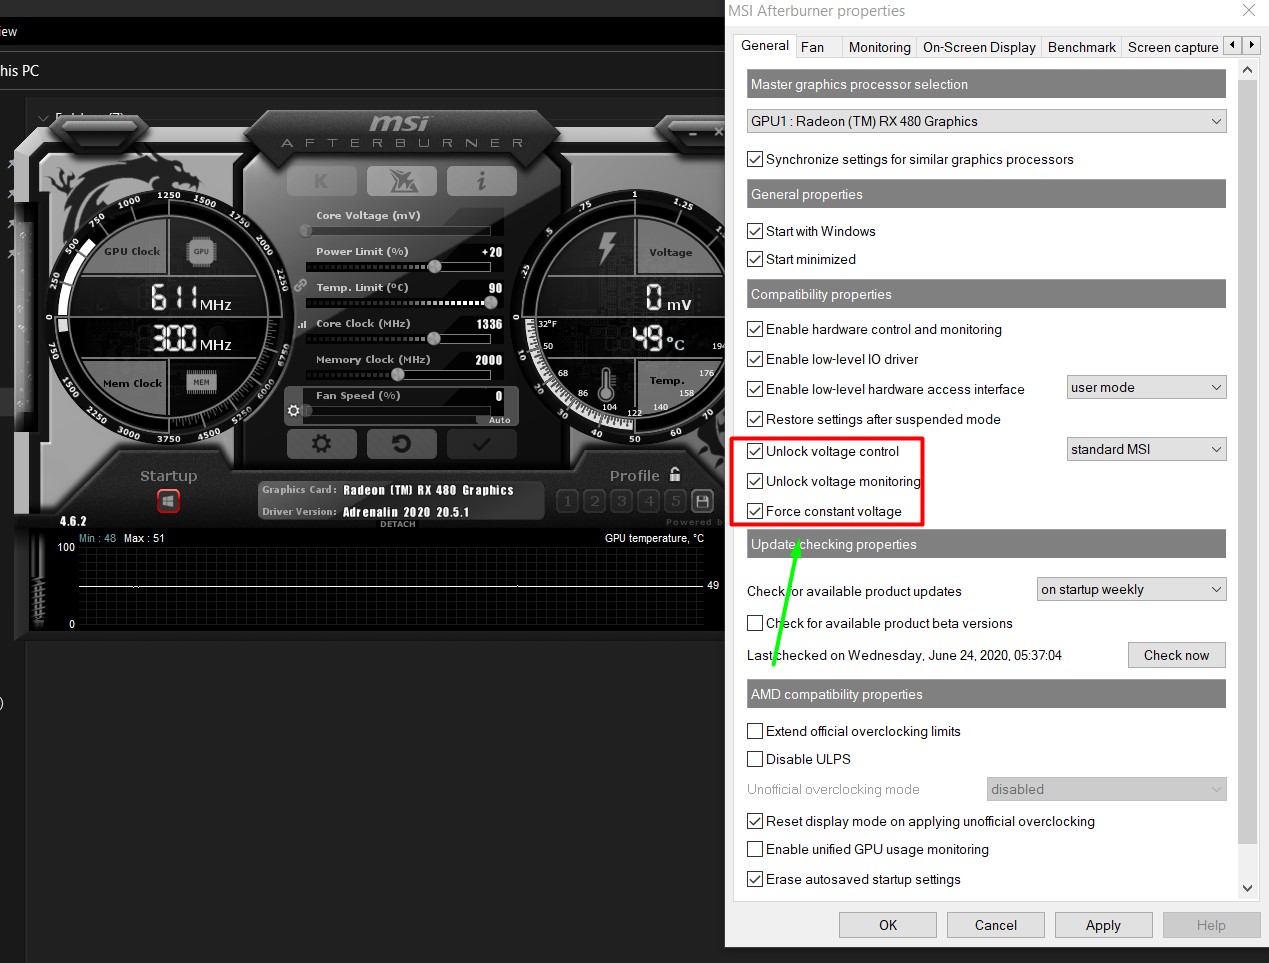
- Launch the MSI Afterburner tool and click on the settings gear icon at the bottom of the control panel.
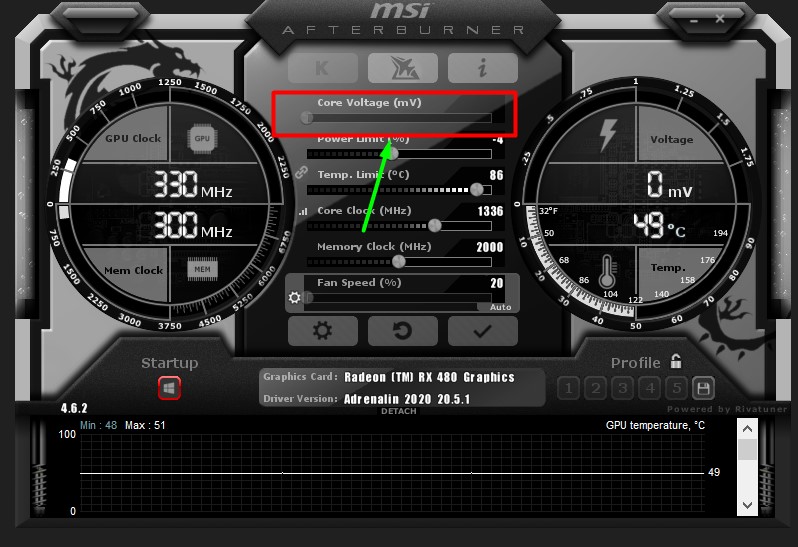
2. At the bottom of the window that pops up, under “Compatibility properties,” check the boxes beside “Unlock Voltage Control,” “Unlock Voltage Monitoring,” and “Force Constant Voltage.” Click okay to exit the window and restart your computer.
3. After restarting, launch the MSI Afterburner tool again and set your temperature limit to 86 C. The power limit marker will automatically adjust when you do this. (We are not increasing power limit because we are focusing on safe overclocking in this article specifically.)

4. Set your core voltage percentage to the max and then click the checkmark button underneath the control panel to implement these changes.
As discussed in our recently published articles about PC ventilation, overheating, and how to use fans to maintain positive airflow, it’s recommended to keep your GPU temperature under 80 C. While some are able to tolerate temperatures of 95 C to 100 C under intense graphical loads, such high temperatures permanently wear out the GPU and degrade its performance permanently over time.
This is why it’s recommended to keep it under 80 C and given that overclocking is bound to increase your GPU’s temperature, optimizing your fans can help keep it cool. Improving the fan curve of your over-heating GPU is explained in detail in this article and it’s something you should carry out in parallel to your GPU overclocking. That said, while 80 C is the ideal ceiling temperature, for the purpose of overclocking, we will set the max limit to 86 C but once you get into the tweaks, keep an eye on the temperature and try to keep it under 80 C as best as possible. You may have to pause your overclocking and adjust your fan curve or fan speeds alongside as explained in the article to ensure that both things balance out hand in hand for optimal performance and a safe usage temperature.
To begin overclocking:
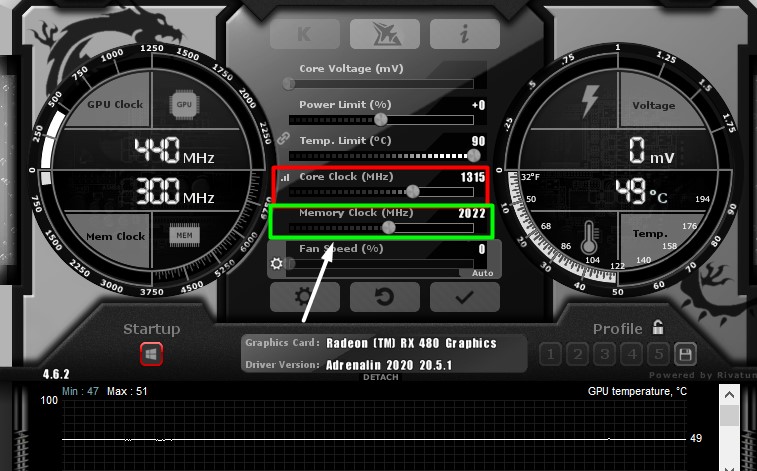
- Set your “core clock (MHz)” slider to +23 and apply the setting by clicking on the checkmark at the bottom of the control panel.
- Run your stress test through the Heaven Benchmark 4.0 application as explained earlier and check to see if there has been an improvement in the end of test statistics.
- You should see your FPS and Score values improve as your temperature rises slightly as well.
- Now, increment the core clock by 20 to 30 units, apply this change, and perform the stress test.
- You will reach a point where your system either crashes or you observe graphical glitches. This is an indication to stop and revert back to your last recorded safe setting which will be 20 to 30 units below your current one (this is why we increment in these small amounts).
- Once you reach such an error, simply revert back and save. Perform a stress test after each increment and note down its values or take a screenshot to compare it to the previous one.
You will notice FPS and score improvements each time but will also observe the temperature rise each time as well which is what you need to keep an eye on to achieve a preferable compromise in the trade-off.
As you’re doing this, you can perform the same steps above for the memory clock as well but that generally does not yield significant improvements in your graphical processing as GPUs have plenty of memory for their processes already. Once you’re done, you can save this profile at the bottom right of your MSI Afterburner home screen as a profile and you can select this later on for your gaming or graphics activities. You can load these profiles through the application when required. You’re able to save 5 profiles through this method. In case you want to revert back to the default settings, you can click the counter-clockwise arrow at the bottom of the control panel to do so.
Final Thoughts
Overclocking your GPU can significantly boost your performance especially under graphics-intensive loads such as gaming. For those who require this boost in their intense load settings, overclocking your GPU is the way to go. Is it safe? Yes. As discussed earlier, overclocking done in baby steps is easy to switch around in and the MSI Afterburner tool lets you set 5 profiles which you can switch between depending upon your usage. The only two points of concern in overclocking are that intense overclocking reduces your GPUs’ lifespan and the heating associated with it does the same by inducing permanent damage and wear and tear over time.
This is why it is important to overclock moderately with a thorough understanding of the trade-off in performance and safety and a solid idea of the level you’re willing to settle for. It is also important to look over your fan speeds and settings, optimizing the GPU fan curve and targeting region-specific fans inside your PC setup to ensure that the GPU remains cool and ideally below 80 C when under load. We published detailed guides on doing this earlier which you can refer to perfectly sort out your GPU overheating concerns. Implement the fan tweaks thoroughly as well to keep your GPU from damaging itself.
Besides that, the pros of doing this significantly outweigh the cons and the two things mentioned earlier are merely things to keep under consideration and not reasons to run away from overclocking your GPU. Your GPU comes with a world of potential that can be unlocked through overclocking its clock and voltage parameters. Following the steps above and performing the adjustments in baby steps can help you get your money’s worth in performance out of your GPU and truly make your gaming or graphics demanding experience enjoyable. Remember to be patient going through this and do not rush any step (especially not the stress tests). It takes a while, but the results are worth all the effort. Lastly, if you’re looking to upgrade your GPU then check out these RX 5600XT GPUs that can handle 1080p AAA gaming with ease.


Yes MSI Afterburner is an amazing overclocking software..and we are working on it