‘Effective way to improve Fan Curve of Over-Heating GPU’ [Guide]
With any sort of overclocking or intensive usage of your processor, RAM, CPU, or GPU, you’ll end up causing your components to overheat as they work to deliver the optimal performance you’re looking for. GPUs, in particular, when overclocked or optimized to extreme profiles are bound to overheat and cause the rest of your system to heat up as well; they form hot air pockets that insulate within the computer structure and cause the general system temperature to rise. If you’ve overclocked your GPU or if for any reason you’ve diagnosed that your GPU is responsible for heating up your device (this is a likely scenario for those processing intensive graphics), optimizing its fan curve to allow for efficient and effective cooling will keep your GPU from damaging itself and will allow it to work as intensively as needed to deliver the performance you’re expecting from it.
What To Expect: Understand What’s Normal
GPUs tend to have an idle temperature between 30C and 40C when not in demanding use. This temperature range matches the room temperature or surrounding environment for the most part. Under intensive load and processing, however, they end up faring between 60C and 85C. Some high-end GPUs claim to be able to tolerate 95C to 105C of temperature as well but once this maximum threshold is crossed, the device will shut off automatically to prevent permanent damage to its components.
100C is the temperature at which if you were to get any water on that component, it would sizzle and evaporate instantly, so you can imagine that while some manufacturers declare this range as the upper limit of their device’s temperature tolerance, it is not at all recommended to hit this ceiling while in use. For the specific thermal tolerance of your GPU, you can find it in the manufacturer’s guide for your product. However, we will discuss some general guidelines when it comes to GPU temperature regulation.
The rule of thumb when it comes to controlling the temperature of your GPU is to not let it exceed 80C. Often times with intensive usage, you’re bound to cross this threshold and hit about 95C. For newer devices, your GPU will be able to tolerate this high temperature (as long as it falls within the manufacturer defined tolerance range) for the first six months when you’re breaking it in. But once it gets older than that, its tolerance will decline with use and as it is kept in a constantly heating (heavy usage) condition, its functions will wear out. Therefore, it’s critical to ensure that your GPU is kept cool and under 80C for optimal and safe usage.
Noise vs Cooling: What Are You Willing To Settle For?
With any computing component inside your PC, there is a trade-off between performance, temperature, and noise. If you overclock your GPU, it may deliver better performance but it will heat up your device causing you to have to amp up your fan activity which will in turn produce a noisier sound profile that takes away from your overall user experience. Before you embark on the journey of changing and improving your GPU’s fan curve, define for yourself what that improvement means.
You may have a personal preference for performance over noise or noise over performance. It is important to decide what end outcome you will be happy with before you work to alter clocking or cool your components. That said, it is important to also keep in mind the ideal recommended ceiling temperature of a GPU as 80C so that you can work to build your clocking and cooling activities around this figure. Beyond this, it’s also important to understand that while a component claims to be able to tolerate a certain temperature, it is most certainly not designed to tolerate that temperature for multiple hours a day, every day of the week. GPUs, in particular, are not designed to be operating between 80C and 90C for your daily 8-hour activity all month.
You can either opt to buy a GPU that has lower temperature ranges and stays under 80C on its own, but that would mean that you’re trading off performance because with the better performance you’re bound to deal with higher temperatures. If you’re sticking with the GPU you have and find that it often exceeds the 80C ceiling mark as it stands or are choosing to further overclock it, optimizing its fan curve will be an essential step you take to keep your component from sustaining permanent heat damage. In this guide, you will be optimizing your GPU cooling through the MSI Afterburner tool. There are other manufacturer provided tools for this task as well; for example, AMD offers the AMD Radeon Settings while Nvidia offers the EVGA Precision X1. Irrespective of which software you opt to use, for the purpose of this method, the general outline of the steps you need to take will more or less be the same.
Adjusting The Fan Curve: How It Works & What You’ll Tweak
When it comes to keeping a graphics card cool, the main factors you’ll be tweaking are its fan speed, clock rate, and voltage, much like with the overclocking of any component that you may have done. The general conceptual understanding that follows is that clock speed pushes your GPU to send out graphical pixels faster and thus betters its performance. The voltage you supply aids in doing the same by contributing to the power you’re providing it. Your fan speed, on the other hand, works to keep your GPU cool and ensure that the performance overclocking you have carried out does not overheat the component.
This is where the personal preference of performance over noise will come in as discussed earlier. If noise isn’t an issue for you, then the first variable you’ll want to tweak is the fan speed to cool down your GPU. The SpeedFan method is the first one you should carry out to see if it helps. If the noise goes beyond a preferred threshold, you may want to tamper with your clock rate and voltage to find a compromise between performance and cooling. This will be done the same way as your overclocking has been carried out, except, you’ll now be doing it in reverse.
Form a mathematical standpoint, while the clock rate and voltage both determine the amount of power that your GPU is using and the performance that it’s delivering, the difference in impact between the two lies in the fact that your voltage tweaks are squarely related to the power dissipated (responsible for component overheating) and the clock rate is linearly proportional to it. This means that a slight tweak in voltage will have a greater impact in terms of power dissipation and consequently temperature. With both tamper elements, however, keep in mind that reducing them is what will bring your temperatures down, but that this will be at the cost of slightly degrading your performance.
Let’s Get Cracking!
Step 1: Tweaking Your Clock And Voltage Through MSI Afterburner
Let’s discuss a few general pointers of understanding before you go on to tweak your GPU’s clock rate and voltage parameters. Reducing both parameters will reduce the performance of your GPU slightly, but will drop its temperature consequently as well. The way to go to reduce the temperature is to:
- Undervolt the voltage (0.1 V to 0.2 V)
- In the case of voltage adjustments, it’s recommended to tweak it down by 0.1V or 0.2V. These are considered safe under volting amounts for your GPU. If you drop far below these recommended amounts, your risk impairing the functionality of your GPU.
- Underclock the clock rate (50 MHz to 100 MHz)
- With the clock rate, reducing by 50 MHz to 100 MHz will significantly improve your GPU’s temperature but will also noticeably degrade your performance. That said, do keep in mind that modern GPUs operate with a base clock as well as turbo clocks and thus simply lowering your base clock by 100 MHz will not result in the same overall reduction of 100 MHz in performance due to the turbo clocks in place. Nonetheless, the general concept remains to try and reduce the clock rate (and slightly trade off performance) to achieve a cooler GPU.
- Perform a Stress Test
- Be sure to perform stress tests after any minute change to the voltage or clock rate values. This means you’ll have to reboot your system after applying any tweak and then observe it for 10 minutes to ensure that your system doesn’t run into any fatal error such as the Blue Screen of Death. Once your pass the stress test, apply the next tweak and perform the test again. Stress tests are critical to ensuring you do not change your parameters so much that your device is rendered unable to operate altogether.
- Repeat
- Adjust your voltage or clock further until you reach a desired optimal performance point without running into any fatal error.
Step 2: Optimizing Your Fan Curve On MSI Afterburner
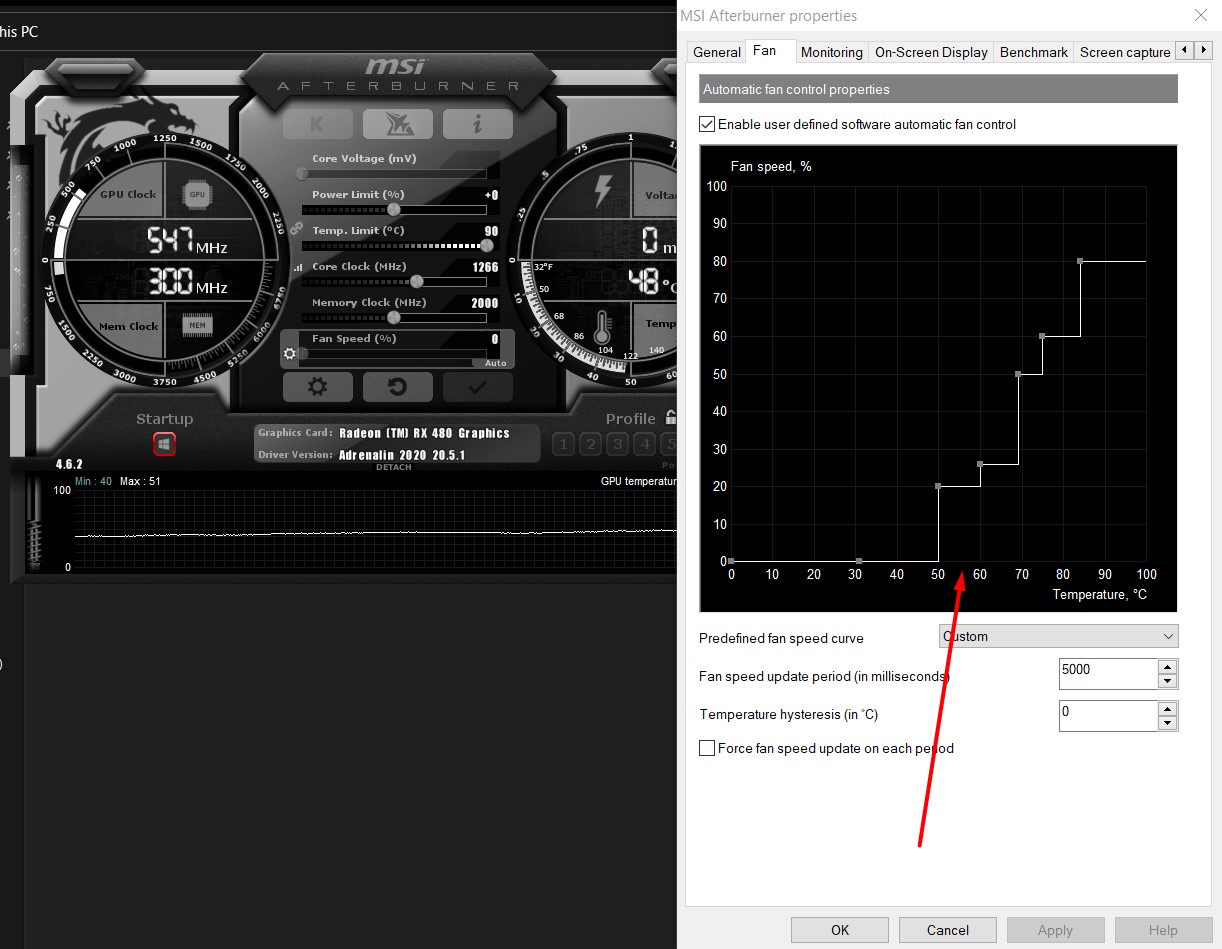
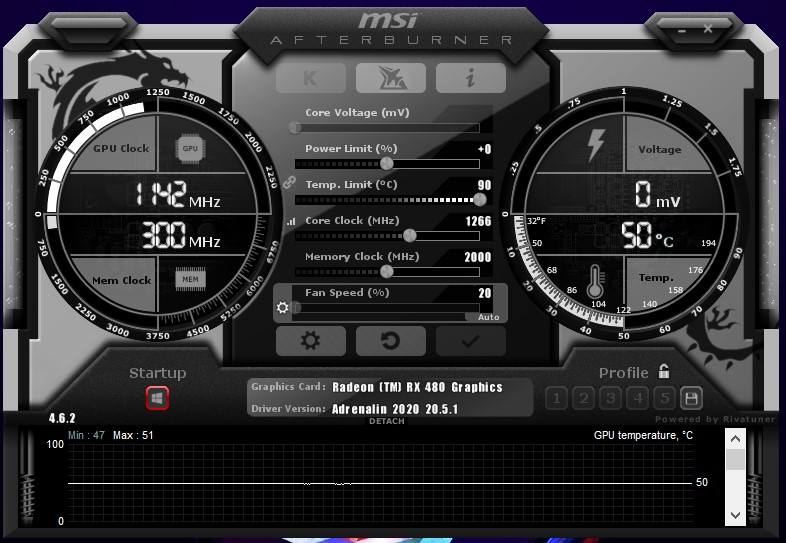
- When you launch MSI Afterburner, you’ll notice a fan curve displayed under the “Fan” tab at the top.
- Firstly, ensure that the box next to “Enable user defined software automatic fan control” is checked
- Then, select custom against the “Predefined Fan Speed Curve” drop down menu. Through this, you’ll be able to manually adjust the markers for your fan curve and indicate the percentage at which you’d like your fans to operate depending upon the different temperatures reached.
- From a safety perspective, it’s important to ensure that your fans do not fall below 20% speed in any temperature scenario to ensure that proper ventilation is always taking place. Thus, we recommend starting from 30% fan usage and increasing it once it crosses 30C (the idle GPU temperature a.k.a your room temperature).
- At or slightly before 80C is where you want to reach maximum fan speed so place a marker at 100% fan speed at a temperature nearing 80C. Press Ctrl + F to flatten the curve out beyond your maximum set temperature.
- You can adjust the markers leading up to this point to set the gradients for your cooling activity based upon how rigorously you’d like the cooling to take place in the various temperature ranges. The gradients don’t need to be as steep leading up to 50C which we will consider a safe and optimal GPU operating temperature.
- Beyond this, however, tweak your curve so that the fan speeds rise till 100% before you hit 80C in temperature. The fan curve shown above is a good example of how an ideal curve should look like.
Final Word
Once you’ve applied this, save your settings, and use the SpeedFan software as a monitoring facility, in this case, to keep an eye on your GPU temperature as you use your PC. When it comes to keeping a GPU cool, it’s important to be careful not to drop further than 0.2V below the set voltage to refrain from underpowering your GPU. From a safety perspective, that is the most important tweak to keep in mind. Otherwise, the trade-off comes in between your performance (via clock rate) and the noise (via fan speed). These tweaks and adjustments will be based upon your personal preference and the amount of performance you’re willing to trade up for a quieter system or the amount of noise you’re willing to tolerate for better performance. In either case, ensure that your GPU temperature remains under 80C which, irrespective of what your manufacturer says about GPU tolerance, is the safe ceiling we recommend you stick to given how GPUs wear out with time. Lastly, if are looking to amp up your GPU’ cooling in a more thorough way then don’t forget to check out our 5 favorite aftermarket GPU coolers of this era.