‘Display driver crashing after Windows 10 Update 1709’ [Solved]
Windows Fall Creators update rolled out recently and is predicted as one of the fastest updates to be installed by the users. While the new update offered many new features and improvements, it was also packed with many conflicts. One of these conflicts includes the display driver crashing with or without the driver installed. As each computer configuration is different, there is no absolute solution to this issue. However, we have listed what worked as workarounds. Take a look.
Solution 1: Installing Graphic Drivers Manually
Before trying any other solutions, we will resort to installing fresh graphics drivers manually. Many users reported that their graphics drivers were not compatible with the current update 1709. You can download the drivers manually from your manufacturer’s website and update them using the method stated below. Make sure you download DDU from here and copy it to an External Drive or save it on your Desktop before you boot into Safe Mode.
- Follow the instructions in our article on how to boot your computer into safe mode.
- Once in Safe Mode, either copy the DDU file to your Desktop in a new folder if you saved it onto a USB or locate the file where it was downloaded and move it to a new folder, so the extracted files can stay within the folder, else it will be extracted where you’ve got the file saved.
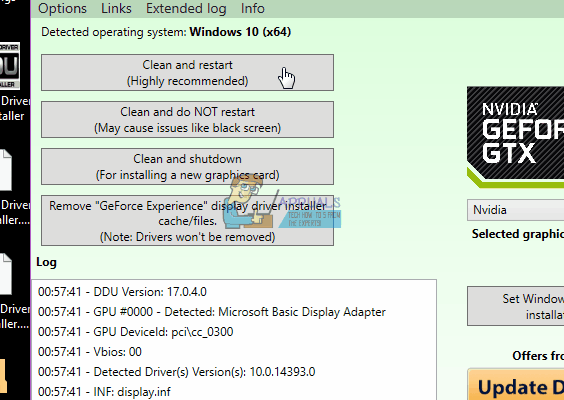
- Once done, click the Display Driver Uninstaller icon and run it. Don’t worry, if it shows “Windows 8.1” as the system detected.
- Go ahead, and choose the Card Type from the drop-down, then choose Option 1 which is Clean and Restart.
- After the Driver Cleaning has finished, the system will reboot back into Normal mode.
- Now, you can go to the manufacturer’s site to download and install the latest driver for your Graphic Card.
Solution 2: Changing Output Color Depth
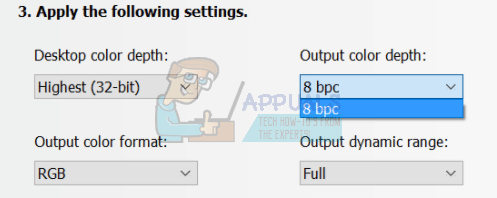
Color depth is also known as bit depth is either the number of bits used to indicate the color of a single pixel or the number of bits used for each color component of a single pixel. This option is available is readily available on various graphics cards to optimize the display performance as per the requirements. After the 1709 update, there seemed to be a problem with the color depth. Many users reported that changing the color depth from 12 bpc to the standard 8 bpc solved the problem at hand. This solution worked particularly for Nvidia users. You are free to try on your hardware.
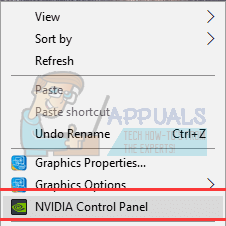
- Right-click on the desktop and select “Nvidia control panel”.
- Once in the control panel, expand the category of “Display” and select “Change resolution”.
- At the right side of the screen, you will see an option of “Output color depth”. Click it and change the value to “8 bpc”.
- Press “Apply” to save changes and exit. Restart your computer and check if the problem got solved.
Solution 3: Changing Monitor Type
Another workaround which worked for users was changing the monitor type from non-generic PnP to PnP. There can be many reasons behind this bug but let’s not get into the details. If you already have your monitor as “PnP”, you can try changing your refresh rate or uncheck the option “Hide modes that this monitor cannot display”. There are many misconfigurations caused by a non- plug and play monitor.
- Press Windows + R to launch the run application. Type “devmgmt.msc” in the dialogue box and press Enter.
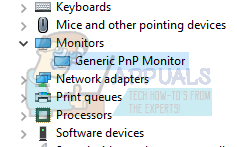
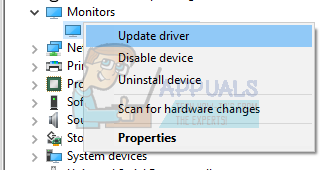
- Once the device manager is opened, expand the category of “Monitors”. Here your current monitor will be listed. Check if it Generic PnP. If it is you will see something like this.
- If it isn’t we will update the driver accordingly. Right-click on the monitor and select “Update driver”.
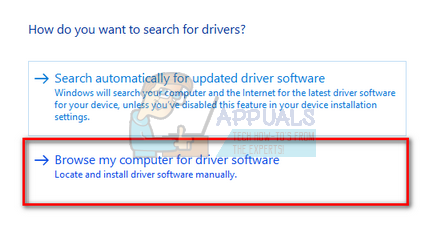
- Now you will be given two option: to update manually or to update automatically. Make sure that you have already downloaded the Generic PnP drivers for your monitor. Select “Browse my computer for computer software”. After selecting the correct driver, install it and reboot your computer.
If you already have Generic PnP drivers installed on your monitor, open your graphics card control panel and try changing the refresh rate and other display settings. Do a little experimenting and check constantly if it fixes the problem at hand.
Solution 4: Disabling Hibernation and Sleep mode
Another issue which many users faced was black and white screen whenever they booted their computer or when their computer turned on after hibernation or sleep. This issue can be bypassed by disabling these modes altogether. Do note that you can always enable them afterward if this doesn’t fix the problem for you.
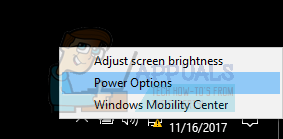
- Right-click on the power icon present at the bottom right side of the screen and select “Power Options”.
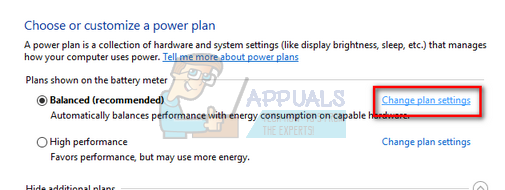
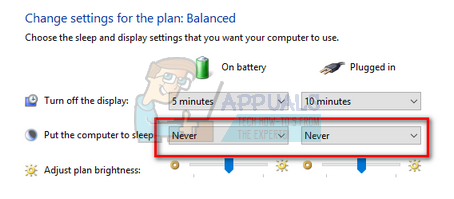
- Once in the Power Options, select “Change plan settings” in front of the power plan you are currently using on your computer.
- Now select “Never” in “Put the computer to sleep” in both cases; on battery and plugged. Press “Save Changes” to update the power plan and back to the previous window.
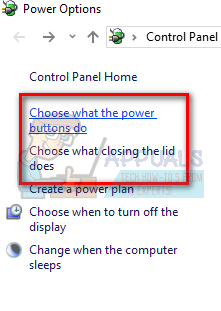
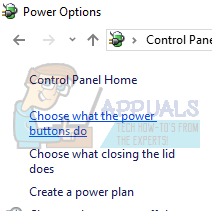
- Once in the main window of power options, make the following changes in both options; choose what closing the lid does and choose what the power buttons do.
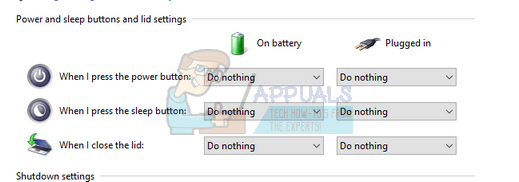
- Change all the settings to “Do nothing”. Press Apply to save changes and exit. You can also change the setting of “When I press the power button” to “Shut Down”. Just refrain from using the options of hibernate and sleep in any settings.
- Restart your computer and check if the problem got solved.
Solution 5: Checking if only the Required Drivers are Installed
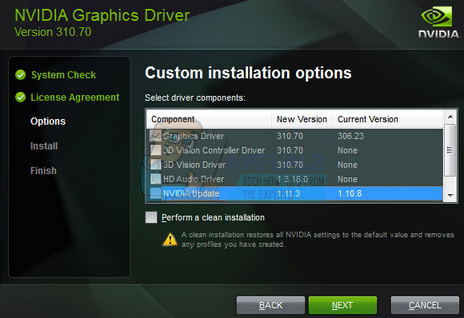
The latest Windows update installed many drivers which may not be supported by your computer. It installed the whole package of display drivers which included various components instead of the ones you only need. You should reinstall drivers accordingly and only check the boxes which are supported by your hardware. You can easily option driver packs from manufacturers such as Nvidia and then select the installation which drivers you want to install and which you don’t.
Once you start the installation, select the option “Custom” instead of “Express”.
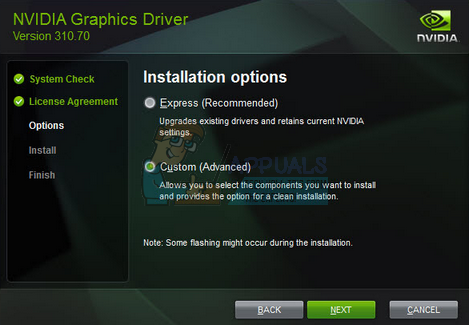
Now you will be asked which components to install and which not to. Select only the components that your hardware supports. Be careful particularly about 3D drivers. Check thoroughly on your machine and then check the required options.
Solution 6: Turning off Fast Startup
Windows 10’s Fast Startup (also called fast boot) works similarly to the hybrid sleep modes of previous versions of windows. It combines the elements of a cold shutdown and the hibernate feature. When you shut down your computer, Windows logs off all users and closes all applications similar to the cold boot. At this point, Window’s state is similar to when it is freshly booted up (as all users are logged off and applications are closed). However, the system session is running and the kernel is already loaded up.
This feature makes Windows boot faster so you don’t have to wait the traditional time. However, this feature is also known to cause problems by not loading the required drivers properly each time. As it doesn’t reload the drivers, some drivers might not be already be loaded. Due to this, your mouse and keyboard might not be working properly.
- Press Windows + R to launch the Run application. In the dialogue box type “control panel” and hit Enter. This will launch your computer’s control panel.
- Once in the control panel, click on Power Options.

- Once in the Power Options, click on “Choose what the power buttons do” present at the left side of the screen.
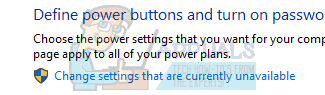
- Now you will see an option which requires administrative privileges named as “Change Settings that are currently unavailable”. Click it.
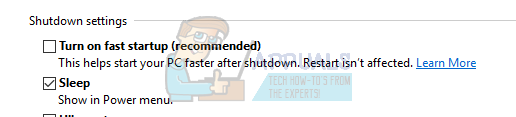
- Now head to the bottom of the screen and uncheck the box which says “Turn on fast startup”. Save changes and exit.
- You might need to restart your computer. Check if the problem at hand got fixed.
This remedy is done so whenever you shit your computer, all the data has to be reloaded after the next start.
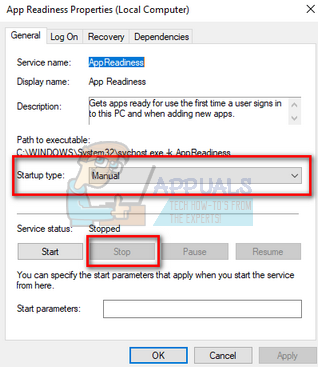
Solution 7: Disabling App Readiness Service
We can also disable the native Windows service “App Readiness” from the services tab. It is enabled by default and many users reported that this service caused their graphics drivers to crash after the update.
- Press Windows + R to launch the Run application. Type “services.msc” in the dialogue box and press Enter.
- Once in the services tab, look for the service of “App Readiness”. Double-click it to open its properties.

- Once in the properties, stop the service by pressing the “Stop” button present alongside Service status. Then select the startup type as “manual” instead of automatic. Press Ok to save changes and exit. Restart your computer and check if the problem got solved.
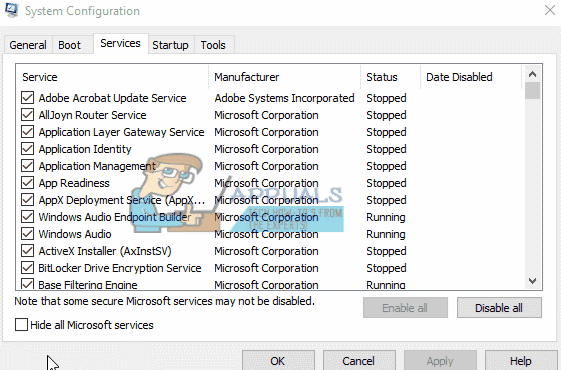
You can also run your computer into Clean Boot state and check if there are any applications conflicting with your display drivers. This boot allows your PC to turn on with a minimal set of drivers and programs. Only the essential ones are enabled while all the other services are disabled.
- Press Windows + R to launch the Run application. Type “msconfig” in the dialogue box and press Enter.
- Navigate to the Services tab present at the top of the screen. Check the line which says “Hide all Microsoft services”. Once you click this, all Microsoft related services will be disabled leaving behind all the third-party services.
- Now click the “Disable all” button present at the near bottom at the left side of the window. All the third-party services will now be disabled.
- Click Apply to save changes and exit.
- Now navigate to the Startup tab and click the option of “Open Task Manager”. You will be redirected to the task manager where all the applications/services which run when your computer starts will be listed.

- Select each service one by one and click “Disable” at the bottom right side of the window.
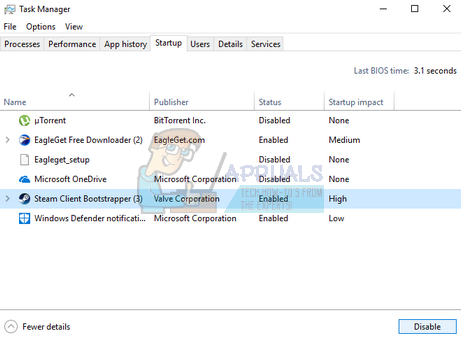
- Now restart your computer and check if the issue with the drivers is solved. If it is, you can easily diagnose by activating the applications one by one and check which one as causing the problem.