How to Fix ‘Getting Windows Ready’ Stuck in Windows 10/11
6 Easy & Quick Solutions to Fix Getting Windows Ready Stuck
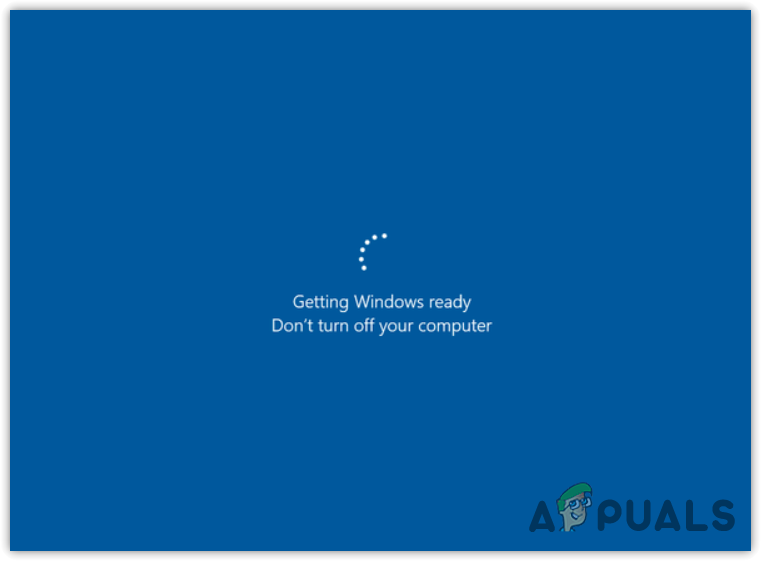
Is your computer or laptop stuck on ‘Getting Windows Ready. Don’t turn off your computer’ screen every time your turn it on? This issue mostly occurs when you try to update your Windows or fresh install it. Don’t worry though! because this issue can be fixed. Below we have plenty of solutions for ‘Getting Windows Ready’ boot loop issue.
This issue is reported on all Windows versions (Including Windows Server and VMWare as well). HP, Dell and Microsoft Surface laptops are getting stuck on ‘Getting Windows Ready’ screen often than other brands.
Contents on this page:
What causes computer to get stuck on Getting Windows Ready?
Windows installs updates using the downloaded update files located in the software distribution folder. If these files get corrupted for some reason, such as a weak internet connection, you will get stuck on a Getting Windows Ready screen.
How long should you wait if stuck on ‘Getting Windows Ready’?
According to Official Microsoft Support troubleshooting article on “Trouble installing Surface updates?” If the “Getting Windows Ready” screen just doesn’t seem to go away after 20 minutes, something might be up with the update installation.
Therefore, before you jump into troubleshooting, give it at least 20 minutes to make sure Windows has enough time to finish the update.
You could even try disconnecting from the internet to see if that speeds things up a bit. If it’s still stuck after half an hour, then it might be time to start looking into what’s going on and follow the troubleshooting steps in your content.
How to fix ‘Getting Windows Ready’ stuck in Windows?
We have listed our most working solutions for you down below, try each method and check if it works for you. Here are all the solutions:
Solution 1: Power cycle your computer
The first solution is to force restart your system because it is the only way to cancel the installation of the Windows update without applying any solution. Force restarting the system closes all the processes immediately and restarts the essential services that allow the system to take a fresh start.
- To force restart the system, hold the Power button until the laptop turns off.
- Once it is turned off, wait for 10 to 15 seconds, then turn on your system by pressing the power button. This can take up to several minutes to continue the Window with the previous Windows update. So be patient.
- Once done, now the problem should be fixed.
Solution 2: Disable Windows Modules Installer service
Windows Module installer is a background service that ensures the installation, modification, and removal of Windows updates.
If this service gets disabled, the process of installation or uninstallation will be terminated from the background. So to get rid of getting Windows ready screen, try disabling the Windows Modules Installer using the Registry Editor.
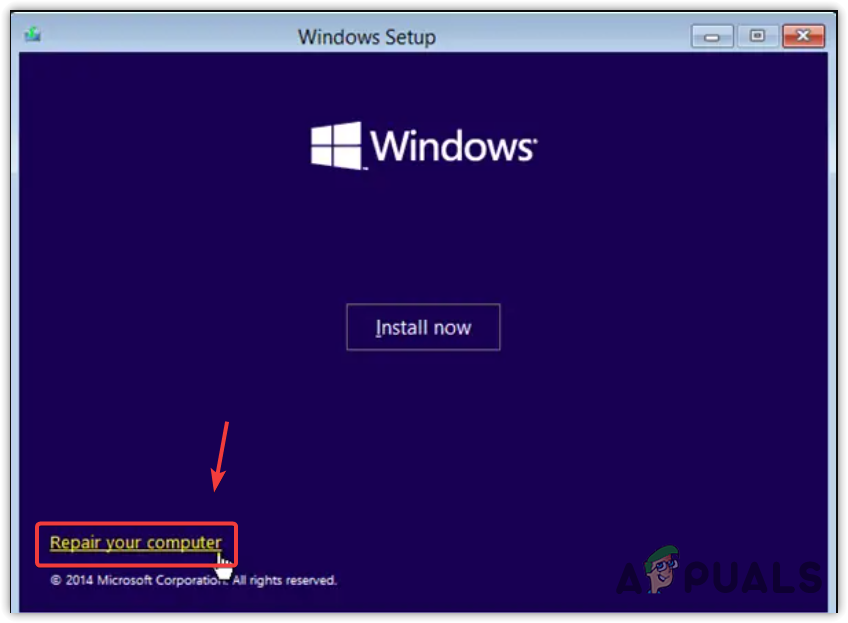
To disable the Windows module installer, you need to go to Windows Recovery Environment. For that, you need to boot your Windows installation disc.
- Click Repair your computer, and select Troubleshoot.
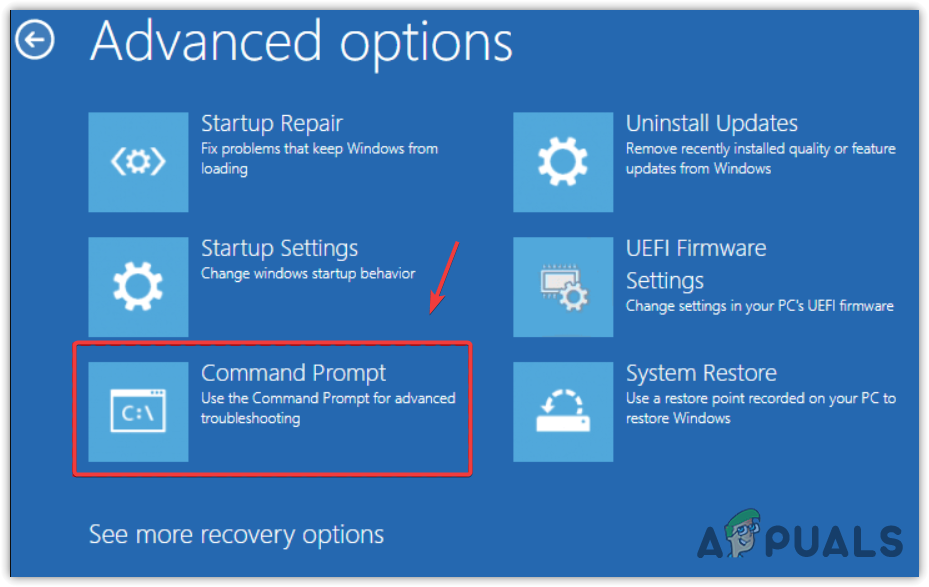
- Then, select Advanced Options > Command Prompt.
- Once the command prompt is opened, type regedit and hit Enter to open the registry editor.

- Once it is opened, select HKEY_LOCAL_MACHINE and click Load Hive from the File Menu.
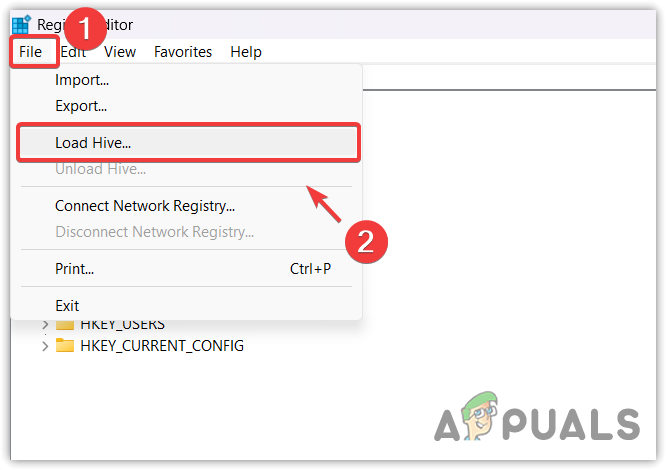
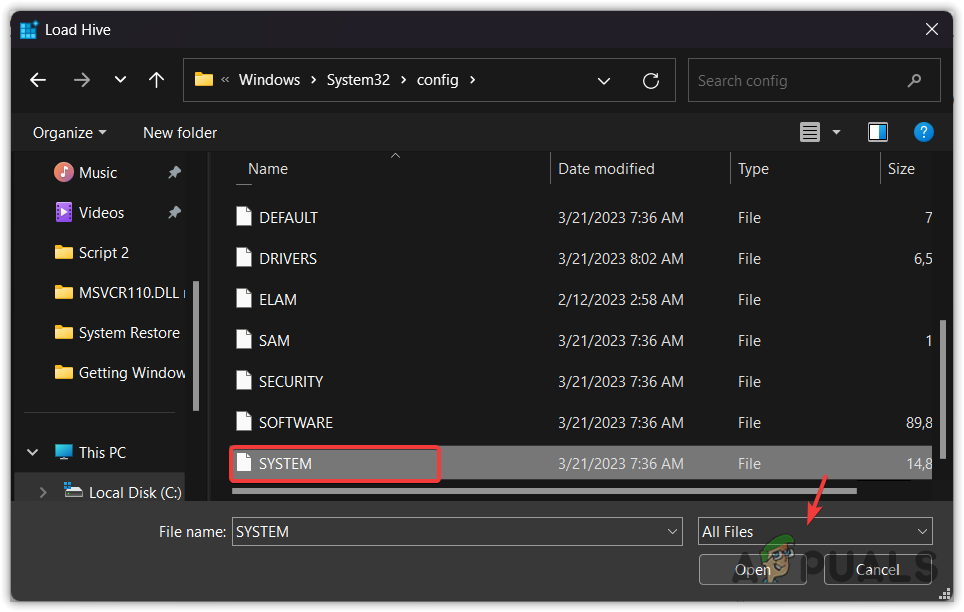
- Navigate to the following path and select the SYSTEM and click Open.
C:\Windows\System32\config
- Now browse the following path in the registry editor.
Computer\HKEY_LOCAL_MACHINE\SYSTEM\ControlSet001\Services\TrustedInstaller
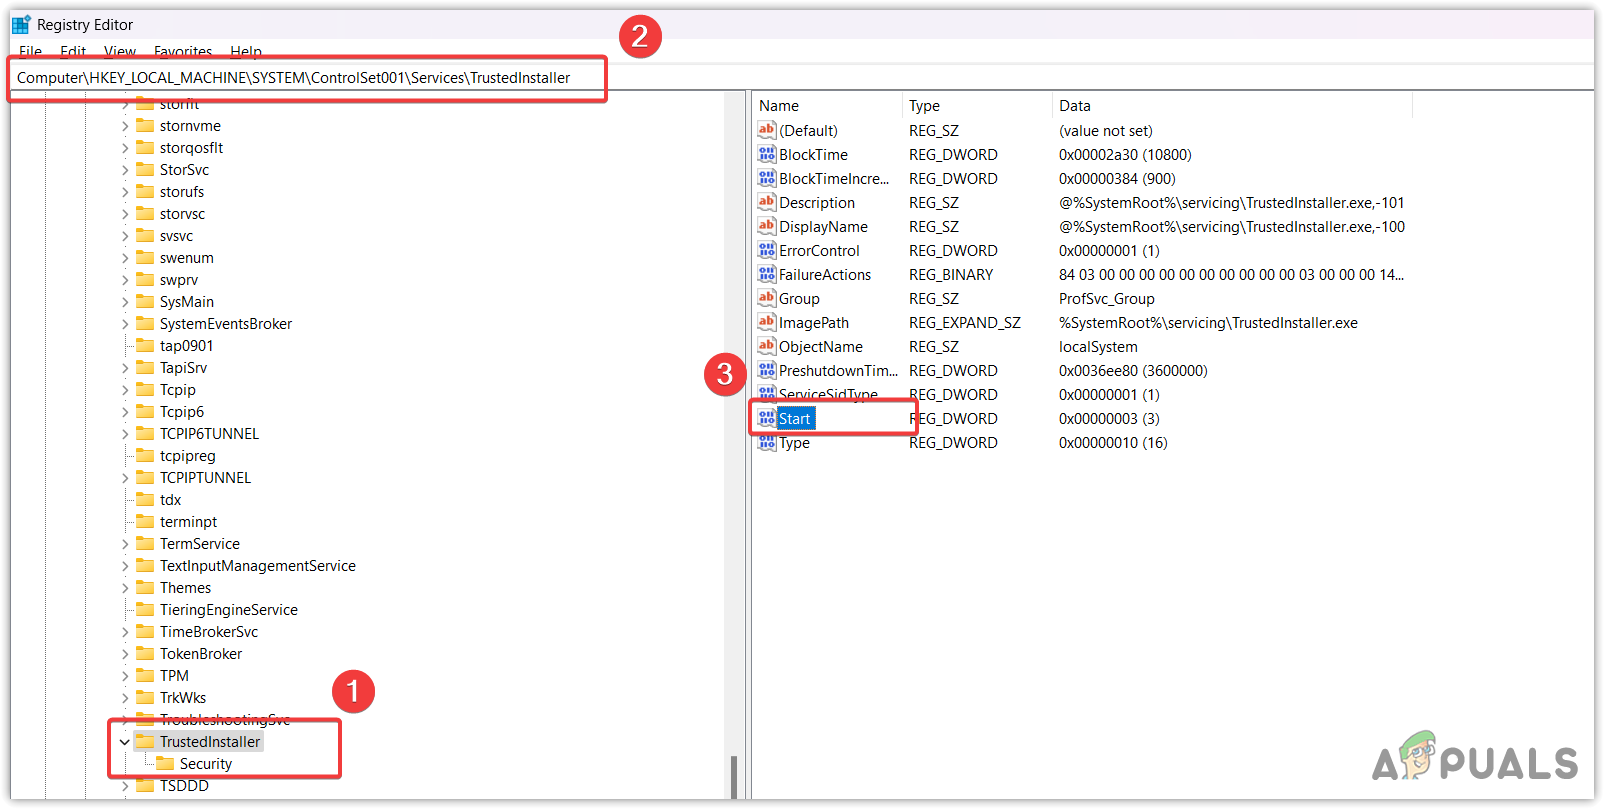
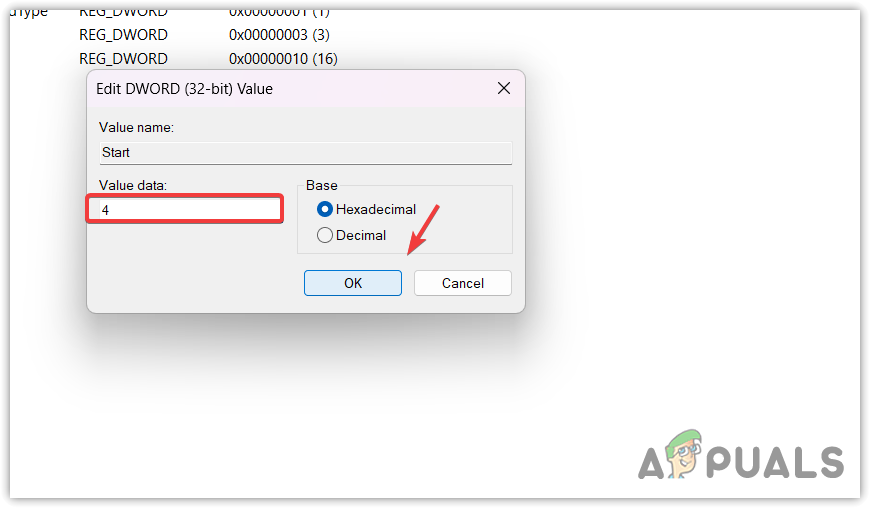
- Change the value of Start to 4, which means you want to disable the Windows Modules installer service.
- Once done, click OK, and close the registry editor.
- Then, simply restart your computer for the changes to take effect then check if the issue is fixed or not.
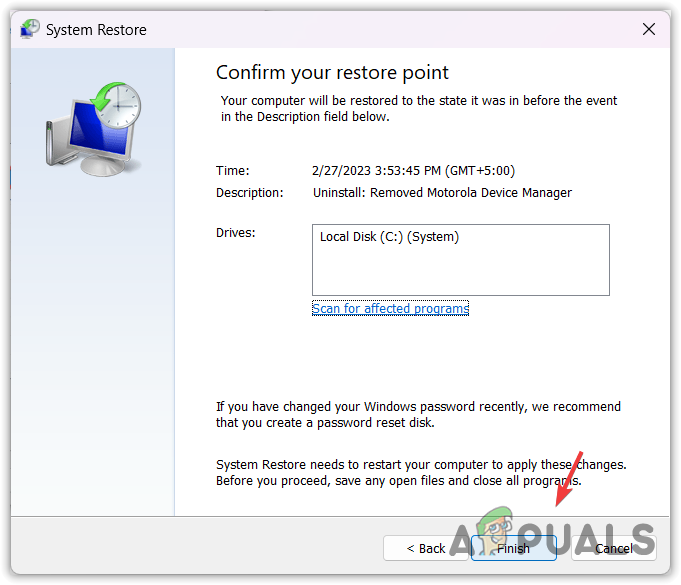
Solution 3: Use a System Restore utility
System Restore is a utility that is used to restore Windows to a previous state, so if the Windows update is continuously failing and getting stuck on getting Windows ready, you can use a system restore utility to roll back to a previous Windows update. But this utility requires a restore point created before you encounter this issue.
- To use a system restore utility, boot the Windows installation disc. You can boot your disc by selecting the USB from the boot options.
- Once done, click Repair your computer and select Troubleshoot > Advanced Options > System Restore.
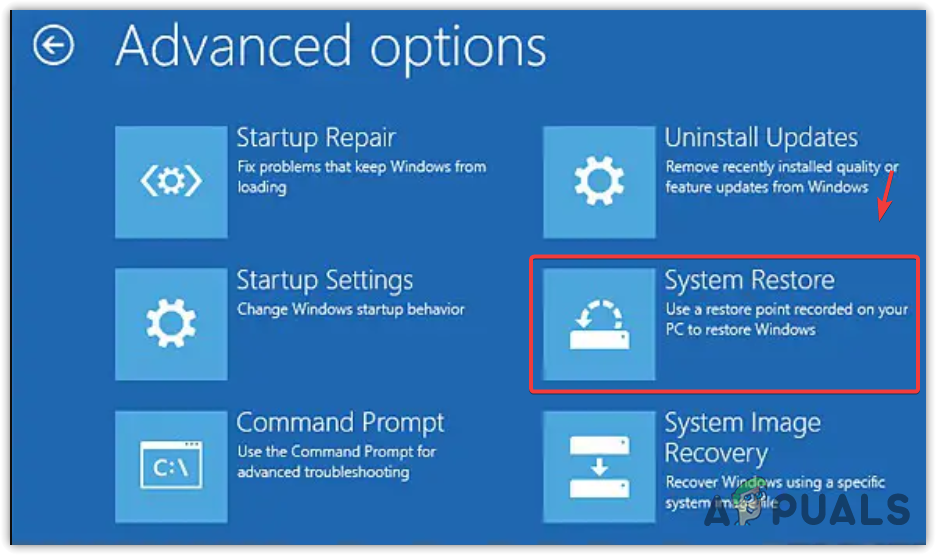
- Wait for your Windows to run the system restore utility, then click Next and select a restore point.
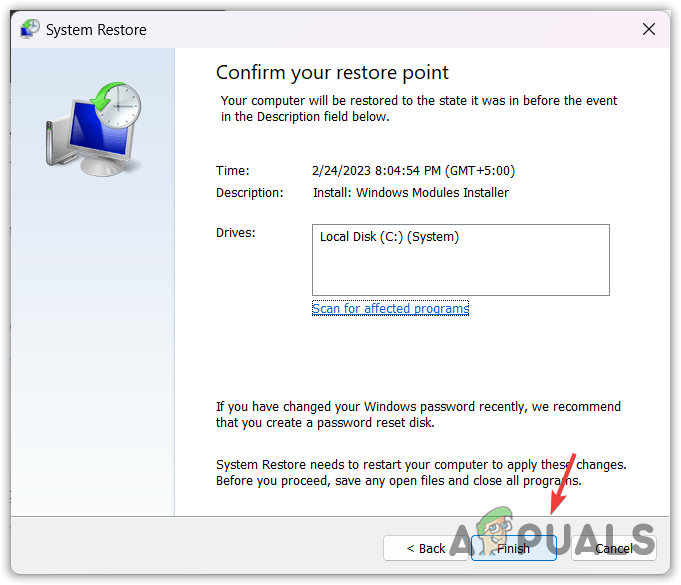
- Finally, click Next and click Finish to restore Windows to its previous state.
Solution 4: Enable Safe Mode to uninstall Windows updates
Safe Mode is a state where the drivers and third-party application services do not work. It is a troubleshooting utility that is used to determine which program or service is interfering and causing the issue.
Even though you can uninstall Windows updates from the Windows recovery environment, you won’t be able to reset the Windows update component unless you enter all the commands one by one, which is a lengthy process.
By accessing the safe mode, you will be able to uninstall Windows update along with running a batch file that contains all the commands to reset the Windows update component. To do so, follow the steps.
- Once you are there, just simply select Troubleshoot > Advanced Options > Startup Settings.
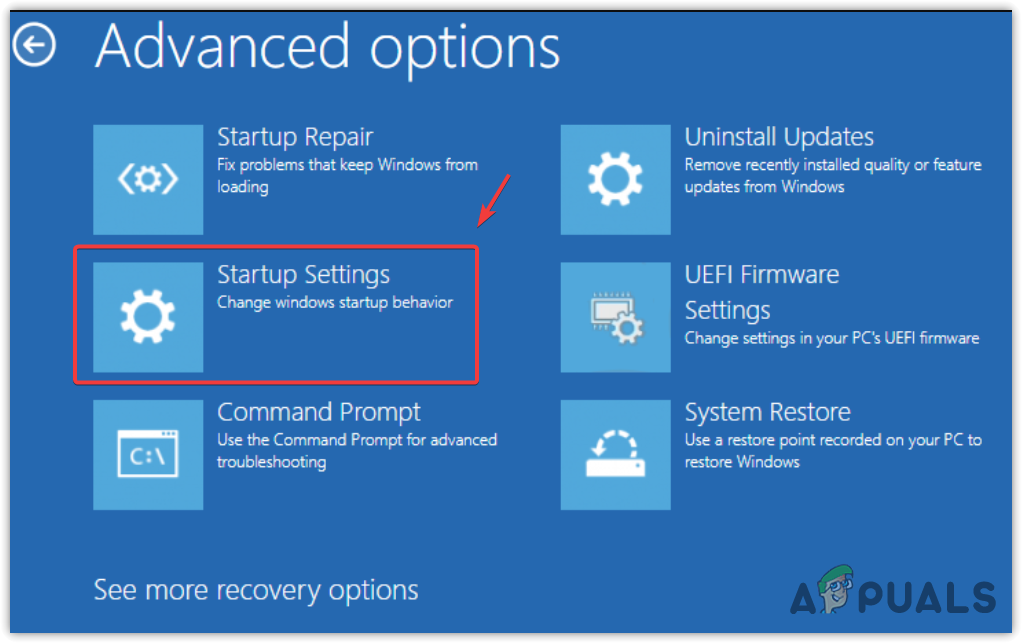
- Click Restart from the right.
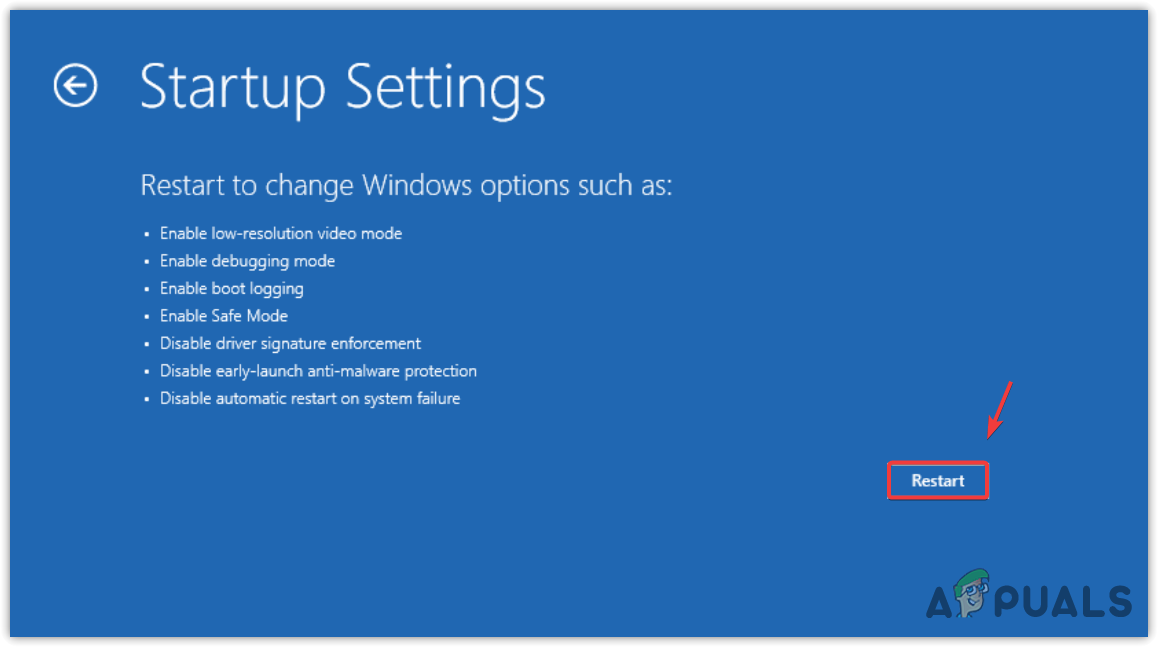
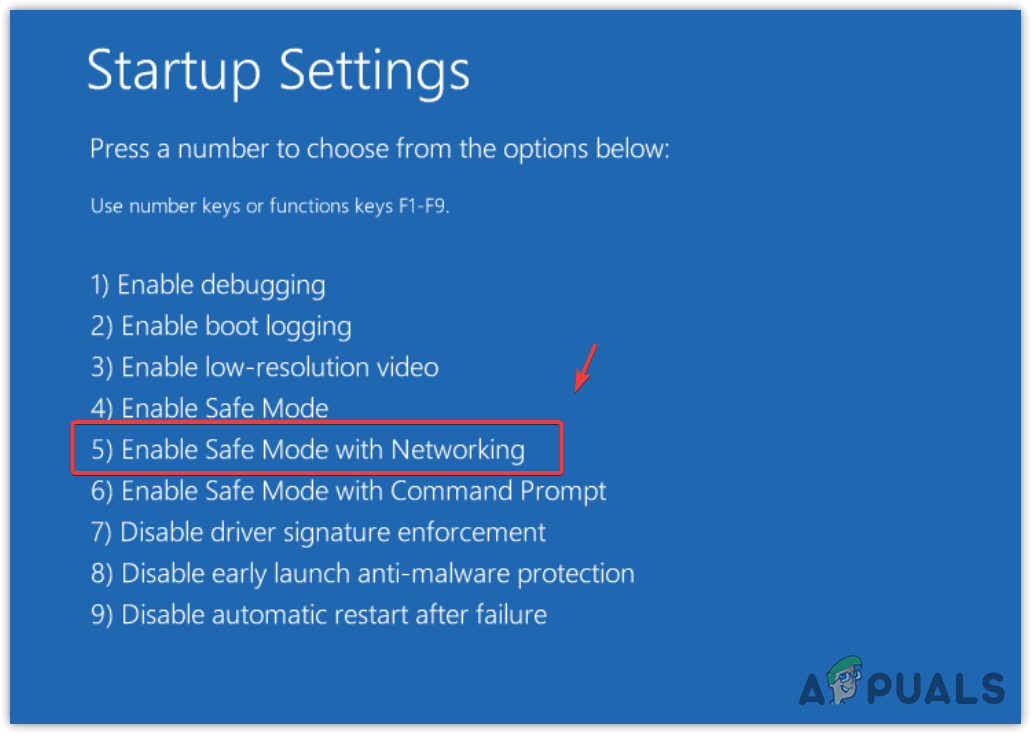
- Wait for your Windows to restart, then press 5 or F5 to enable the safe mode.
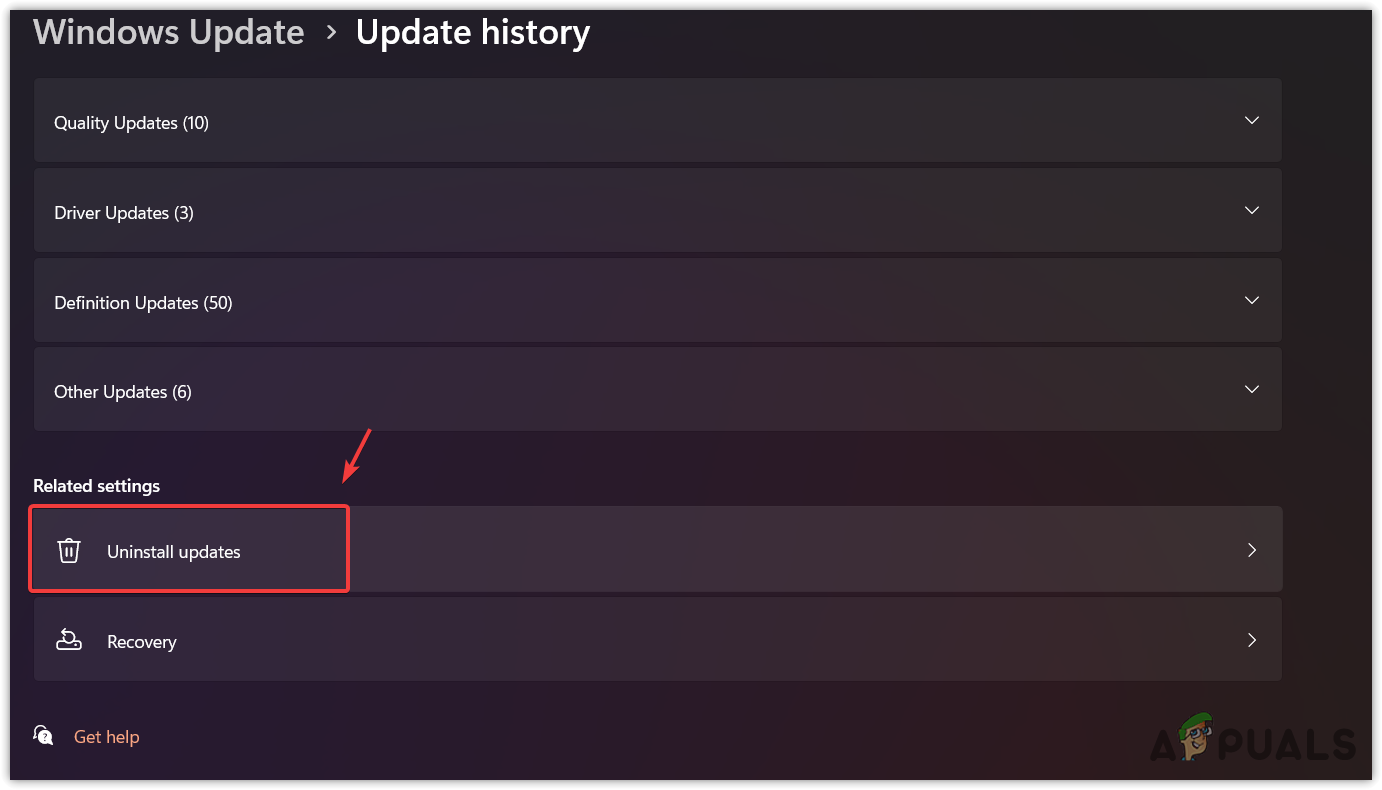
- Once the Windows is booted in safe mode, go to settings by pressing Win + I.
- Go to Update and security from the left pane.
- Then, go to update history.

- Scroll down to the bottom and click Uninstall updates.
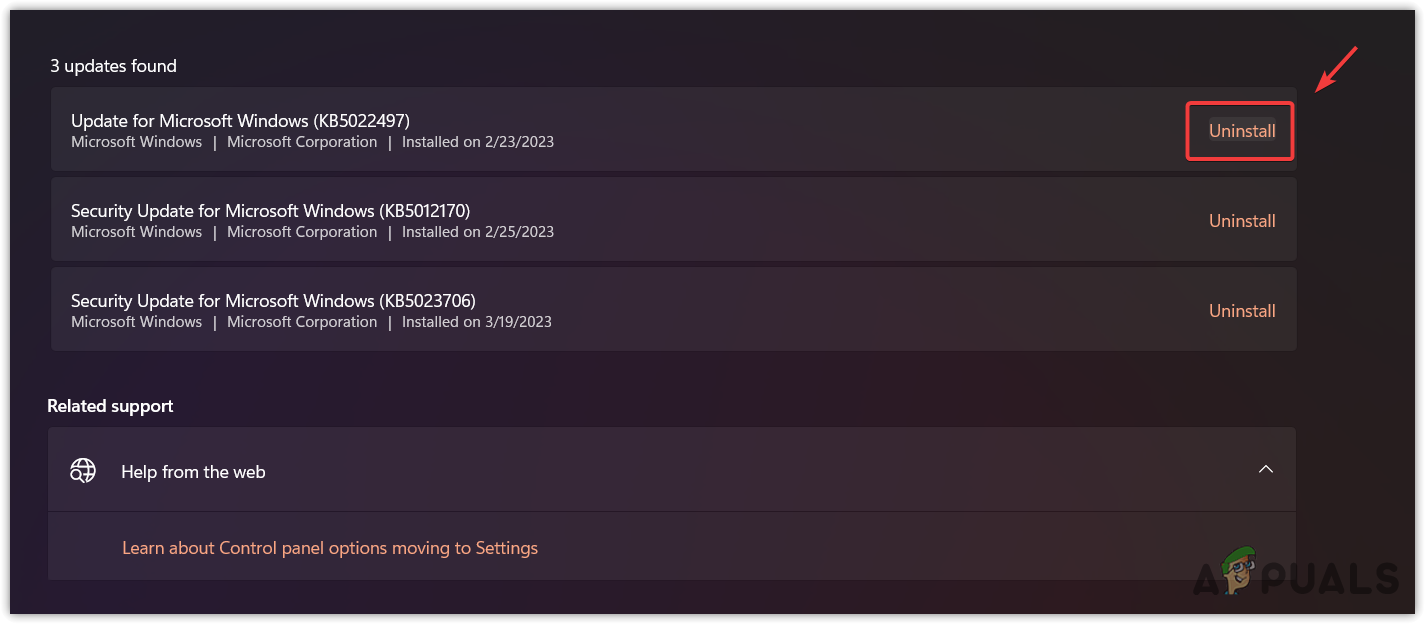
- Uninstall the recent Windows update.
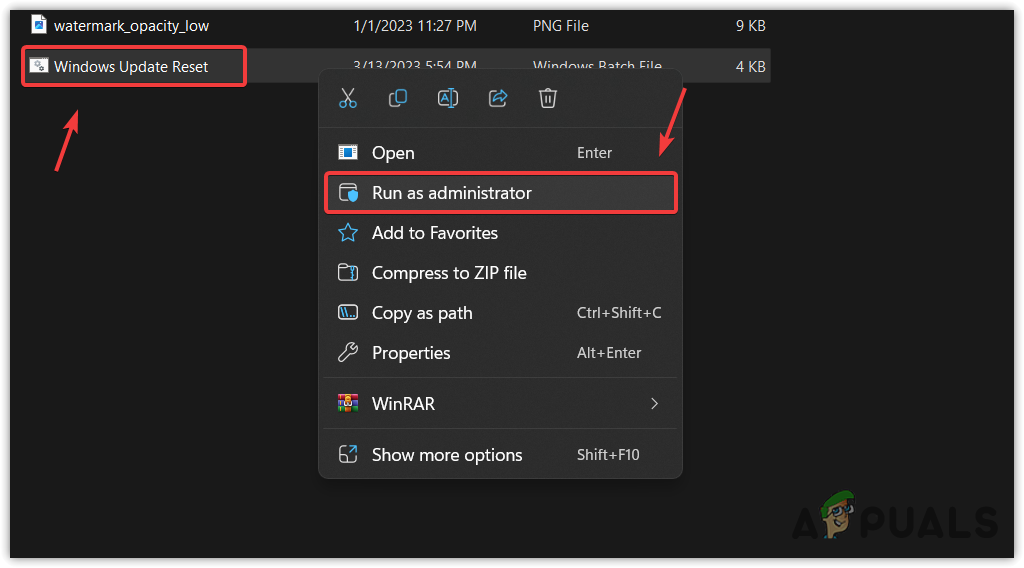
- Once done, download the bat file that contains all the commands to reset the Windows update component.
- Right-click the batch file and select Run as administrator.
- Once done, now simply restart your computer, and your issue should be fixed.
Solution 5: Remove peripheral devices
In some cases, Windows fails to install drivers for the peripherals devices such as keyboards, headphones, pen drives, etc. As a result, it gets stuck on the getting Windows ready screen. Therefore, try disconnecting all the peripheral devices, so the Windows won’t focus on installing peripheral device drivers.
Solution 6: Reinstall or reset Your Windows
In case all the mentioned solutions have failed to fix getting Windows ready screen. In this case, you can try resetting or reinstalling Windows. Both methods will install fresh Windows with new system files, which will fix this issue.
If you want to reinstall Windows, you can visit the article, but if you want to reset Windows, follow the steps:
- Boot the Windows installation disc and click Repair your computer to navigate into the Windows recovery environment.
- Then, click Troubleshoot > Reset this PC.
- Select Keep my files > Local Reinstall.
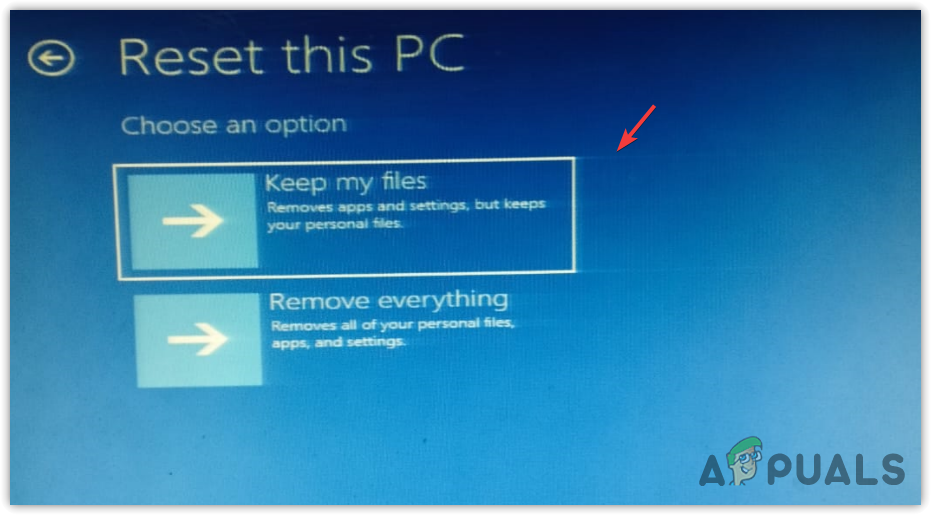
- Now click Reset and wait for Windows to restart with new settings.
 . Remember, this won’t delete your documents and pictures but will delete drivers and programs installed on the system disk.
 - Once done, now your issue should be resolved.
Conclusion
Being stuck on ‘Getting Windows Ready’ can be frustrating and anxious, in this article we explained multiple solutions you can get your computer fixed. If for some reason these fixes doesn’t work for you make sure to leave a comment down below so our technician can help you get your computer up and running in no time. Thanks for reading!


