6 Easy Ways to Fix the Generic PnP Monitor Error
- The Generic PnP monitor driver in Windows allows external monitors to be used without manually installing specific drivers. It defaults to this when it can't find a suitable driver for the monitor connected.
- Ensure all connections are secure. Update or reinstall the Generic PnP Monitor driver through Device Manager. Check your display card drivers for updates, and use Windows' System File Checker or troubleshooter to fix system errors.
- Regularly check for Windows updates to keep your system and drivers up to date. This helps avoid conflicts and ensures better hardware compatibility and performance, reducing issues like the Generic PnP monitor error.
Suppose you are trying to connect an external monitor to your system but are facing issues such as the monitor not being detected. In that case, chances are you might be facing the Generic PnP monitor error. In this article, we’ll look at what the Generic PnP drivers are and 6 ways to help you fix the Generic PnP monitor error. So, let’s dive in!
Table of Contents
What is the Generic PnP Monitor Driver?
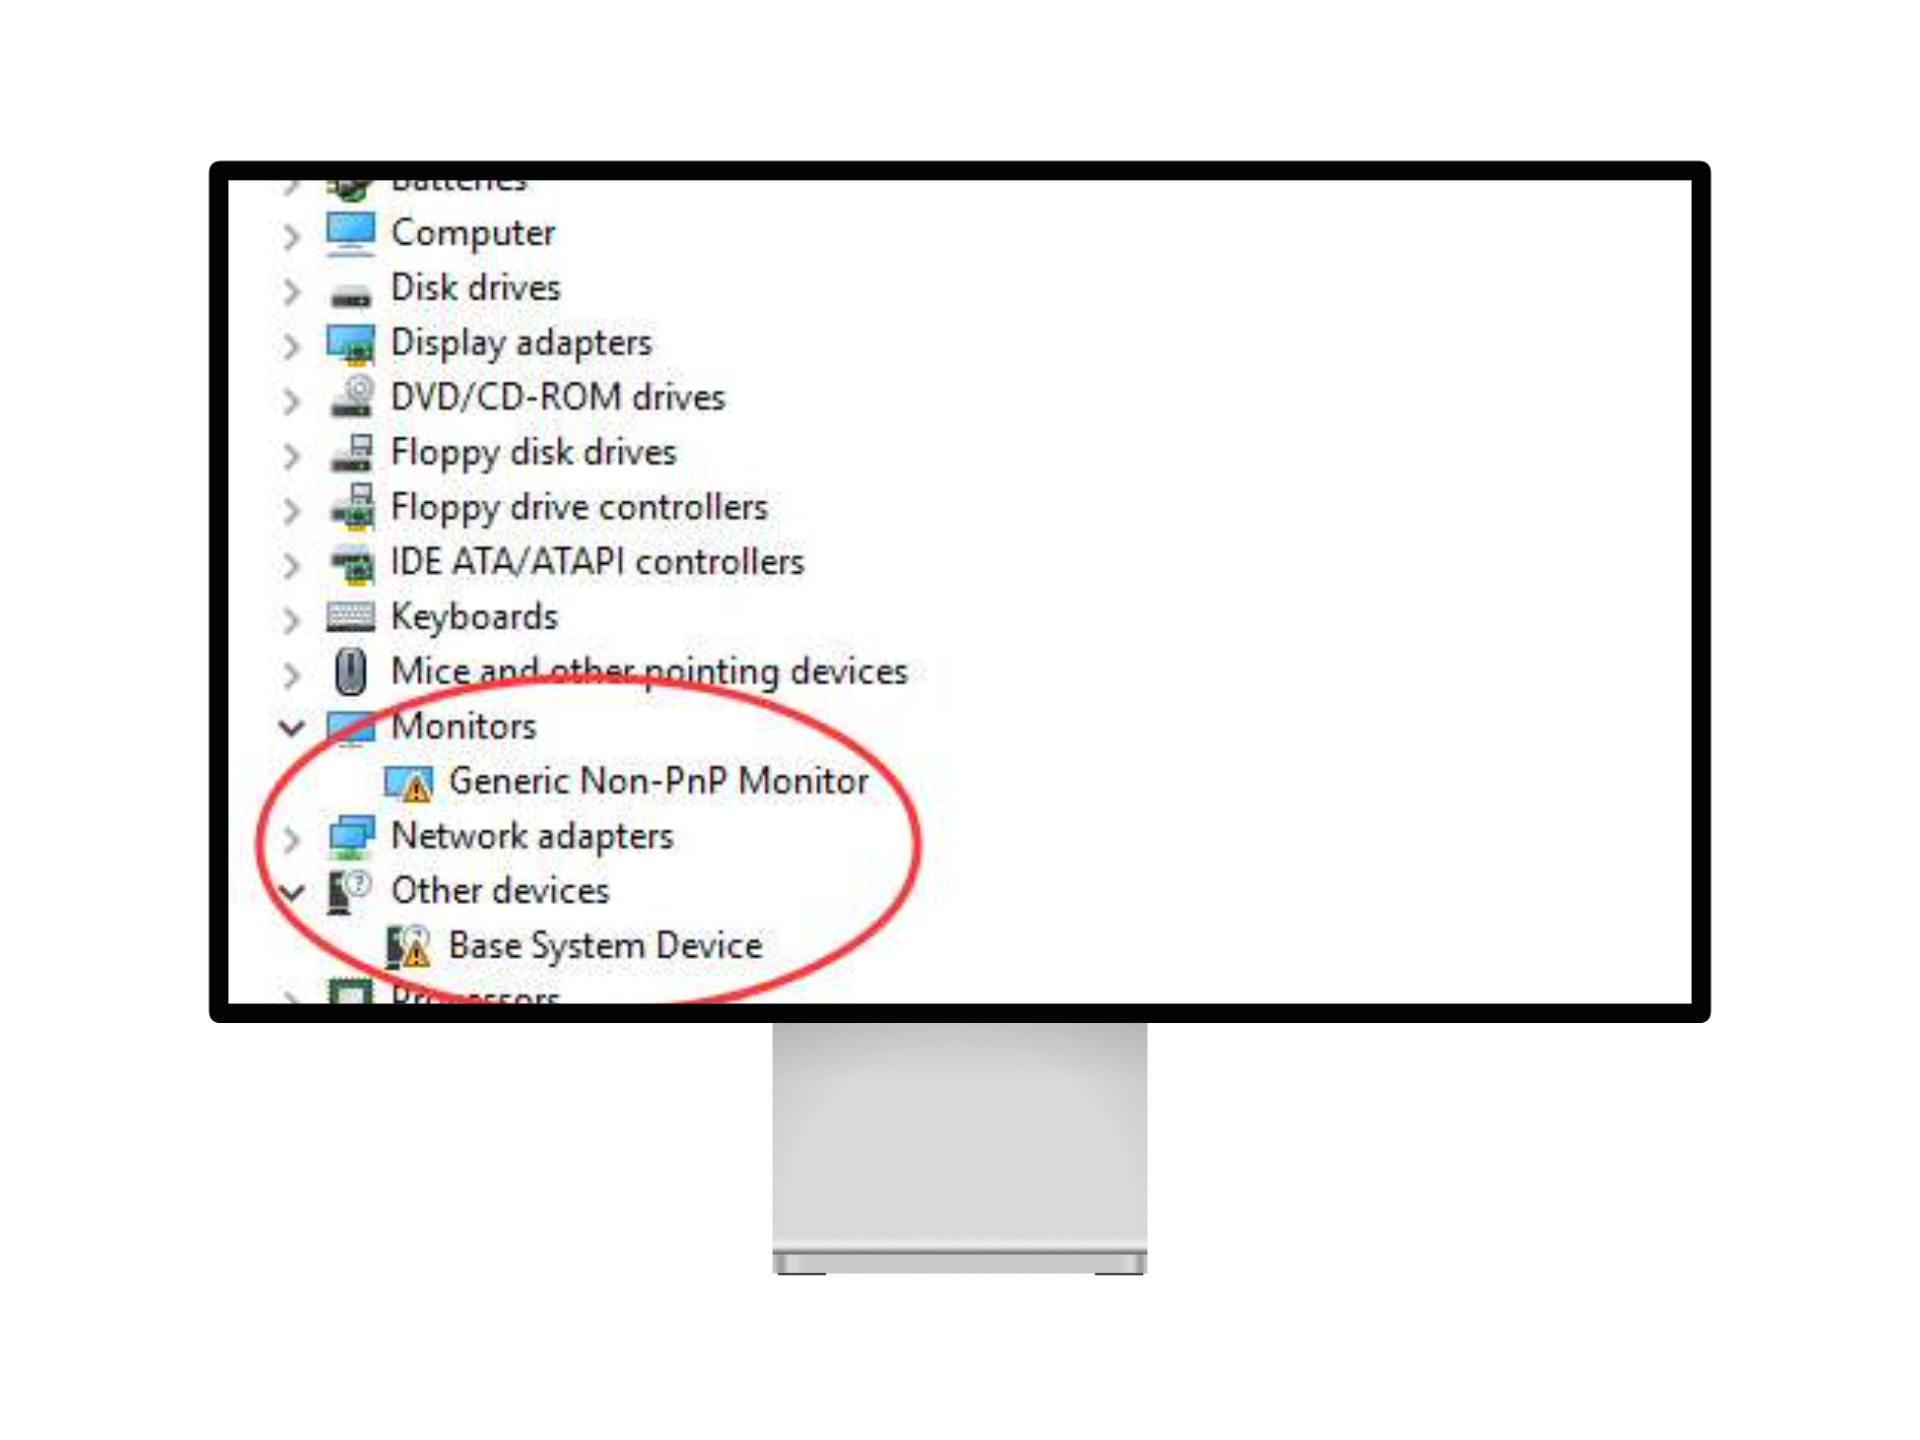
PnP means Plug and Play and is a part of your computer that allows external hardware to work without manually installing drivers. When you plug an external monitor into your computer, Windows searches for a suitable driver for it. However, if Windows is unable to find a driver for your monitor, it will instead install a generic monitor driver.
While PnP monitor drivers ease the process of using an external monitor, sometimes these generic drivers don’t properly work with the monitor and lead to issues such as a yellow caution sign next to your Generic PnP monitor driver.
READ MORE: Monitor Says “No Signal”? Try These 8 Easy Fixes! [2024] ➜
How to Fix Generic PnP Monitor Issue
Now that you know what PnP means and what the Generic PnP Monitor issue is, let’s look at some of the best and quickest ways to help you fix it.
1. Check The Basics
One of the first things you should do before trying anything advanced is check the connection to your external monitor. This is because your system can not detect if the video cable is connected properly to both the external monitor and the PC. For this, simply shut down your computer, remove the power cables, and reconnect your monitor’s video and power cable.
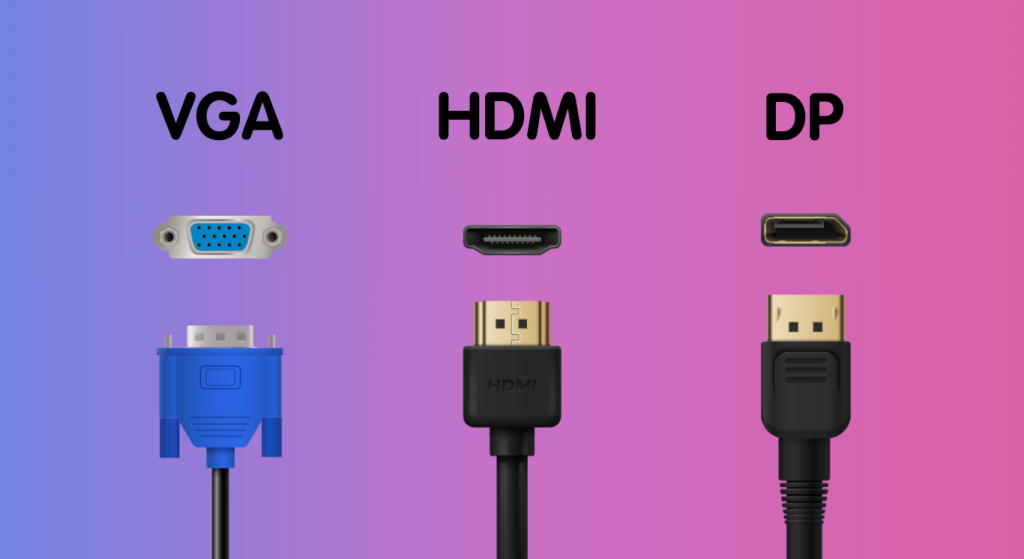
You can also try checking your monitor with another system to see if it works. If the issue persists, the culprit might be a faulty video cable or the monitor itself. Try using different video cables and if nothing changes, keep on reading for monitor-related fixes.
READ MORE: HDMI 2.1 vs DisplayPort 1.4 – Which is Better in 2024? ➜
2. Update Generic PnP Monitor Driver
After checking the cables and connections, the next thing that has worked for several people is updating the Generic PnP monitor driver as outdated and faulty drivers are a big cause of this issue.
Here’s a step-by-step guide to updating your Generic PnP Monitor drivers:
- Right-click on the Start menu and select Device Manager from the menu.

- From here, expand the Monitor tab and right-click on the Generic PnP Monitor driver.
 Expand the Monitor tab
 - A drop-down menu will appear. Click on the “Update driver” option.
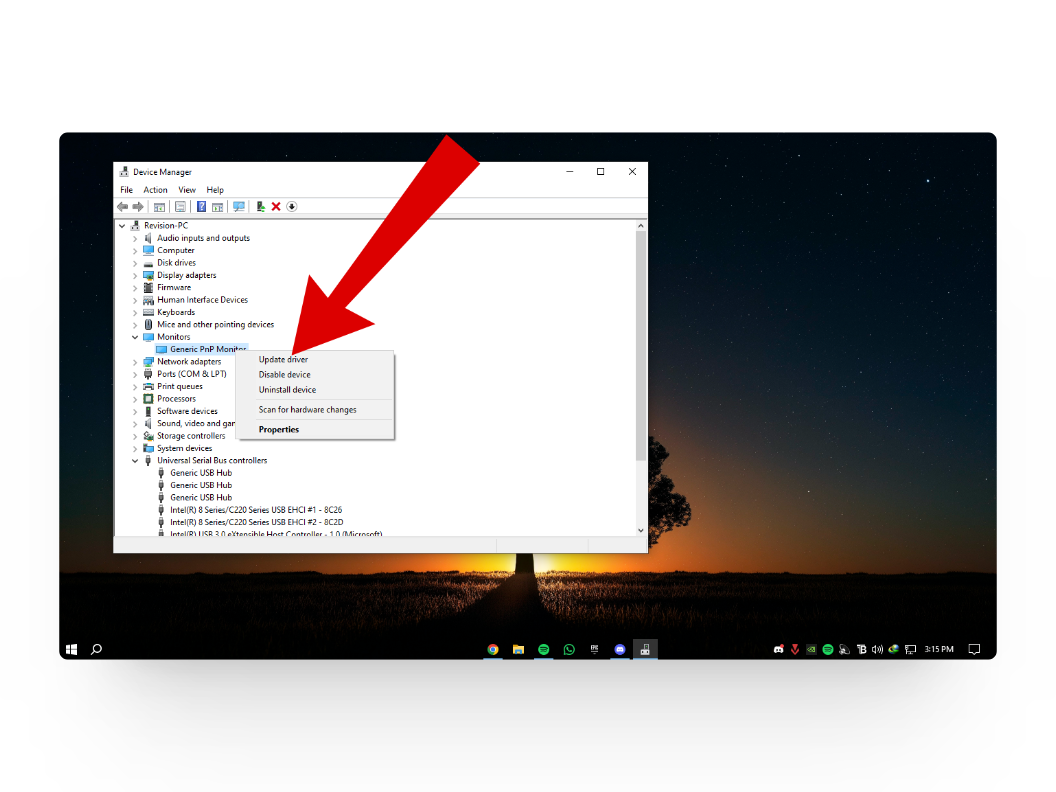
Click on Update driver - This will open up a dialogue box asking you to either automatically or manually download the drivers. Here, select the first option “Search automatically for updated driver software“.

Click on Search automatically
If there are any updates available, Windows will automatically install them. Once the process is finished, restart your computer to see if anything changes.
READ MORE: [FIXED] Mouse Cursor Won’t Move to Second Monitor in Windows ➜
3. Uninstall the Generic PnP Monitor Driver
When updating your Generic PnP Monitor driver, Windows might fail to find any updates. In that case, you can uninstall the Generic PnP Monitor driver altogether and let Windows automatically install it back into your system.
To uninstall the Generic PnP Monitor driver, follow these steps:
- Open up the Device Manager by right-clicking the start menu.

Click on Device Manager - From here, expand the Monitor section and again right-click on the Generic PnP Monitor driver.

Expand the Monitor tab - Now, select the “Uninstall device” option from the drop-down menu.
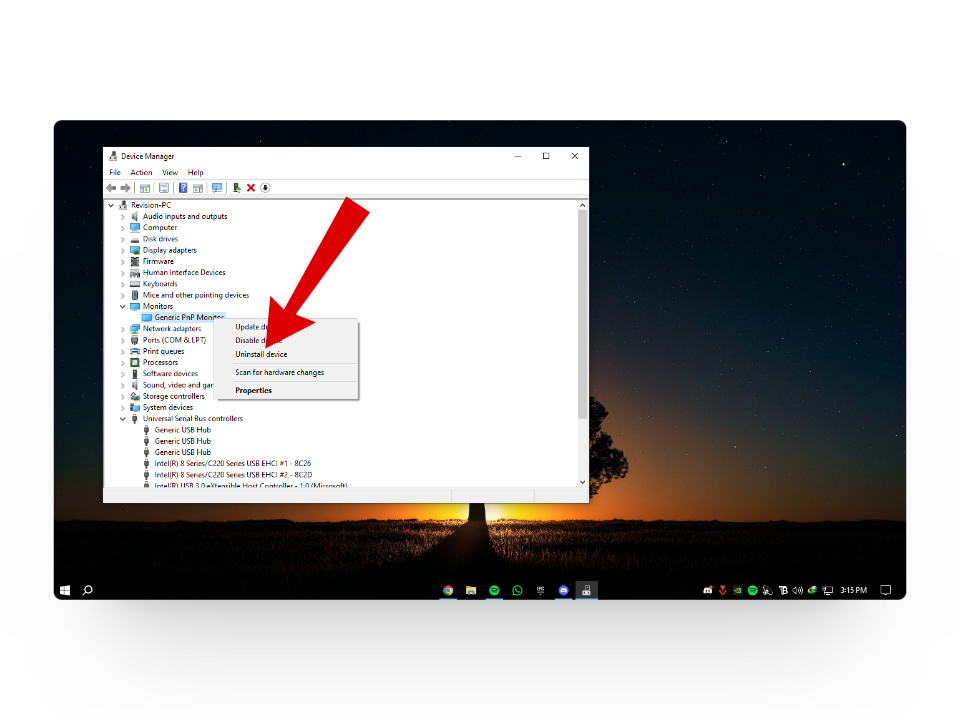
Uninstall the driver - If you are asked for confirmation, simply click on the Uninstall button.

Click on Uninstall
Once you have successfully uninstalled the Generic PnP Monitor driver, click on the Action tab and select “Scan for hardware changes“. This time Windows should install the correct drivers for your monitor instead of generic drivers.
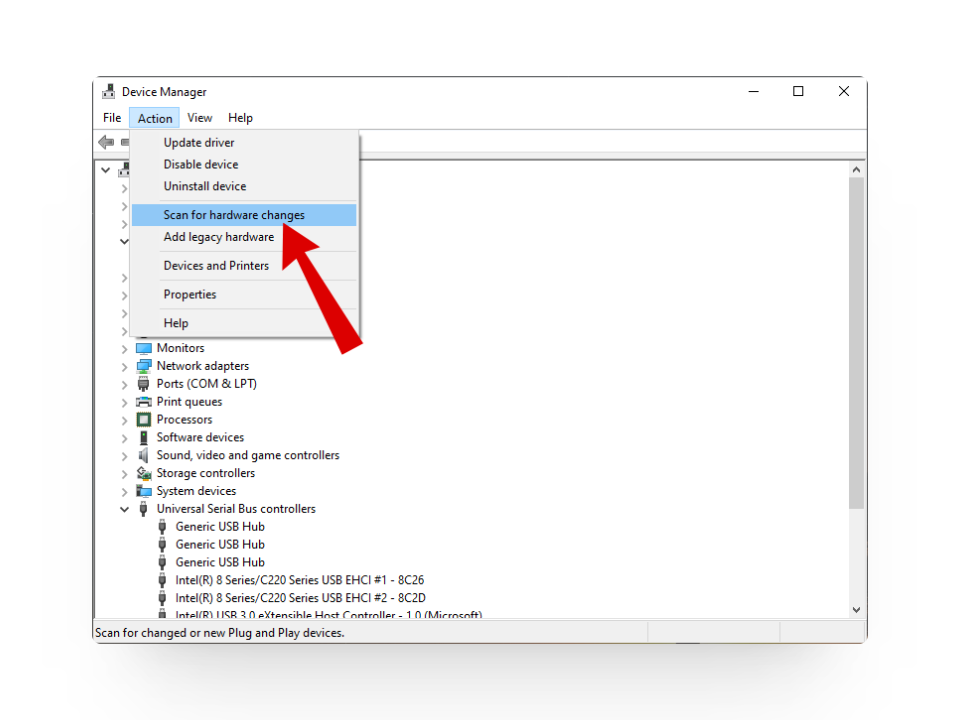
READ MORE: How to Troubleshoot and Fix Black Lines on Your Monitor? ➜
4. Update or Roll Back Display Card Driver
While your display card’s drivers aren’t directly related to the Generic PnP Monitor issue, we still suggest checking for any updates just to be safe.
Here’s how to update the display card driver:
- Open up the Device Manager and expand the Display Adapters tab.

Expand your display tab - From here, right-click on your system’s display card and select the Update driver option.
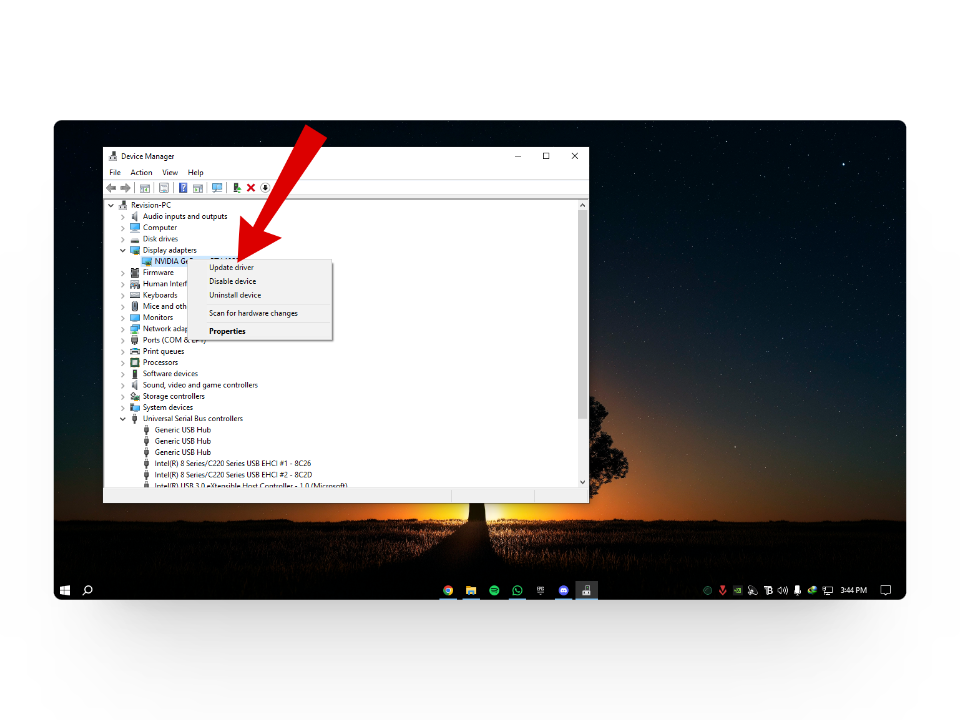
Click on Update drivers - In the next dialogue box, select “Search automatically for updated driver software” to automatically install updated drivers from the Internet.
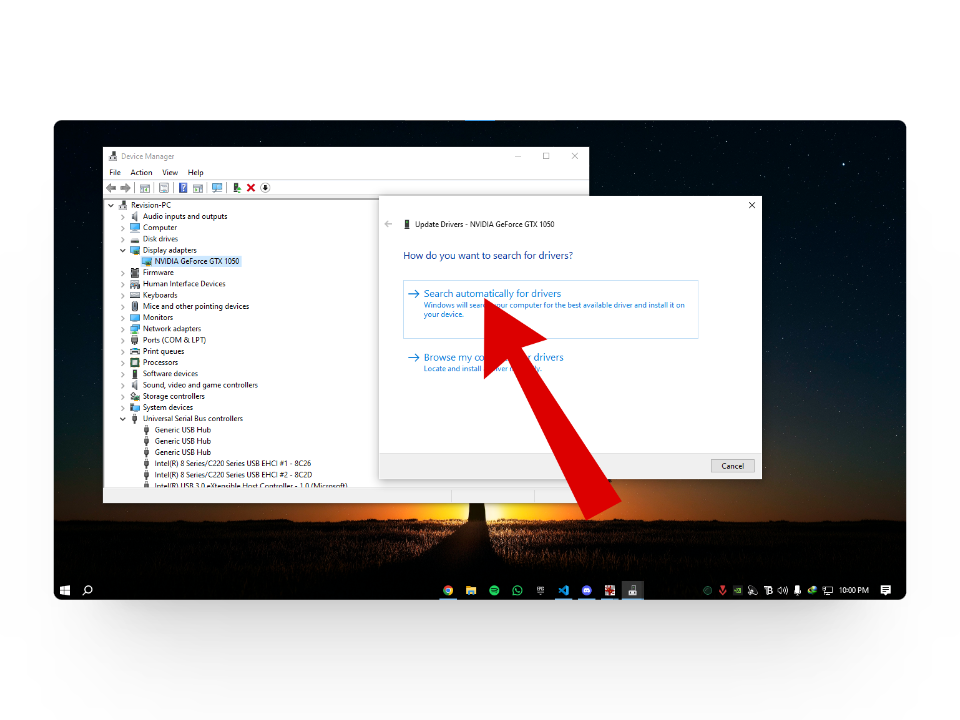
Click on Automatically
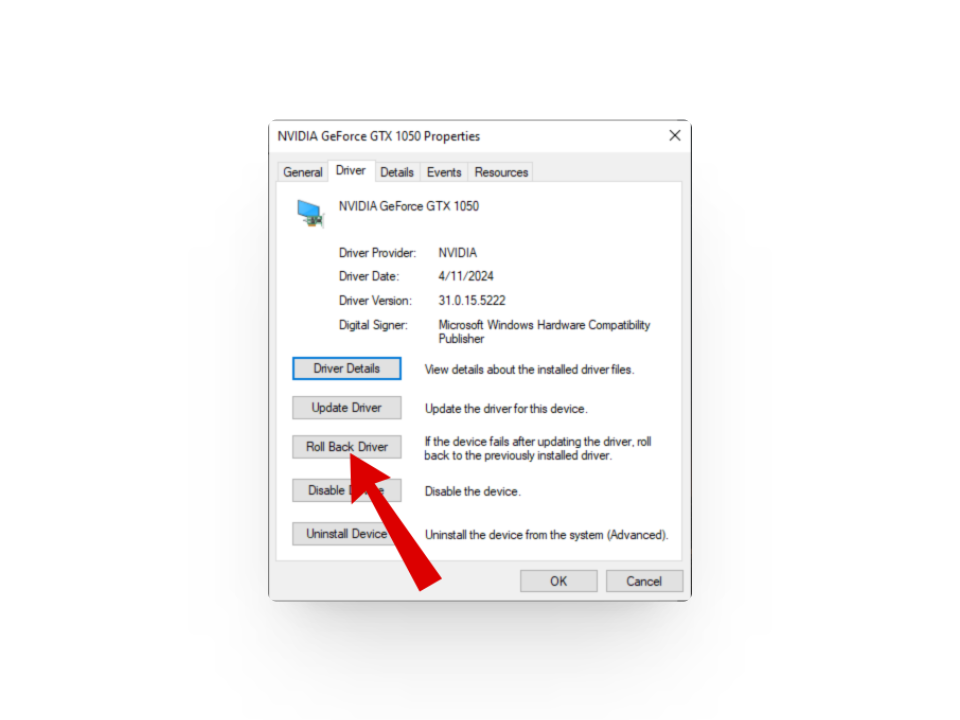
After the process is finished, restart your computer and see if the issue persists. If it does, you can try rolling back the driver to a previous version. For that, open your display adapter’s properties > switch to the Driver tab and click on the Roll Back driver button. Once everything is complete, restart your computer again.
READ MORE: How to update graphics driver in Windows? (AMD, Nvidia, Intel) ➜
5. Run the SFC or the Windows Troubleshooter
System File Checker in Windows works as an automatic troubleshooter that allows you to scan corrupt files and faulty and missing drivers and then repair them. In that case, you can run SFC to help you find the files you need.
Here’s how to fix the Generic PnP Monitor issue using System File Checker:
- Open up the Windows Search Bar and type in Command Prompt.
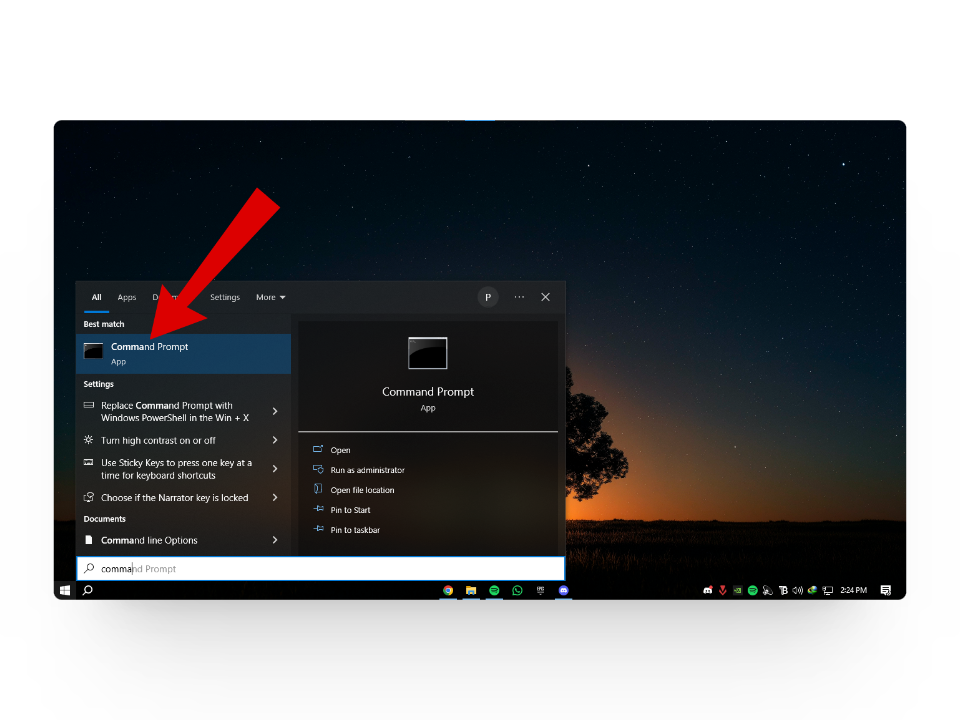
Search for Command Prompt - Right-click on the first result and select the “Run as administrator” option.
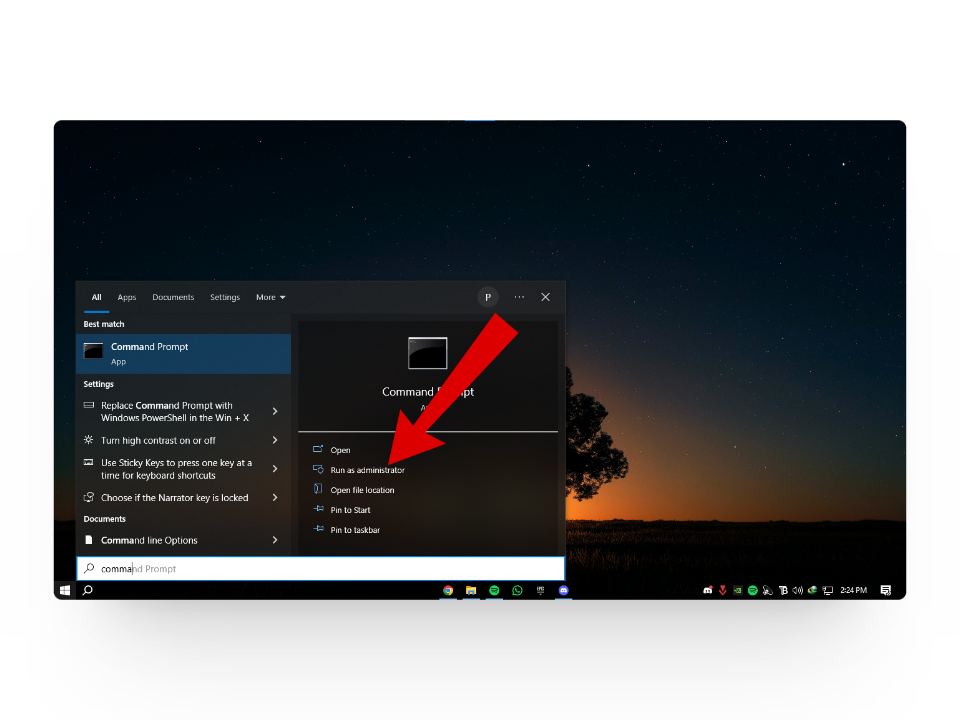
Run as administrator - Once the command prompt opens up, type “sfc /scannow” and hit enter.
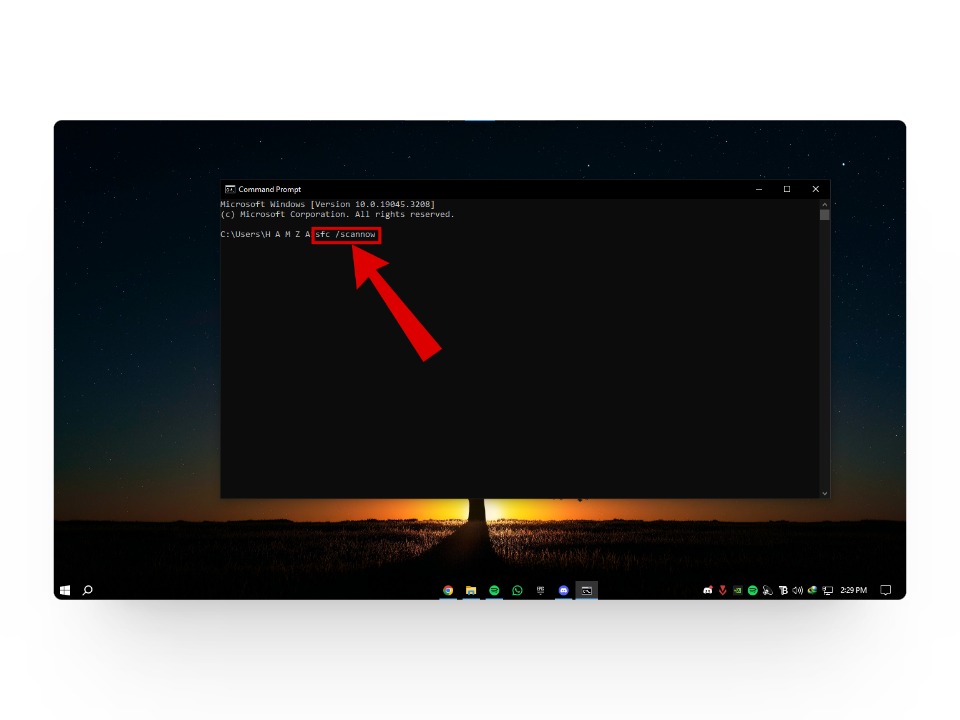
Type the command - Wait for the SFC to do its magic and be patient as this could take as long as 15 minutes if there are several underlying issues.
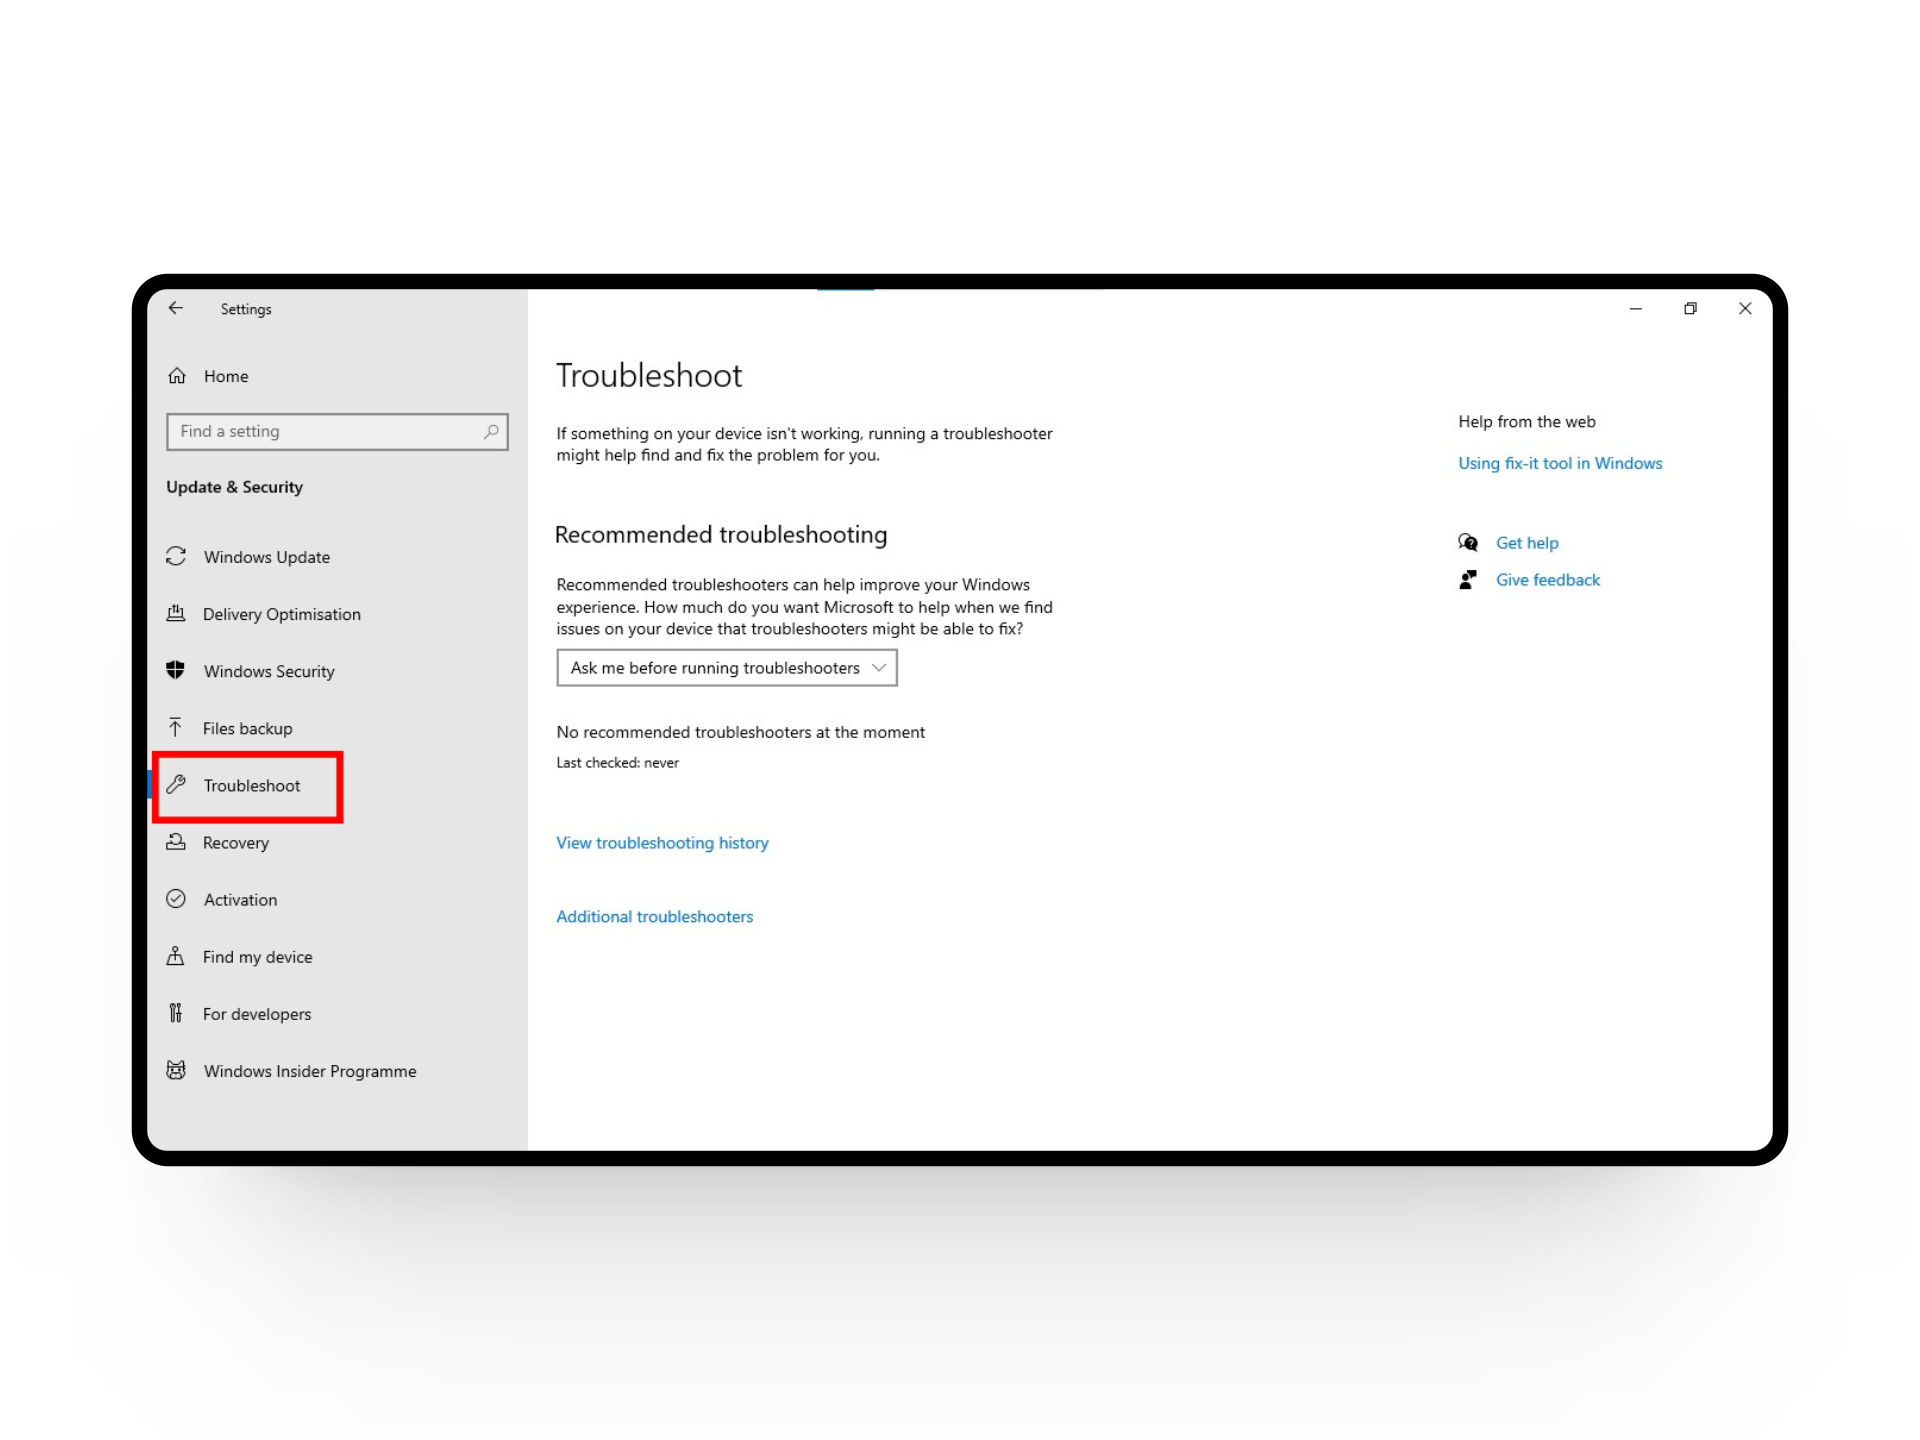
When the process is done, check if the issue is still there. Additionally, you can also use Windows Troubleshooter which also scans for system file issues and fixes them automatically. To run the Windows Troubleshooter, open up Settings > Update & Security > Troubleshoot to scan your system files and replace the problematic ones.
READ MORE: How to Use DISM to Repair Windows ➜
6. Check For Windows Updates
If the issue still hasn’t moved an inch, one final course of action to take is to check for any available Windows updates. Updating your Windows to the latest version ensures all the files are up to date. Here’s a quick rundown on updating your Windows to the latest version:
- Search for Settings in the Windows Search bar and open up the best match.

Search for windows - From here, click on the Update & Security tab.
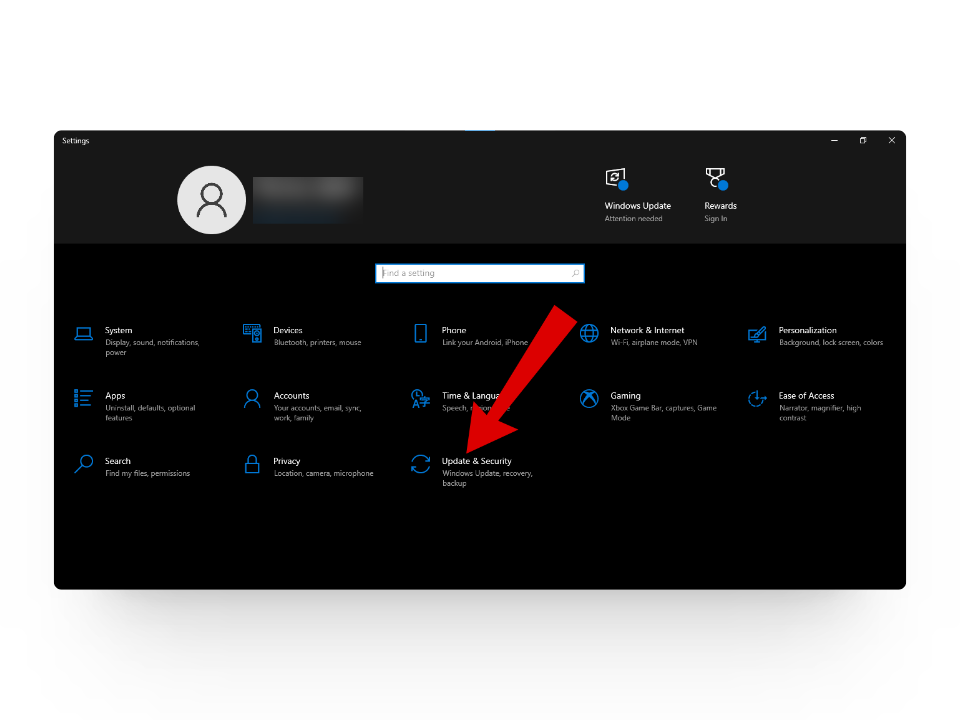
Tap on Windows & Security - Next, select the “Windows Update” option from the side menu and click on Check for updates.

Check for Windows Updates
Conclusion
Whether it’s for gaming, streaming, or work purposes setting up an external monitor can make multitasking a breeze for you. With the above-mentioned fixes, we hope you can resolve the Generic PnP Monitor in no time.
FAQs
Common video cable connections include HDMI, which is widely used for high-definition audio and video signals, VGA, primarily found in older devices like computers and monitors, and DisplayPort, known for its high bandwidth and compatibility with modern displays.
The Command Prompt is a tool in Windows that lets you control your computer using text commands. Instead of clicking icons or buttons, you type commands like “dir” to see files or “ping” to test network connections. It’s handy for tasks like navigating files, troubleshooting, or automating tasks quickly.
Setting up a second monitor can be a great idea for improving productivity and multitasking. With two screens, you can have multiple applications or documents open simultaneously, making it easier to compare information, work on different projects, or simply have more screen real estate for your tasks.
 Reviewed by


