How to Fix ‘Unable to connect with ScanSnap’ Error
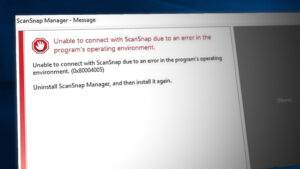
Some Windows users are reporting that they end up seeing the ‘Unable to connect with ScanSnap due to an error in the program’s operation environment‘. There are a lot of different error codes associated with this error, but in most cases, this problem occurs when Fujitsu Scansnap users attempt to initiate a scanning job on their Windows computer.
After investigating this particular issue, it turns out that there are several different underlying issues that might be responsible for the apparition of this error code. Here’s a list of potential culprits that might trigger the ‘Unable to connect with ScanSnap’ error:
- Common Spooler service inconsistency – More often than not, you can expect to encounter this particular issue in those instances where you’re actually dealing with a glitched Spooler service. If this scenario is applicable, you should be able to fix the issue temporarily with a simple restart.
- The Windows Image Acquisition service is not allowed to interact with your desktop – By far, the most common cause that will produce this error is an instance in which the WIA (Windows Image Acquisition service) is not permitted to interact with the computer. In this case, you can fix the issue by using the Services utility to allow the WIA service to interact with your desktop.
- A different imaging device is controlling the ScanSnap utility – If you have multiple imaging devices installed on the computer that is triggering this issue, it’s likely that a conflicting driver is taking over ScanSnap. If this scenario is applicable, you can fix the issue by disabling every non-relevant imaging device that you don’t need when using your Fujitsu scanner using Device Manager.
- Outdated ScanSnap Home version – If you’re using a severely outdated ScanSnap version, it’s possible to see this error because the version you’re using is not fully compatible with your operating system. If you find yourself in this situation, uninstalling the current version before upgrading to the latest build should allow you to fix the issue.
Now that you are familiar with every situation that might end up causing this error, here’s a list of verified methods that will allow you to fix the issue:
Method 1: Restarting your Computer
Before you move on to more intricate reparation attempts, you should start with a simple computer restart.
Several affected users have reported that they managed to fix the ‘Unable to connect with ScanSnap due to an error in the program’s operation environment’ simply restarting the computer that bridged the ScanSnap connection.
If you’re encountering this issue due to a glitched dependency, this simple fix should allow you to use your ScanSnap device normally again.
Important: The majority of users that deployed this fix have reported that the error message returned at a later date. Because of this, our recommendation is to threaten this as a temporary workaround rather than a fix and move down to the next methods below if you want to fix the ‘Unable to connect with ScanSnap due to an error in the program’s operation environment‘ permanently.
If a simple restart didn’t do the trick for you, move down to the next method below.
Method 2: Allowing the WIA service to interact with Desktop
Keep in mind that the ScanSnap service is heavily dependent on the Windows Image Acquisition (WIA) service. So to ensure that your Windows installation is scalable of connecting to the ScanSnap device, you need to ensure that the Windows Image Acquisition (WIA) service is allowed to interact with the desktop.
There are a lot of users confirming that this method was the only thing that allowed them to fix the ‘Unable to connect with ScanSnap due to an error in the program’s operation environment‘ on their Windows computer.
Note: This method is confirmed to be effective for Windows 7, Windows 8.1, and Windows 10.
If you’re not certain that the Windows Image Acquisition service is configured to interact with the desktop, follow the instructions below for step by step instructions on doing this:
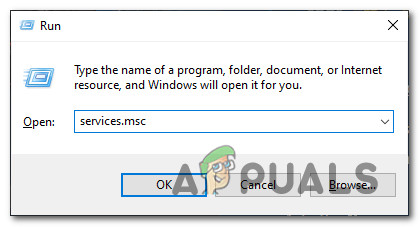
- Press Windows key + R to open up a Run dialog box. Next, type ‘service.msc’ and press Enter to open up the Services screen. If you’re prompted by the UAC (User Account Control), click Yes to grant admin access.
Accessing the Services screen - Once you’re inside the Services screen, move to the right-hand section of the screen and locate the Windows Image Acquisition (WIA) service.
- When you see the entry associated with Windows Image Acquisition (WIA), right-click on it and click on Properties from the context menu that just appeared.
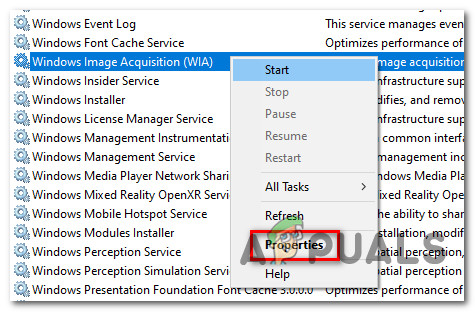
Accessing the Properties screen of the Windows Image Acquisition service - Inside the properties screen of the Windows Image Acquisition, access the Log On tab.
- Next, select the Local System account toggle, then check the box associated with Allow service to interact with desktop.
- Click Apply to save the changes, then restart your computer and see if the problem is fixed once the next startup is complete by attempting to scan something via the Scansnap device.
If this problem is still not resolved as you’re still encountering the same ‘Unable to connect with ScanSnap’ error when you try to scan something, move down to the next potential fix below.
Method 3: Disabling every other Imaging Device
If you’re experiencing this issue intermittently as your computer can’t stay connected to your ScanSnap device, it’s also possible that another Imaging Device ends up taking over the scanner. This is very likely if you have other printers or scanners connected to the same desktop.
In case this scenario is applicable, you should be able to fix this problem by disabling every imaging device that is not needed in your particular case.
Update: In most cases that we’ve investigated, it seems like the imaging device associated with an HP printer was responsible for this type of interference.
if this scenario is applicable, follow the instructions below to disable every non-necessary imaging device by using Device Manager:
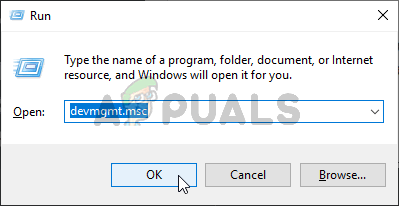
- Press Windows key + R to open up a Run dialog box. Next, type ‘devmgmt.msc’ and press Enter to open up the Device Manager utility. When you’re prompted by the UAC (User Account Control), click Yes to grant admin access.
Opening the Device Manager utility - Once you’re inside Device Manager, scroll down through the various device types and expand the entry associated with Imaging Devices.
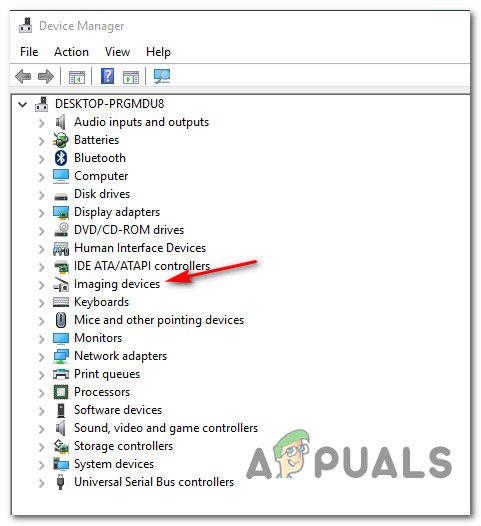
Accessing the Imaging Device menu - Once you’re inside the Imaging Devices tab, determine the Imaging Device associated with ScanSnap, then go ahead and disable the rest by right-clicking on them and choosing Disable from the context menu.
- After every unnecessary imaging device is disabled, restart your computer and repeat the action that was causing the ‘Unable to connect with ScanSnap due to an error in the program’s operation environment‘ error.
In case this method was not applicable in your particular scenario or you already followed the instructions above to no avail, move down to the next potential fix below.
Method 4: Install the Latest Version of ScanSnap Home
According to several affected users, you can also expect to encounter this particular issue in situations where you’re attempting to use a severely outdated ScanSnap Home version that is not fully compatible with Windows 10.
Some users that were also facing the ‘Unable to connect with ScanSnap due to an error in the program’s operation environment‘ error have confirmed that they were finally able to fix the problem by uninstalling their current version of ScanSnap and upgrading to the latest build downloaded through the official channels.
If this scenario looks like it could be applicable, follow the instructions below to get rid of your current version of ScanSnap and install the latest one from the official website:
- Press Windows key + R to open up a Run dialog box. Next, inside the text box, type ‘appwiz.cpl’ and press Enter to open up the Programs and Features screen. If you’re prompted by the UAC (User Account Control) prompt, click Yes to grant admin access.
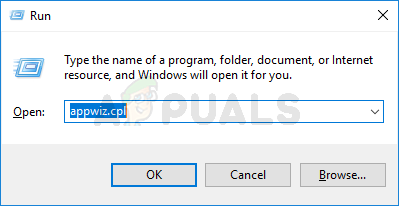
Accessing the Apps and Features screen - Once you’re inside the Programs and Features screen, scroll down through the list of installed programs and locate the entry associated with ScanSnap.
- After you locate the correct entry, right-click on it and choose Uninstall from the context menu that just appeared.
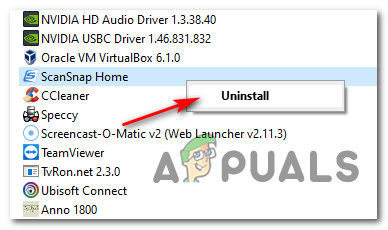
Uninstalling the ScanSnap Home app - Next, follow the on-screen prompts to complete the uninstallation process, then restart your computer and see if the problem is fixed once the next startup is complete.
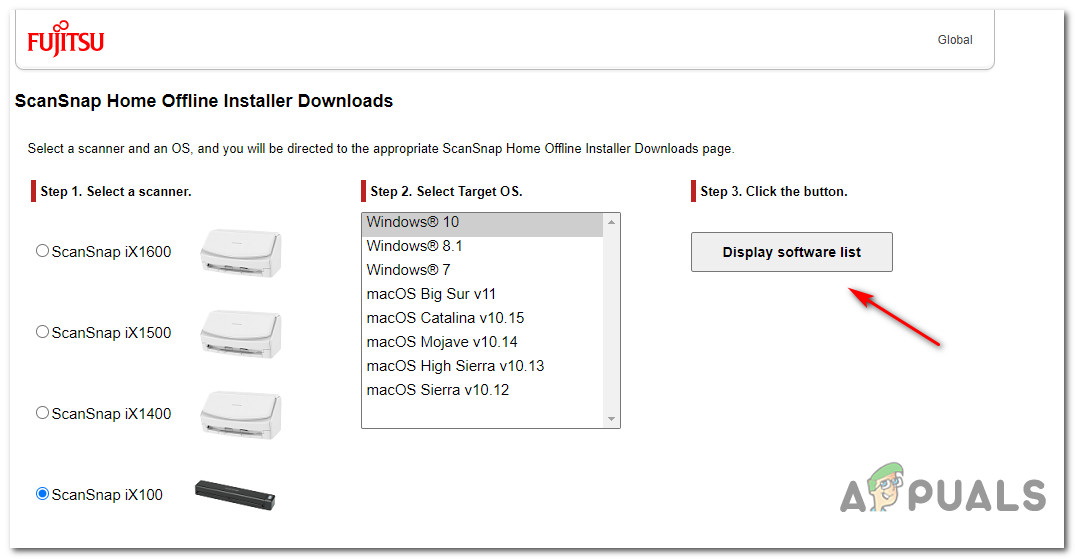
- Once your computer boots back up, open your default browser and visit the official download page of ScanSnap Home.
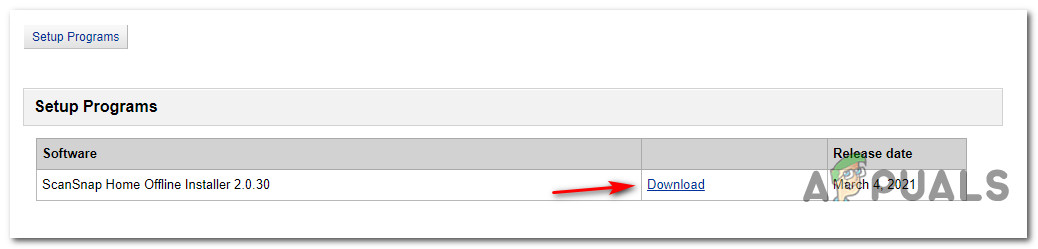
- Inside the download page, go ahead and select your Scanner model from the column on the right, then choose your current Windows OS from the Target OS column before finally clicking on Display software list.
Downloading the latest version of ScanSnap - Once you get to the next page, click on the Download hyperlink associated with the most recent version of ScanSnap Home Offline Installer.
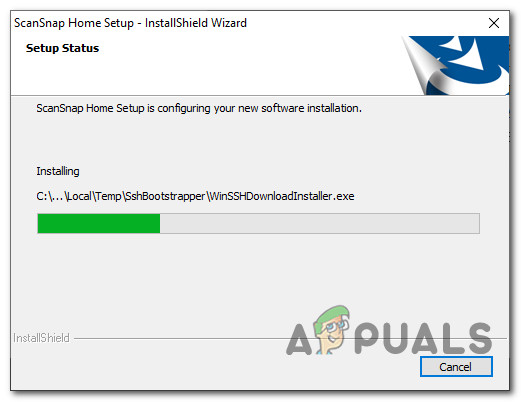
Downloading the latest version of the ScanSnap installer - Once the installer is fully downloaded, right-click on it and choose Run as Administrator from the context menu, then click Yes when prompted by the UAC prompt.
- Inside the installation screen, follow the on-screen prompts to complete the installation of the ScanSnap home. Once the procedure is complete, reboot your computer and see if the issue is fixed once the next startup is finished.
Installing the ScanSnap Home utility - Once the installation is complete, restart your computer and see if the problem is not fixed.


