How to Flash TWRP Custom Recovery on Android?
Team Win Recovery Project, or TWRP for short, is one of the more popular options available for Android devices, offering you significantly more control than what is found in OEM recoveries. This guide will walk you through the specific steps to flash TWRP on your device.
Table of Contents
It’s important to note that TWRP may not be available for all Android devices. You can check if your device is supported by TWRP on TeamWin’s Devices page.
If your phone doesn’t support TWRP, it can potentially be ported over to your specific phone model. However, it might require a basic understanding of Linux commands and compiling AOSP from scratch. Appuals offers an in-depth guide to port TWRP to any Android device.
How to Flash TWRP on Your Android Phone?
This section provides a general outline for flashing TWRP on your phone. However, please note that some steps may vary depending on the specific device.
NOTE: It is strongly advised to consult the official documentation for your device before proceeding with any flashing process. Each device page includes a detailed section outlining the specific requirements for running TWRP on that particular model.
Pre-Requisites
Before initiating the flash process, there are a few things you will need in advance. Without these, it is not recommended to move any further with flashing TWRP, as an incomplete flash could possibly result in a soft-brick, too.
- Unlocked Bootloader: Your device must have an unlocked bootloader. We have detailed guides on the unlock process for Xiaomi, Huawei, Samsung, and OnePlus devices.
- PC with Internet Connection: You will need a PC, preferably Windows, to download and install the recovery via ADB.
- ADB Drivers: To connect your phone to your PC and communicate via the Android Debug Bridge, you will need ADB drivers installed beforehand. We have an in-depth guide on setting up ADB on Windows.
- You can download Minimal ADB and Fastboot directly for ADB commands to run on Windows Terminal.
- USB Cable: For connecting your device via USB, you will need a cable that is capable of transferring data to and from your phone.
- Enable USB Debugging: Your phone will need to have USB Debugging enabled in order to communicate with the PC via Android Debug Bridge.
↪ Fastboot Manual Flash (No Root Required)
If your device isn’t rooted, you’ll have to stick to Manual Flash. This procedure may require a bit more user intervention, but it is advised that non-rooted devices avoid Automatic Flash via TWRP’s app, which only works for rooted phones.
1) Find TWRP for Your Device
To check if your device is supported by TWRP, visit TeamWin’s devices section, where you’ll find a list of mobile phone manufacturers, each with a list of supported mobile devices. These links will take you to the download page.
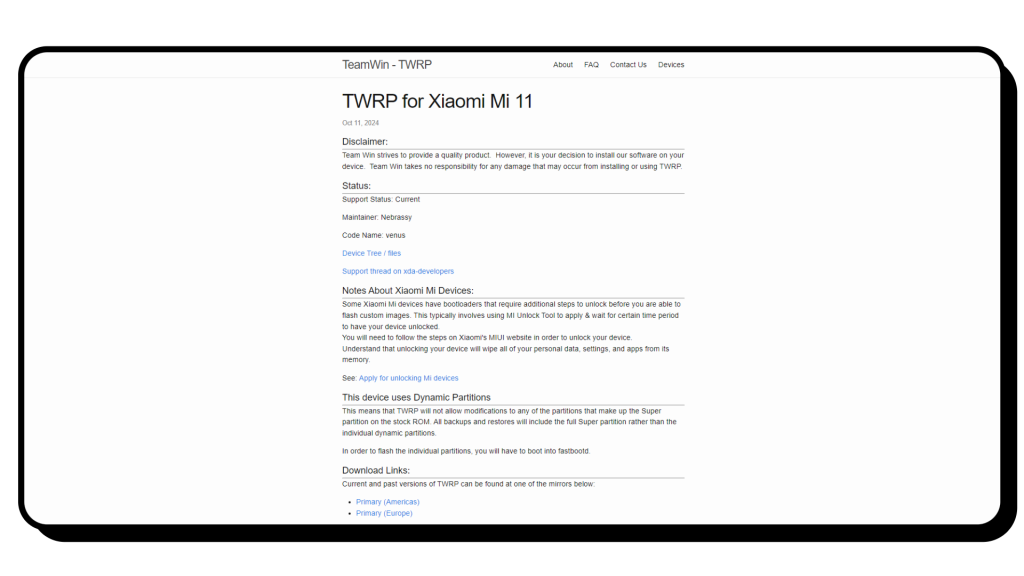
You will need to download the IMG file for the recovery; this file will later be flashed onto the phone via ADB. The device page will also link to TeamWin’s GitHub repository for the specific model, providing information on known bugs and working features within the recovery. You may want to review this list before downloading the latest file version.
2) Boot Into Fastboot Mode
To boot into Fastboot mode, you can either use an ADB command or manually use your phone’s manufacturer-defined button combination after turning off your device. In this state, connect your phone to a PC via an external USB cable.
- Connect your phone to your PC using an external USB cable.
- Launch Minimal ADB and Fastboot. This will open a Terminal window in Command Prompt.
- Type
adb devicesin the terminal window. This will check to see if your phone is being detected by ADB. - If your device is recognized, type
adb reboot bootloaderto boot directly into Fastboot mode.
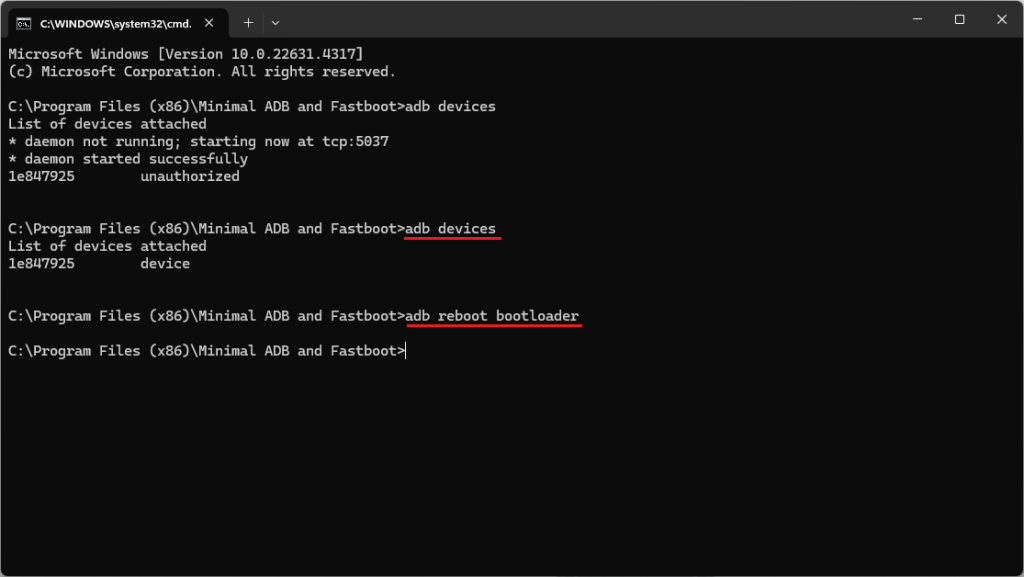
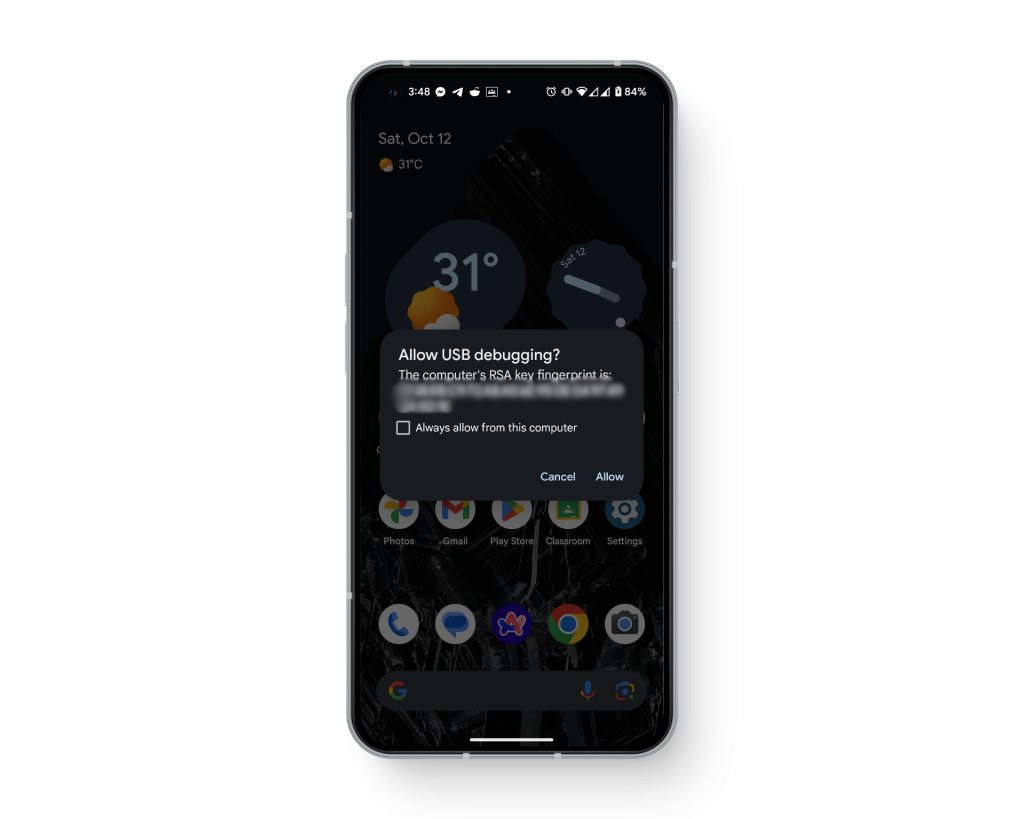
NOTE: When connecting your phone to ADB or your PC for the first time, you may need to manually grant permissions on your device. After connecting the phone, when you enter the “adb devices” command, a pop-up may appear on your phone requesting user authorization. Simply tap “Allow” to proceed.
3) Flash the Recovery IMG File
Once in Fastboot mode, you will need to flash the recovery image file. For reference, this is the same file you downloaded in the first step.
- Copy the IMG file to the Minimal ADB and Fastboot directory.
- This is commonly found inside
C:\Program Files (x86)\Minimal ADB & Fastboot, unless manually changed.
- This is commonly found inside
- Rename the copied file to twrp.img for ease of flashing. If not, you may need to manually drag over the file when needing to provide the image file path.
- Open the Minimal ADB and Fastboot terminal, and type
fastboot devicesto ensure your device is detected in Fastboot mode. - If it is, type
fastboot flash recovery twrp.img. This will initiate the flashing process on your device.
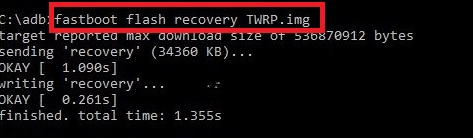
The flashing process may take a few minutes to complete. Once finished, the screen will display a message showing the total time taken: “Finished. total time: X.XXs” (where X is the duration of the process).
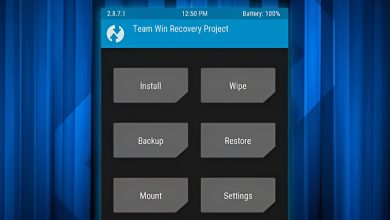
To reboot into TWRP, you will need to enter the command “fastboot reboot recovery,” which will reboot your phone into TWRP automatically. If the process is completed without any issues, you may unplug your phone from the PC. TWRP is now installed on your device.