How to Flash TWRP in Xiaomi Devices? [5 Easy Steps]
 Reviewed by Huzaifa Haroon
- TeamWin Recovery Project (TWRP) is a custom recovery tool that allows for the installation of custom ROMs, system backups, and full wipes, offering greater control over Android devices than standard recovery software.
- Install TWRP on Xiaomi devices by ensuring an unlocked bootloader and ADB drivers are in place. Flash the TWRP image using Platform Tools, adapting the approach based on whether the device has A-only or
- Differences in the flashing process can depend on the device's operating system (MIUI vs. HyperOS) and partition type. Follow steps accurately to prevent potential device bricking.
Xiaomi has one of the oldest, but largest modding communities within the Android smartphone space. This modding scene stretches back nearly as far as Android itself, when MIUI was simply itself a custom ROM. For enthusiasts, rooting or installing custom ROMs are different methods to get the most out of their devices. But at the core of it all is a custom recovery, and TWRP is by far the most popular choice.
This guide will walk you through the process of flashing TWRP onto your Xiaomi phone. We’ll look at some of the benefits of doing so, as well as the slight differences in the flashing procedure depending on whether you’re running MIUI or HyperOS.
Table of Contents
What is TWRP?
The TeamWin Recovery Project, commonly known as TWRP, is a touch-based GUI custom recovery. It allows users to install custom firmware or ROMs, back up existing data, or perform a complete phone wipe, resetting it.

While every phone comes with its own OEM recovery software, which provides basic functionality, TWRP gives unrestricted access to install or update system files that would otherwise be restricted. It was initially developed for Nexus phones, but has since gained immense popularity and has been ported to other devices.
READ MORE: How to DIY Port TWRP for Android ➜
How to Flash TWRP in Xiaomi Devices?
The process of flashing TWRP on Xiaomi devices is fairly straightforward given that you’ve checked off all of the prerequisites required to install a custom recovery in your phone.
↪ Pre-Requisites
Before installing TWRP onto your device, you need to make sure you have the following sorted. You will need:
- A phone with an unlocked bootloader.
- A PC with ADB drivers installed.
- A USB cable for connecting your phone to the PC.
- An active internet connection for downloading TWRP files.
It is important that each requirement listed above is fulfilled. For instance, if your Xiaomi phone has a locked bootloader, you will need to unlock it first. We have a detailed guide that you can follow along to unlock your device’s bootloader.
Before starting to flash TWRP, it is also recommended to backup all of your existing data since it may be wiped off completely. Also, try to install ADB drivers in your PC first before proceeding along with this guide.
READ MORE: How to Unlock Bootloader on Xiaomi HyperOS Devices ➜
Step 1: Setting Up Platform Tools
To install TWRP on your phone, we’ll use the Android Debug Bridge (ADB) to flash the recovery image file. If you’re unfamiliar with ADB, it’s a tool that lets you communicate with and control your Android device from your computer.
ADB Platform Tools in particular, is a suite of different programs that provides a command-line interface, either via Command Prompt on Windows or Terminal on Mac, for interacting with your device via ADB or Fastboot. To set this up, follow the steps down below:
- Download the SDK Platform Tools by Google.
- Extract the downloaded .zip file.
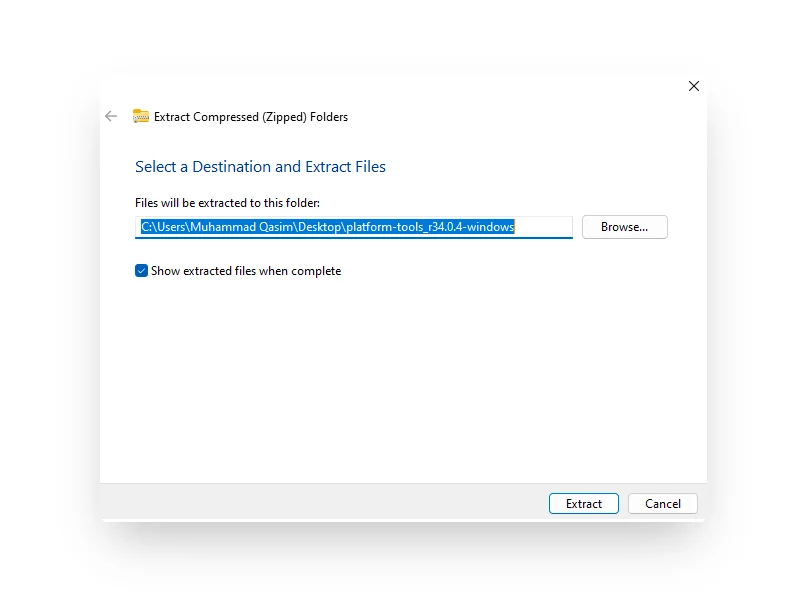
Extracting the Platform Tools’ .zip file - You’ll find a folder named “platform-tools.” Within that folder, tap on the address bar, and type in ‘cmd.’ This will open up Command Prompt.

Accessing ADB on Windows - If you are on Mac, open the Terminal and head to the directory using the command “cd [file directory].”

Accessing ADB on macOS - This Command Prompt (Windows) or Terminal (macOS) window will be used to push the ADB commands for flashing TWRP.
Step 2: Enabling Developer Options
The next step is to enable USB debugging and that involves unlocking any restrictions (Developer options) that might prevent communication with an external device. This is important not only for this process, but also because it allows you to flash a fresh version of the OS via Fastboot in case of a software brick where the device won’t boot normally after flashing TWRP.
To enable USB Debugging, follow the steps below:
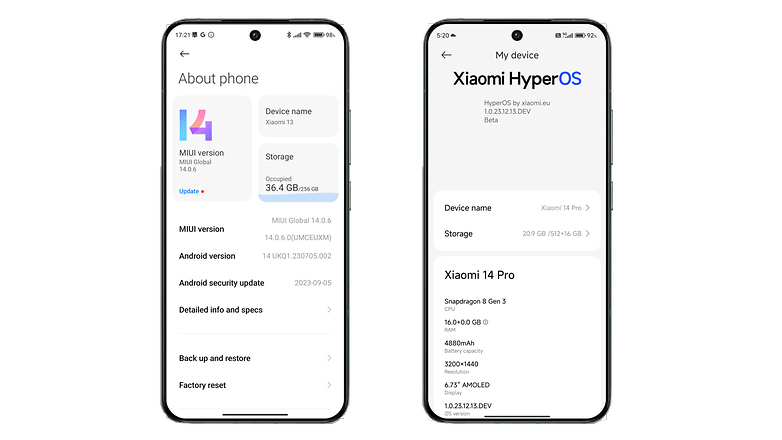
- Go to Settings and tap on “About Phone.”
- Look for the “OS version,” and tap on it several times till you see the message: “You are now a developer.”
 Enabling “Developer options” in HyperOS
 - Head back to Settings and scroll down to find “Additional settings.” Tap on this.
- Scroll down to “Developer options,” and tap on it.
- Look for “USB debugging,” and turn the toggle on.
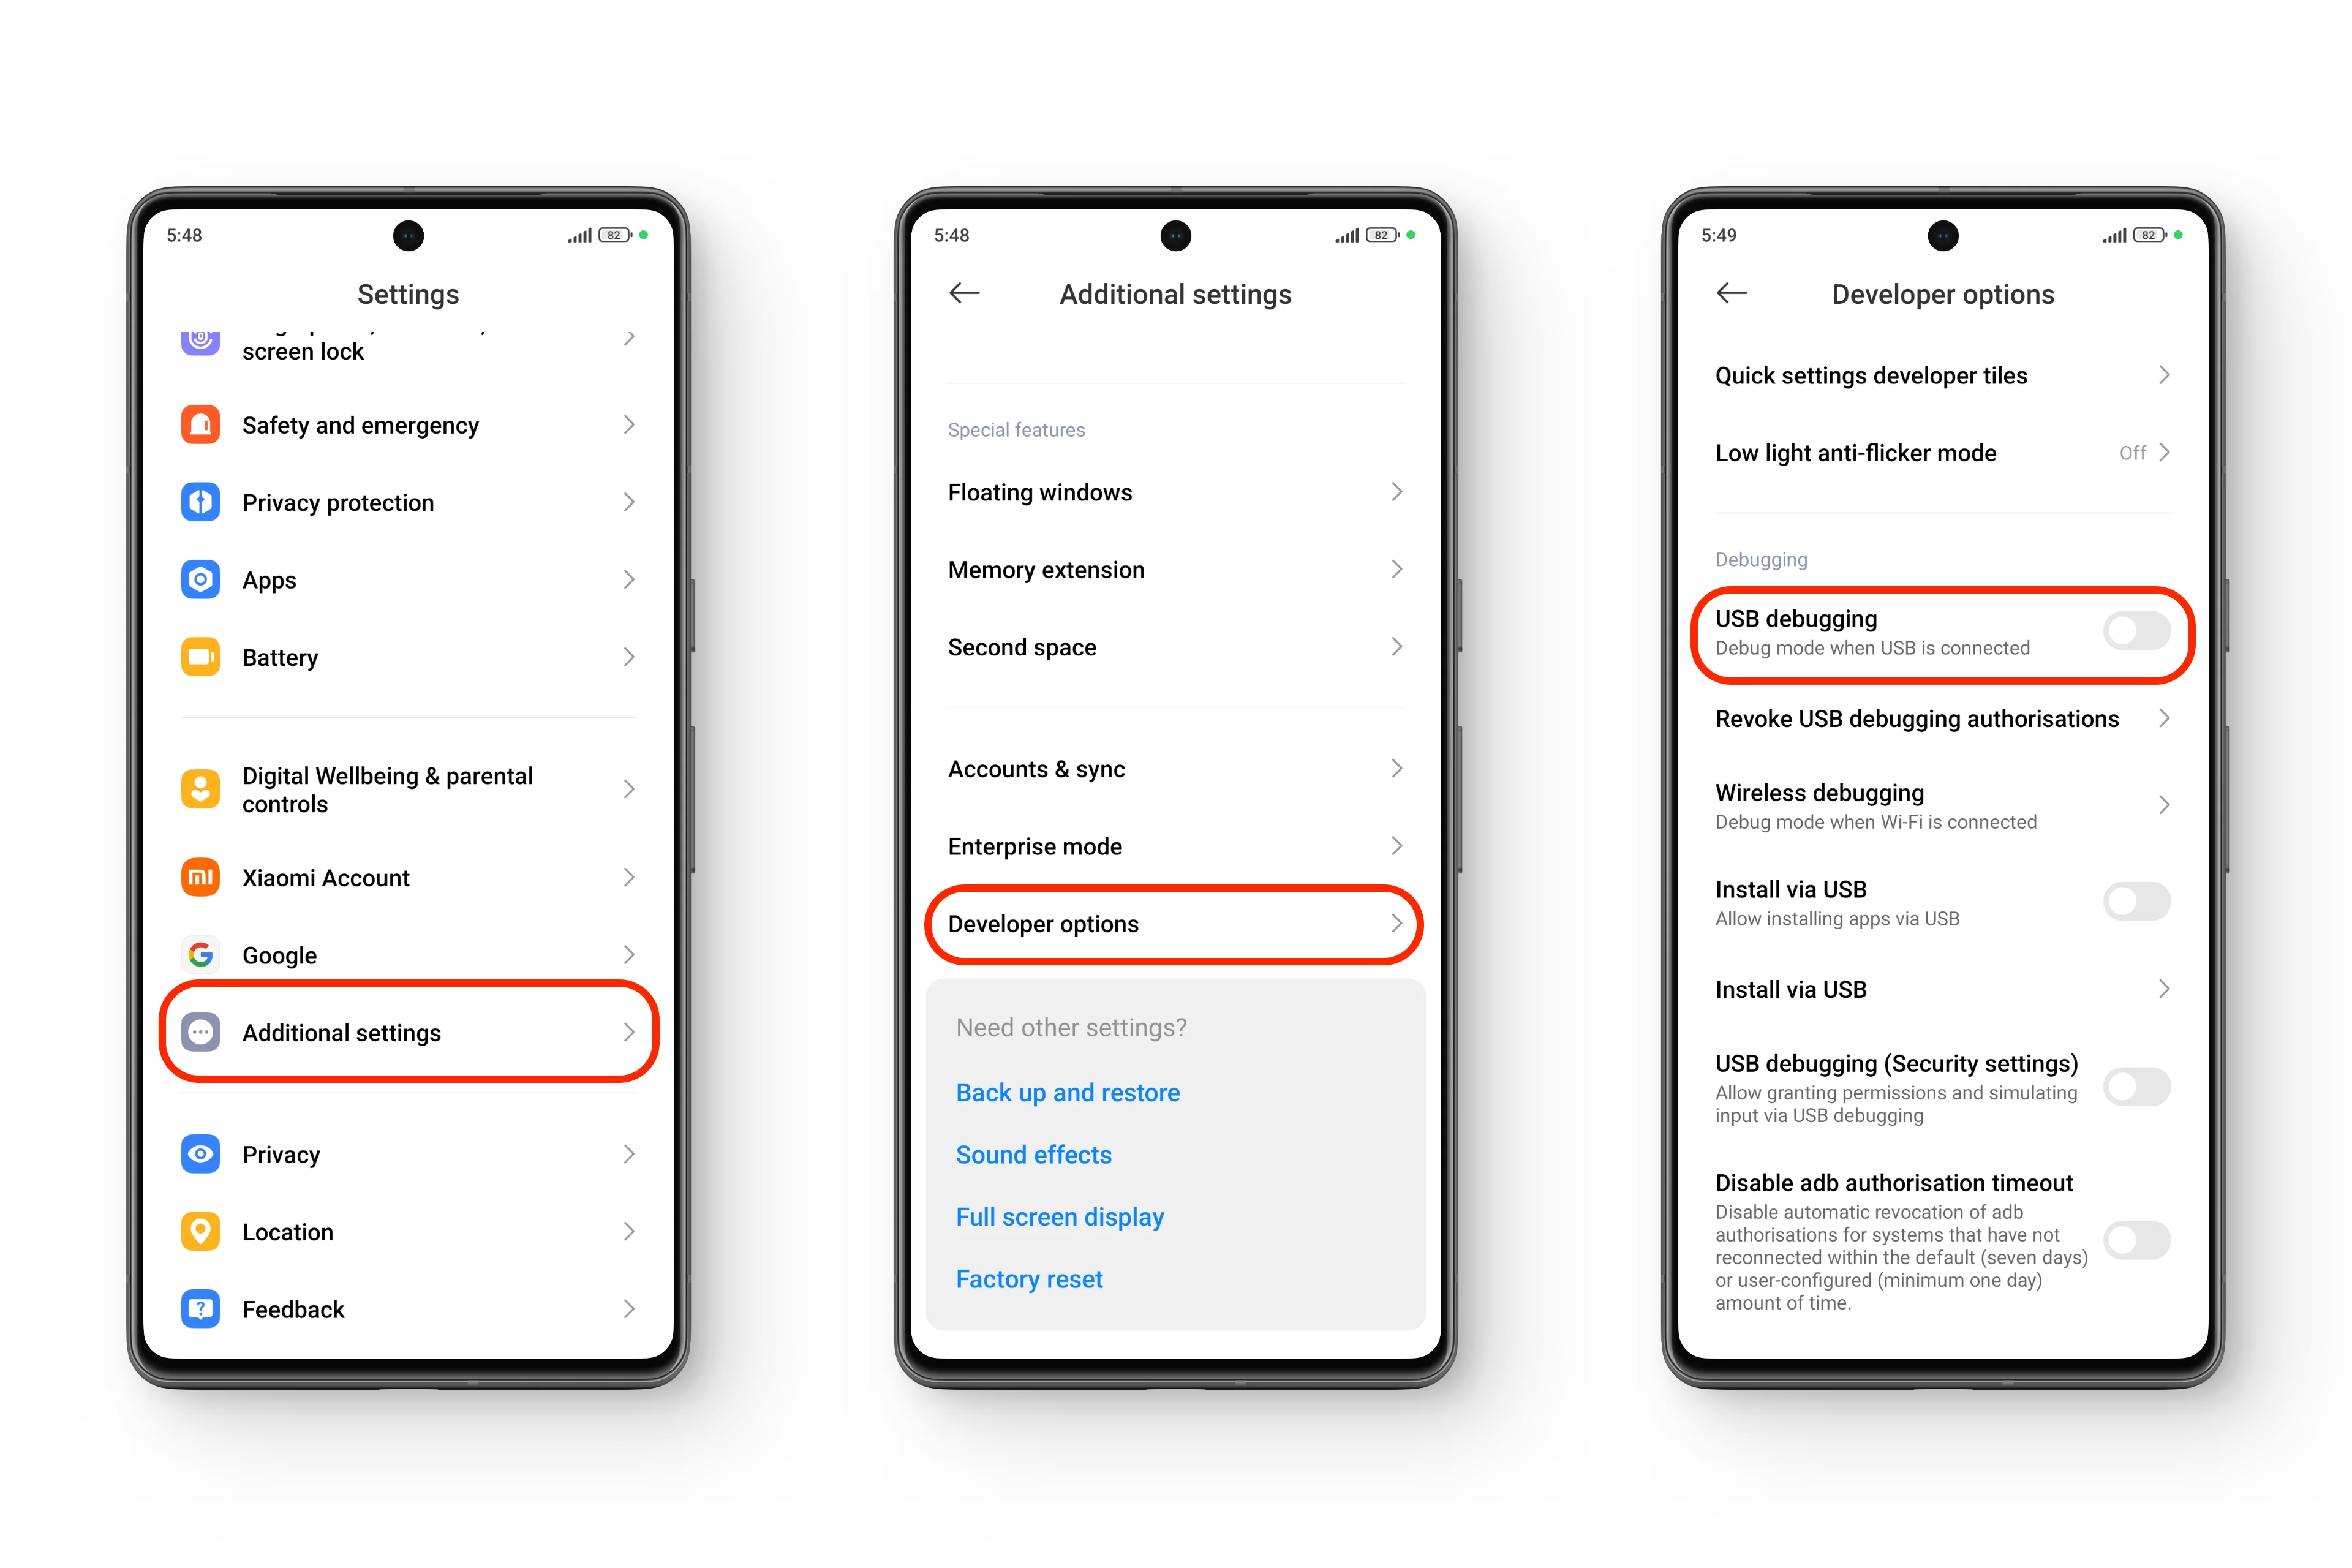 Enabling “USB debugging” in HyperOS
 - In the confirmation dialog that pops up, tap “OK.
 The (HyperOS) precautionary dialog box
 Enabling “Developer options” in HyperOS
 Enabling “USB debugging” in HyperOS
 The (HyperOS) precautionary dialog box
READ MORE: Android Developer Options Complete List (Explained) ➜
Step 3: Check your Phone’s Partition Scheme
Once all the necessary prerequisites are fulfilled, the next step is to check what sort of partition scheme your phone uses. There are two main types of these partitions — A/B and A-only. On the surface, note that non-A/B devices need only flash TWRP once, while the other set of devices must first boot into TWRP and then install the recovery from within the recovery itself.
↪ A/B and Non-A/B (A-Only) Partitions
For devices that support A/B partitions or “Seamless Updates,” it works in a way that the operating system resides in one slot while any new update that needs to be installed does so in the other (inactive) slot. Once the update is successfully installed, the phone boots into the other partition and designates it as the active partition. However, if the update fails, the phone never boots into the other slot altogether.
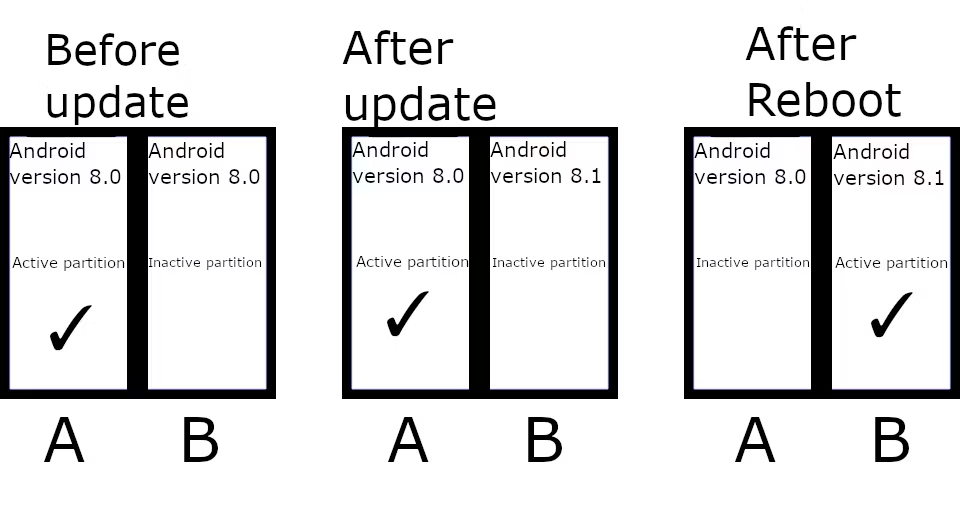
The other set of devices with A-only partitions have a single recovery partition, whereas A/B devices’ recovery partition is split inside the boot image along with the kernel. This is why you will first need to boot the TWRP image via Fastboot (as you will see later) and then patch the recovery partition, which will install TWRP in both boot_a and boot_b partitions.
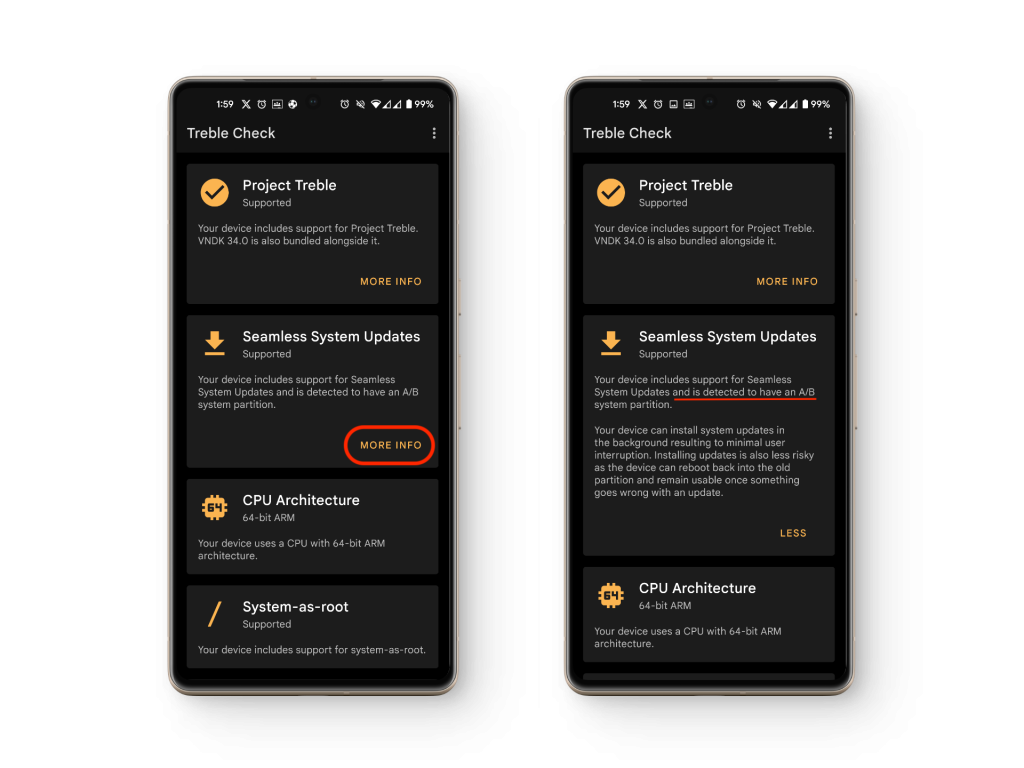
- Download the Treble Check app from the Play Store.
- Launch the app, and go to “Seamless System Updates.”
- If the app reads “…and is detected to have an A/B system partition,” then you have an A/B partition, otherwise your devices uses a single A-only partition.
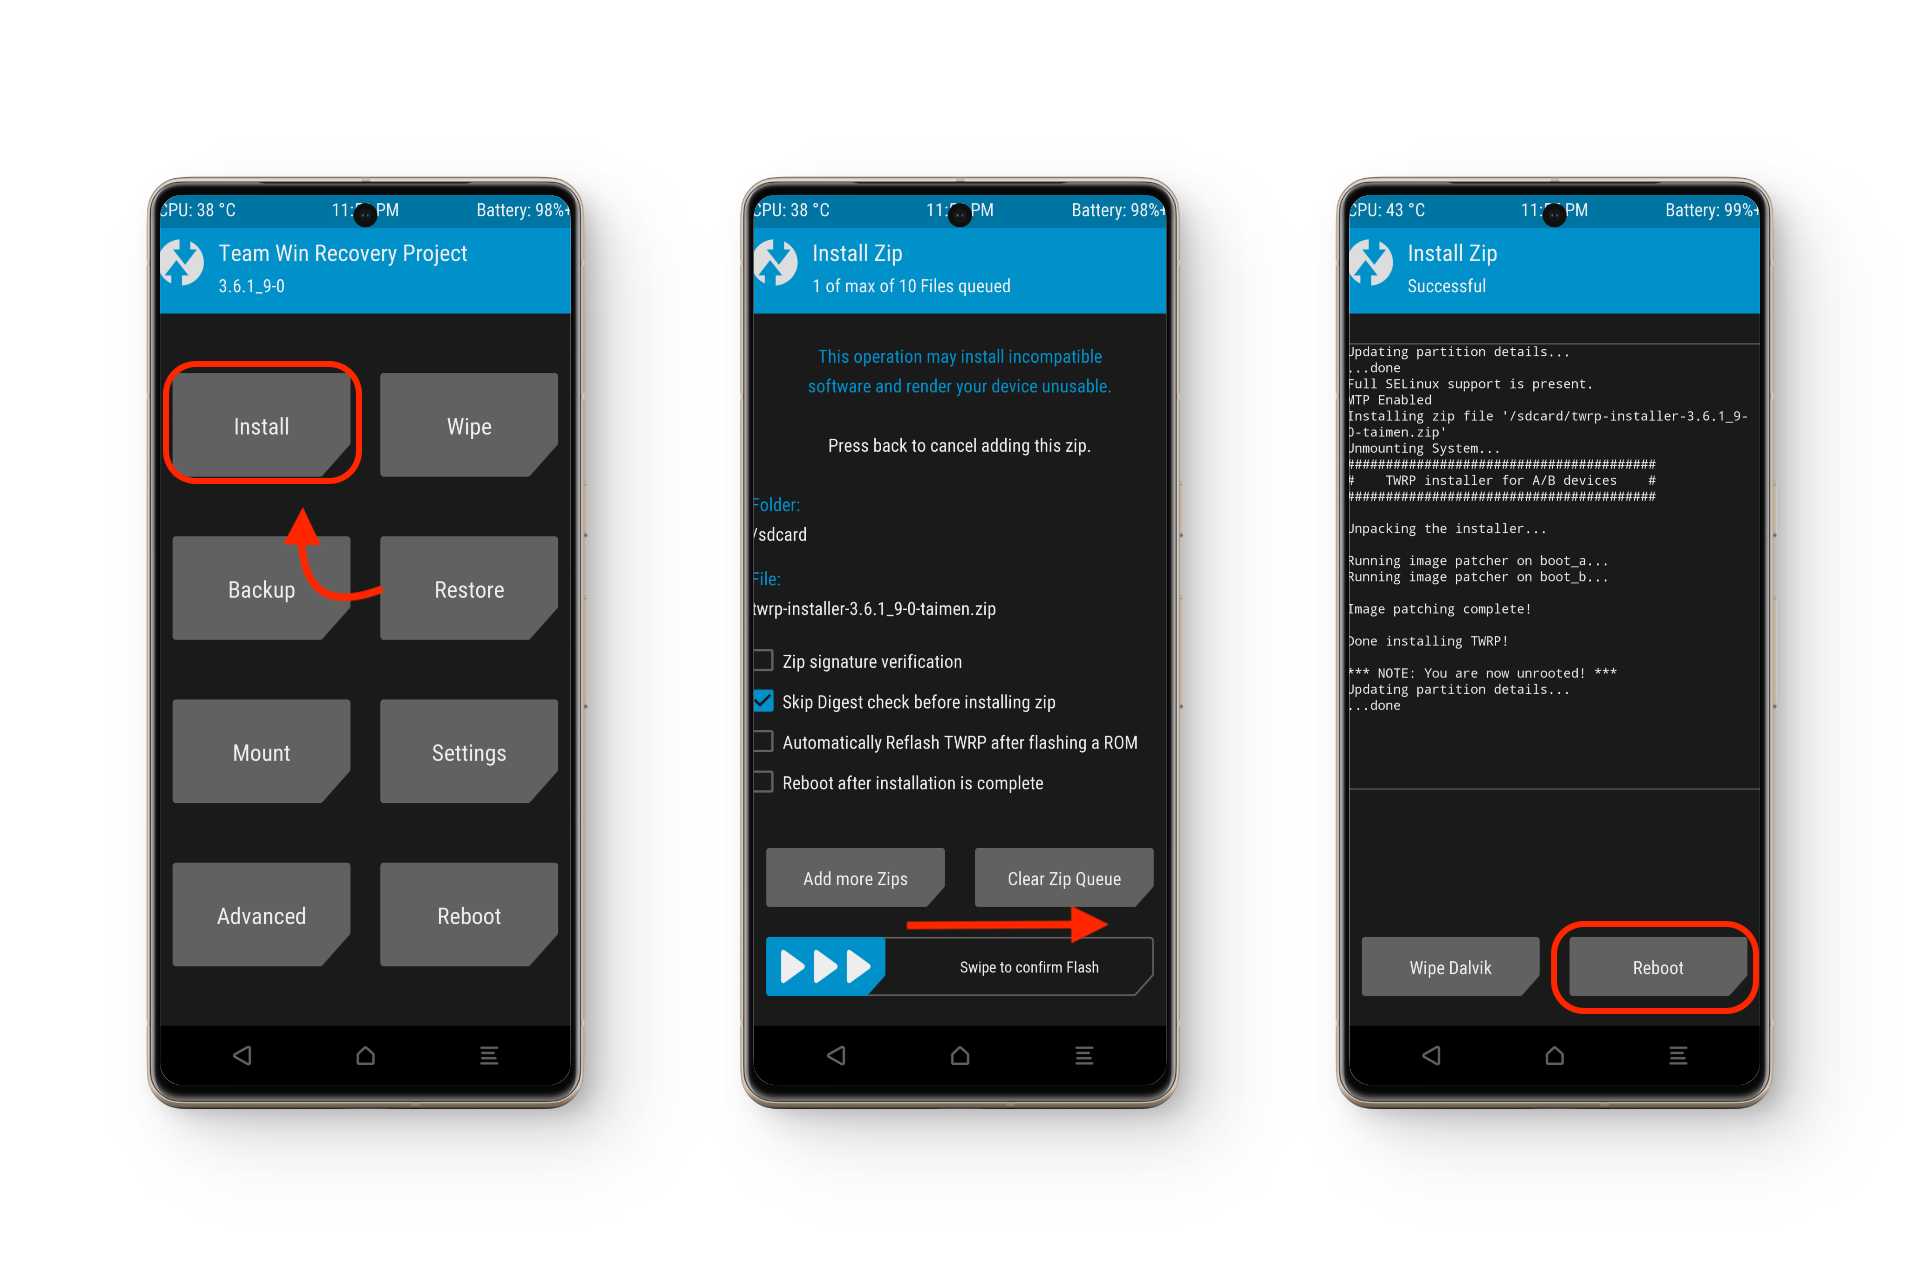
Step 4: Installing TWRP (A/B & A-Only)
Head on over to TeamWin’s official website, find if your device is listed in the list of supported devices and download the TWRP image (.img) file. Then follow the steps down below:
1.Non-A/B Partition (A-Only)
For this type of partition scheme, you will generally need to flash the recovery only once. To do this follow the steps down below.
- Power off your phone, hold the Volume Down + Power buttons until you see the Fastboot screen.
- Connect your phone to PC using a USB cable.
- Open Platform Tools using Command Prompt or Terminal.
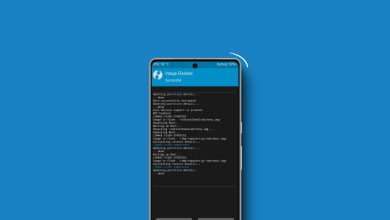
- Type “fastboot flash recovery [recovery file name].”
- Wait till the flashing process completes. Once you see “Finished,” you can reboot into TWRP by powering off your phone and then holding Volume Up + Power.
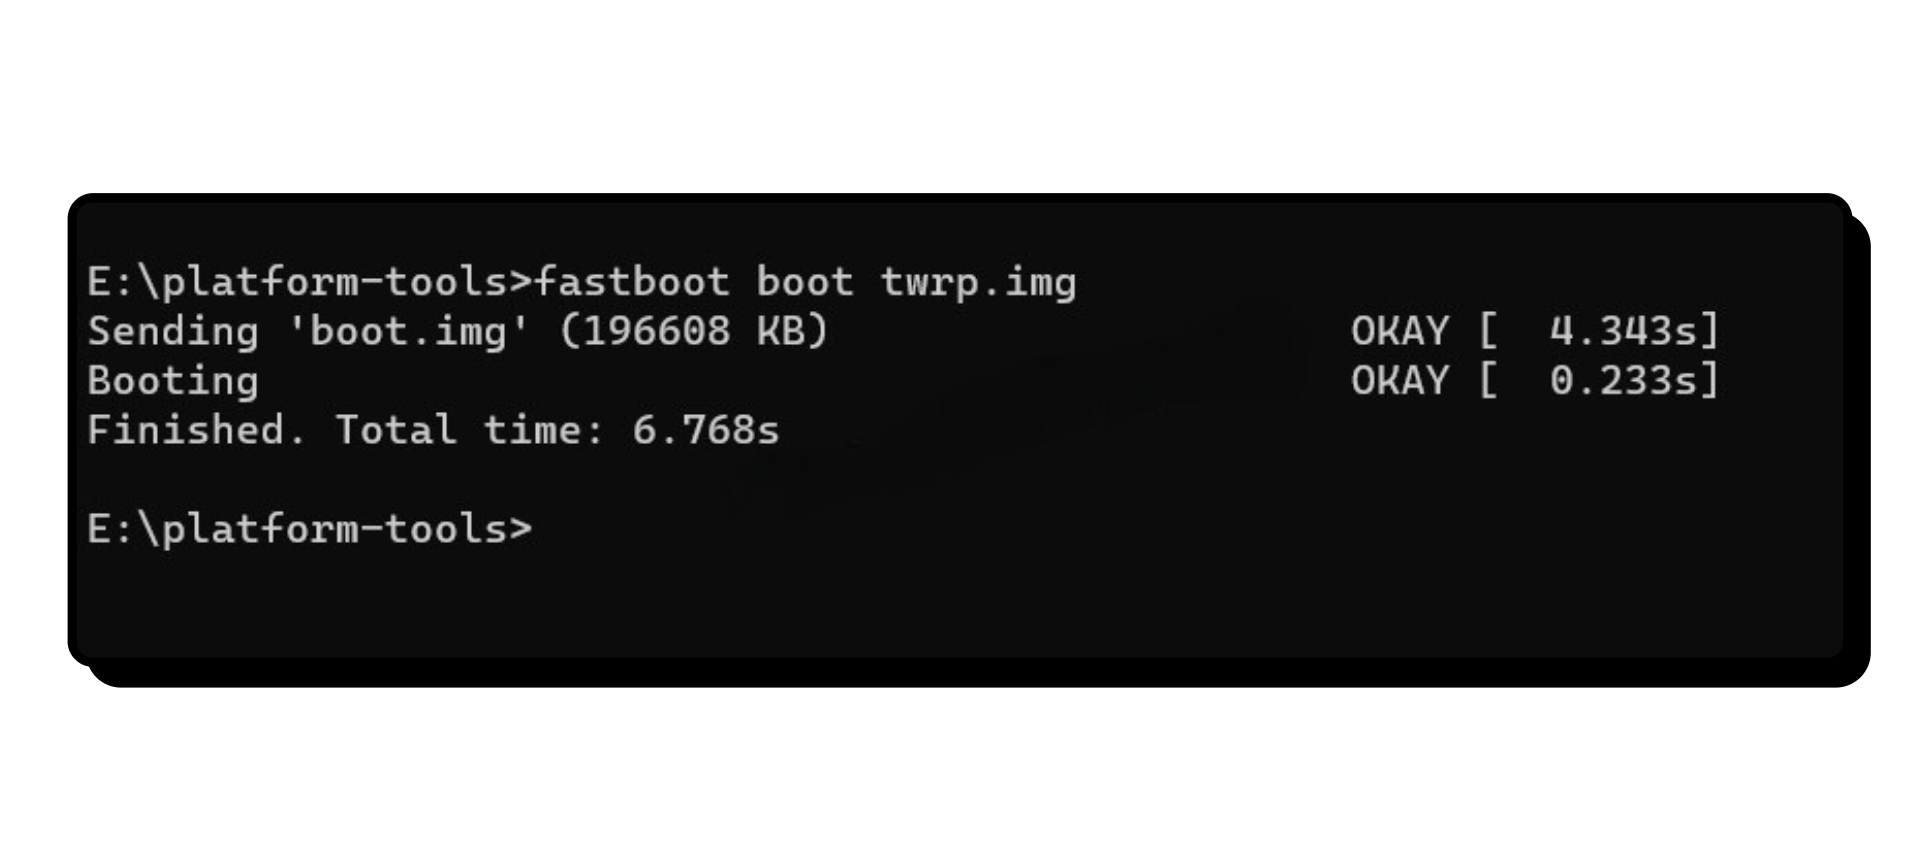
2. A/B Devices
For devices using an A/B partition scheme, the installation process is slightly different from the method above. In this case, you’ll not only need the previously downloaded .img file, but also a separate TWRP recovery .zip file.
- Download the .zip file for TWRP and store it into your phone’s partition. It is recommended to use an external SD card or an OTG cable with a USB to store this file.
- Power off your phone, hold the Volume Down + Power buttons until you see the Fastboot screen.
- Connect your phone to PC using a USB cable.
- Open Platform Tools using Command Prompt or Terminal.
- Type “fastboot boot [recovery file name].“
- In TWRP, tap on Install > Swipe to confirm flash > Reboot.
Step 5: Rebooting into Recovery
Now that TWRP is installed, there are two ways you can access TWRP. One using ADB and other using the physical buttons on your mobile phone.
- ADB: In Fastboot mode, type “fastboot reboot recovery.”
- Directly via Physical Buttons: When the phone is powered off, tap and hold the Power + Volume Up buttons. When you see the Xiaomi, Redmi or POCO logo, release the Power button.
MIUI vs HyperOS Flashing
Flashing TWRP or any other custom recovery onto any phone (not just Xiaomi) follows a similar basic procedure. You essentially use the ADB Platform Tools to flash the TWRP.img file onto your phone’s partition. However, the key difference lies in how Xiaomi’s different operating systems (HyperOS and MIUI) allow you to unlock the bootloader.
For MIUI, the process was straightforward. You simply needed to enable OEM Unlocking permissions and then initiate the unlock countdown timer using the Mi Flash tool. However, Xiaomi has implemented stricter restrictions on newer devices running HyperOS, making bootloader unlocking slightly more complex. We have a detailed guide available if you’d like to follow the process.
In addition to this, older Xiaomi devices might use either A-only or A/B partition schemes. This difference can make the flashing process slightly more selective, but the steps mentioned above also explain, in detail on how to identify your phone’s partition scheme.
READ MORE: How to Install HyperOS Moon Super Wallpaper on Any Android ➜
Conclusion
This guide outlines all of the important procedures for flashing TWRP onto your Xiaomi device. It caters to both device partition types (A/B & A-only) and both operating systems, including MIUI and the newer HyperOS. However, be aware that improperly following these instructions could permanently brick your device.
FAQs
This could be because your phone uses an A/B partition scheme. In this case, you’ll need to boot into TWRP recovery first and then manually install the TWRP .zip file from within the recovery environment.
First off, check if your phone’s bootloader is unlocked. On Xiaomi phones, a simple way to check is to look for an unlocked padlock icon on the boot screen when you power on your device. If the bootloader is unlocked, double-check the connection between your phone and your PC. A faulty USB cable or using a different USB port might also resolve the issue.
Flashing TWRP on devices with A/B partitions often requires wiping all system data. It’s possible that the .zip file itself was deleted during this process. To workaround this, try storing the .zip file in an SD card or if your phone doesn’t support one, connect a USB to your phone using an OTG cable.
Reviewed by Huzaifa Haroon