How to DIY Port TWRP for Android
Appual’s hosts many “how to root Android” guides, but root guides do not exist for every device on the planet – this is usually due to a number of reasons; most especially, the unavailability of a custom recovery, like TWRP, for any particular device. Fortunately, porting a custom recovery like TWRP to your device is not incredibly difficult (though still fairly so).
If you have a device that you want to root and cannot find any kind of root method available, you should strongly consider learning how to port TWRP for yourself. This will at least give you a custom recovery to work from as you attempt to root your device.
If you’re interested in these sort of DIY Android projects, consider also reading the following guides from Appuals:
- How to Build Custom ROM from Android Open Source Project | Pt. 2
- How to Manually Theme Android System UI
Pre-Requisites:
A basic knowledge of Linux commands and/or compiling AOSP from scratch.
If you aren’t familiar with basic Linux commands and/or building AOSP, this guide is not for you – there’s no “newbie friendly” way to write a guide for this process. I suggest trying some easier operations first, like reading Appual’s guide on how to build AOSP from scratch.
Now, for building, you can use Omni versions 5.1 to 8.1, or CM versions 12.1 to 15.1 – but if you use CM, you may encounter small issues related to makefile. If you aren’t handy at troubleshooting makefile issues, you should opt to use Omni instead.
But if you decide to use CM, you’ll have to place TWRP in the CM/bootable/recovery-twrp folder, and set RECOVERY_VARIANT: =twrp in the BoardConfig.mk file
You can find the TWRP source code here, and you should choose the latest available branch. You won’t need to do this with Omni, because it includes TWRP source by default, unless you’re using an older version of Omni – in which case, you’ll want to pull from the latest branch.
If you only want to build TWRP, you can try working with a smaller tree, such as this Minimal Manifest TWRP. However, there may be situations where you’ll need more repos than this manifest allows.
Major note before compiling: If you add or change any flags, you will need to make clean (or make clobber) before recompiling, otherwise your flag changes will not be included!
After you have the TWRP source code, we need to change some of the build flags for your specific device. Find the BoardConfig.mk for your device – typically this will be found in devices/manufacturer/codename (for example, devices/lge/hammerhead/BoardConfig.mk)
The board config needs to include architecture and platform settings – these are typically already included if you’re using somebody else’s device config. But if you created your own, you’ll need to add them. This is because without them, the recovery boot may segfault and it will just flash the TeamWin logo on your screen repeatedly.
Flags should be put at the bottom of the BoardConfig.mk, under a heading of #twrp
For all devices, you need to instruct TWRP which theme to use. The TW_THEME flag is used instead of the older DEVICE_RESOLUTION flag, which means TWRP now uses scaling to stretch any theme.
Your options are: portrait_hdpi, portrait_mdpi, landscape_hdpi, landscape_mdpi, and watch_mdpi. For portrait mode you’ll most likely want the hdpi theme of 720×1280 and up, but for landscape devices go with 1280×720 and up.
So your build flag section + theme flag should look like this:
#twrp
TW_THEME := portrait_hdpi
Some additional build flags you’ll want to include in this section (credits to XDA forums):
- RECOVERY_SDCARD_ON_DATA := true (this enables proper handling of /data/media on devices that have this folder for storage (most Honeycomb and devices that originally shipped with ICS like Galaxy Nexus) This flag is not required for these types of devices though. If you do not define this flag and also do not include any references to /sdcard, /internal_sd, /internal_sdcard, or /emmc in your fstab, then we will automatically assume that the device is using emulated storage.)
- BOARD_HAS_NO_REAL_SDCARD := true — disables things like SD card partitioning and may save you some space if TWRP isn’t fitting in your recovery patition
- TW_NO_BATT_PERCENT := true — disables the display of the battery percentage for devices that don’t support it properly
- TW_CUSTOM_POWER_BUTTON := 107 — custom maps the power button for the lockscreen
- TW_NO_REBOOT_BOOTLOADER := true — removes the reboot bootloader button from the reboot menu
- TW_NO_REBOOT_RECOVERY := true — removes the reboot recovery button from the reboot menu
- RECOVERY_TOUCHSCREEN_SWAP_XY := true — swaps the mapping of touches between the X and Y axis
- RECOVERY_TOUCHSCREEN_FLIP_Y := true — flips y axis touchscreen values
- RECOVERY_TOUCHSCREEN_FLIP_X := true — flips x axis touchscreen values
- TWRP_EVENT_LOGGING := true — enables touch event logging to help debug touchscreen issues (don’t leave this on for a release – it will fill up your logfile very quickly)
- BOARD_HAS_FLIPPED_SCREEN := true — flips the screen upside down for screens that were mounted upside-down
Additional build flags can be found by skimming through the Android.mk files in the recovery source, but they are typically not used so there’s no point in documenting them.
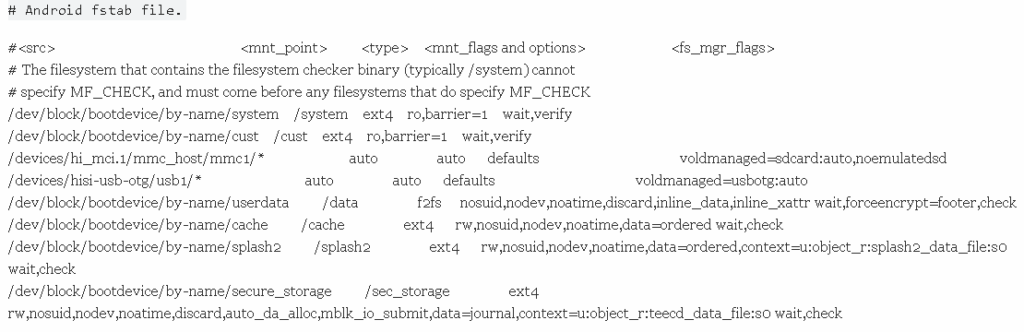
Using Recovery.Fstab
TWRP 2.5 and higher has support for new recovery.fstab features – notably the ability to extend TWRP’s backup/restore functions. You do not need to add fstab flags, because most partitions will automatically be handled.
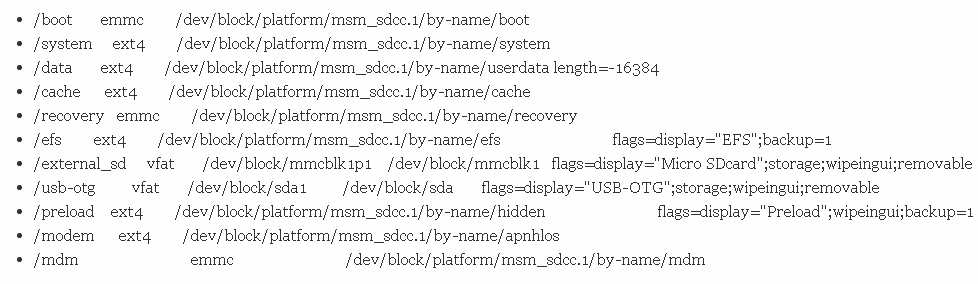
TWRP only supports v2 fstabs in version 3.2.0 and higher – in older versions of TWRP, you’ll need to use the old format of fstab. Here’s an example of TWRP fstab for a Galaxy S4:
To maximize compatibility with your particular build tree, you can create a twrp.fstab and use PRODUCT_COPY_FILES to place in >etc>twrp.fstab.
When TWRP launches and finds twrp.fstab in the ramdisk, it will rename it it to >etc>recovery.fstab.bak – basically it replaces the fstab from your device with the TWRP fstab, which extends compatibility.
Example code:
PRODUCT_COPY_FILES += device/lge/hammerhead/twrp.fstab:recovery>root>etc>twrp.fstab
The fstab in TWRP can contain some “flags” for each partition listed in the fstab.
These flags are added to the end of the partition listing in the fstab, separated by white space / spaces / tabs. The flag will only affect that partition, but no others. Flags are separated by semicolons. Here’s some example code:
![]()
So let’s examine this bit by bit. The flag here will give a display name of “Micro SDcard”. The wipeingui flag will make this partition available for wiping in the Advanced Wipe menu. The removable flag indicates that this partition is not always present, which will prevent mounting errors from being displayed.
A complete list of flags (credits to TeamWin):
- removable — indicates that the partition may not be present preventing mounting errors from being displayed during boot
- storage— indicates that the partition can be used as storage which makes the partition available as storage for backup, restore, zip installs, etc.
- settingsstorage — only one partition should be set as settings storage, this partition is used as the location for storing TWRP’s settings file
- canbewiped — indicates that the partition can be wiped by the back-end system, but may not be listed in the GUI for wiping by the user
- userrmrf — overrides the normal format type of wiping and only allows the partition to be wiped using the rm -rf command
- backup= — must be succeeded by the equals sign, so backup=1 or backup=0, 1 indicates that the partition can be listed in the backup/restore list while 0 ensures that this partition will not show up in the backup list.
- wipeingui — makes the partition show up in the GUI to allow the user to select it for wiping in the advanced wipe menu
- wipeduringfactoryreset — the partition will be wiped during a factory reset
- ignoreblkid — blkid is used to determine what file system is in use by TWRP, this flag will cause TWRP to skip/ignore the results of blkid and use the file system specified in the fstab only
- retainlayoutversion — causes TWRP to retain the .layoutversion file in /data on devices like Sony Xperia S which sort of uses /data/media but still has a separate /sdcard partition
- symlink= — causes TWRP to run an additional mount command when mounting the partition, generally used with /data/media to create /sdcard
- display= — sets a display name for the partition for listing in the GUI
- storagename= — sets a storage name for the partition for listing in the GUI storage list
- backupname= — sets a backup name for the partition for listing in the GUI backup/restore list
length= — usually used to reserve empty space at the end of the /data partition for storing the decryption key when Android’s full device encryption is present, not setting this may lead to the inability to encrypt the device - canencryptbackup= — 1 or 0 to enable/disable, makes TWRP encrypt the backup of this partition if the user chooses encryption (only applies to tar backups, not images)
- userdataencryptbackup= — 1 or 0 to enable/disable, makes TWRP encrypt only the userdata portion of this partition, certain subfuldes like /data/app would not be encrypted to save time
- subpartitionof= — must be succeeded by the equals sign and the path of the partition it is a subpartition of. A subpartition is treated as “part” of the main partition so for instance, TWRP automatically makes /datadata a subpartition of /data. This means that /datadata will not show up in the GUI listings, but /datadata would be wiped, backed up, restored, mounted, and unmounted anytime those operations are performed on /data.
A good example of the use of subpartitions is the 3x efs partitions on the LG Optimus G:

This lumps all 3 partitions into a single “EFS” entry in the TWRP GUI allowing all three to be backed up and restored together under a single entry.
With TWRP 3.2.0 and above which uses V2 Fstab, you do not need to add any build flags. V2 Fstab support is automatic. V2 Fstab also supports wildcards (the * symbol) which can be useful for USB OTG and micro-SD cards with multiple partitions. You can also continue to use the V1 Fstab format, and it’s entirely possible to use both V1 and V2 types in the same Fstab.
For example, here is a V1 Fstab line with a wildcard meant for a USB OTG:
![]()
Here is a V2 Fstab line for the same device which achieves the same result:
![]()
Additionally you may include etc twrp.flags which use the V1 Fstab format, and they can be used to supplement the V2 Fstab with TWRP flags, additional partitions not included in the V2 Fstab, or overriding settings in the V2 Fstab.
For example, a Huawei device might have this V2 fstab in the etc recovery.fstab:
It may also have these flags included:
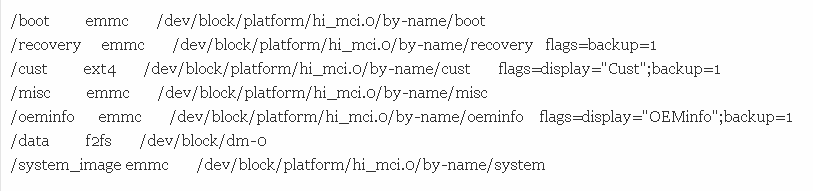
So here, the first two lines in TWRP.Flags will add the Boot and the Recovery partitions, which were not present in the V2 Fstab. Then, the /cust line in TWRP.flags will instruct TWRP to allow the end-user to backup the (cust) partition, and give it a display name.
The /misc partition is present in twrp.flags, and the /oeminfo partition instructs TWRP to also allow backing up and giving it a display name.
We need the /data line because many Huawei devices are encrypted, but use special Huawei binaries – thus, we use the Huawei binaries to decrypt the device automatically in Recovery Mode. So here the /data line will instruct TWRP to use /dev/block/dm -0, and not /dev/block/bootdevice/by-name/userdata, which is typically used for “proper” mounting”.
Finally there is /system_image, so that TWRP will include an option to create a system image in the Backup and Restore menus.
The official TeamWin github should also contain the latest example device trees for devices that have an official TWRP port. The TeamWin github can be found HERE.
After Omni or CM has been synced, and you’ve set up your TWRP flags, you should build a source ./build/envsetup.sh
And you’ll want to “lunch” the device, so you can do something like “lunch omni_hammerhead.eng”.
After a successful lunch, most devices will use this command:
![]()
You need to replace the # in –j# with the core count +1. So if you have a dual core it’s –j3, a quadcore will be –j5, etc.Replace the # with the core count +1, so if you have a dual core it’s -j3 and a quad core becomes -j5, etc.
Also, typical Samsung devices will require this:
![]()
This is because most Samsung devices include the recovery as an extra ramdisk in the boot, instead of on a separate recovery partition (which most other devices use).
By now, you should have TWRP compiled for your device and hopefully it works in an emulator environment. You should always test your TWRP port in an emulator environment first, so you don’t risk borking your device.
Download this set of device configuration files.
Compile a recoveryimage using those device files. In the Android SDK, click on Tools -> Manage AVDs. Click New. Set it up as the following:
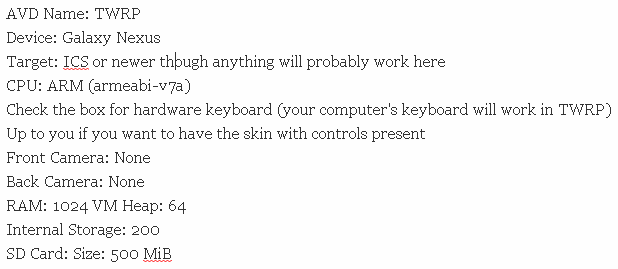
Then click OK.
Once you have your AVD and your recoveryimage, you can boot TWRP in the emulator by browsing to your android-sdk/tools folder and run this command:
![]()
Note that ADB doesn’t work right away. About 10 to 15 seconds after TWRP finishes booting, ADB will come online. We start ADB via init.rc so even if TWRP fails to boot due to some kind of code error that you may have made, ADB should still work. Enjoy!
TWRP and A/B devices (credits to TeamWin):
From a TWRP standpoint, A/B devices aren’t a whole lot different from regular devices, but developers seem to be shy about working on these devices. I’m going to try to shed some light on this subject and hopefully this will serve as a guide for porting TWRP to A/B devices.
Firstly, let’s understand what is an A/B device and how it’s different. A/B devices have duplicates of many partitions on the device. An A/B device has 2x systempartitions, 2x boot partitions, 2x vendor partitions, 2x modem / firmware partitions, etc. Only one slot is in use at a time. During early boot, the first stages of the bootloader read some small amount of data called the BCB or Bootloader Control Block and decide whether to boot the A partitions or the B partitions. When an OTA update is available, the data from the active slot is copied from the inactive slot and patched / updated. For example, if you’re currently on slot A, your device would download the update and copy the existing system partition from slot A and patch / update it with the new updates into slot B. Once the copying and updating is complete, the BCB is updated and the device reboots using slot B. Next time an update is available, the system partition in slot B is copied to slot A and updated, the BCB gets updated, and we reboot to slot A. When viewing partitions on the device, you’ll see something like this:
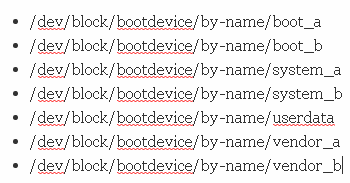
Note the dual boot, system and vendor partitions in the list above, but only one userdata partition.
While there is technically no requirement that I am aware of, all A/B devices shipped thus far have no separate recovery partition. Instead, the boot image contains the recovery in its ramdisk. The important thing is knowing that the boot image now also contains the recovery. For completeness, the system partition is a full root file system. During boot, if the kernel is told to boot to recovery, it will extract the ramdisk in the boot partition. If the kernel is not told by the bootloader to boot to recovery, then the kernel will mount the appropriate system partition (A or B) because the system partition is a full root file system. This means that the system partition on these devices is mounted to / instead of to /system and the system partition contains all of the files that would have normally been in the boot image ramdisk and a /system subfolder.
From a TWRP standpoint, there are 3 things that you have to do for an A/B device. First, you need to set
Code:
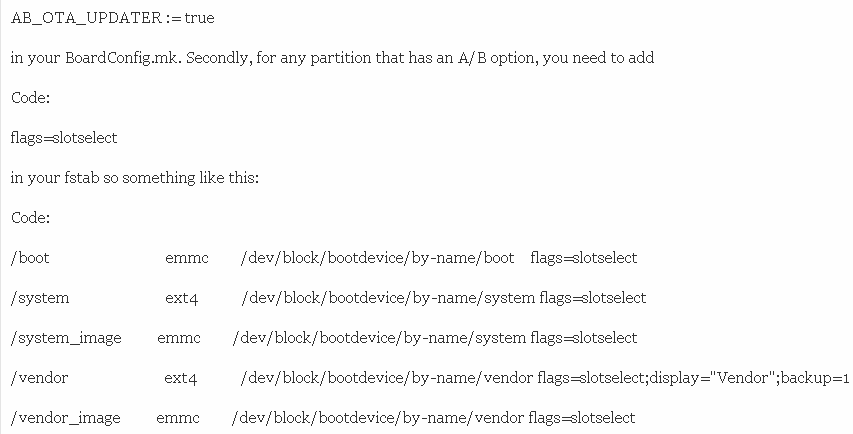
Lastly, once you get into TWRP, you will probably want to make sure that bootctl hal-info responds correctly with no errors. Usually the bootctl binary requires a proprietary library or even a couple of services to work correctly. If bootctl does not work correctly, then you will not be able to switch slots within TWRP correctly either.
In addition to setting
Code:
AB_OTA_UPDATER := true
you may also want to set:
Code:
BOARD_USES_RECOVERY_AS_BOOT := true
BOARD_BUILD_SYSTEM_ROOT_IMAGE := true
If you set
Code:
BOARD_USES_RECOVERY_AS_BOOT := true
then make recoveryimage will no longer work and instead you will have to make bootimage. I don’t recommend setting either of these flags for TWRP-only build trees. These flags will probably be required for developers building full ROMs for A/B devices.
Installing / Flashing TWRP on A/B devices:
Since all known A/B devices do not have a separate recovery partition, you will eventually have to flash TWRP to the boot partition. On the Pixel 1 and 2, we use fastboot boot to temporarily boot TWRP without flashing TWRP. We are then supplying a zip to allow users to flash TWRP to both slots. You can download one of these zips from our website and update the zip as needed to support your devices. Eventually we will add tools to TWRP to allow users to flash recoveries on these devices without needing to use zips.
Recently, I worked on the Razer Phone. The Razer Phone unfortunately does not support fastboot boot. Instead, users have to determine their currently active boot slot using
Code:
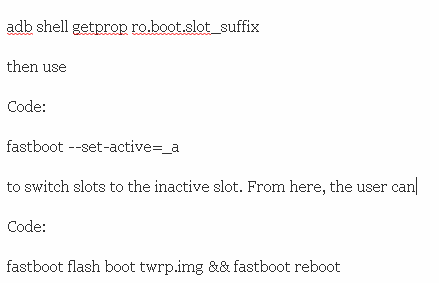
to get into TWRP. Once in TWRP they can then go to the reboot page and change back to their originally active slot, make a backup, then install TWRP. Using the inactive slot allows users to get a good, unmodified backup of their device before installing TWRP.
Additional notes:
If you’d like to get TWRP officially supported for your device so that it can be automatically installed with the TWRP app, and you really want to do this so that other owners of the same device can enjoy official TWRP support and it’s the nice thing to do, you’ll need to send the following information to TeamWin:
- Device configuration files to compile TWRP from source for your device – do not repack a recovery.img by hand, they need to compile it from source.
- After TeamWin builds a copy of TWRP, they’ll send it to you for validation – once you have validated it, TeamWin will build a working image for your device, and add it to the official TWRP app.