How to Build a Custom ROM from Android Source Project Pt. 2
In our previous “How to Build an Android ROM from AOSP” guide, we went over the basics – setting up Linux, the build environment, and compiling the most basic of Android ROMs. This guide will show you how to add flavor to the ROM by adding a custom boot animation and system themes. Get your gloves on, because things will get messy.
How to Create a Boot Animation
Tools Required:
- A photo editor that saves in .PNG format (like GIMP or Photoshop)
Assuming you want to create your very own custom boot animation, remember that the image resolution should meet your device’s resolution. So your images should be 720 x 1280 if you have a phone with that resolution, for example. Save them as 32-bit .PNG files. You need to save each frame of your images in corresponding steps:
00001.png
00002.png
00003.png
There is no limit to the number of frames you can have in your boot animation, but the best practice is to use a lesser amount of frames on a loop. CyanogenMod for example uses a looping animation of only a few frames, rather than one long continuous animation.
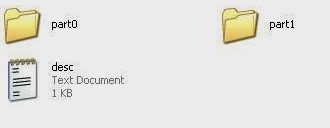
You need to create two folders on your desktop – name them part0 and part1. If you’re creating something really fancy, you can create more part# folders. This is because the part0 folder will be the animation’s “intro”, and part1 will be the looping frames, and part2 can be the outro, if you decide to do this. So think of it this way: your image fades onto the screen – these frames are saved in part0. Now your image spins around a few times – these frames are saved in part1. Now your image fades out of the screen – these frames are saved in part2. Makes sense, right?
Now what controls how your animation is played is a text file called “desc.txt”. The desc.txt is broken down like this:
720 1280 30
c 1 15 part0
c 0 0 part1
c 1 30 part2
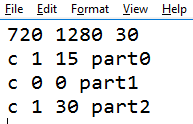
Here is what all of that means:
- 720 1280 30 = Resolution (width x height) + play at 30 frames-per-second. You can also do 60 or 10 FPS.
- C means the animation will continue to play fully and not abort, even if the OS is loaded. You can optionally use P instead of C, which will abort the animation and go straight to the OS when its loaded, but this makes for an ugly boot-animation that never plays fully – unless you create an infinitely-looping animation.
- 1 is the loop count, meaning how many times the frames inside the part# folder will be played before moving to the next folder.
- 15 is how long each frame will “pause” before going to the next frame. 15 is 0.5 seconds, because 15 is half of 30.
- Part# is obviously the folder being played.
Basically you want your desc.txt file to read like this:
[type] [loop count] [pause] [path]
Now, create a new .zip archive and name it bootanimation.zip, then drag your desc.txt and part# folders into this archive. If you followed Part 1 of this guide, you will have a WORKING_DIRECTORY on your Linux machine. You need to copy your bootanimation.zip into the following folder:
out/target/product/<product>/system/media
Now the next time your build your ROM, your bootanimation.zip will be the default boot animation for your ROM.
Set the Default Wallpaper
Navigate to this folder:
/frameworks/base/core/res/res/your-resolution
In there you will find a file “default_wallpaper.jpg” – you can replace this with an image of the same resolution and filename, and when you build your ROM, it will be the default wallpaper.
Add ROM Info to Settings > About
Navigate to ./packages/apps/Settings/res/xml/ in your build tree folder.
Now open device_info_settings.xml with GEdit and edit this information to your liking:
<!– ROM name –>
<Preference android:key=”rom_name”
android:enabled=”false”
android:shouldDisableView=”false”
android:title=”ROM name”
android:summary=”Appuals ROM Build Guide ROM”/>
<!– ROM build version –>
<Preference android:key=”rom_number”
android:enabled=”false”
android:shouldDisableView=”false”
android:title=”ROM build number”
android:summary=”7.0.1″/>
Customize the Messenger App
Modifying a pre-existing app is much easier than replacing the core apps, so let’s perform a simple tweak on the default messaging app.
Navigate to ./packages/apps/Messaging/ and open BugleApplication.java with GEdit. We’re going to make a simple toast function, that is, the app will display a pop-up message when the app is opened. So inside the BugleApplication.java file, look for this bit of code:
import android.widget.Toast;
Look for the onCreate() function and just before the Trace.endSection(), add these lines:
Toast myToast = Toast.makeText(getApplicationContext(), “Appuals Rocks!”, Toast.LENGTH_LONG);myToast.show();
Save the file and now the messenger app will display that toast message whenever the app is opened on your ROM!
Edit the Build.Prop File
Navigate to the /build/tools folder in the Android source directory and edit the file buildinfo.sh with a text editor. It basically contains what will be output to the ROM’s build.prop file when the ROM is compiled, for example you will see in buildinfo.sh things like:
echo “ro.build.date.utc=$BUILD_UTC_DATE”
echo “ro.build.type=$TARGET_BUILD_TYPE”
echo “ro.build.user=$USER”
echo “ro.build.host=`hostname`”
echo “ro.build.tags=$BUILD_VERSION_TAGS”
echo “ro.product.model=$PRODUCT_MODEL”
echo “ro.product.brand=$PRODUCT_BRAND”
echo “ro.product.name=$PRODUCT_NAME”
echo “ro.product.device=$TARGET_DEVICE”
echo “ro.product.board=$TARGET_BOOTLOADER_BOARD_NAM E”
echo “ro.product.cpu.abi=$TARGET_CPU_ABI”
Anything you change in here will be copied over to build.prop when you compile the ROM. Read this Appual’s guide “How to Edit The Android Build.Prop with Essential Tweaks” as it will show you a lot of useful things to edit in the buildinfo.sh file.
Hi Kevin,
Nice tutorial, it would be nice if you can post similar tutorial for building AOSP for non google phones such as HTC etc