5 Fixes for ‘Double Nat Detected’ in Xbox One and Series X/S
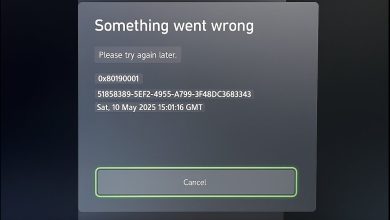
The “Double NAT detected” error appears in the network settings of your Xbox while playing online games. This prevents users from having a stable connection, and as a result, they cannot participate in multiplayer matches.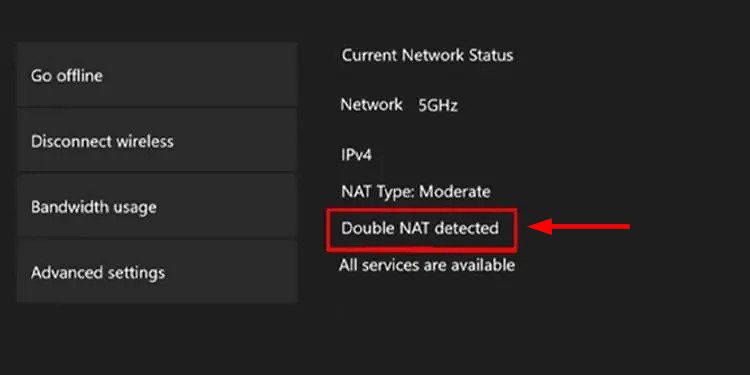
What does ‘Double NAT detected’ mean?
In simple terms, double NAT (Network Address Translation) means that there is more than one router or gateway attempting to connect your Xbox One, Series X, or Series S to the internet.
It happens mostly due to incorrect network configuration while using both a router and a gateway. Those with this setup need to enable Bridge mode in the gateway to resolve this issue.
Alternatively, you can also turn on the Access Point operation mode on your router if the gateway does not support bridge mode. Both of these solutions will work equally well.
Furthermore, below you will find five simple methods to permanently fix this double NAT obstacle.
1. Restart your Xbox console and router.
This is the first step you should take if you are not using multiple routers. Users with numerous routers need to configure some settings, but those with only a solitary router do not. The router can start misbehaving sometimes and simply needs a restart to return to normal functioning.
So, begin by turning off both your Xbox console and router. Wait for 30 seconds, then power on both of them again. Now, connect the console to the network and see if the double NAT issue persists or not.
2. Enable bridge mode on your gateway.
Bridge mode allows two routers to work efficiently without any issues. It enables the devices on both networks to communicate with one another as though they are on the same Local Area Network (LAN). This is accomplished by allowing the router or gateway to connect two LANs together.
In other words, bridge mode disables the NAT functionality of one router or gateway, solving the double NAT problem. Usually, you won’t find this option in many routers. Therefore, this solution works best if you have a gateway-plus-router arrangement.
The following steps show how to enable bridge mode:
- Open any browser and type the IP address of your router in the URL bar. It will primarily be either 192.168.1.1 or 192.168.0.1.
- Enter the login credentials, and click on “Login” or press “Enter.
Note: The IP address and username/password of your router or gateway are often written on the back of the device. If they are not there, consult the user manual or obtain details from the provider.
- Once you are on the admin page of the gateway, look for the Wireless menu.
- There will be the option to operate the gateway as a Bridge, Wireless Bridge, or WDS Bridge mode. Select one and save the changes.
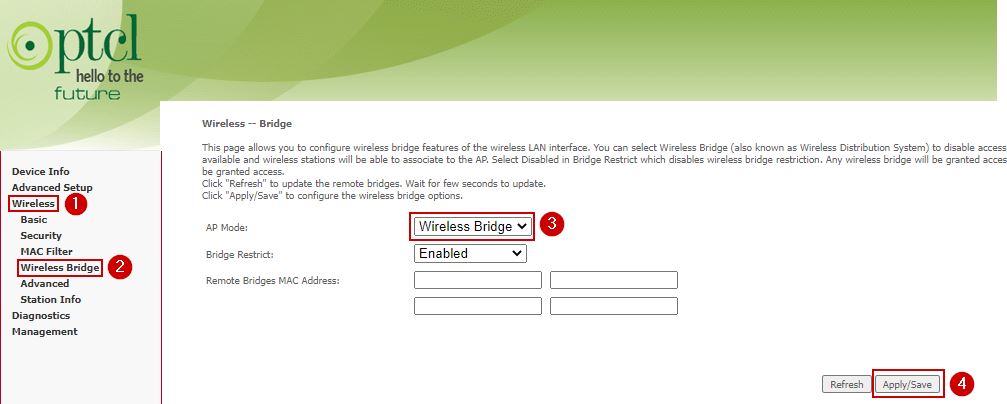
- Restart your gateway and connect it to the Xbox.
- Now, go to the Network settings on the Xbox and check whether the Double NAT detected error has been resolved.
3. Enable the Access Point Operation Mode on your router.
Access Point (AP) mode in routers primarily performs the same function as Bridge mode in gateways. It simply extends your Wi-Fi signals by acting as a pathway and ceases to function as a regular router does.
Again, it’s beneficial to enable AP mode in an environment where there is already a router working in Router mode. Not only will it prevent double NAT, but it will also strengthen the Wi-Fi signals. For a detailed overview of the two modes, refer to our guide: What is the Difference Between a Wireless Router and a Wireless Access Point?
The steps for this are similar to the ones mentioned in the previous method.
- Login to your router’s Admin page again.
- Navigate to the Wireless menu.
- Change the operation mode to Access Point.
- Save the changes and reboot the router.
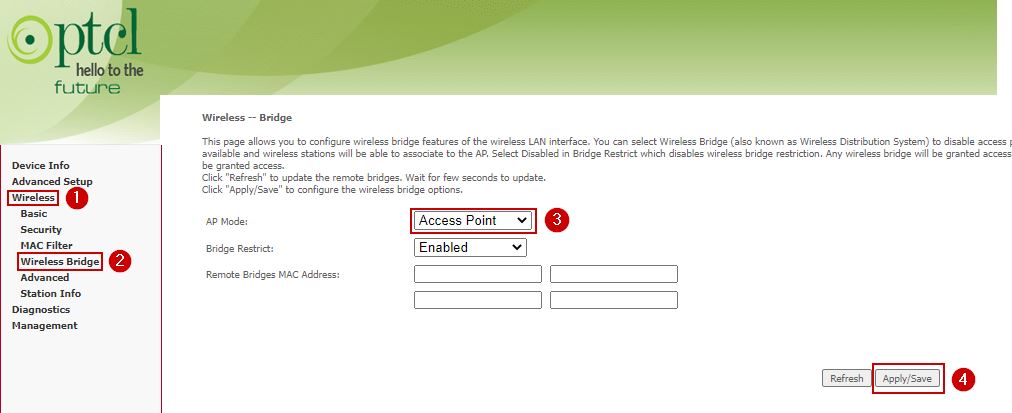
- Connect your network with the Xbox now to start playing online games.
4. Use only the gateway and remove the secondary router.
A gateway functions both as a router and a modem. This is the reason why we recommend keeping it and removing the router when you are playing multiplayer games on Xbox. This will be for a temporary time, and you can reconnect the router once the gaming session is completed.
It’s not necessary to keep the gateway connected and only remove the router; it can be vice versa as well. Besides, if you have two routers and no gateway, then remove the one with weaker signals or the more outdated one.
However, make sure that the distance between the router and your Xbox is not too great, and that there are no thick walls in between, as this can be the reason why your Xbox keeps disconnecting from Wi-Fi. If that is the case, then simply stick to either of the first two methods.
Now, to remove the router, simply unplug the cable from its WAN port and plug it into the gateway or the primary router.
Afterward, follow the steps below to check whether the double NAT has been resolved or not:
- Reset your Xbox and power it on.
- Navigate to Profile & system after pressing the Xbox button.
- Click on Settings.
- Go to General > Network settings.
- Check the Bandwidth usage section.
- If it doesn’t show Double NAT detected then it means the problem has been cleared.
5. Establish a direct connection between the Xbox console and gateway/router.
Establishing a direct connection means connecting your Xbox to the router or gateway with an Ethernet cable. The best Ethernet cables for gaming guarantee stronger and faster network signals compared to a regular wireless Wi-Fi connection.
You can also use either a MoCA adapter or a Powerline Ethernet adapter for this purpose. Once the connection is complete, restart both the router and the Xbox console. Then, return to the Network settings on the Xbox, and you will no longer see ‘Double NAT detected’ next to Bandwidth usage.