How to Fix Xbox Keeps Disconnecting from WiFi?
If your Xbox One or Xbox Series S/X console is constantly disconnecting from the WiFi and then reconnecting, you are not the only one. Many gamers using Xbox deal with this problem when playing on a Wi-Fi connection.
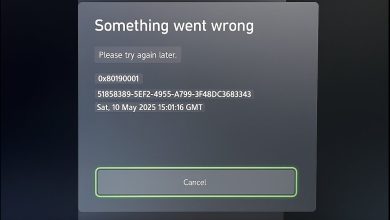
You might experience this problem due to server issues, temporary data glitches, or network problems.
You can troubleshoot this issue in several different ways. Here’s a list of every confirmed fix that was helpful to Xbox players that were constantly being disconnected from Wi-Fi connections.
Workaround: Connect via ethernet cable
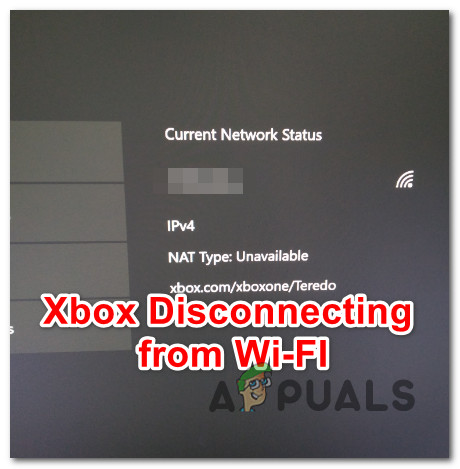
It’s likely that the main cause of your frequent disconnects when using a wireless connection and a low-end router is that you are using a connection with limited bandwidth.
Features such as VoIP use many resources, especially if your ISP plan isn’t very generous. Suppose you’re losing connection to Wi-Fi while at a party; this is probably why.
Additionally, if several other devices are connected to the same network, this problem is probably amplified even further.
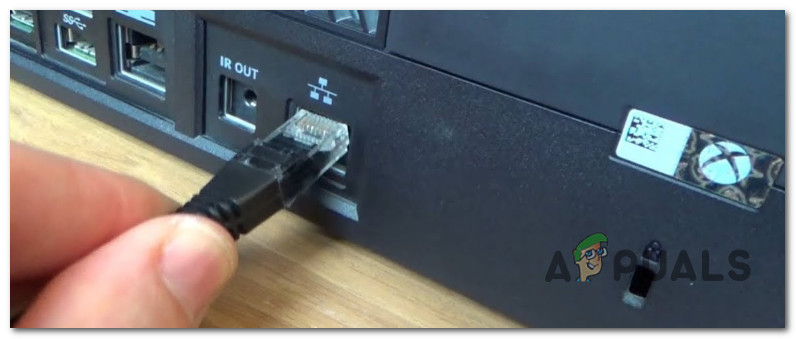
If your situation fits this description, we recommend switching to an ethernet connection (rather than Wi-Fi) and connecting to your home network via cable.
Note: Connecting via ethernet cable might not be applicable depending on your current setup. In this case, move directly to method 4.
Restart your console and ensure it’s connected to a Wi-Fi network after switching to an ethernet connection to see if the problem reappears.
Continue to the next potential solution below if the issue is still not fixed.
Prerequisites: Check for a server issue
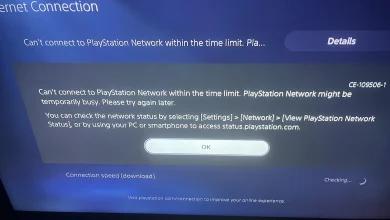
Checking the Xbox server status to determine if there are any issues right now is the first thing you need to do if Xbox is the only device currently losing the internet connection. This error could appear because the server is experiencing problems or undergoing maintenance.
You should start by visiting the official Xbox support website, where you may view the current status of the live servers.
You can view a list of every Xbox service once you are on this website.
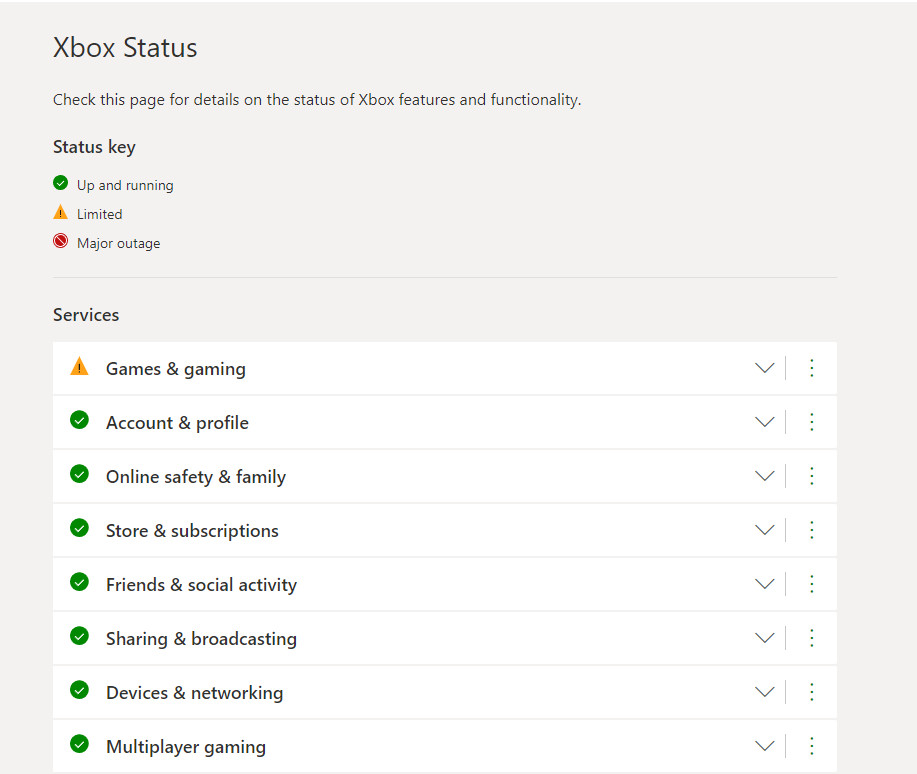
Note: The related icon should be green if the services are operating properly. The servers are experiencing either limited or major outages if the icons are yellow or red. The servers are, therefore, not operating properly.
If the icon is not green, you are likely experiencing random disconnects due to the Xbox Live infrastructure crashing.
If that’s the case, your only option is to wait until Microsoft this problem because you have no other options.
You can also check websites like Downdetector to see whether other users report issues with the Xbox servers.
Note: The website has a graph displaying all reports submitted during the previous 24 hours. If you’d like, you may also comment or ask a question.
If you discover that other people are having issues simultaneously with you, the only option is to wait until the server issues are fixed.
Proceed to the next method below if you are certain that the Xbox servers are operational and that this is not the root of your issue.
Fix 1. Perform a power cycle procedure
If you’ve confirmed that a server issue is not causing the problem, the first thing you should do (if you have already tried restarting) is clear any temporary data preserved between restarts. Clearing this data will also clear any network data causing these random disconnects.
To do this, initiate a power cycle procedure.
Here’s a quick guide on how to initiate a power cycle procedure on Xbox consoles:
- Check that your console is fully powered and no game is running in the background before continuing.
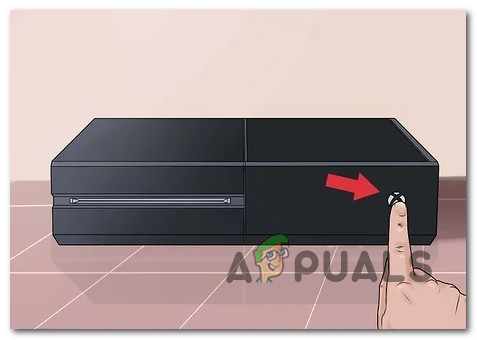
- Press and hold the power button (on your console, not your controller) for around 10 seconds until your console no longer shows signs of life.
Press and hold on the Power button - Before attempting to restart your console, physically unplug your console from the power outlet.
- Wait for one minute and plug the console back.
- Now turn on your console again and if it is taking a little longer to load it means that the power-cycle was sucessful
- Once your console boots back up, restore the Wi-Fi connection and see if the disconnection happens again.
If the problem is still not fixed, move to the next method below.
Fix 2. Clear Local Saved Games
Deleting all of the locally saved data that your Xbox console keeps is another solution that might allow your o improve the stability of your Wi-Fi connections.
This can be a helpful action because the console’s saved data may have become damaged, which could lead to various issues with network-cached data.
You only need to navigate to My Library, select Manage Saves, then remove any saved currently stored on your console.
Note: Make sure you upload all your local saves on the cloud saves before moving on to the steps featured below.
Here’s how to remove locally saved data from your Xbox console:
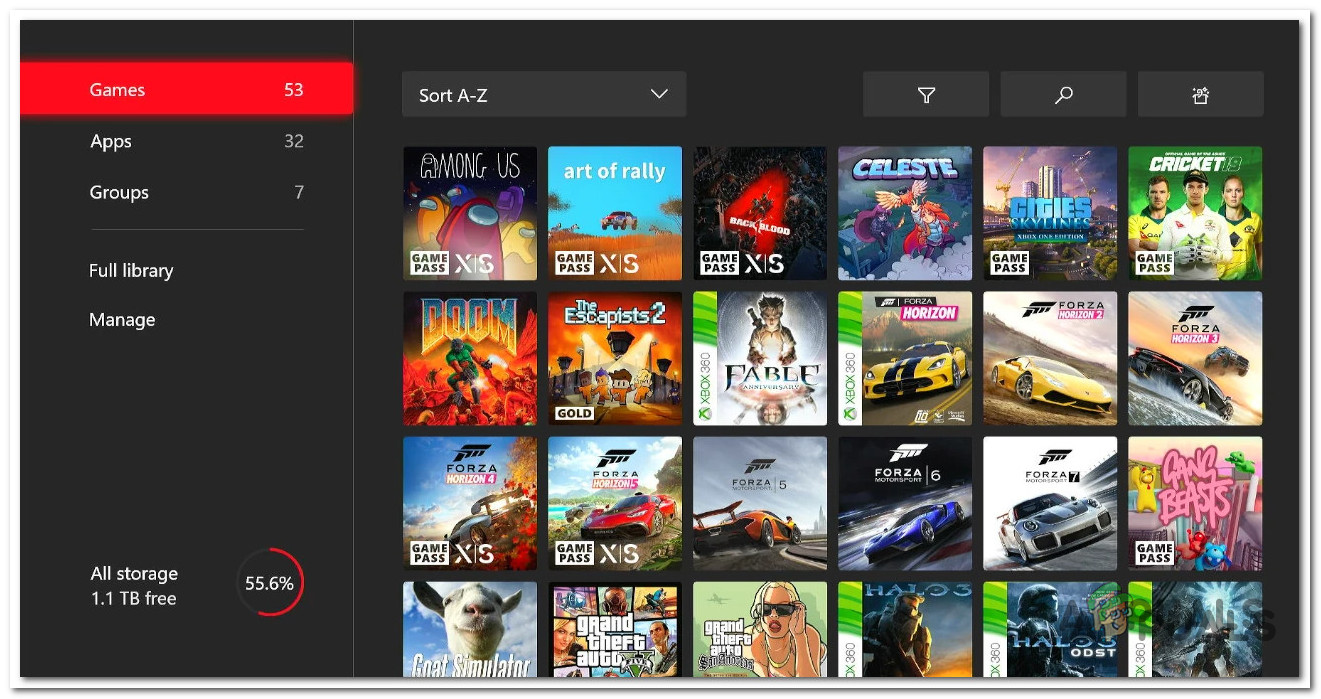
- Start by accessing the My games & Applications menu after pressing the Xbox button on your controller.
- Next, choose the See all button under the My games & applications section.
- In the My games & apps section, start cycling through your games and highlight each of them individually.
Accessing the library - Next, select More options to bring up a little menu.
- Choose the Manage game & add-ons area by scrolling down.
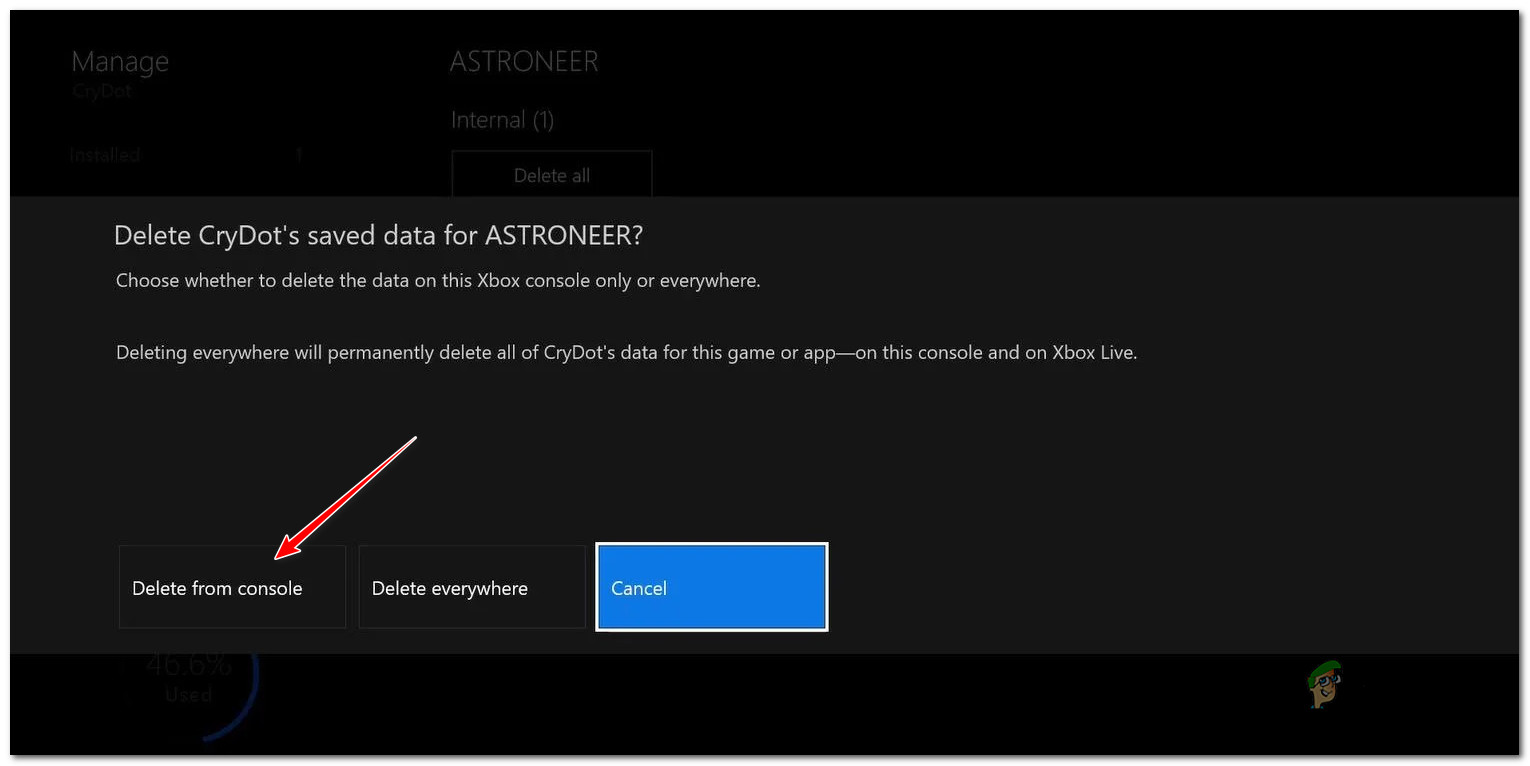
- Select Delete everything from the Saved data area of the left-side menu to remove any locally saved data.
- At the confirmation prompt, select Delete from the console.
Delete from console - After every piece of local data has been successfully cleared, reboot your console and connect to a Wi-Fi network once again to see if the problem is now resolved.
If the same issue is still occurring, move to the next method below.
Fix 3. Change DNS for IPv6 and IPv4
You should investigate your DNS range if you’ve come this far without a viable fix. More often than not, this problem comes down from the underlying protocol. Most commonly, the Wi-Fi connection is lost because IPv6 packets are transmitted on an IPv4 network which facilitates data packet loss.
In this case, you should be able to fix the issue by accessing your console’s network settings and changing the DNS (domain name address) for IPv6 and IPv4 to Google equivalents.
Note: This method will work on both Xbox One and Xbox Series S / X.
If you don’t know how to change the DNS server for your Xbox console, you should follow these steps:
- Press the Xbox button on your Xbox controller to launch the guide menu.
Press the Xbox button - Next, enter Settings by navigating to the Settings section (gear icon).
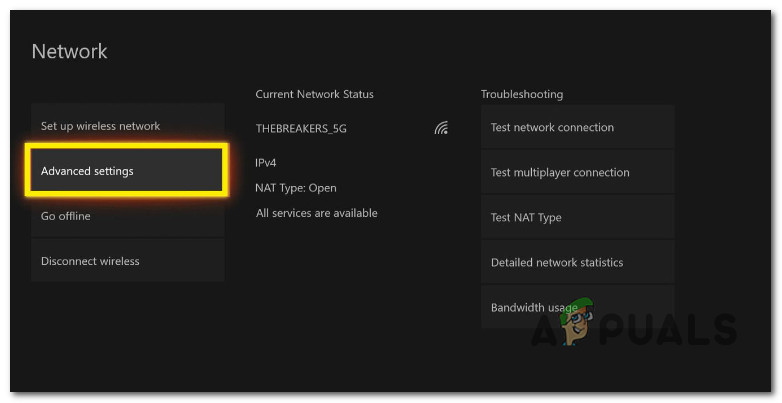
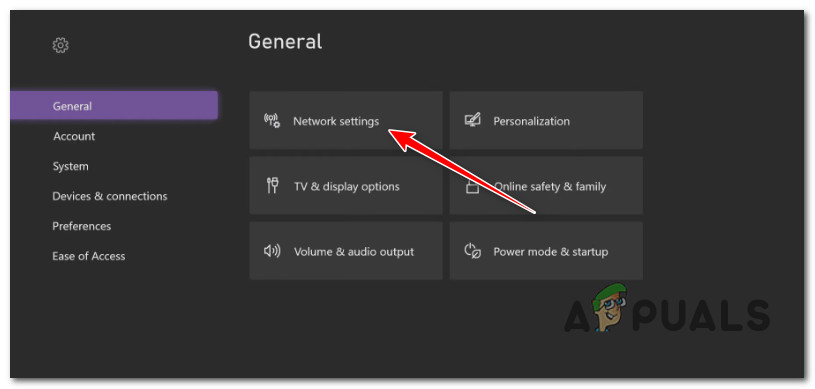
- In the Settings menu of your Xbox console, select the Network section and then go to the Network settings by navigating to it.
- Access the DNS settings by going to the Advanced settings.
Access the Advanced Settings menu - To be able to change the DNS server on your own, you must now choose the Manual option.
- Change the Primary IPv4 DNS and Secondary IPv4 DNS with the following to migrate to equivalents from Google:
1.1.1.1 for the Primary IPv4 DNS
1.0.0.1 for the Secondary IPv4 DNS
- After finishing, submit the changes and restart your console.
- After your console boots back up, connect to the same Wi-Fi network and see if the problem is now fixed.
If the issue persists after performing this, move on to the method below.
Fix 4. Delete the Mac Address
Cleaning the active MAC address is another thing you may do if you still get the same frequent disconnections while connected to Wi-Fi on your Xbox console. You can do this by accessing the Network settings screen of your Xbox current-gen or last Xbox console.
We recommend deleting the custom MAC address from your console’s network settings to ensure it’s not causing network instability.
Here’s a quick guide on how to do this:
- Start by going to the Xbox console’s home screen, then select the Settings option from the vertical menu on the right or left side.
- Next, choose the Network tab from the navigation menu.
- Choose Network Settings from the newly shown menu.
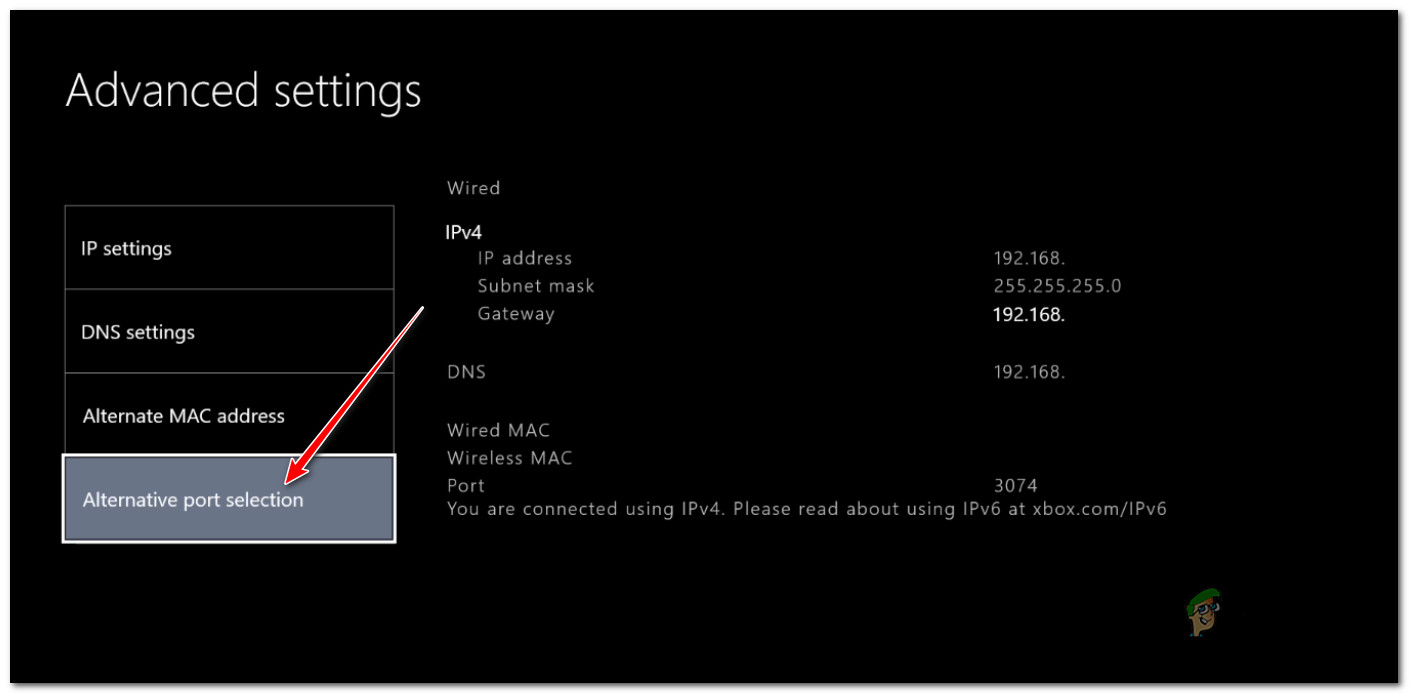
Access the Network settings menu on Xbox - After doing so, choose Advanced Settings and the menu item for an alternate MAC address.
- Next, clear the alternate MAC address using the dedicated clean button.
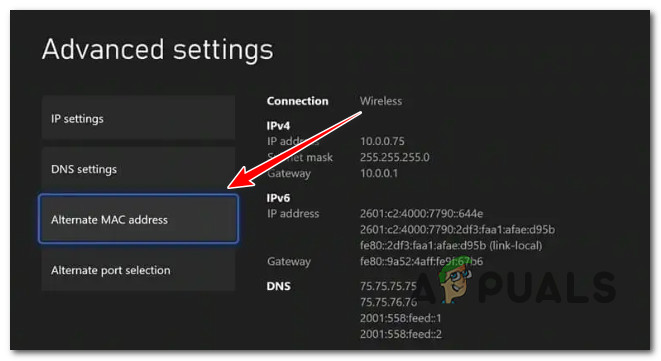
Clearing the alternate MAC address - Restart your console and wait for it to boot up after the Alternative MAC address changes to the default.
- Check if the sign-in error occurs after rebooting your console and connecting to the Wi-Fi session.
If the same problem is still present, proceed to the next possible solution below.
Fix 5. Change Wi-Fi Channel
Suppose the space where your Xbox console is connected to your router has several WiFi networks stacked on top of one another. In that case, you’re most likely having this issue because there is some form of conflict or interference between the WiFi network you’re connected to and another Wi-Fi network.
Remember that most WiFi routers available today are designed to transmit data utilizing either the 2.4 GHz or 5 GHz frequency bands. However, these bands are split up into separate channels employed for data transmission.
The channel you should (ideally) select varies depending on the frequency bands used by your router:
- The 1, 6, and 11 Wi-Fi channels are good for using 2.4 GHz because they normally don’t conflict with other networks.
- You should have no issues cycling through the available channels if you’re on 5 GHz. Theoretically, you can select from any 24 non-overlapping channels without encountering interferences.
Note: The default channel for most router models is the same. Your router will most likely use the same channels as nearby networks if you don’t change your Wi-Fi channel, which will impede or completely hijack your WIFI signal.
If you believe that a conflicting WiFi channel is interfering with the Wi-Fi connection of your console, follow the instructions below to change the Wi-FI channel:
- To view your router settings, launch any browser on a computer connected to the WiFi Network, type one of the following addresses, and then press Enter.
192.168.0.1
192.168.1.1
- To view your router settings, log in using the correct credentials at the login screen.
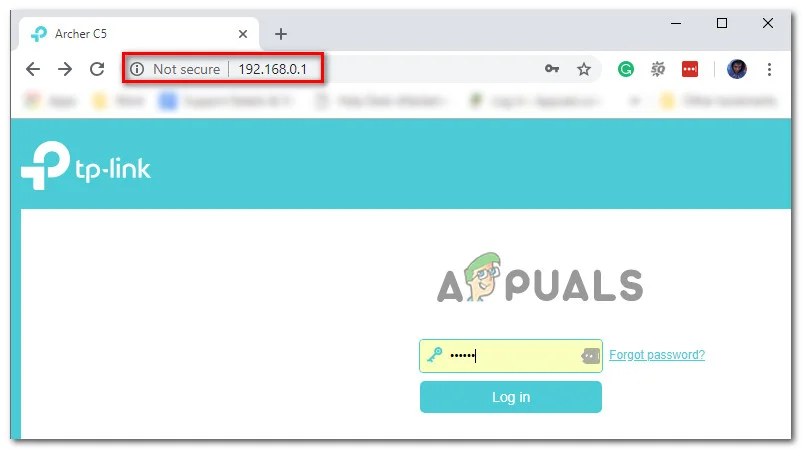
Access the Router settings Note: If you didn’t alter the default login information, you should be able to access the system using the username and password combinations admin or 1234. If it doesn’t work, look up detailed instructions on accessing your router settings online.
- Access the Advanced settings from the menu at the top of your router settings page.
- Select Wireless > Wireless Settings in the advanced menus on the left.
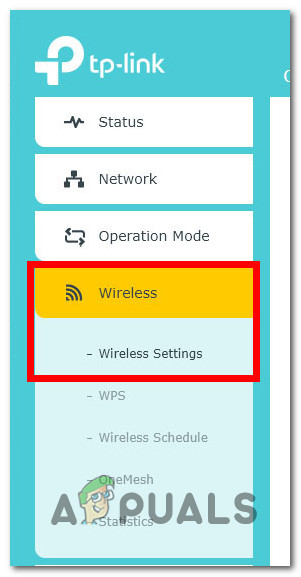
Access the Wireless Settings Note: Depending on your router’s configuration, these settings may differ.
- Afterward, head to the right-hand menu and disable Smart Connect (if your router supports it) to stop your router from choosing a Wi-Fi band.
- After turning off Smart Connect, go to your wireless settings, select between 2.4 GHz and 5 GHz (based on the network you’re connected to), and then select the proper Wi-Fi channel by the guidelines above.
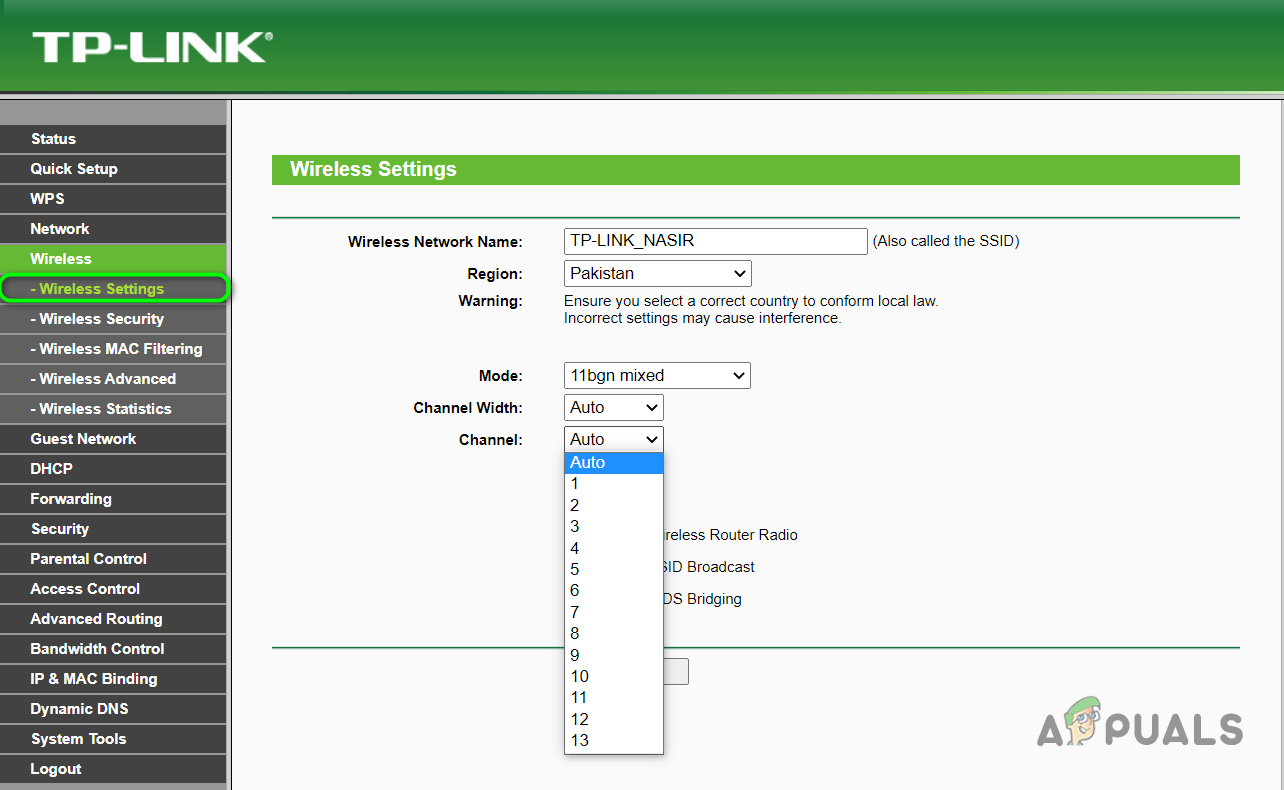
Change the Wi-Fi channel - After saving the update, restart your network to see if the issue has been resolved.
Move down to the next solution below if the same issue is still present and you still can’t stay connected on the WI-FI network from your Xbox console.
Fix 6. Update router firmware
If none of the above solutions resolved the Wi-Fi stability issues with your Xbox console, see if your router has fresh firmware that can be installed.
With older routers that don’t know how to handle the new GRE (generic routing encapsulation) protocol, it’s more likely for the current-gen Xbox console version (Xbox Series S/X) to experience connection instability.
The procedure for updating the firmware on your router will vary based on the manufacturer. Most of the time, you may complete this update by going to your router’s IP and downloading the most recent firmware update from the Advanced menu of your router.
Note: While some manufacturers only require you to click a button to update, others require you to manually download and install the firmware on your router over the network.
Our advice is to refer to the official router firmware update instructions on your manufacturer’s official support website.
If you have already updated the firmware on your router and the WI-FI connection issue still occurs, move down to the next method below.
Fix 7. Enable Xbox Live ports
Let’s see if your NAT type is responsible for the issue. It’s likely that some ports required to maintain the connection with the Xbox Live server is having trouble being forwarded by your router. In this case, you should be able to fix the issue by manually forwarding these ports.
Note: If you didn’t have this issue earlier, your ISP probably updated your modem or router (much like a console system update) and closed the necessary ports for the Xbox Live connection. On the Internet, ports are virtual conduits that enable communication and information transfer between devices and computers. Making your gaming console or PC more available to other gaming consoles or PCs on the Internet is a frequent gaming practice.
If this scenario is applicable, there’s a big chance your network is behind a cone NAT, and the Xbox Live ports are unreachable or have a delay that exceeds the accepted parameters.
To fix this, you need to configure all the ports used by Xbox Live so they’re all forwarded:
Port 88 (UDP)
Port 3074 (UDP and TCP)
Port 53 (UDP and TCP)
Port 80 (TCP)
Port 500 (UDP)
Port 3544 (UDP)
Port 4500 (UDP)
Note: You can do this yourself or contact your ISP and ask support to do it for you.
If you want to go with the manual router, follow the instructions below to manually forward the ports used by Xbox Live from your router settings:
- Start by accessing your router’s settings. To do this, launch the default browser on your computer, type one of the following addresses, and then press Enter:
192.168.0.1
192.168.1.1
Note: These are the two default addresses for your router settings. If you previously established a custom gateway for your router, use that address instead.
- When the login screen for your router appears, enter your login information to access the router’s settings.
Login to Router Note: You should be able to access the website by entering admin or 1234 as the username or password if you haven’t changed the default login information. If it still doesn’t work, look for step-by-step instructions on how to access your router’s settings online.
- When you are in the router’s settings, expand the Advanced option and then go to the NAT Forwarding section (Port Forwarding).
- Start adding the following ports individually. Make sure to add both UDP and TCP variations of a port where applicable
-
Port 88 (UDP)
Port 3074 (UDP and TCP)
Port 53 (UDP and TCP)
Port 80 (TCP)
Port 500 (UDP)
Port 3544 (UDP)
Port 4500 (UDP)
- Once you’ve finished, save the modifications and reboot your router and Xbox console.
- Connect to the Wi-Fi once again from your Xbox console and see if the problem is now fixed.
If the problem is still not fixed, move down to the next method below.
Fix 8. Use an Alternate port
If you’ve come this far without a viable fix, you take the time to configure an alternate port from the advanced network settings of your Xbox console.
Note: Using an alternate port is usually effective on home networks where UPnP (Universal Plug and Play) is not available or problematic. You should also use an alternate multiplayer port on home setups where multile Xbox consoles are present. This option will be preffered even if port forwarding is not so it’s a great alternative to the method above.
You can enforce an alternate port by accessing the Settings menu on your console, then going to Advance Network Settings and selecting an alternate port from the list.
Here’s a quick guide on how to do this:
- From the home screen of your console, access the Settings menu using your Xbox controller.
- Inside the Settings menu, select the General tab from the side menu on the left, then access the Network settings menu.
Access the Network settings menu on Xbox - From the next menu, go to Advanced Settings.
- Inside the Advanced Settings menu, select Alternate port selection.
Access the Alternate port selection menu - From the port selection menu, select Manual.
- Next, use the Select port drop-down menu to select a used port.
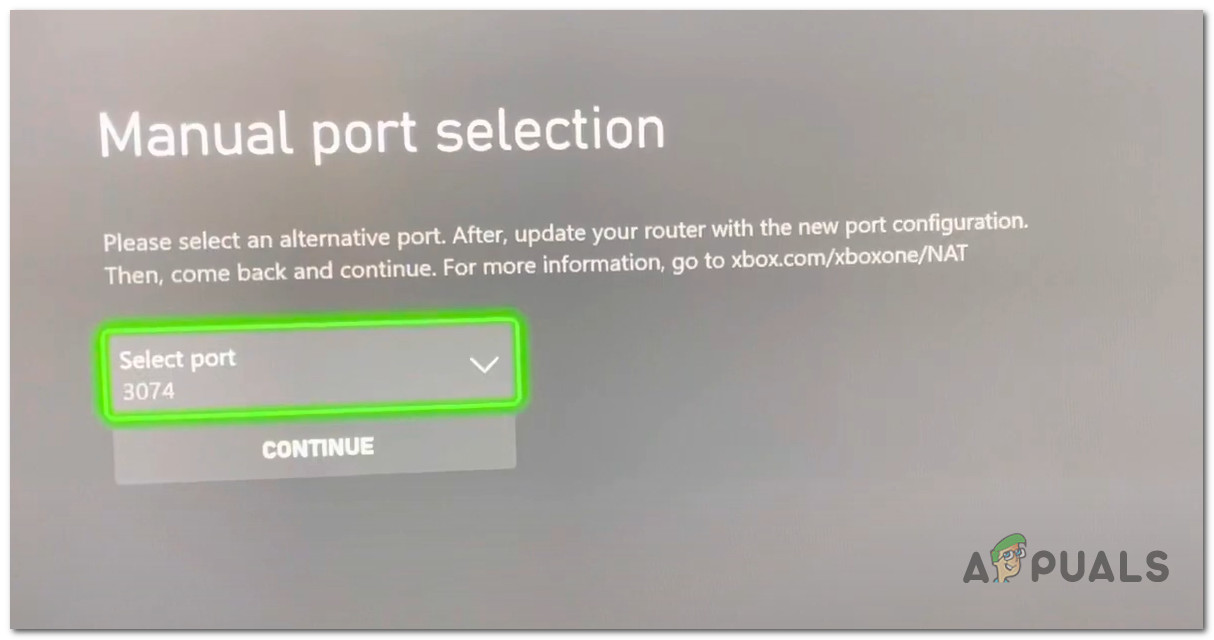
Select the alternate port manually Note: Make sure you don’t select the very first option from the list since that is most likely the port perfered by the automatic method.
- Once the alternate port is established, reboot your console and see if the Wi-Fi connection issue is fixed at the next startup.
If the same problem is still occuring, move down to the next method below.
Fix 9. Disable Protected Management Frames in Router (PMF)
Turn off PMF (Protected Management Frames) if your router supports them and has them activated.
Not just the Xbox line of devices are affected by this, but many other gadgets also experience lag spikes, subpar wifi performance, and sporadic disconnections.
Many modern Wi-Fi 6 routers either force this on by default or by design, don’t offer an option to turn it off, and don’t display it in a web GUI.
Note: The security feature known as Protected Management Frames (PMF) guards against the interception and modification of unicast and multicast management frames for malicious reasons.
If PMF can be disabled frpom your router settings, go ahead and turn it off and see if the stability of your Wi-Fi connection on Xbox improves:
Important: The instruction below will be differnet depending on your router manufacturer. If you can’t find the options featured below, look for specific steps on disabling the PMF feature online.
- Start by accessing your router’s settings. To do this, launch the default browser on your computer, type one of the following addresses, and then press Enter:
192.168.0.1
192.168.1.1
Note: These are the two default addresses for your router settings. If you previously established a custom gateway for your router, use that address instead.
- When the login screen for your router appears, enter your login information to access the router’s settings.
Login to Router Note: You should be able to access the website by entering admin or 1234 as the username or password if you haven’t changed the default login information. If it still doesn’t work, look for step-by-step instructions on how to access your router’s settings online.
- From the settings menu, access the Advanced tab and see if you can locate the Wireless settings.
- Next, look for a toggle that allows you to disable the PMF feature.
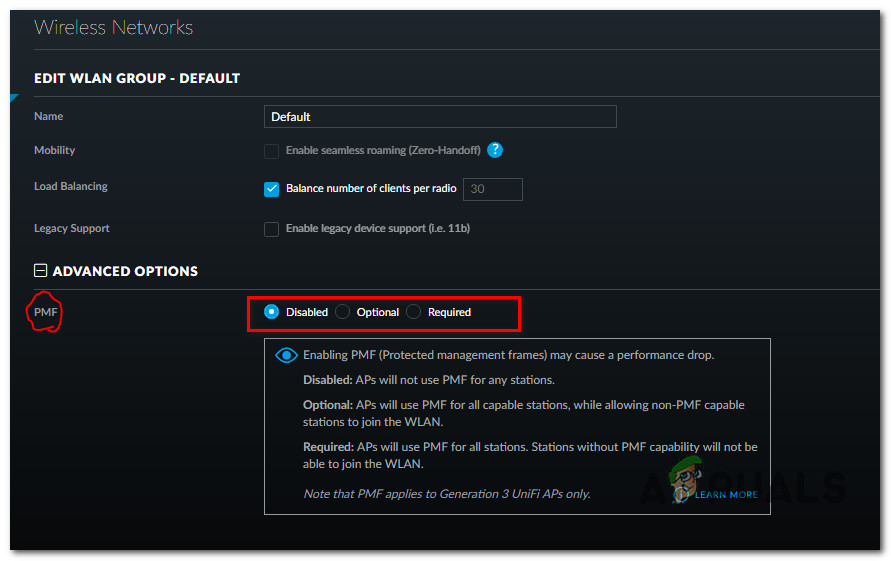
Disable the PMF feature - Apply the changes, then reboot your PC and see if the problem is now fixed.
If the same problem is sgtill occuring, move down to the next method below.
Fix 10. Reset the Xbox console
Resetting your console to its factory settings is your last option if you’ve come this far without finding a workable solution. A hard reset is another name for this process.
Before using this method, try all the other possible fixes listed above because doing so could result in the loss of all the data you’ve saved on your Xbox.
Important: If you go through with this method, you must redownload any game that is currently installed on your console after completing this process. With this operation, save game files will also be deleted, so before continuing, upload them to the cloud (or put them on an external USB stick).
Here’s what you need to do to reset the Xbox console:
- When the first black screen appears on your Xbox, hit the Xbox button + the eject button simultaneously.
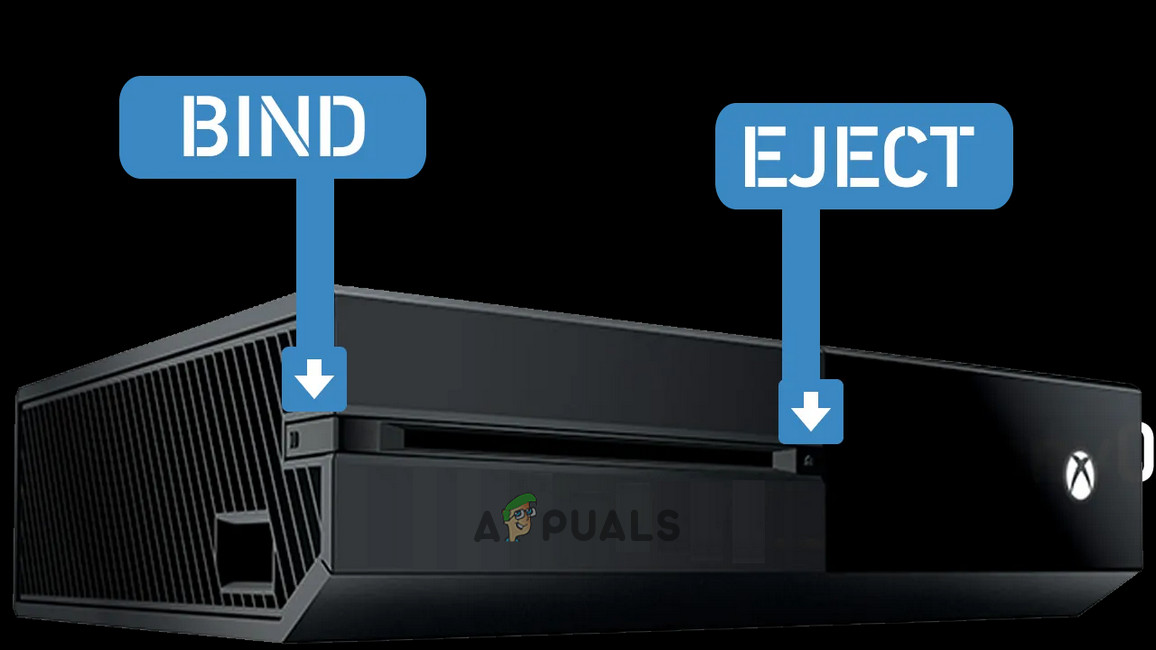
Press the Bind + Eject button - The Troubleshoot screen will appear after completing this step.
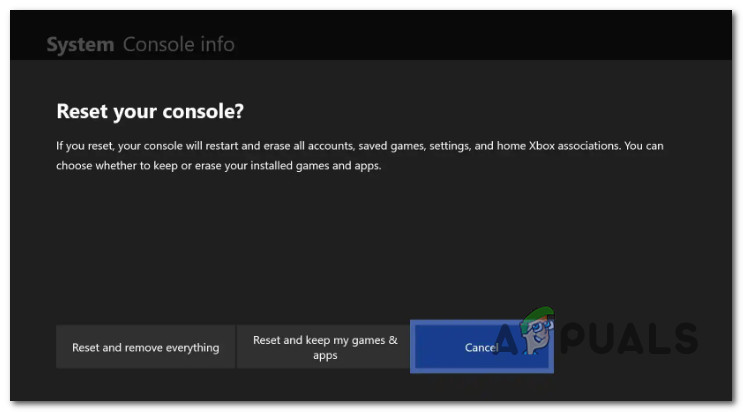
- Once you do, click “Reset this Xbox” and then press your controller’s confirm button.
- Select the System heading from the drop-down menu, then choose Remove Everything and confirm the action.
Reset xbox console - After the procedure is finished, download the troublesome game again and check to see if the problem has been resolved.