Fix: VMware Bridged Network not Working
Some VMware Workstation Player and VMware Workstation Pro users are reporting that they’re having a bridged network problem with all their guest machines. What happens is, none of their guest VM’s can contact the host machine and the host machine cannot contact the guest machines. This problem is reported to occur on Windows 7, Windows 8 and Windows 10.
What is causing problems with the VMware Bridged Network?
We investigated this particular issue by looking at various user reports and the repair strategies that are commonly used to fix this problem. Based on what we gathered, there are several common scenarios that are known to lead to this issue:
- Vmnetbridge.sys is glitched – As it turns out, this particular issue can occur in those instances where the service responsible for the bridged mode is incorrectly started or remains in a ‘limbo’ state. In this particular case, you can resolve the issue by running a couple of commands in an elevated Command Prompt.
- WMware picks the wrong virtual network – If you leave VMware to choose which virtual network to use for the bridging mode, chances are it will end up using one without an active connection to the internet- which ends up producing this problem. One way to fix this issue is to set up a specific virtual network that you know is working.
- Wmware is bridging to the wrong adapter – If you leave the Bridging settings to Automatic, this issue will occur if VMnet0 ends up Bridging to a network adapter that is not currently maintaining your internet connection. You can rectify this issue by choosing the bridging adapter manually.
- Too many unnecessary adapters – Vmware is not very good in selecting the ideal host network adapter that should be used for the bridging mode. Fortunately, you can ensure that the software doesn’t pick the wrong one by removing all unnecessary adapters from the Automatic Bridging list.
- VPN client is interfering with VMware – There are several VPN clients (particularly Endpoint Remote Access VPN) that are known to interfere with the bridging feature on VMware. If this scenario is applicable, you can resolve the issue by uninstalling the VPN client from the host machine.
- VirtualBox adapters are interfering with VMware – As several users have reported, this particular issue can also occur if you previously used VirtualBox (before making the switch to VMware) If the network adapters used by VirtualBox are still being used, you’ll need to disable them in order to resolve the issue in VMware.
- Windows update broke the bridging feature – If you update to Windows 10 build 1703 or above while VMware is installed, the update used will end up deleting a couple of registry keys that are essential to the bridging feature. In this case, you can resolve the issue by reverting the settings of the Virtual Network Editor to the default.
- 3rd party firewall is blocking the bridging feature – There are several AV suites that include a firewall (most commonly AVG and BitDefender) that are known to cause this particular issue. If this scenario is applicable, you can either use the built-in solution to allow virtual machines through the firewall or disable the firewall altogether.
Method 1: Rebooting Vmnetbridge.sys via admin CMD
VMnetbridge.sys (VMware Bridge Control) can also cause this particular problem in instances where the file is incorrectly started or becomes glitched before it can facilitate communication between the host machine and the guest computer.
If this scenario is applicable, chances are you will be able to resolve the issue by essentially restarting the bmnetbridge service via an elevated Command Prompt. Several affected users have reported that this procedure allowed them to fix the problem, as the host and guest machines started communicated the next time a VMware window was launched.
Here’s a quick guide on rebooting vmnetbriddge.sys via an admin CMD:
- Make sure VMware Workstation is closed along with any opened guest machine.
- Press Windows key + R to open up a Run dialog box. Then, type “cmd” and press Ctrl + Shift + Enter to open up an elevated Command Prompt. When you see the UAC (User Account Control) confirmation prompt, click Yes to grant administrative privileges.

Running CMD using the Run Dialog Box - Inside the elevated Command Prompt, type the following commands in order and press Enter after each one to restart the VMnetbridge service:
net stop vmnetbridge
net start vmnetbridge
- Once the VMNetService has been restarted, close the elevated command prompt, re-open VMware workstation and mount the virtual machine that you we’re previously encountering issues wit.
If the issue is still not resolved and you’re still encountering the same Bridged Network problem, move down to the next method below.
Method 2: Using a specific virtual network (VMnet0)
Several affected users have reported that for them, the issue was resolved entirely after they configured their WMware workstation to use a specific virtual network (VMnet0). As it turns out, if you leave the Network connection to Bridged, there’s a chance that the program will use the wrong one.
In the vast majority of cases, VMnet0 is the correct virtual network that needs to be used in this case. Here’s a short guide on how to program VMware to use a custom virtual network (VMnet0):
- Open VMWare Workstation, right-click on the virtual machine that you’re having issues with (from the left-hand menu) and choose Settings.
- Inside the Virtual Machine settings, select the Hardware tab. Then, select Network Adapter from the device list.
- With the network Adapter selected, go over to the right-hand and click on the toggle associated with Custom: Specific virtual network.
- Then, use the drop-down menu below to select VMnet0 from the list of specific virtual networks.
- Click Ok to save the configuration, then launch the virtual machine again and see if you’re now able to connect to the internet with your virtual machine.
If the issue is still not resolved and you’re still having issues with the network bridge in VMware Workstation, move down to the next method below.
Method 3: Deselecting all adapters besides the physical network card
If you’re using Workstation Pro, and you’re experiencing no network connectivity inside your virtual machines while using a bridged connection, you will be able to resolve the issue by using the VMWare Virtual Network Editor to deselect all network adapters that are not essential to the network connection.
Several affected users have reported that the host machine and the guest machine started sharing the internet connection moments after this modification was conducted.
Important: This method will only be applicable if you’re using VMware Workstation Pro. The steps below can’t be replicated on VMware Workstation Player!
Here’s a quick guide on how to do this:
- Open VMware Workstation PRO and use the ribbon bar at the top to go to Edit > Virtual Network Editor.
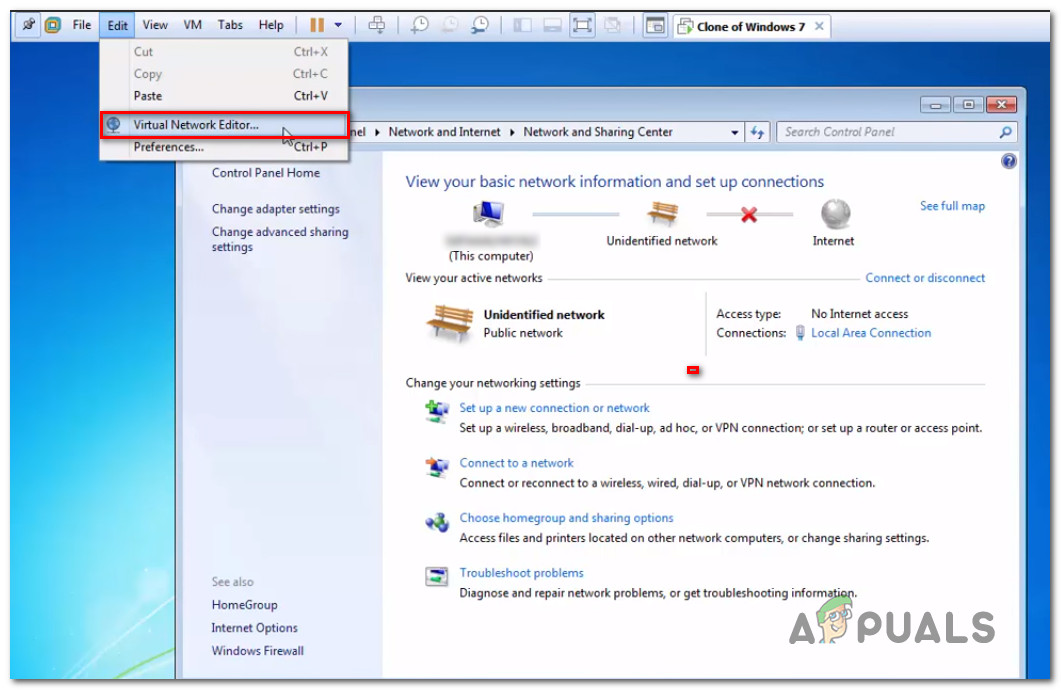
Accessing the Virtual Network Editor from within the application Note: You can also close VMware Workstation completely and use the windows search function (press the Windows key) to search for VMWare Virtual Network Editor.
- Inside the Virtual Network Editor, click the Change Settings button at the bottom of the screen.
- Since the issue is most likely occurring because the bridge adapter is confused, let’s make things clearer, by selecting Vmnet0 from the list of virtual networks and changing the Bridge to option from Automatic to the network adapter that you’re currently using (in this case, the wireless network adapter).
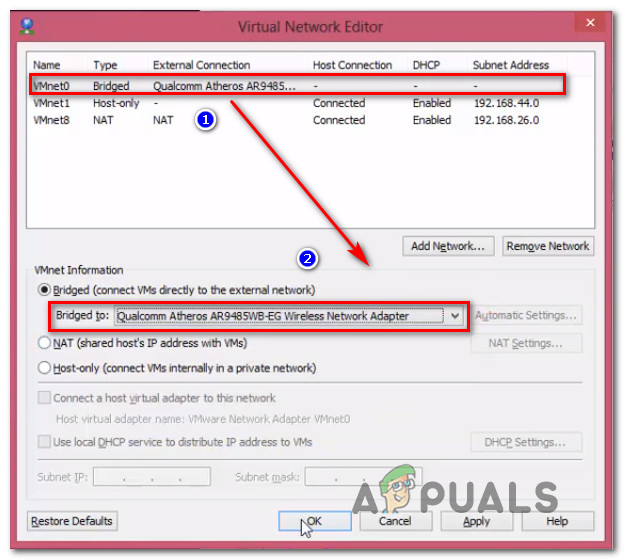
Changing the bridged adapter from Automatic to the one that is currently active - Restart your VMWare Workstation virtual machine and see if the issue has been resolved.
If you’re still encountering the same problem or this method wasn’t applicable to your particular scenario, move down to the next method below.
Method 4: Removing all unnecessary host network adapters
If you’re using VMware Workstation Player (the free version) and the method above wasn’t applicable, this is how you can do it from the free version. In the vast majority of case, the error occurs because the software has a lot of host network adapters to choose from when having to pick one for the bridged network connection.
Often times, the software ends up choosing a network adapter that can’t facilitate a connection to the Internet, which ends up creating the issue that is discussed in this article. If this scenario is applicable, you can resolve the problem quite easily by making sure that the host adapters that are not necessary for this procedure are removed from the Automatic Bridging Settings menu.
Here’s a quick guide on how to do this:
- First things first, we need to start by discovering which network adapter is being used for our current connection to the Internet. This first step is essential as it will help us discover which host network adapters need to be discarded later on.
- Press Windows key + R to open up a Run dialog box. Then, type “ncpa.cpl” and press Enter to open up the Network Connections menu.
- Inside the Network Connections menu, see which network is currently being used. You can spot this by looking at which entry has the green signal icon. Once you spot the active network connection, see which network adapter is being used for it. You can see this directly under the name of the network – in our case, is Qualcomm Atheros AR9285.
- Now that you know the host network adapter that should be used, open VMware Workstation, right-click on the virtual machine that you’re having issues with and choose Settings.
- Inside the Virtual Machine Settings screen, select the Hardware tab, then choose Network Adapter from the list below.
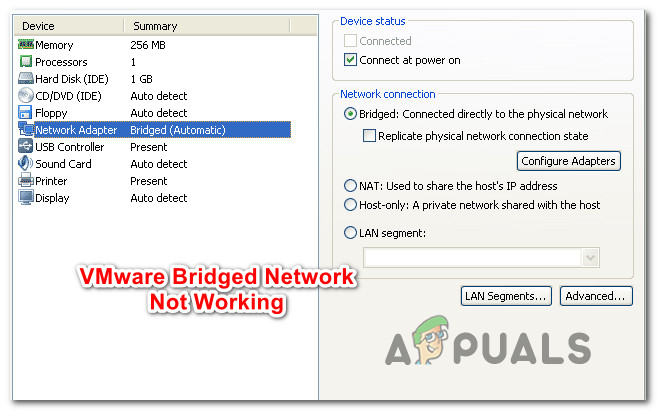
- With the Network Adapter device selected, move over to the right part of the screen and check the toggle associated with Bridged (under Network connection). Then, click on the Configure Adapters button.
- In the Automatic Bridging Settings menu, uncheck everything except for the host network adapter that you’ve uncovered at step 3.
- Click Ok to save the configuration, then launch the virtual machine and see if you have a working bridged network connection.
If you’re still encountering the same problem, move down to the next method below.
Method 5: Removing VPN client from the host machine
As it turns out, this particular issue can also occur if you’re actively using a VPN connection to protect your anonymity on the web. Several affected users have reported that the bridged connection started working as expected as soon as they uninstalled their VPN client.
Note: If you’re keen on using a VPN client, you can try different providers until you discover an option that doesn’t conflict with VMware Workstation. In most cases, the VPN client that is reported to conflict with VMware workstation is Endpoint Remote Access VPN, but there could be others.
Here’s a quick guide on uninstalling your VPN client in order to resolve the bridged network issue:
- Press Windows key + R to open up a Run dialog box. Then, type “appwiz.cpl” and press Enter to open up the Programs an Features screen.

Type appwiz.cpl and Press Enter to Open Installed Programs List - Inside the Programs and Features screen, scroll down through the list of applications and locate the VPN client that you’re currently using.
- Right-click on your VPN client and choose Uninstall. Then, follow the on-screen prompts to complete the uninstallation.
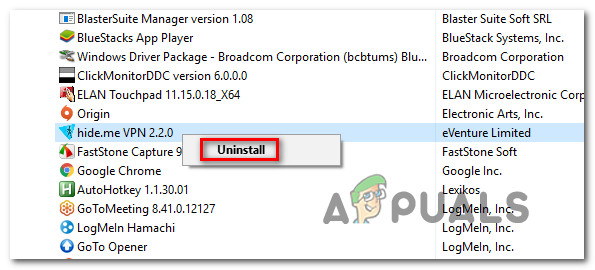
Uninstalling the VPN client - Once the VPN client is uninstalled, restart your computer and see if the bridged connection issue is resolved by launching the same virtual machine that was previously giving you trouble.
Method 6: Disabling all VirtualBox network entries from Networking Connections
If you’ve been previously using Virtual box, keep in mind that you might be encountering issues if you make the switch to VMware (bridged mode). As it turns out, the adapter/s that are left behind by virtual box might cause problems with bridged connection inside VMware.
If this scenario is applicable to your current situation and you want to use VMware, there are three ways forward:
- Uninstall VirtualBox along with an adapter that was used by the software.
- Start using NAT with VMWare
- Disable every network entries belonging to VirtualBox from the Network Connections menu
Since this guide is about helping you use a bridged connection with VMware Workstation, we are going to focus on the third option since it’s the least intrusive. Here’s a quick guide on disabling all VirtualBox network entries to resolve the birding feature on VMware:
- Press Windows key + R to open up a Run dialog box. Then, type “ncpa.cpl” and press Enter to bring up the Network Connections tab.
- Inside the Network Connections tab, right-click > Disable on every network adapter belonging to VirtualBox. You might have one or you might have several different adapters, depending on how extensively you used VirtualBox‘s features.
Note: If you’re prompted by the UAC (User Account Control), click Yes to grant the necessary permissions to disable the virtual adapter. - Once every VirtualBox adapter has been disabled, open VMware, launch the virtual machine that was previously giving you problems and see if the bridging features is not working.

If you’re still encountering the same problem, move down to the next method below
Method 7: Restoring Virtual Network Editor settings to the defaults
As it turns out, there’s one particular Windows 10 build that breaks the bridged connection feature on VMware Workstation. As it turns out, if you update to Windows 10 built 1703 or above while WMware is installed, the network bridging feature will become unusable unless manual action is conducted.
This happens because this update deletes a couple of keys (VMnetDHCP and VMware NAT Service) which ends up effectively breaking the bridging feature inside VMWare Workstation. But as it turns out, you can rectify the damage very easily by forcing VMware to recreate the two registry keys by restoring the settings of the Virtual Network Editor to the default.
Note: The steps below are only applicable for Vmware Workstation PRO users and can’t be replicated on VMware Player.
Here’s a quick guide on how to do this:
- Open File Explorer and navigate to the following location:
C:\Program Files (x86)\VMware\VMware Workstation\vmnetcfg.exe
- Once you get there, right-click on vmnetcfg.exe and choose Run as Administrator.
- Once you manage to open the Virtual Network Editor with administrative privileges, click on Restore Default, and then click on Apply to save the changes.
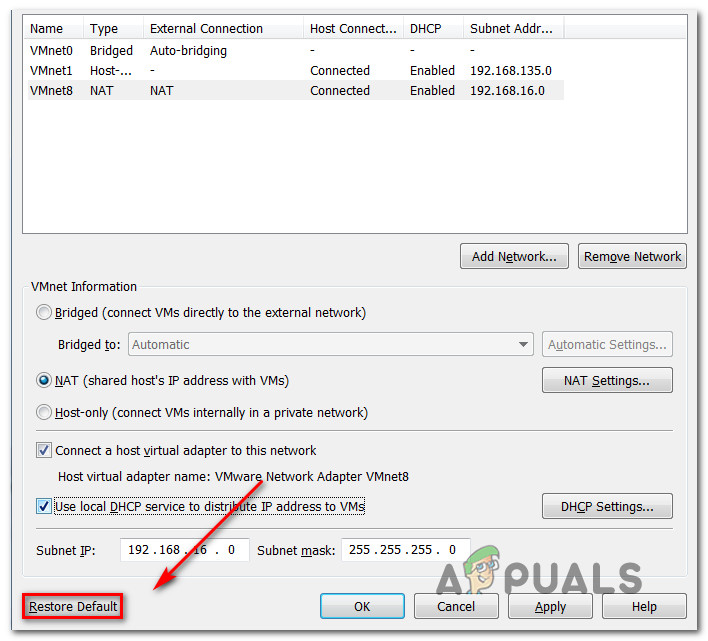
Restoring the Virtual Network Editor settings to the default - Restart VMware workstation and see if the bridge mode is working as intended.
If this method wasn’t applicable or you’re still encountering this particular issue, move down to the next method below.
Method 8: Allowing VMware virtual machines from AVG’s firewalls (if applicable)
As it turns out, this particular issue can also occur if you’re using a 3rd party security (which includes a firewall) that is overprotective with the network connections that it manages. Several affected users have reported that they managed to resolve the issue after discovering that AVG firewall ( or a similar security solution) is responsible for their bridged mode problem in VMware.
Update: It seems that this issue can also be caused by Bitdefender’s firewall. Since BitDefender doesn’t include an option that will allow virtual networks through their firewall, the only way, in this case, is to disable the firewall completely.
If this scenario is applicable to your current situation and you’re using AVG Internet Security, you can resolve the issue swiftly by modifying AVG’s advanced settings to allow all virtual machines and traffic. Here’s how to do this:
- Open Avast Internet security and go to Settings > Expert Mode > Advanced Settings.
- Inside the Advanced settings menu, ensure that the box associated with Allow any traffic from/to virtual machines supported by firewall is checked.
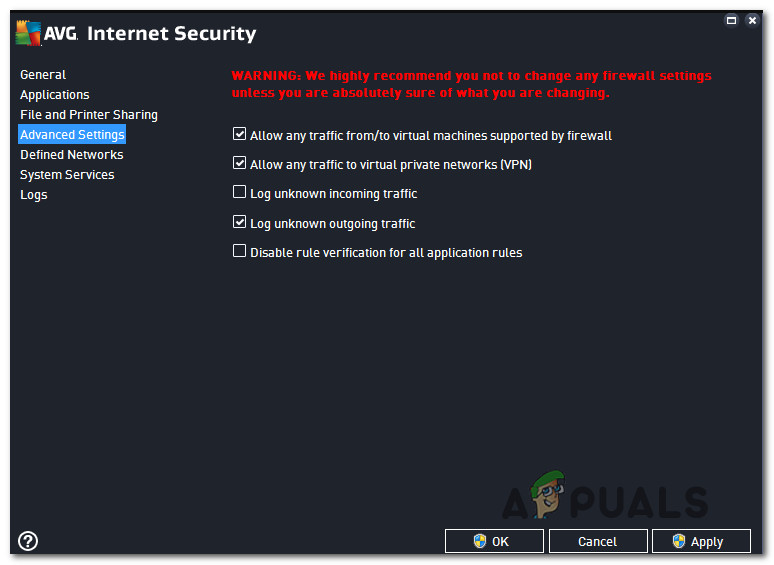
Allowing virtual networks in AVG - Click Apply to save the current configuration.
- Restart VMware and see if the issue has been resolved.
Note: if you’re using a different security suite and you think this method might be applicable, search online for specific steps on how to allow your virtual networks according to the firewall that you’re using.h


HiNone of these worked for me…..I needed to enable internet sharing on the network adaptor that was going to be used as the bridging interface.