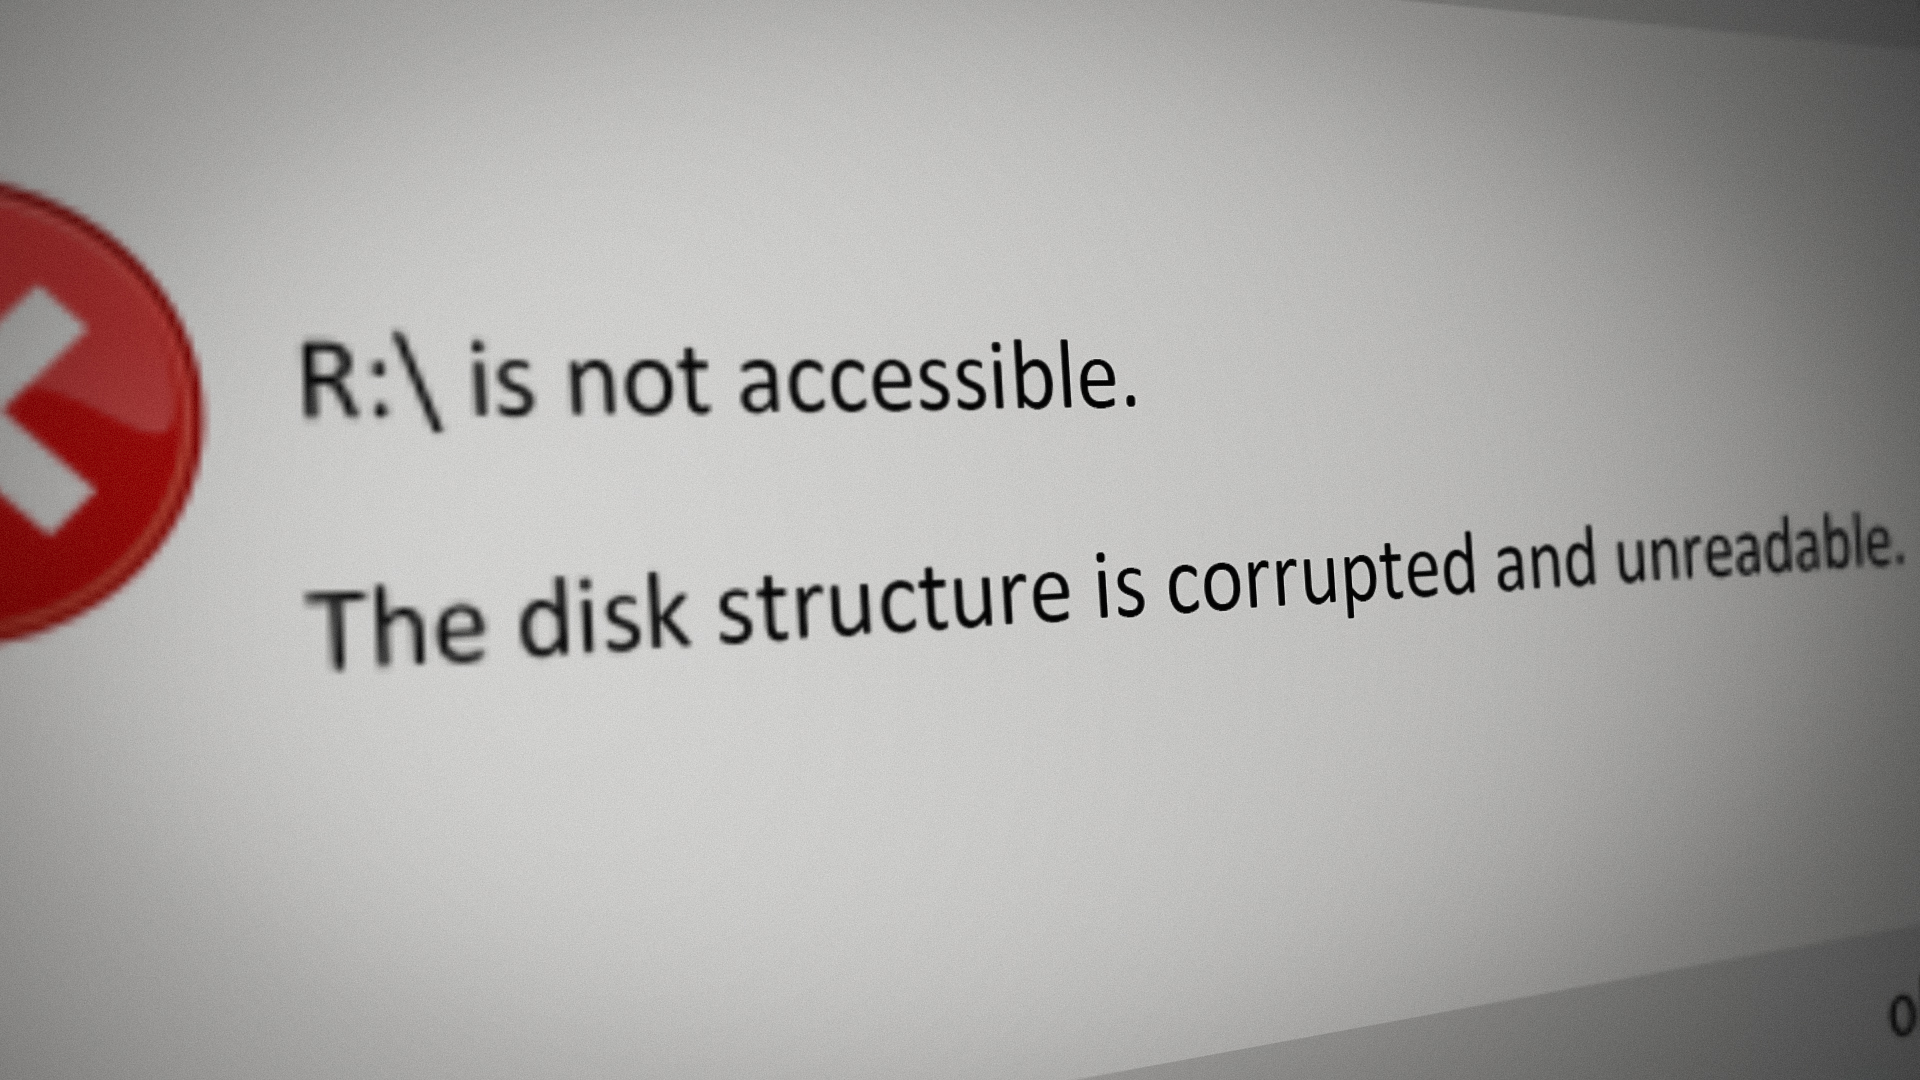
(Solved) Disk Structure is Corrupted and Unreadable
“The disk structure is corrupted and unreadable” error is mainly caused due to bad sectors (physical or logical) and messed up security permissions of the drive. The issue occurs when you try to access a disk or any part of it but encounter the error at hand. The problem is reported on external as well as internal disks. In some cases, an update to the BitLocker caused the error.
The disk structure might get corrupted and the disk may become unreadable due to the following main factors:
- Outdated System’s Windows: The outdated Windows on your system misses the patches to the bugs that may cause the disk structure error and thus cause the problem at hand.
- Faulty RAM: If your system is failing to properly offload the data from the system’s RAM to the disk as the RAM has become faulty, then that could cause the issue.
- Missing Security Permissions on the Drive: You may encounter the disk structure issue if your user account does not have the necessary security permissions to access the drive.
- Logical or Physical Errors on the Drive: If your drive has logical or physical bad sectors on it, then the drive’s inability to read or write to those sectors could be the root cause of the error.
1. Reconnect the Problematic Drive to the System
A temporary glitch in the read/write operation to a drive may result in a corrupted disk structure and unreadable error. Here, reconnecting the problematic drive to the system may clear the error. As the corrupt disk structure could be one of the first signals that the drive is failing, make sure to back up the data from the drive before trying any methods discussed below or any type of write operation to the drive till the backup completes.
If you do not have enough storage to back up the data, then you may either use an online backup service or safely remove the drive from the system till the storage space is arranged for the backup to avoid data loss.
- In the case of an external drive, safely remove the drive from the system tray and then unplug it from the system.
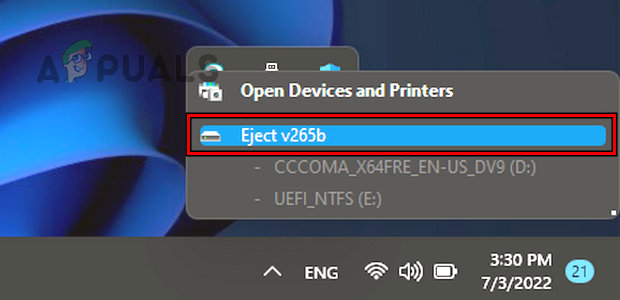
Safely Remove a Drive from the System - Now, plug back the drive (preferably, with a different cable on a different port) into the system and if it asks to perform a repair on the drive, click Repair or Scan and Fix.

Scan and Fix a Drive on Windows - Then wait till the process completes and once done, check if the disk corrupt issue is cleared.
- If that fails and the external drive has a case, check if using another case or using the disk without a case (if possible) clears the error.
If the issue is occurring with an internal drive, you may try the above steps on the drive on a different system.
2. Update the PC’s Windows to the Latest Build
The disk structure corrupted issue could be a result of a bug that may have been cleared by Microsoft in the latest Windows update. Also, an outdated Windows installation causes a lot of compatibility issues with other OS modules (like a storage device or BitLocker encryption modules) and thus causes the issue. Here, updating the PC’s Windows to the latest build may clear the disk structure corrupted error, especially, if BitLocker is the root cause of the issue.
- Click Windows and type Check for Updates.
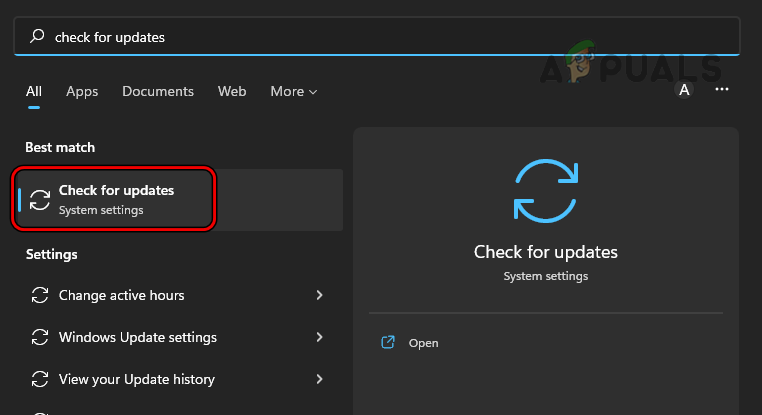
Open Check for Updates on Windows - Now open the System Settings of Check for Update and in the resulting window, click on Check for Updates.
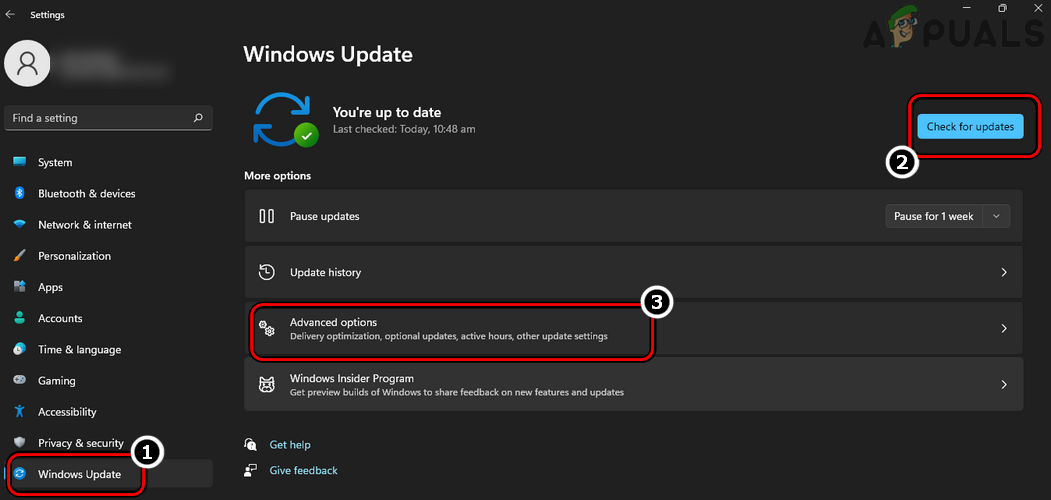
Check for Windows Updates and Open Advanced Options - If updates are available, download and install all the updates.
- Once done, restart the system and head to the Windows Updates in Settings.
- Now open Advanced Options and click on Optional Updates.
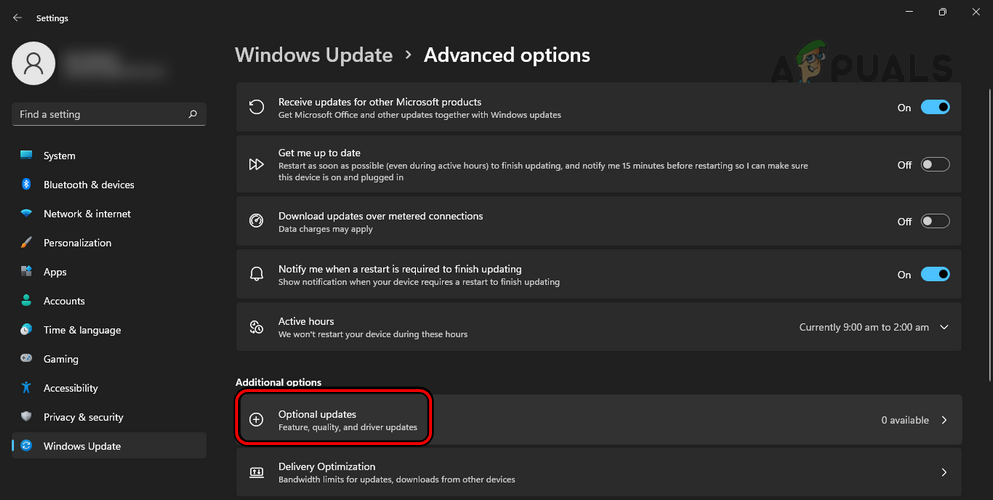
Open Optional Updates in the Windows Update - Then install all the optional updates as well. If you are using a server, then make sure to install all the released hotfixes for the server’s OS.
- Afterward, restart your PC and upon restart, check if the disk structure issue is cleared.
3. Use the Windows Memory Diagnostics
If your system’s RAM is failing, then the system may fail to properly offload data from the system’s memory to the hard disk and thus cause the issue. Here, performing Windows Memory Diagnostics may solve the problem.
- Click Windows and search for Windows Memory Diagnostics.
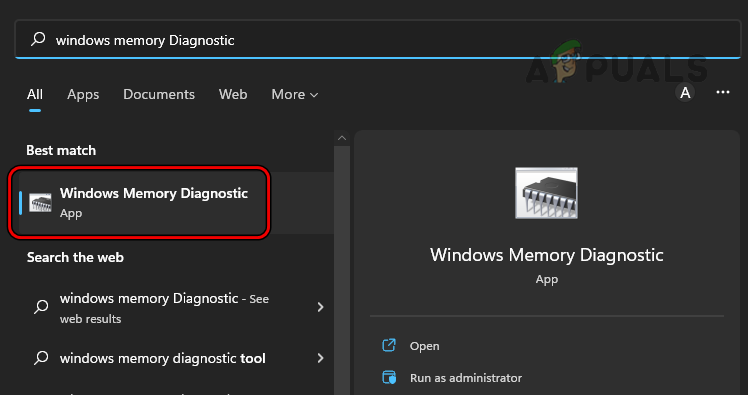
Open Windows Memory Diagnostics - Now select it and in the dialogue box shown, select Restart Now and Check for Problems (make sure to exit all the running applications).
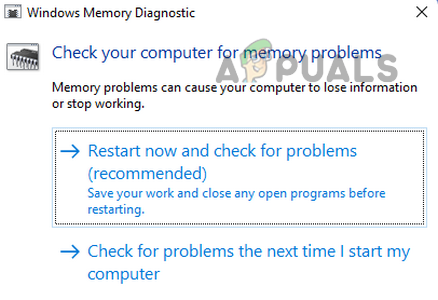
Select Restart Now and Check for Problems on Windows Memory Diagnostics - Then wait till the process completes and once done, check if there is a RAM issue.
- If so, then check if replacing or removing the RAM clears the disk structure corrupted error.
4. Boot the PC in the Safe Mode
If any of the system drivers or applications on your system are hindering the read/write operation to the system’s disk, then that could result in the disk structure being corrupted and unreadable error. Here, booting your PC into safe mode may clear the error.
- Power on the system (if powered off) and once powered on, press Windows.
- Now hold the Shift key and click on the power icon.
- Then, while holding the Shift key, press Restart.

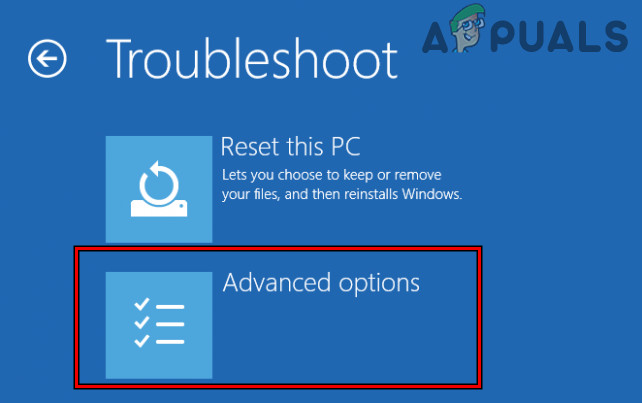
Hold the Shift Key and Click Restart to Restart the System in the Safe Mode - Upon restart, select Troubleshoot and open Advanced Options.
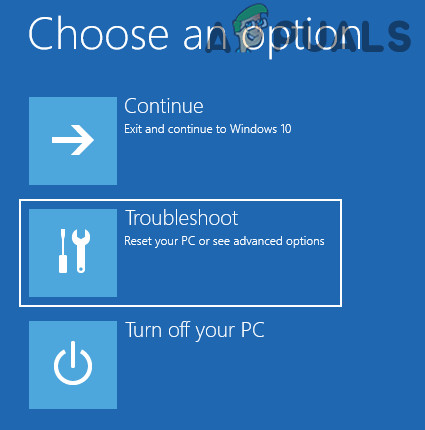
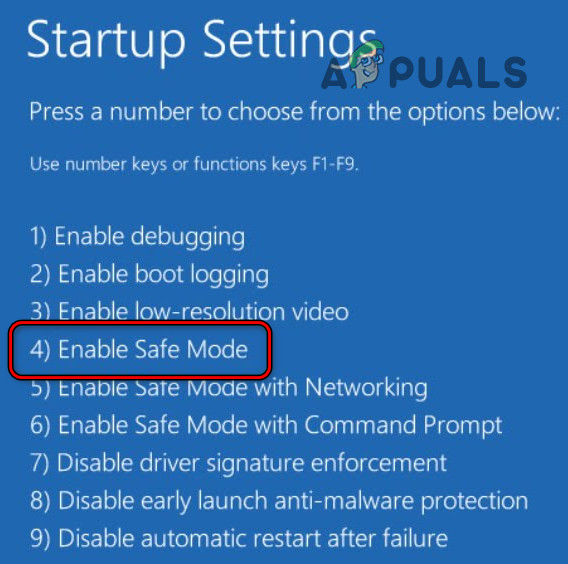
Open Troubleshoot in Advanced Startup Menu - Now select Startup Settings and click Restart.
Open Advanced Options in the Startup Menu - Upon restart, press the F4 (or 4) key to boot the system in the safe mode, and once in the safe mode, check if it is working fine.
Boot Your System into Safe Mode If the issue was resolved in the Safe Mode, then may perform a clean boot of your PC to find out the process/service causing the issue, and once found, check if removing it clears the disk structure error.
5. Edit the Drive’s Security Permissions
If authenticated user accounts (required by many applications and system to access a drive) on your system does not have permissions to access the drive, then that could also cause the issue at hand. In this case, editing the security permission of the drive to give your user account and the system user Full Control over the drive may clear the error.
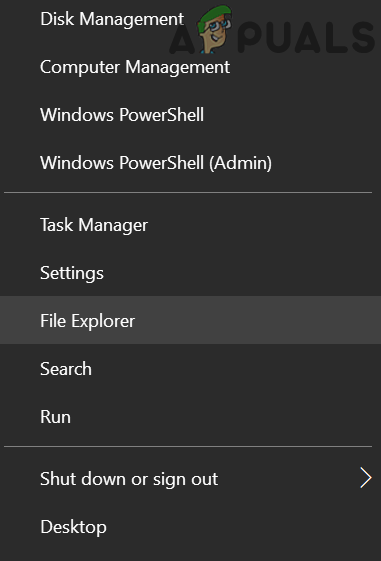
- Right-click on Windows and select File Explorer.
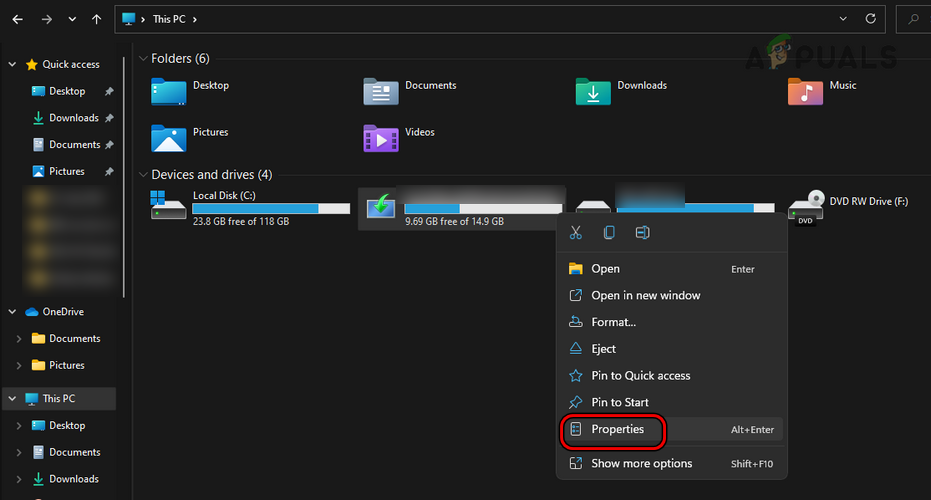
Open the File Explorer - Now, in the left pane, select This PC and right-click on your drive.
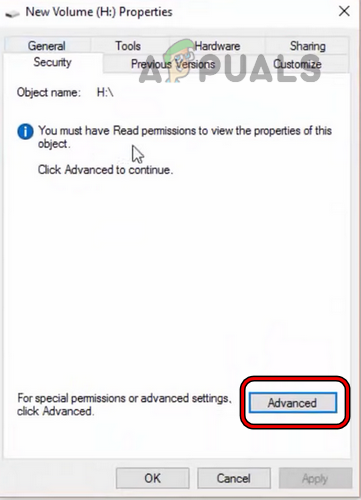
- Then select Properties and switch to the Security tab.
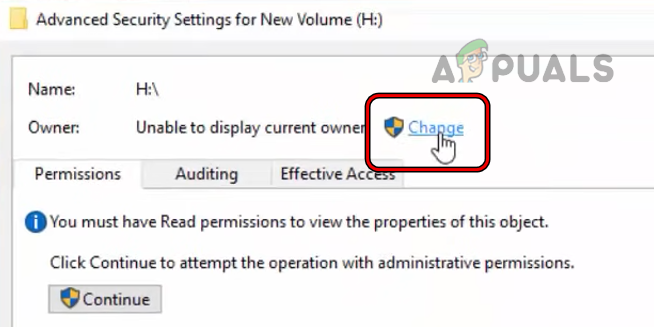
Open Properties of the Problematic Drive0 - Now select Advanced and click on Change (in front of the owner).
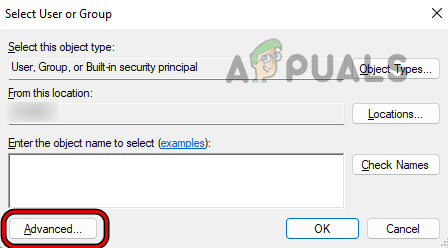
Open Advanced Settings in the Security Tab of the Disk Properties - Then select Advanced and click on Find Now.
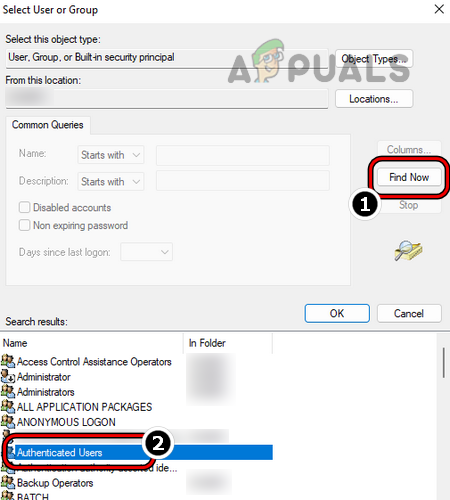
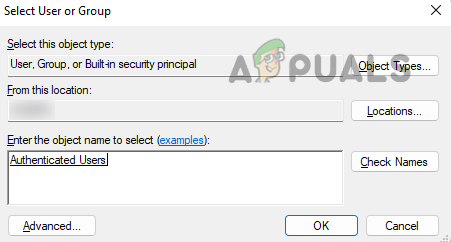
Click Change for the Owner on the Advanced Security Settings of the Drive - Now, in the results shown, double-click on Authenticated Users and click OK.
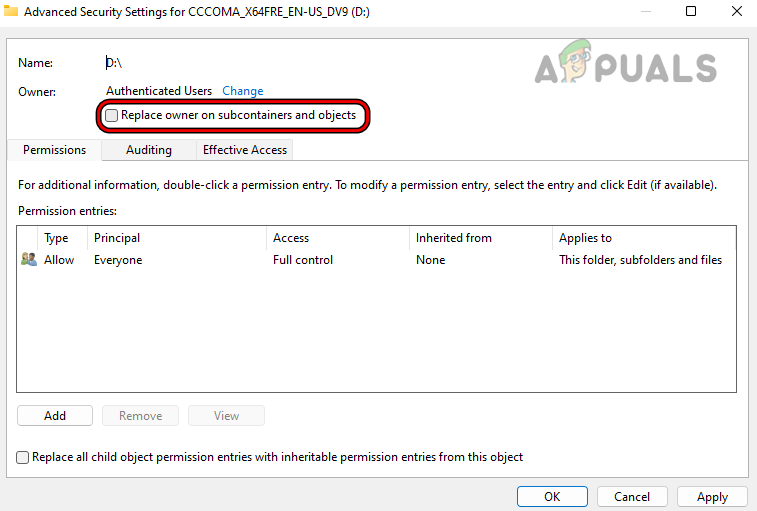
Open Advanced in Select User or Group - Then checkmark the checkbox of Replace Owner on Subcontainers and Objects.
Click Find Now and Double-click Authenticated Users - Now click Apply and then OK.
Click OK to Select Authenticated Users as the New Owner of the Drive - Again, click on OK and right-click in This PC window.
Select Replace Owner on Subcontainder and Objects - Now select Refresh and again, head to the Security tab in the properties of the problematic drive.
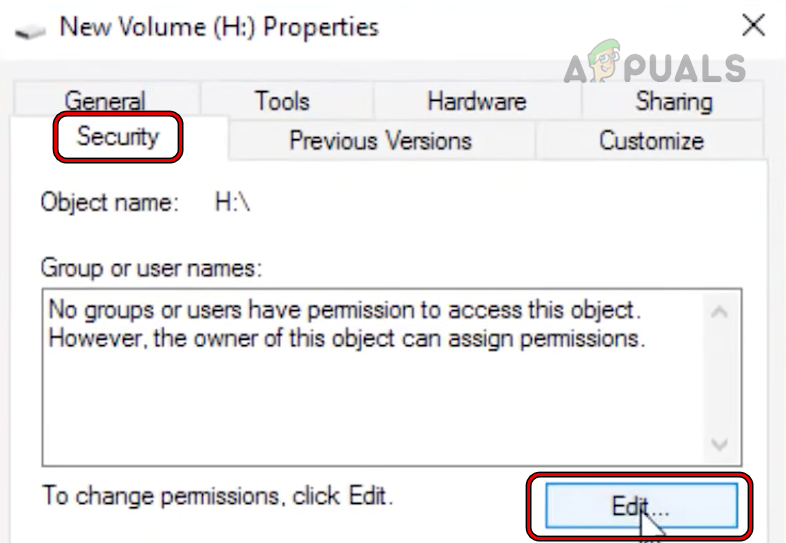
Click Edit in the Group or User Name Section of the Security Tab of the Driver’s Properties - Then, in the Group or User Names, click on Edit and click on Add.
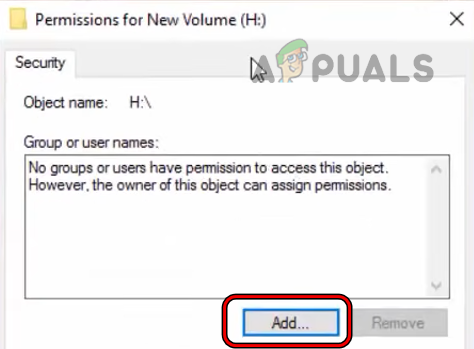
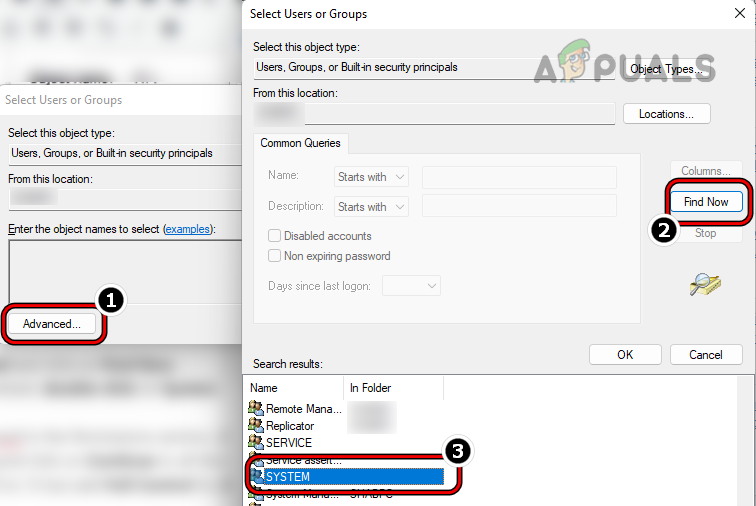
Click Add in the Group or User Names Section in the Drive’s Security Properties - Now select Advanced and click on Find Now.
- Then, in the results shown, double-click on System.
Double-Click System in Select Users or Groups - Now, select System, and in the Permissions section, checkmark Full Control.
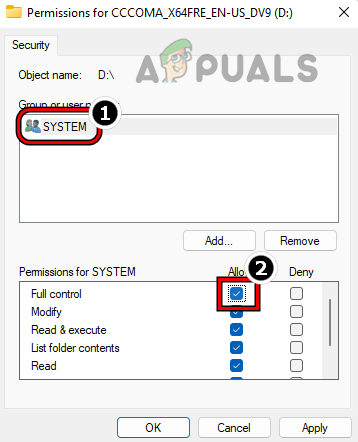
Allow the System Full Control Over the Disk - Then click on Apply and click on Continue to all the error messages shown.
- Now repeat steps 10 to 15 but add Full Control for Administrators.
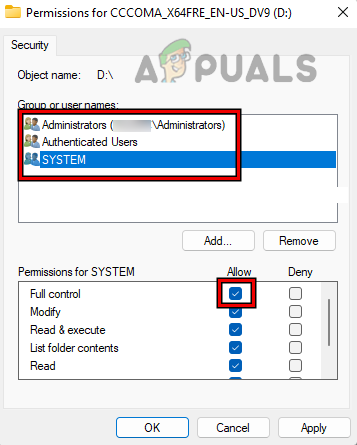
Allow Administrators, Authenticated Users, and System Account Full Control Over the Disk - Then repeat steps 10 to 15 but add Full Control for Authenticated Users.
- Now click on Apply and click on Continue/OK for any warning received.
- Once permissions are replaced, restart your system and upon restart, check if the drive’s disk structure corrupted issue is cleared.
6. Enable ‘Automount’ on a Server
If automount feature on a server is disabled, then that could lead to the disk structure corrupted error as it can create a validation fail error on the disk. Here, enabling the Automount feature on the server may clear the error.
- Open the Administrator Command Prompt and execute the following:
Diskpart
- Now execute the following:
Automount
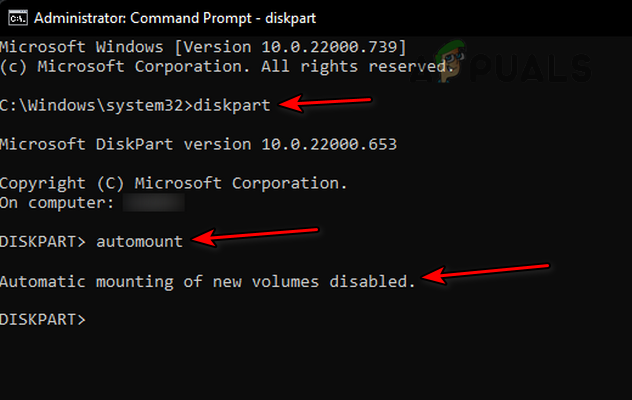
Open Diskpart in the Command Prompt and Check Automount Status of the New Drives - Then check if Automount is disabled. If so, then execute the following to mount the problematic volume:
Mountvol.exe /E
- Afterward, check if the disk structure corrupted error is cleared.
7. Run the Check Disk Scan
If the file system of the disk has logical errors, then that could also cause the issue when the disk is being read. Here, running the check disk scan of the drive may clear the error but do note that this step can be devastating for a failing disk. You may try this step at your own risk and make sure to back up your data first.
- Click Windows and search for Command Prompt.
- Now, in the search results, right-click on Command Prompt, and in the sub-menu, choose Run as Administrator.
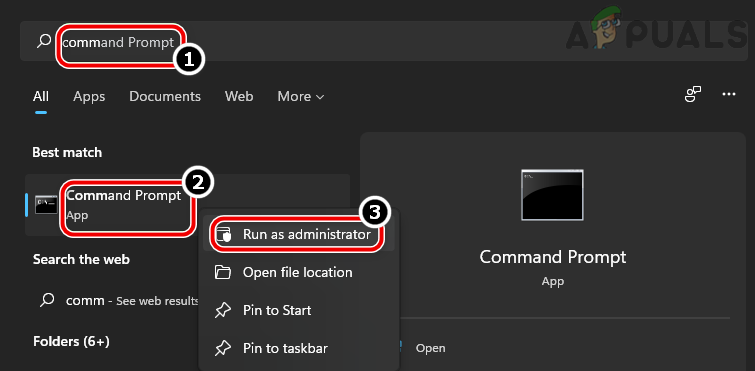
Open Command Prompt as Administrator - Then navigate to the problematic disk e.g., to navigate to the F drive, execute the following:
F:
- Now execute the following but keep in mind it may take some time to complete, so, make sure the system does not power off in the process:
chkdsk /f
- Once done, restart the system and check if the corrupted disk structure issue is resolved.
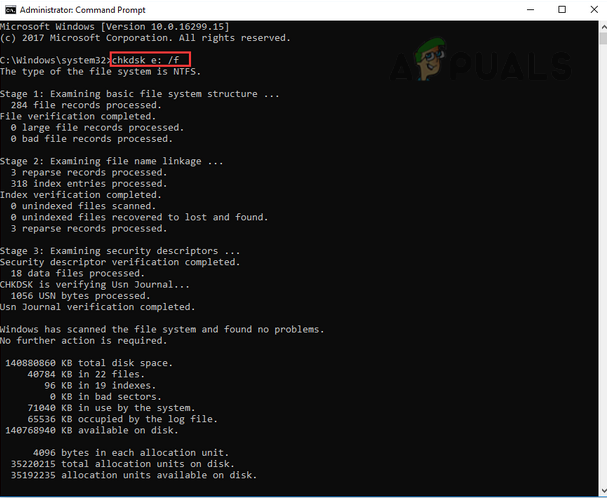
Run Check Disk Through the Command Prompt - If that fails, check if executing the following for the problematic disk clears the error on the next system reboot:
chkdsk /f /r
- If the issue persists, check if performing an SFC scan (logical bad sectors might have caused corruption of the essential system files) clears the unreadable disk error.
8. Re-Format the Drive
You may encounter the disk structure corrupted and unreadable issue if the file system on the drive is corrupt to a level that none of the above worked. In this scenario, reformatting the disk drive may solve the problem. Before moving on, make sure to back the data on the drive.
- Right-click Windows and open Disk Management.
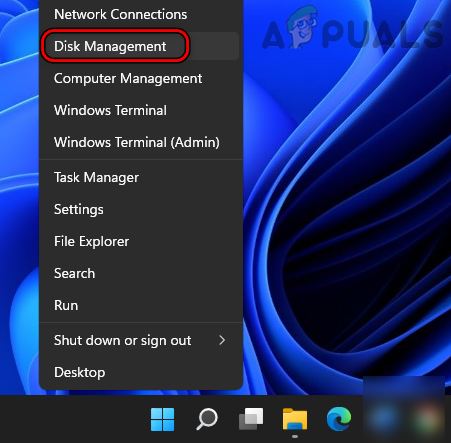
Open Disk Management in the Quick Access Menu of Windows 11 - Now right-click on the problematic drive and format it (it will be better to uncheck Quick Format).
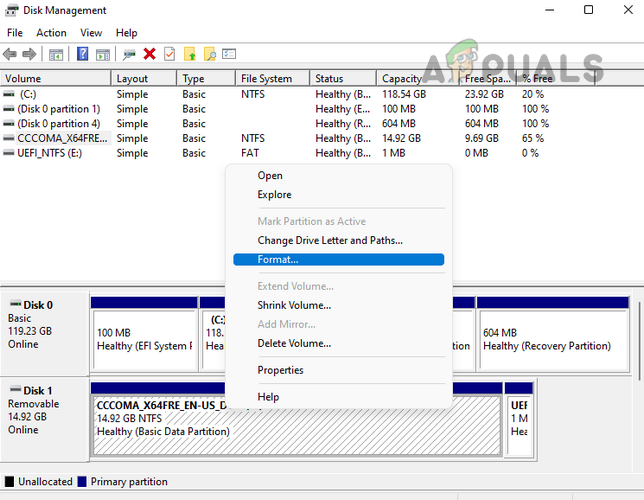
Format the Drive Through the Disk Management - Once done, check if it is clear of the disk structure.
9. Use the Disk Part to Clean the Disk’s Sectors
If formatting the drive did not work, then using the Windows’s Disk Part utility to clean the disk’s sectors may clear the disk structure error. Before proceeding, make sure to back up any data on the drive as it will be wiped clean.
- Click Windows and search for Command Prompt.
- Now, in the list of results, right-click on the Command Prompt and select Run as Administrator.
- Then, execute the following:
DiskPart
- Now execute the following to list down all the disks on the system:
list disk
- Then select the problematic disk by executing Select e.g., to select Disk 1, you may execute the following:
select disk 1
- Now execute the following to zero sectors on the in-focus disk:
clean
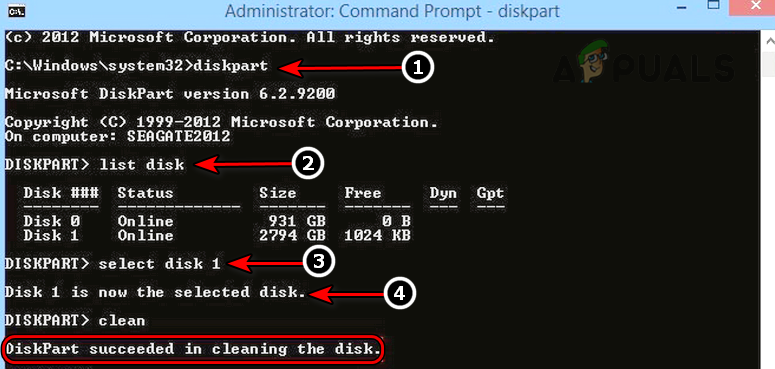
Clean the Disk By Using the Diskpart - In the case of an external device (like a USB), you may execute the following as well (but one by one):
convert mbr

create partition primary
- Then close the Command Prompt window and right-click on Windows.
- Now select Disk Management and right-click on the problematic disk that will be showing Not Initialized.
- Then select Initialize Disk and follow the prompts to complete the process.
- Once the disk is initialized, right-click on the disk.
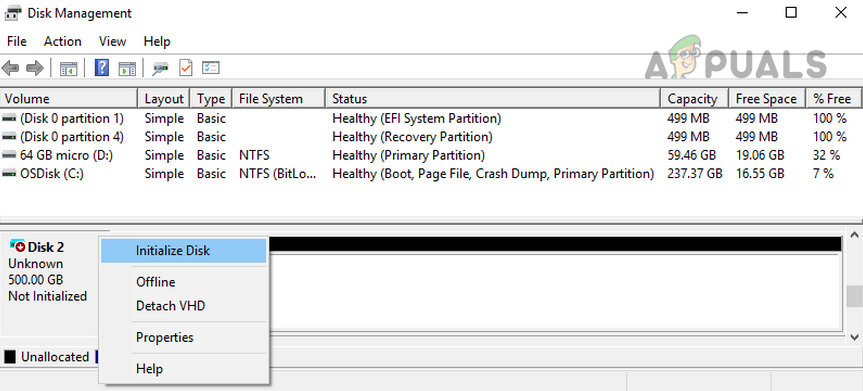
Initialize Disk in the Disk Management - Now select New Partition and follow the prompts to complete the format process.
- Once done, check if the disk’s structure is corrupted and the unreadable issue is resolved.
If that fails, you may connect the problematic drive to another system (preferably, using another OS) and check if the disk works fine there. You may need to format it on the other system. If the issue still happens, then make sure the drive is not failing. You may also check the SMART status of the drive.
If the problem persists, then it is time to contact a professional to recover the disk. If you are confident, then you may try a 3rd party utility to resolve the error. The following is the list of some of the apps in this niche but you may try these apps at your own risk as we are not linked to any of these in any way:
- EaseUS
- Spinrite
- Testdisk
- Photorec
- GetDataBack
- Rstudio
- TestDisk
- Puran Utilities


