Call of Duty: Vanguard Won’t Launch? Try These Fixes
Vanguard.exe often tries to start but closes right away or just shows a black screen. You might still hear music or background programs running. This error usually comes with a Windows error code (like c0000409 or BLZBNTBNA00000015). This means the game crashed while starting.
The main cause is often a broken game or system file—especially problems with Vanguard.exe or ntdll.dll. Other causes include full‑screen optimizations, running the game as an administrator, or using overlay programs.
1. Check for ongoing server issues
Before trying other fixes, we recommend you check if the problem is simply due to a server outage affecting Call of Duty: Vanguard. If you can’t get past the initial screen or your game crashes right after launching, it may be a widespread online issue. This is especially likely if you had no problems before.
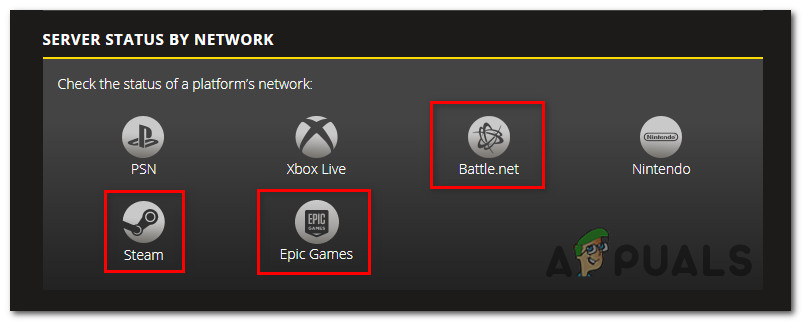
Activision offers a dedicated status page where you can check for server disruptions.

Once on the status page, use the drop-down menu at the top right and select Call of Duty: Vanguard. Look for any warnings or alerts from Activision about current problems. If everything is marked green, server issues are unlikely.
Note: Sometimes, your gaming platform itself (Steam, Epic Games, Playstation, Xbox, or Battle.Net) might have ongoing issues. You can check this directly on Activision’s site under Server Status by Network.
Tip: Cross-check with community outage sites, such as DownDetector or IsItDownRightNow , to see if other players are having the same problem right now.
Important: If server issues are confirmed, you’ll just need to be patient—the fix is up to Activision.
2. Reboot PC or Console
Once you’re sure it’s not a server problem, try rebooting your device. This basic step can resolve many temporary bugs.
- On PC: Click the Start button, choose the power icon, and select Restart.

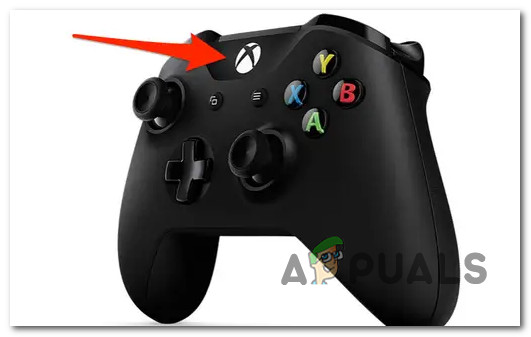
restart windows - On Xbox: Hold the Xbox button on your controller, open the Power menu, choose Restart console, then confirm.
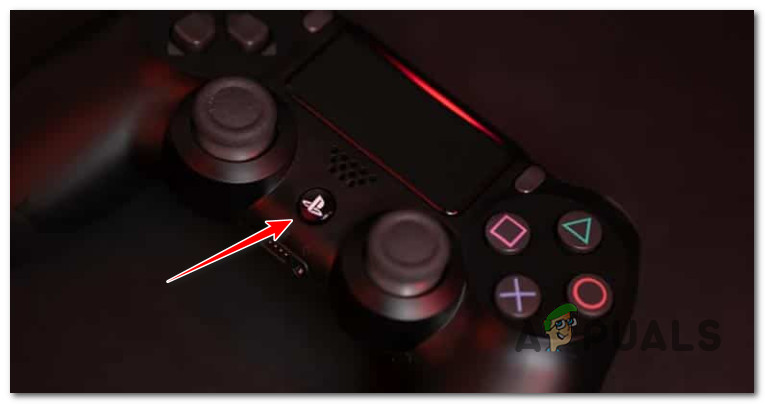
Restart Xbox Console - On PS4: Hold the PS button, select Power, then Restart PS4 and wait for it to finish.
Press the PS button on your controller - On PS5: Press the PS button, go to the Power menu at the bottom, and select Restart PS5.
Restart the PS5 console
After restarting, try launching the game again.
If the problem persists, move to the next step below.
3. Delete game cache (Xbox One / Xbox Series Only)
If you’re on Xbox One or Xbox Series X/S, and server issues aren’t to blame, a corrupted game cache might be the problem.
Note: Xbox consoles keep a game cache that can be cleared without uninstalling the game.
This often happens after a failed or interrupted Vanguard update.
- Press the Xbox button, go to My games & apps.
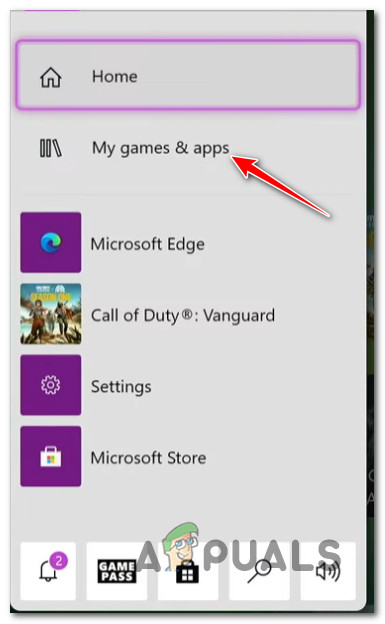
Access the My Games and Apps menu - Select the Games tab, find Call of Duty: Vanguard in your library.
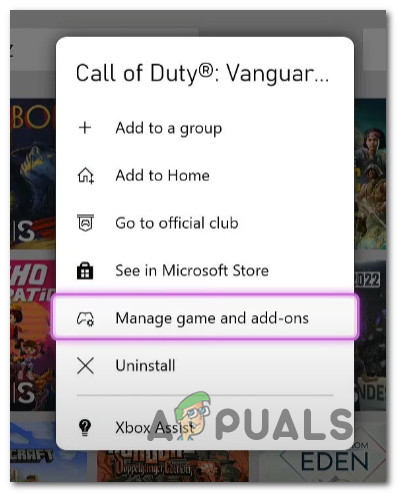
- Highlight the game, press the menu button, and open the context menu.
- Select Manage game and add-ons.
Managing the game on Xbox - Choose Saved data at the bottom of the screen.

Access the Saved data menu - Clear the saved data or cache, reboot your console, and try launching Vanguard again.
If this didn’t resolve it, continue with the next potential fix.
4. Clear more space (Consoles Only)
Call of Duty: Vanguard may not warn you if there isn’t enough space to install updates, especially on consoles.
Both Xbox and Playstation users have reported issues launching the game due to a lack of storage for shader or content updates.
Note: This issue is mainly for consoles (PS5, PS4, Xbox Series), not PCs.
To rule this out, make sure you have at least 100 GB of free space:
4.1. On Playstation 5
Go to Settings > Storage. Delete unneeded games, add-ons, or files until you have at least 100 GB free.
Then try starting the game again.
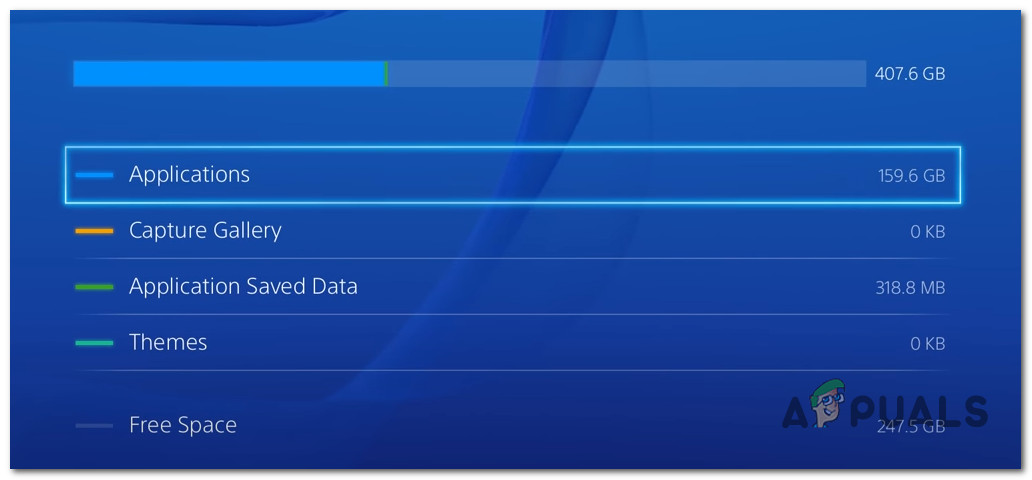
4.2. On Playstation 4
From Settings, go to System Storage Management, and check Free Space. If it’s under 100 GB, clear out Applications or other files as needed.
4.3. On Xbox One / Xbox Series X
In My games and apps, open the Manage tab, choose Free up space and delete old games or files until you have at least 100 GB free.
Try launching the game once more.
5. Reinstall the Game (PC and Consoles)
If nothing so far has worked, it may be a corrupted installation. Many users have solved launch issues with a fresh install.
Instructions differ by platform, so follow the steps for your device:
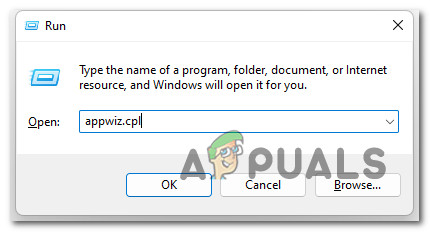
5.1. Reinstall the game on PC
Open Programs and Features (or Installed Apps on Windows 11), find Vanguard, and uninstall it. This is better than using the “repair” tool because it clears all files.
- Press Windows key + R, type appwiz.cpl, and press Enter.
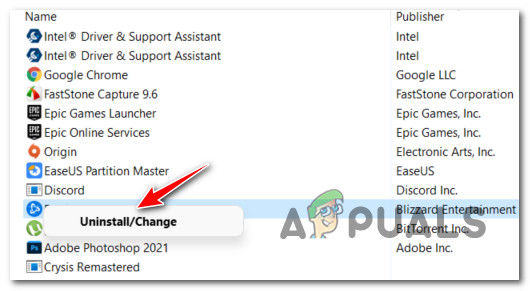
Open up a Programs and Features menu - Find Call of Duty: Vanguard, right-click and choose Uninstall.
Uninstall problematic game - Follow on-screen steps, then restart your PC.
- Reinstall the game via your game launcher.
- Try launching again.
5.2. Reinstall the game on PlayStation 4
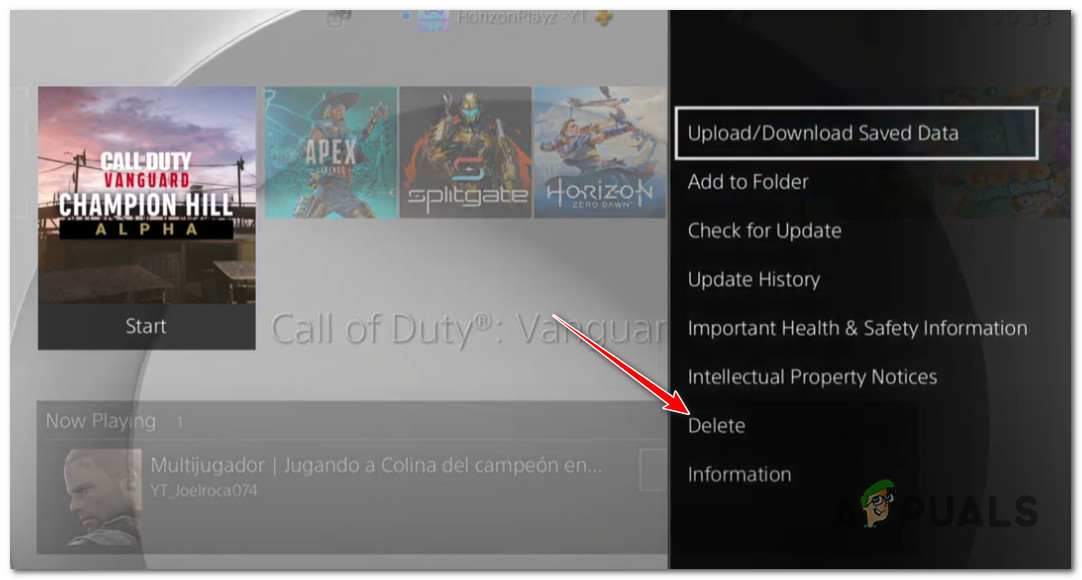
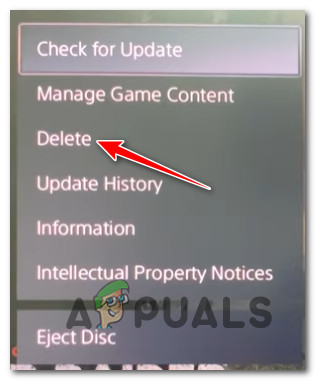
From your home screen, select Vanguard, press Options, and choose Delete.
- On the home screen, find and highlight Call of Duty: Vanguard.
- Press Options, select Delete.
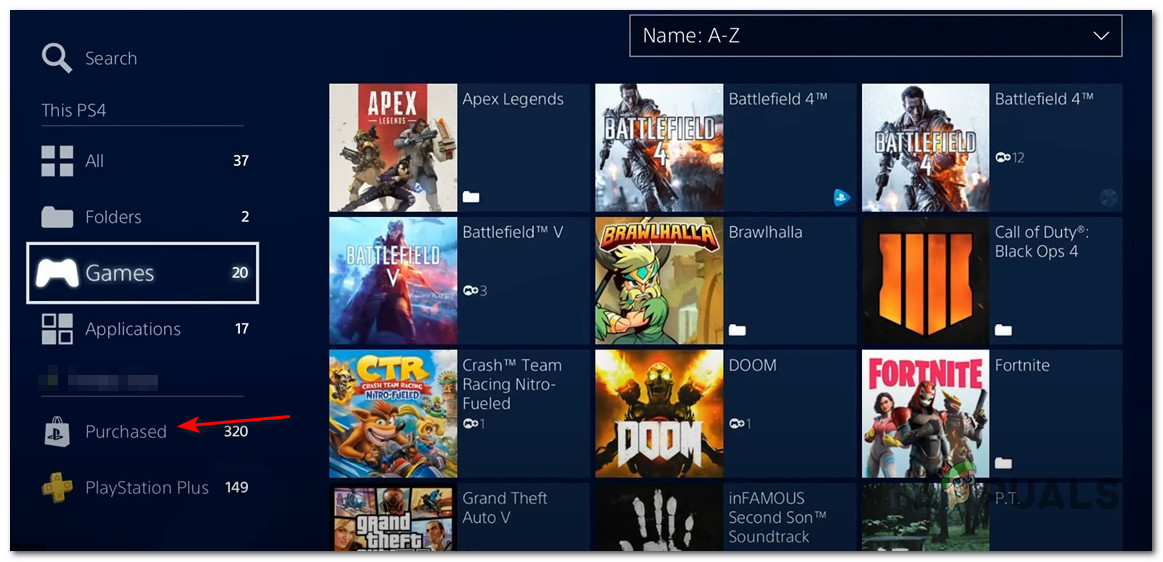
Delete the Call of Duty Vanguard installation - Go to the Library tab, select Purchased, find Vanguard.
- Select Vanguard, press Download, and reinstall.
Reinstalling the game - After installing, try to launch the game.
5.3. Reinstall the game on PlayStation 5
These steps are slightly different from PS4 due to a new interface:
- From the home screen, select Vanguard, press Options.

Open the Options menu associated with Call of Duty: Vanguard - Choose Delete, confirm and let it uninstall.
Delete Call of Duty: Vanguard from Playstation 5 - Access Game Library from the home screen.

Download Call of Duty Vanguard on PS5 - Under Your Collection, find and select Vanguard.
- Select Download and wait for it to install.
- After install, launch Vanguard and check if it works.
5.4. Reinstall the game on Xbox One / Xbox Series S & X
Steps are the same for both consoles due to a shared interface:
- Press the Xbox button, go to My games & apps.
Access the My Games and Apps menu - Find Games, scroll to Call of Duty: Vanguard.
- Highlight Vanguard, open its context menu.
- Choose Manage game and add-ons.
Managing the game on Xbox - Select Uninstall all.
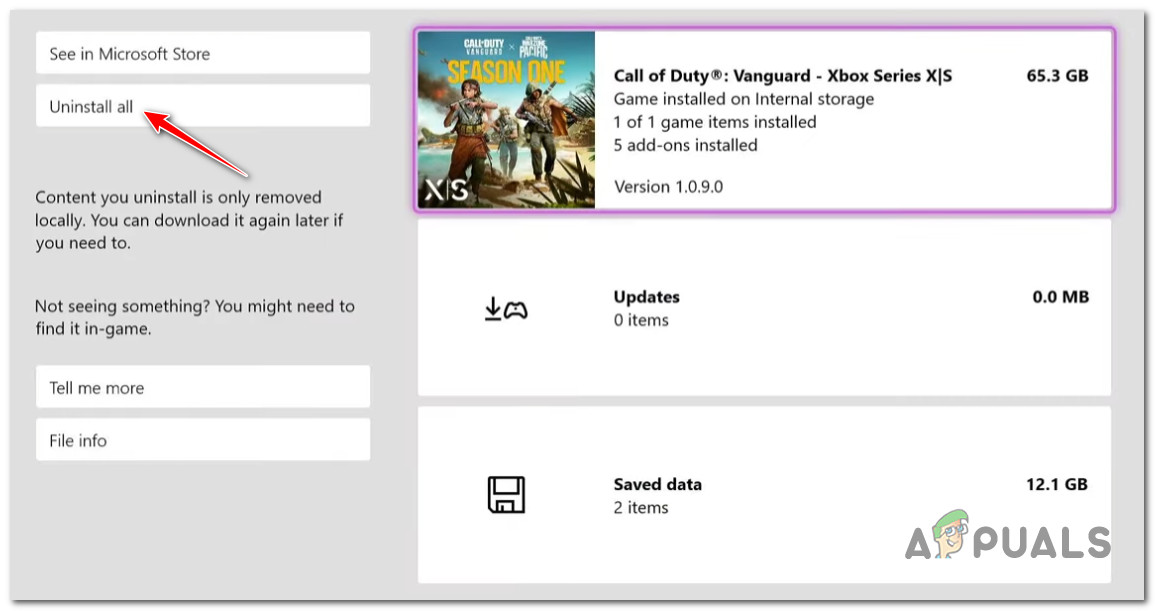
Uninstall Call of Duty Vanguard - Once uninstalled, go to your Library, access All owned games, reinstall Vanguard.
- Try to launch the game again.
6. Optimize Settings for Vanguard (PC Only)
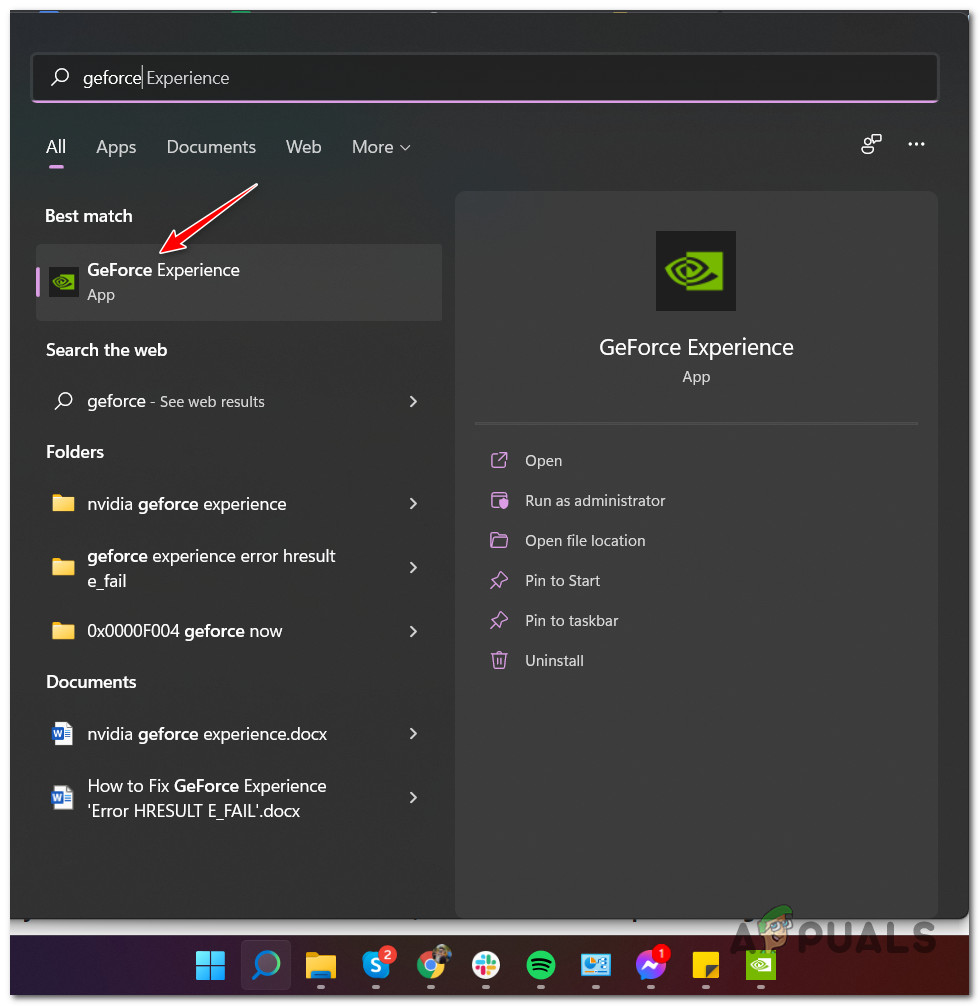
If you have an Nvidia GPU and problems persist, try letting Nvidia GeForce Experience auto-optimize the game settings. This resolves issues when game graphics settings are incompatible with your hardware.
- Open Start menu, search for GeForce Experience, and launch it.
Open up GeForce Experience - In GeForce Experience, open the Games tab, select Vanguard.
- Click Optimize.
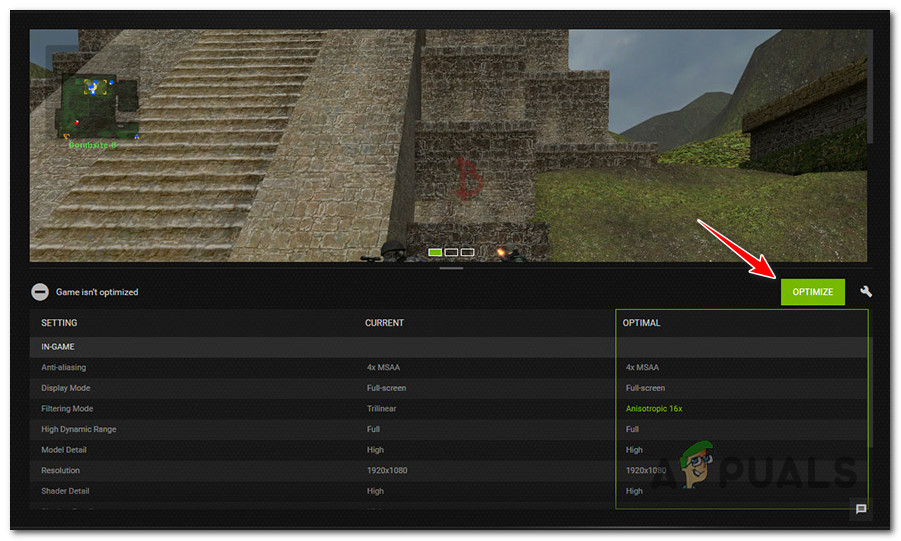
Optimizing the game - Try launching Vanguard again.
7. Reinstall the Intel Management Engine
If you’re on a PC—especially with an Intel CPU—the Intel Management Engine driver may need updating. This is especially true after upgrading to Windows 11.
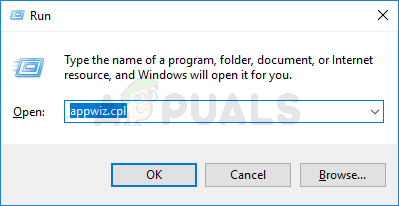
- Press Windows key + R, type ‘appwiz.cpl’, press Enter.
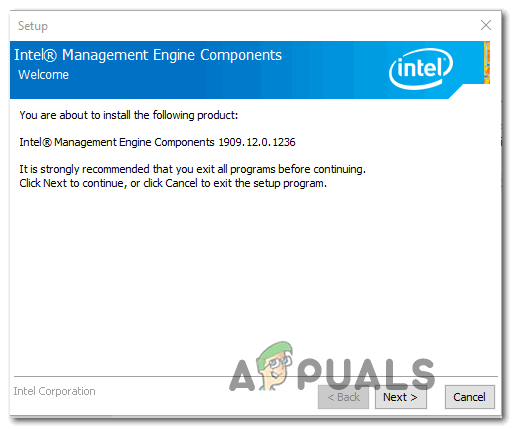
Open up the Programs and Feature menu - Find Intel Management Engine Components, select & uninstall.
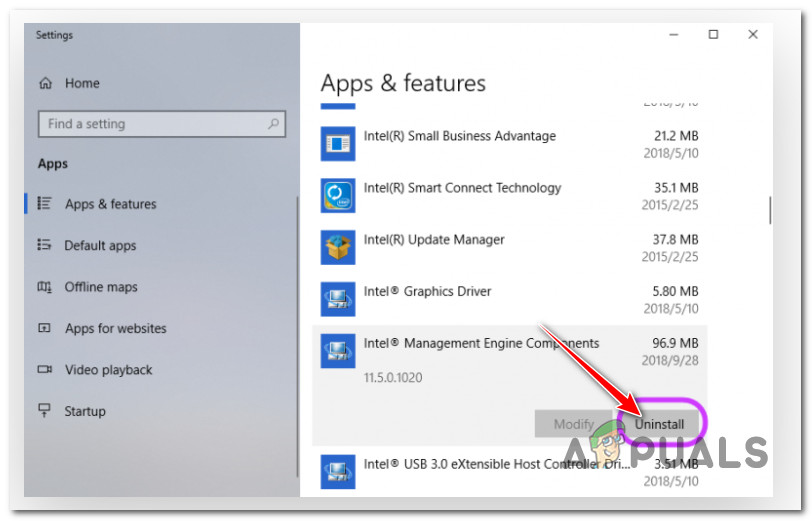
Uninstall intel components driver - Do not restart your PC yet.
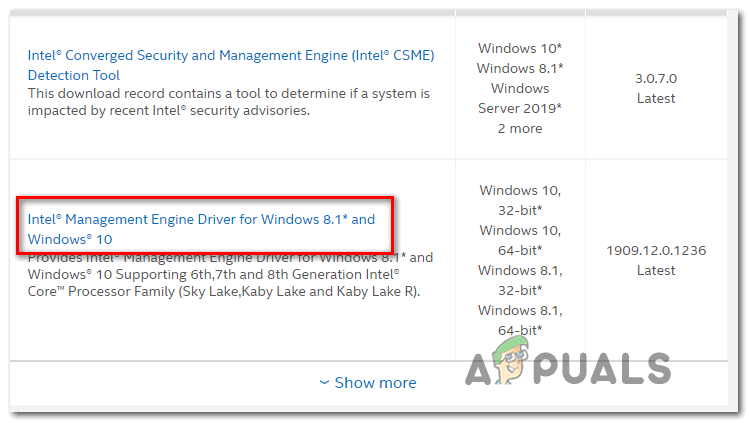
- Go to Intel’s download page for Management Engine drivers.
- Click Intel Management Engine Driver for Windows 8.1, 10, or 11.

Uninstall Intel Management Engine Driver - Download and extract it, then run MEISetup.exe as administrator.
Download the Intel Management driver - Restart your PC when installation completes.
Install the Intel Management driver - Try to launch Vanguard again.
8. Force the game on DirectX 11
If you previously set Vanguard to run with DirectX 12 but encounter startup issues, switching to DirectX 11 may help—especially for newer GPUs.
- Fully close Vanguard.
- In Battle.net, select Vanguard, go to Options > Game Settings.
- Check Additional Command Line Arguments.
- Type -d3d11, save changes.
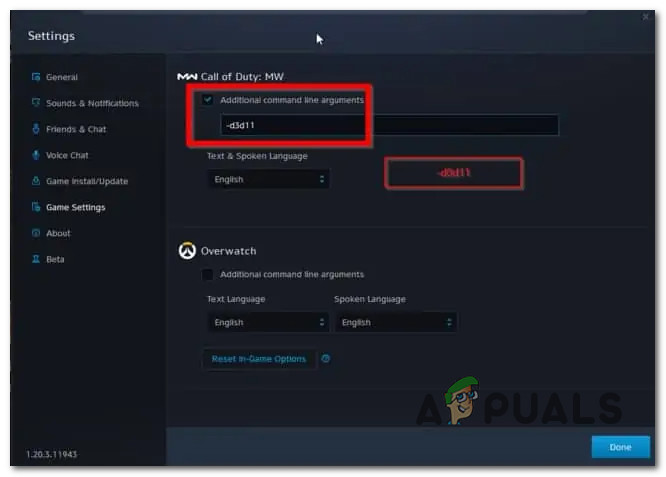
Forcing DirectX 11 - Try launching through Battle.net.
9. Whitelist Game or Disable Antivirus/Firewall (PC Only)
On PC, some security programs (especially third-party antivirus or firewall tools) may incorrectly block Vanguard’s components.
- Whitelist Vanguard and the Battle.net launcher in your antivirus/firewall settings
- Or temporarily disable your antivirus/firewall real-time protection while launching the game
Note: Steps will vary for different third-party security software. See instructions for Windows Firewall here.
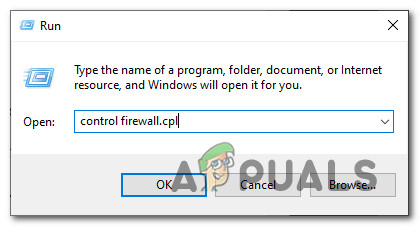
- Press Windows key + R, type control firewall.cpl, press Enter.
Open the firewall component - On the left, click Allow an app or feature through Windows Defender Firewall.
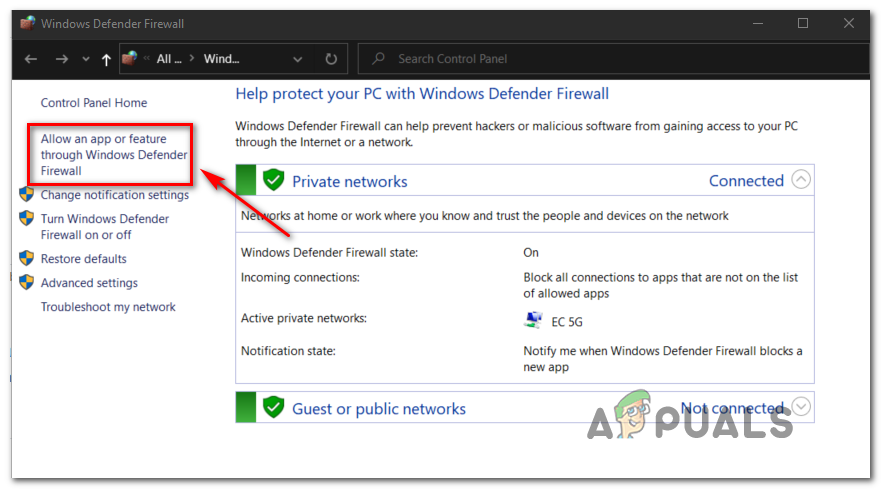
Allow an extra feature through firewall - Click Change settings, confirm UAC prompt.
- Find Vanguard and Battle.net in the list, tick both Private and Public boxes. Click OK to save.
Note: If missing, click Allow another app and add them manually.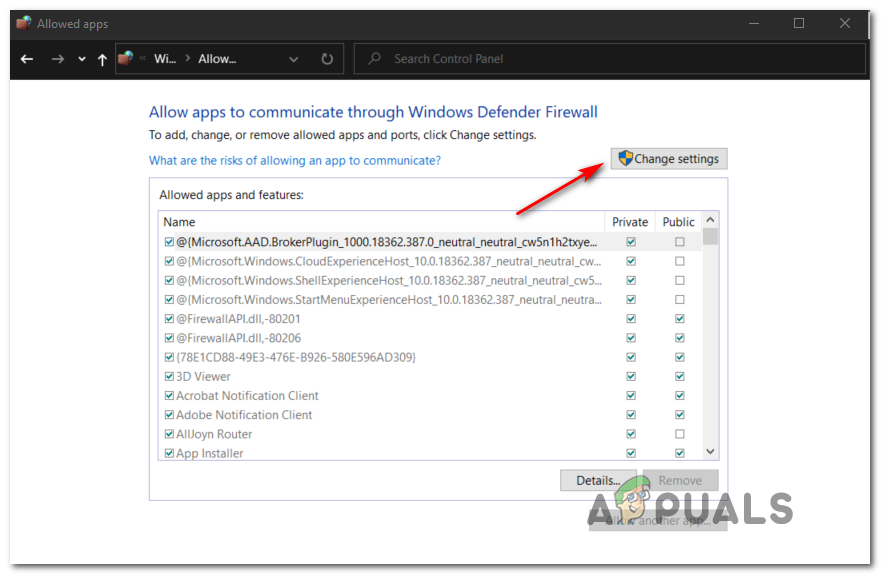
Change the settings - Try launching Vanguard again.
10. Link Console Account to Activision Account (Consoles Only)
If you’re on console and get a sign-in error, make sure your Blizzard or platform account is linked with your Activision account.
- Log into your Playstation, Xbox, or Nintendo account.
- In a browser, sign in to your Activision account here.
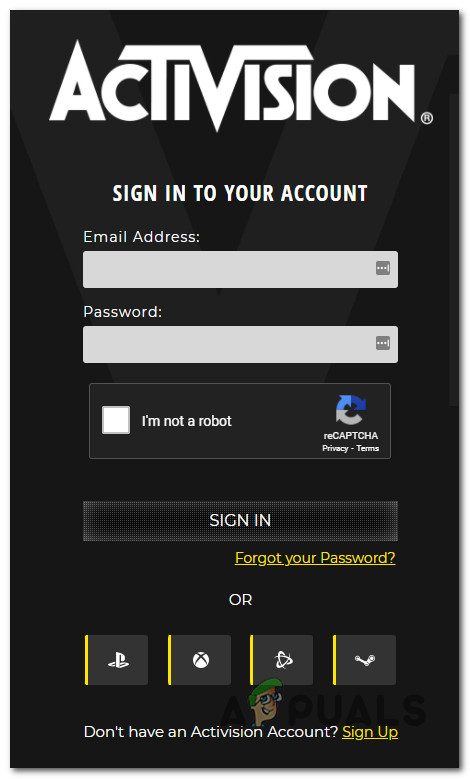
Sign in with Activision account - In the Activision Account Linking section, choose the account you want to link.
- Click Continue to complete the process via your platform’s site.
- After linking, try launching the game.
11. Disable Discord or Nvidia Experience Overlay (PC Only)
Screen overlays from Discord, Nvidia GeForce Experience, or apps like OBS may conflict with Vanguard and cause it to crash. While some fixes have been released, conflicts still occur for some users.
11.1. Disable the Discord Overlay
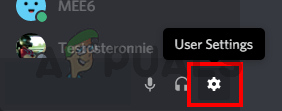
- Close Vanguard and its launcher.
- Open Discord. (Check the system tray if needed.)
- Click User settings (gear icon) at the bottom.
Accessing the Settings menu of Discord - Go to Overlay under App Settings.
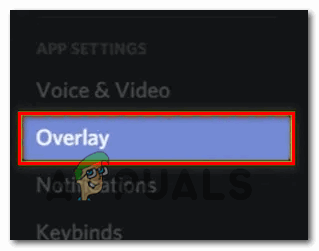
Disable the Overlay features - Turn off Enable in-game overlay.
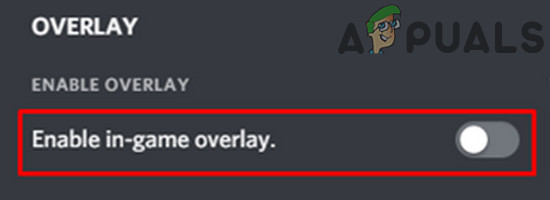
Disable in-game overlay - Save changes, then try launching Vanguard.
11.2. Disable Nvidia Overlay
- Close the game and launcher.
- Open GeForce Experience, go to General.
- Toggle off the In-Game Overlay.
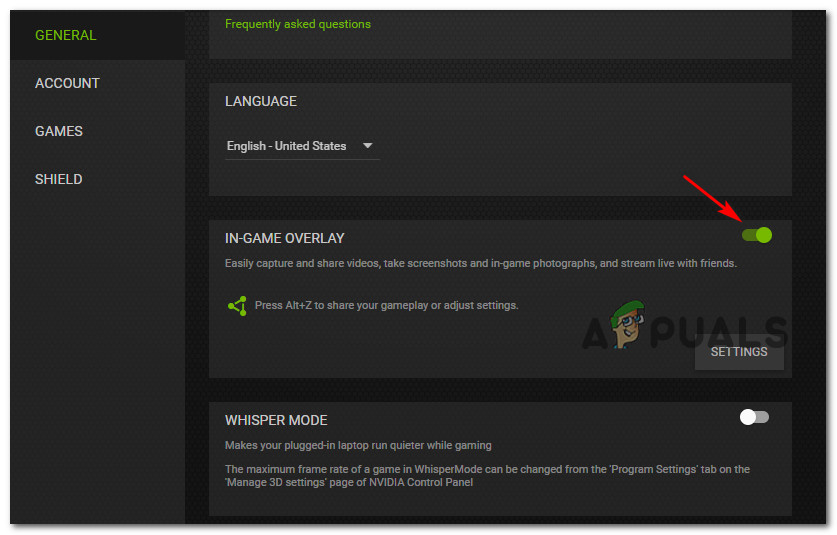
Disable Nvidia Overlay - Save and close GeForce Experience.
- Try launching Vanguard.
11.3. Uninstall Overlay Software
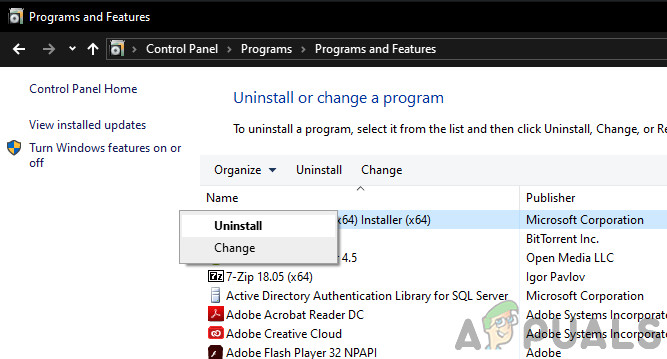
- Press Windows key + R, type appwiz.cpl, press Enter.

Open up the Programs and Features menu - Find the overlay software, right-click, and choose Uninstall.
Uninstall Nvidia Experience - Follow the uninstall instructions, restart your computer, then try Vanguard again.
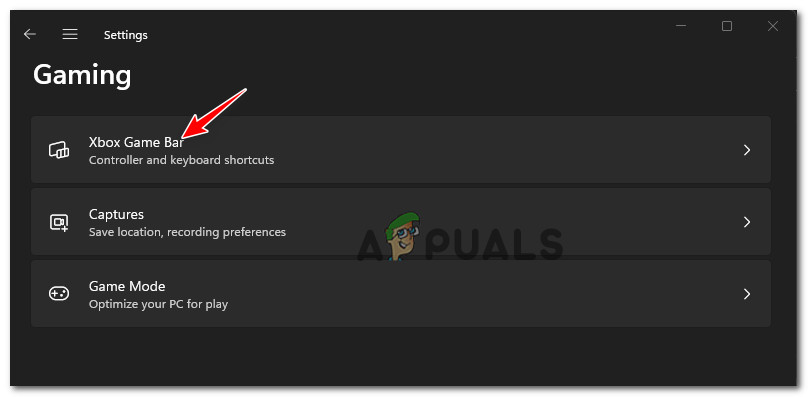
12. Disable Xbox Game Bar (Windows 11 only)
Some preview builds of Windows 11 have issues with the Xbox Game Bar causing Vanguard to fail to launch.
- Press Windows key + I to open Settings.
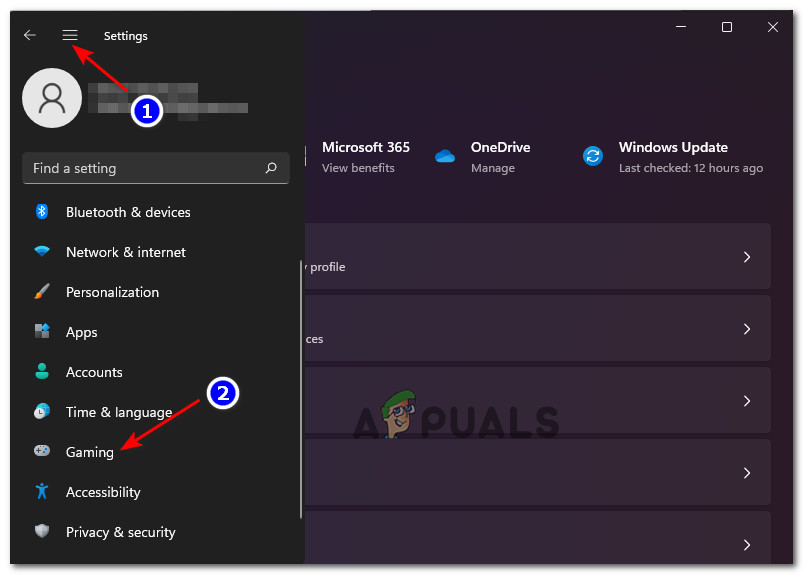
Open the Gaming tab on Windows 11 - Click Gaming in the left menu.
Note: If you don’t see it, click the three-dot action icon at the top left. - In Gaming, select Xbox Game Bar.
Open the Xbox Game bar settings - Turn off Open Xbox Game Bar using this button on a controller.
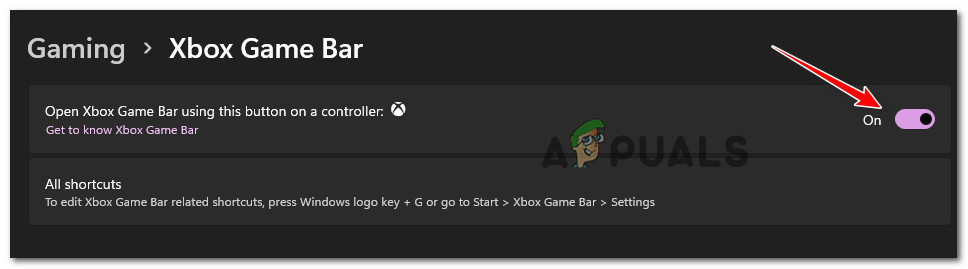
Disable Xbox Game bar


