Fix: Disk Usage 100% But No Programs Running in Background
Your task manager shows the current percentage of your hard disk being used by your system. If there are several applications running on the system, it will automatically increase the disk usage percentage. Occasionally your system will use 100% disk usage despite not having many applications running in the background. This will result in your system becoming slow and will cause performance issues.
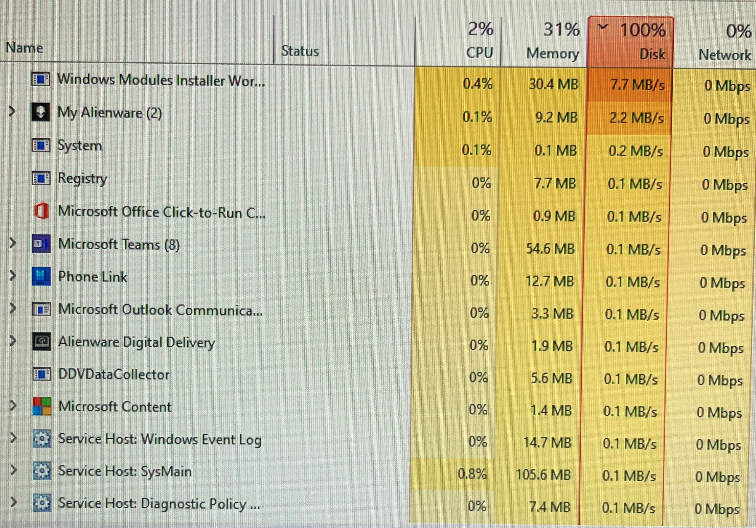
This guide will show you the steps to minimizing your disk usage when it is at 100%.
1. Disable Real-time protection
Real-time protection is a Windows security feature that prevents malware from entering your system. However, the Windows Antimalware Executable takes hold of most of the disk usage, as a result, causes the Disk usage issue. Therefore, you must disable this feature manually with the instructions listed below:
- Open the Windows settings with the Win + I keys.
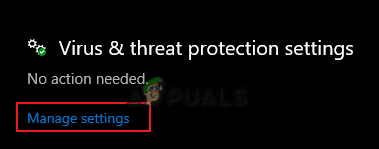
- Navigate to Update and Security > Windows Security > Virus and threat protection.
- Click on “Manage” settings” under Virus and threat protection settings.
Managing the settings - Turn off the toggle button under “Real-time protection to disable the feature.
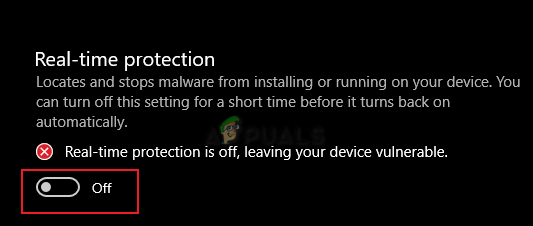
Turning off real-time protection
2. Turn off Scheduled Optimization
Scheduled Optimization is a default feature in Windows that optimizes your Hard drives and SSD(s). This feature is turned on by default in Windows and optimizes your drives on a weekly basis. However, this feature is known to cause issues with disk usage as it uses a high percentage of the disk during its optimization. Therefore, you must turn it off to prevent high disk usage:
- Open the File Explorer by pressing the Win + E keys together.
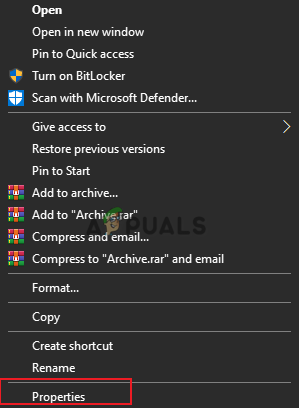
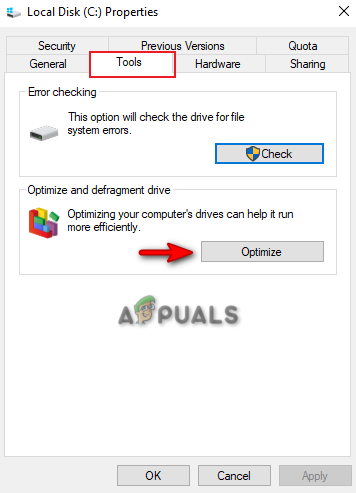
- Navigate to This PC > Drive C (here C drive is the Default Drive).
- Right-click on the default drive and select “properties.”
Opening default drive properties - Open the “Tools” tab and click on “Optimize” under “Optimize and defragment the drive.”
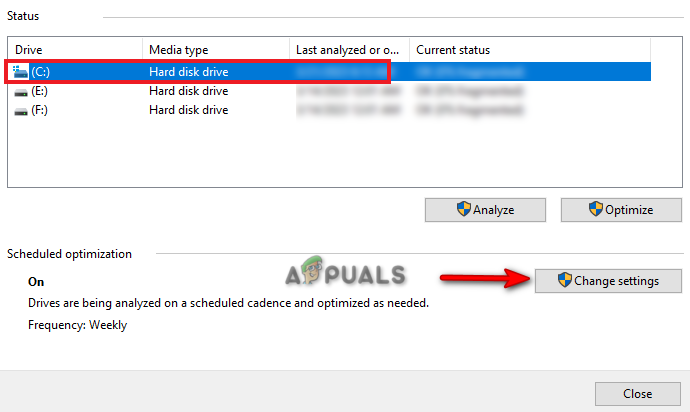
Opening drive optimization - Select the default drive and under “Scheduled Optimization, click on “Change Settings.”
Changing settings - Uncheck the “Run on the schedule” box and click OK.
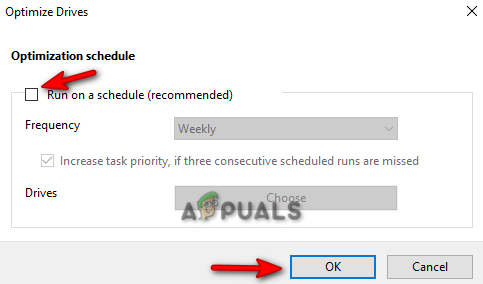
Turning off optimization scheduling - This will disable the Schedule Optimization option on your device.
3. Disable Windows telemetry
Windows telemetry is a built-in Windows service responsible for storing technical data related to the performance of the device and software. However, since this service has a high disk usage, it will use the majority of the disk. Therefore, you must disable this service after booting your system. Below is how you can disable the Windows telemetry service:
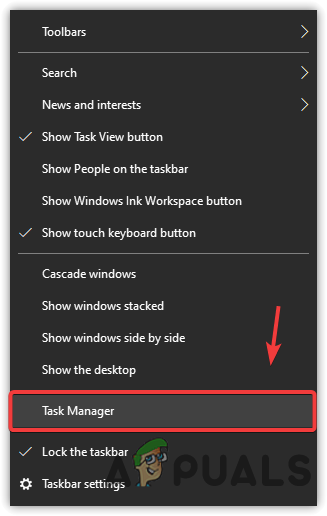
- Press the Win +X keys together to open the Power user menu.
- Click on the Task Manager option.
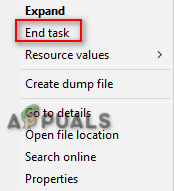
Opening Task Manager - Open the “Details” tab and find the CompatTelRunner.exe process running in the background.
- Right-click on the process and select “End task” to disable the Windows telemetry service.
Ending the Task - Additionally, you must open the Task Scheduler.
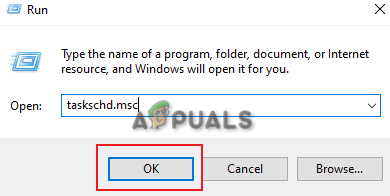
- Open the Run command by pressing the Win + R keys together.
- Type “taskschd.msc” and press OK to open the Task Scheduler.
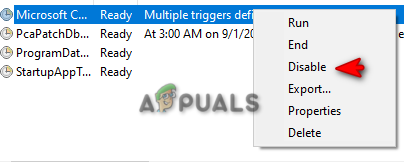
Opening the task scheduler - Navigate to Microsoft > Windows > Application Experience.
- Right-click on the Microsoft Compatibility Appraiser and select “Disable”
Disabling Microsoft Compatibility Appraiser
4. Disable the Prefetching and Connected Device Platform Services
Windows services are known to take a good percentage of Disk usage. Specifically, two particular services such as SysMain and Connected Device platforms. Although they have their own roles on the system such as pre-loading programs and files into memory, and Connecting Devices Platform scenarios respectively, they are still known to take a wide range of Disk Usage. Therefore, you must disable these services as given below:
- Open the Run command with the Win + R keys.
- Type “services.ms” and click OK to open the Windows Services page.

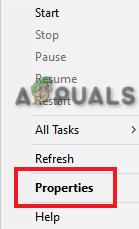
Opening Windows Services - Right-click on both the “SysMain” and “Connected Devices Platform” services, and open their respective properties.
Opening service properties - Select the Startup type as “Disabled.”
- Click on Apply and OK to confirm the actions.
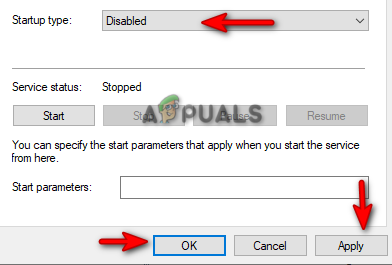
Disabling service
5. Disable the Disk defragmentation configuration
Disk Defragmentation configuration is used for arranging the storage on your system by consolidating files and other saved data on your Hard drive. However, due to corruption in this process caused by malware, the disk faces issues with its usage and as a result, will take up 100% of the disk usage. Therefore, you must disable the Disk defragmentation configuration:
- Open the Run command by pressing the Win + R keys together.
- Type “taskschd.msc” and press OK to open the Task Scheduler.
Opening the task scheduler - Navigate to Task Scheduler Library > Microsoft > Windows > Defrag.
- Click on the ScheduledDefrag task and click on “End” under the “Actions” section.
- Lastly, click on the “Disable” option to disable this task.
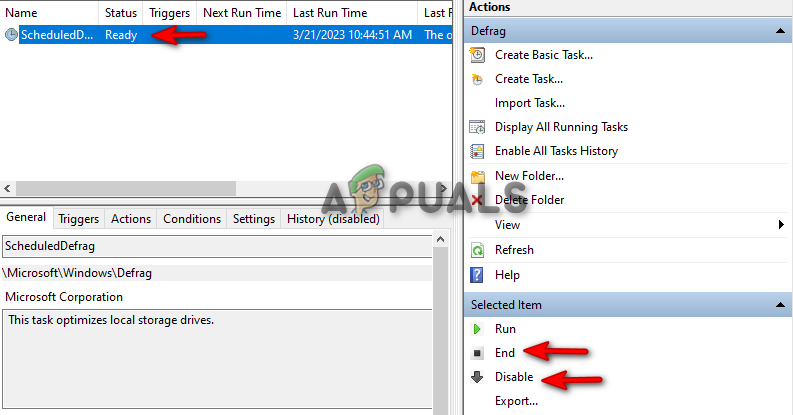
Disabling Disk defragmentation
6. Update the device drivers
Having outdated device drivers is one of the reasons why your disk is being used to the fullest. Therefore, check your device drivers and update them to prevent this problem from occurring. You can update your device drivers by performing a simple Windows update. Below are the instructions to help you update your windows:
- Open the Windows settings by pressing the Win + I keys together.
- Navigate to Update and Security > Windows Update.
- Click on “Check for updates” and let the system find the available updates.
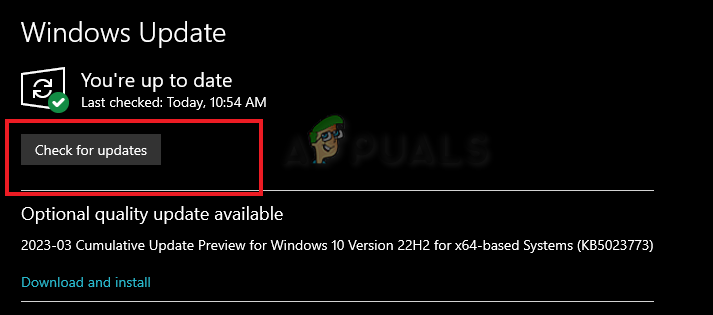
Updating Windows - Once the windows are updated, the installed device drivers will automatically be updated.
- Open the Run command using the Win + R keys.
- Type “devmgmt.msc” and click OK to open the Device Manager.
- Right-click on the device drivers and select “Update driver”
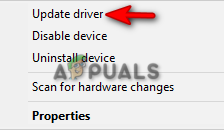
Updating driver - Choose an automatic update method.
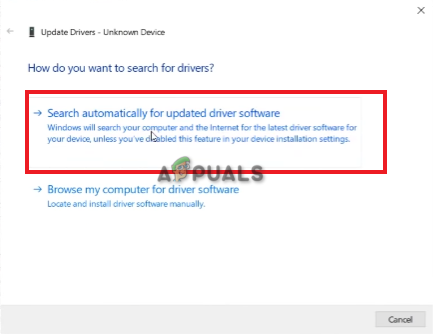
Automatically updating driver - Restart your computer afterward to make the necessary changes.
7. Disable automatic updates services
Each version of Windows that its own update service which is a utility that allows the system to maintain your Windows in an updated state with the latest service packs, fixes, and other updates installed on it. However, when this service faces malfunctioning caused by certain malware on the system, it is known to cause such issues. Therefore, to prevent this from happening, you can disable the automatic update services on your Windows.
Reset the virtual memory
Virtual Memory is a technique in your system that allows your RAM to be extended into your Hard disk virtually to improve its performance. However, this technique is known to perform read and write requests that lead to high disk usage. Therefore, resetting it will be recommended to lower its use of the disk.
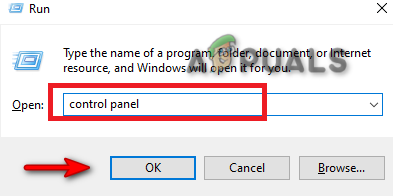
- Press the Win + R keys to open the Run command.
- Type “control panel” and click OK.
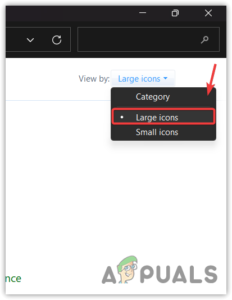
Opening the control panel - Click on the View by optional and select “Large icons.”
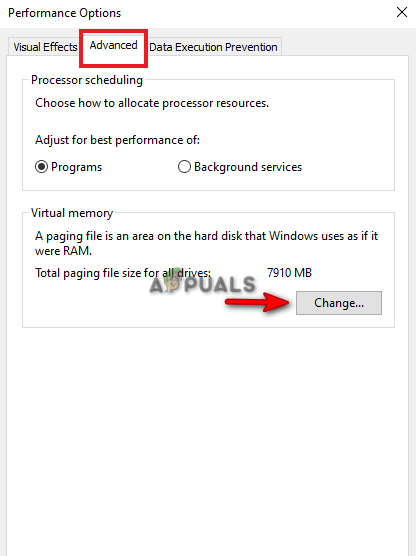
Changing View By to Large icons - Navigate to System > Advanced system settings.
- Select “Settings” under Performance.
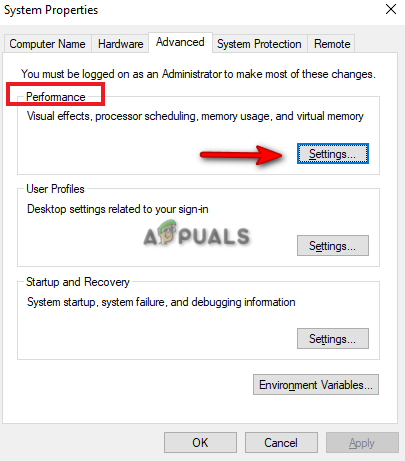
Changing performance settings - Open the “Advanced” tab.
- Click “Change” under Virtual Memory.
Changing virtual memory
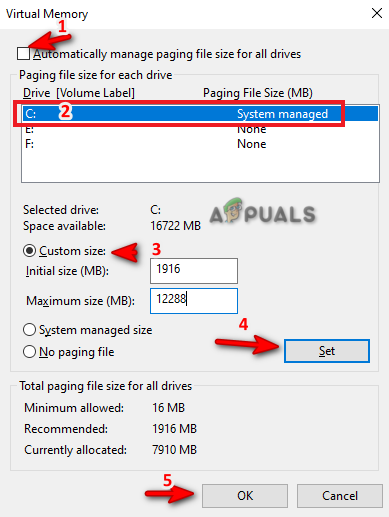
- Uncheck the “Automatically manage paging file size” box.
- Select the default drive.
- Click on the “Custom size” box.
- Add recommended virtual memory size in the “Initial size” slot (Here it is 1916)
- Add 1.5x times your RAM size in the “Maximum size” slot. (For 8 GB RAM, put 8 * 1024 * 1.5).
- Click Set and OK to confirm the actions.
Setting custom memory size - Restart your computer.
8. Check AHCI PCIe configuration
The Advanced host controller interface is a technical standard that allows communication between software and Serial ATA (SATA) devices. The disk fails to respond to the Input and Output requests when the Messaged Signal Interrupt mode is enabled. This causes high disk usage. You can prevent this from happening by disabling the MSI Mode:
Verifying inbox AHCI driver
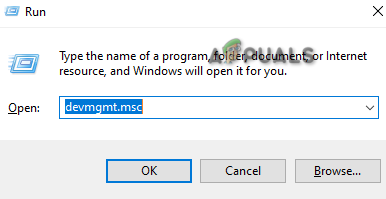
- Open the run command with the Win + R keys pressed together.
- Type “devmgmt.msc” and click OK to open the device manager.
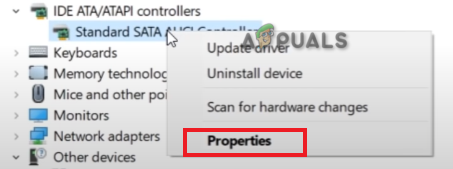
Opening device manager - Click on the IDE ATA/ATAPI controller.
- Right-click on the Standard SATA AHCI controller and open its properties.
Opening controller properties - Navigate to Driver > Driver Details and see verify the inbox AHCI driver (stroahci.sys folder)
Finding device instance path
- On the Standard SATA AHCI controller properties, open the Details tab.
- Click on “Property” and select “Device instance path.“
- Copy the path under ” Value” in the notepad or take a screenshot.
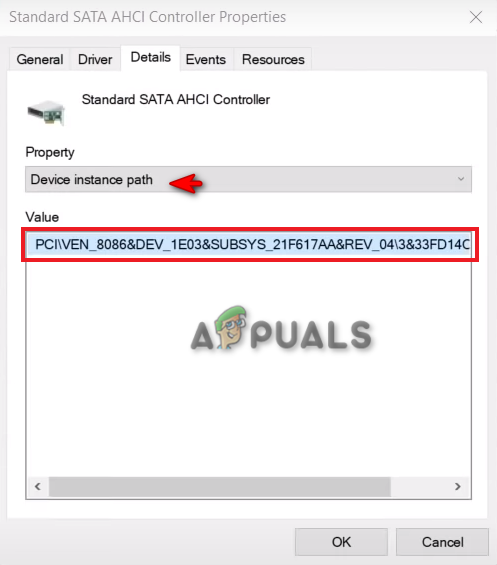
Device instance path
Disabling the MSI mode
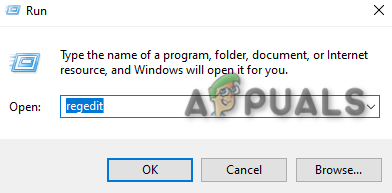
- Open the Run command with Win + R keys.
- Type “regedit” and click OK to open the Registry editor.
Opening registry editor - Navigate to the following path:
HKEY_LOCAL_MACHINE\SYSTEM\CurrentControlSet\Enum\PCI
- Click on the folder with the Device instance path value you copied on your notepad.
- Click on its sub-folder.

Opening device instance path folder - Navigate to the following path:
Device Parameters\Interrupt Management\MessageSignaledInterruptProperties.
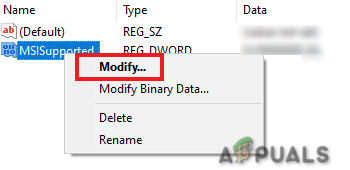
- Right-click on the MSISupported key and click Modify.
Modifying registry key - Change the value from 1 to 0 under Value data.
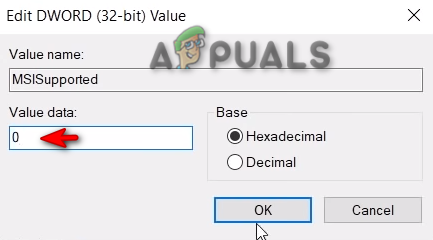
Disabling MSI Supported - Click OK and restart your computer.
9. Reinstall your Windows
If your issue of disk usage still persists even after performing all the methods, you must resort to the last step which is backing up all your files and saved data and performing a complete Windows re-installation. This is a faster way to remove malware from your system that is causing performance issues. However, this should be your last resort.


