The 5 Fastest Ways to Transfer Files From PC to PC
Learn how to transfer files from one PC to another, with ease and at the best speed.
 Reviewed by Huzaifa Haroon
At some point, everyone needs to transfer files from their PC to another one. This can be for work purposes, or when exporting a backup from your old PC to your new one. Here are the best and easiest ways to transfer files from one PC to another, using both hardware and software.
1. Using External Storage Devices
The oldest, simplest, and most common method of transferring files from one computer to another is with the help of external storage media, such as a USB. This method is not limited by the operating systems of the PCs.
The procedure for this method is simple; connect the external storage media to your PC, copy the files you want to transfer to the other PC, paste them onto the device, disconnect the device, plug it into the other PC and move the files from the device to the PC’s storage.
The speed of the file transfer is dependent upon the type of device you’re using and any intermediaries. So the external drive itself, its connector, the cable that connects it to a PC, and the port on the PC, all can affect the transfer speeds. If you’re plugging in a USB 3.0 drive into a USB 2.0 port, you’ll be capped by the max speeds of the USB 2.0 protocol, severely undermining the potential speeds of the drive.
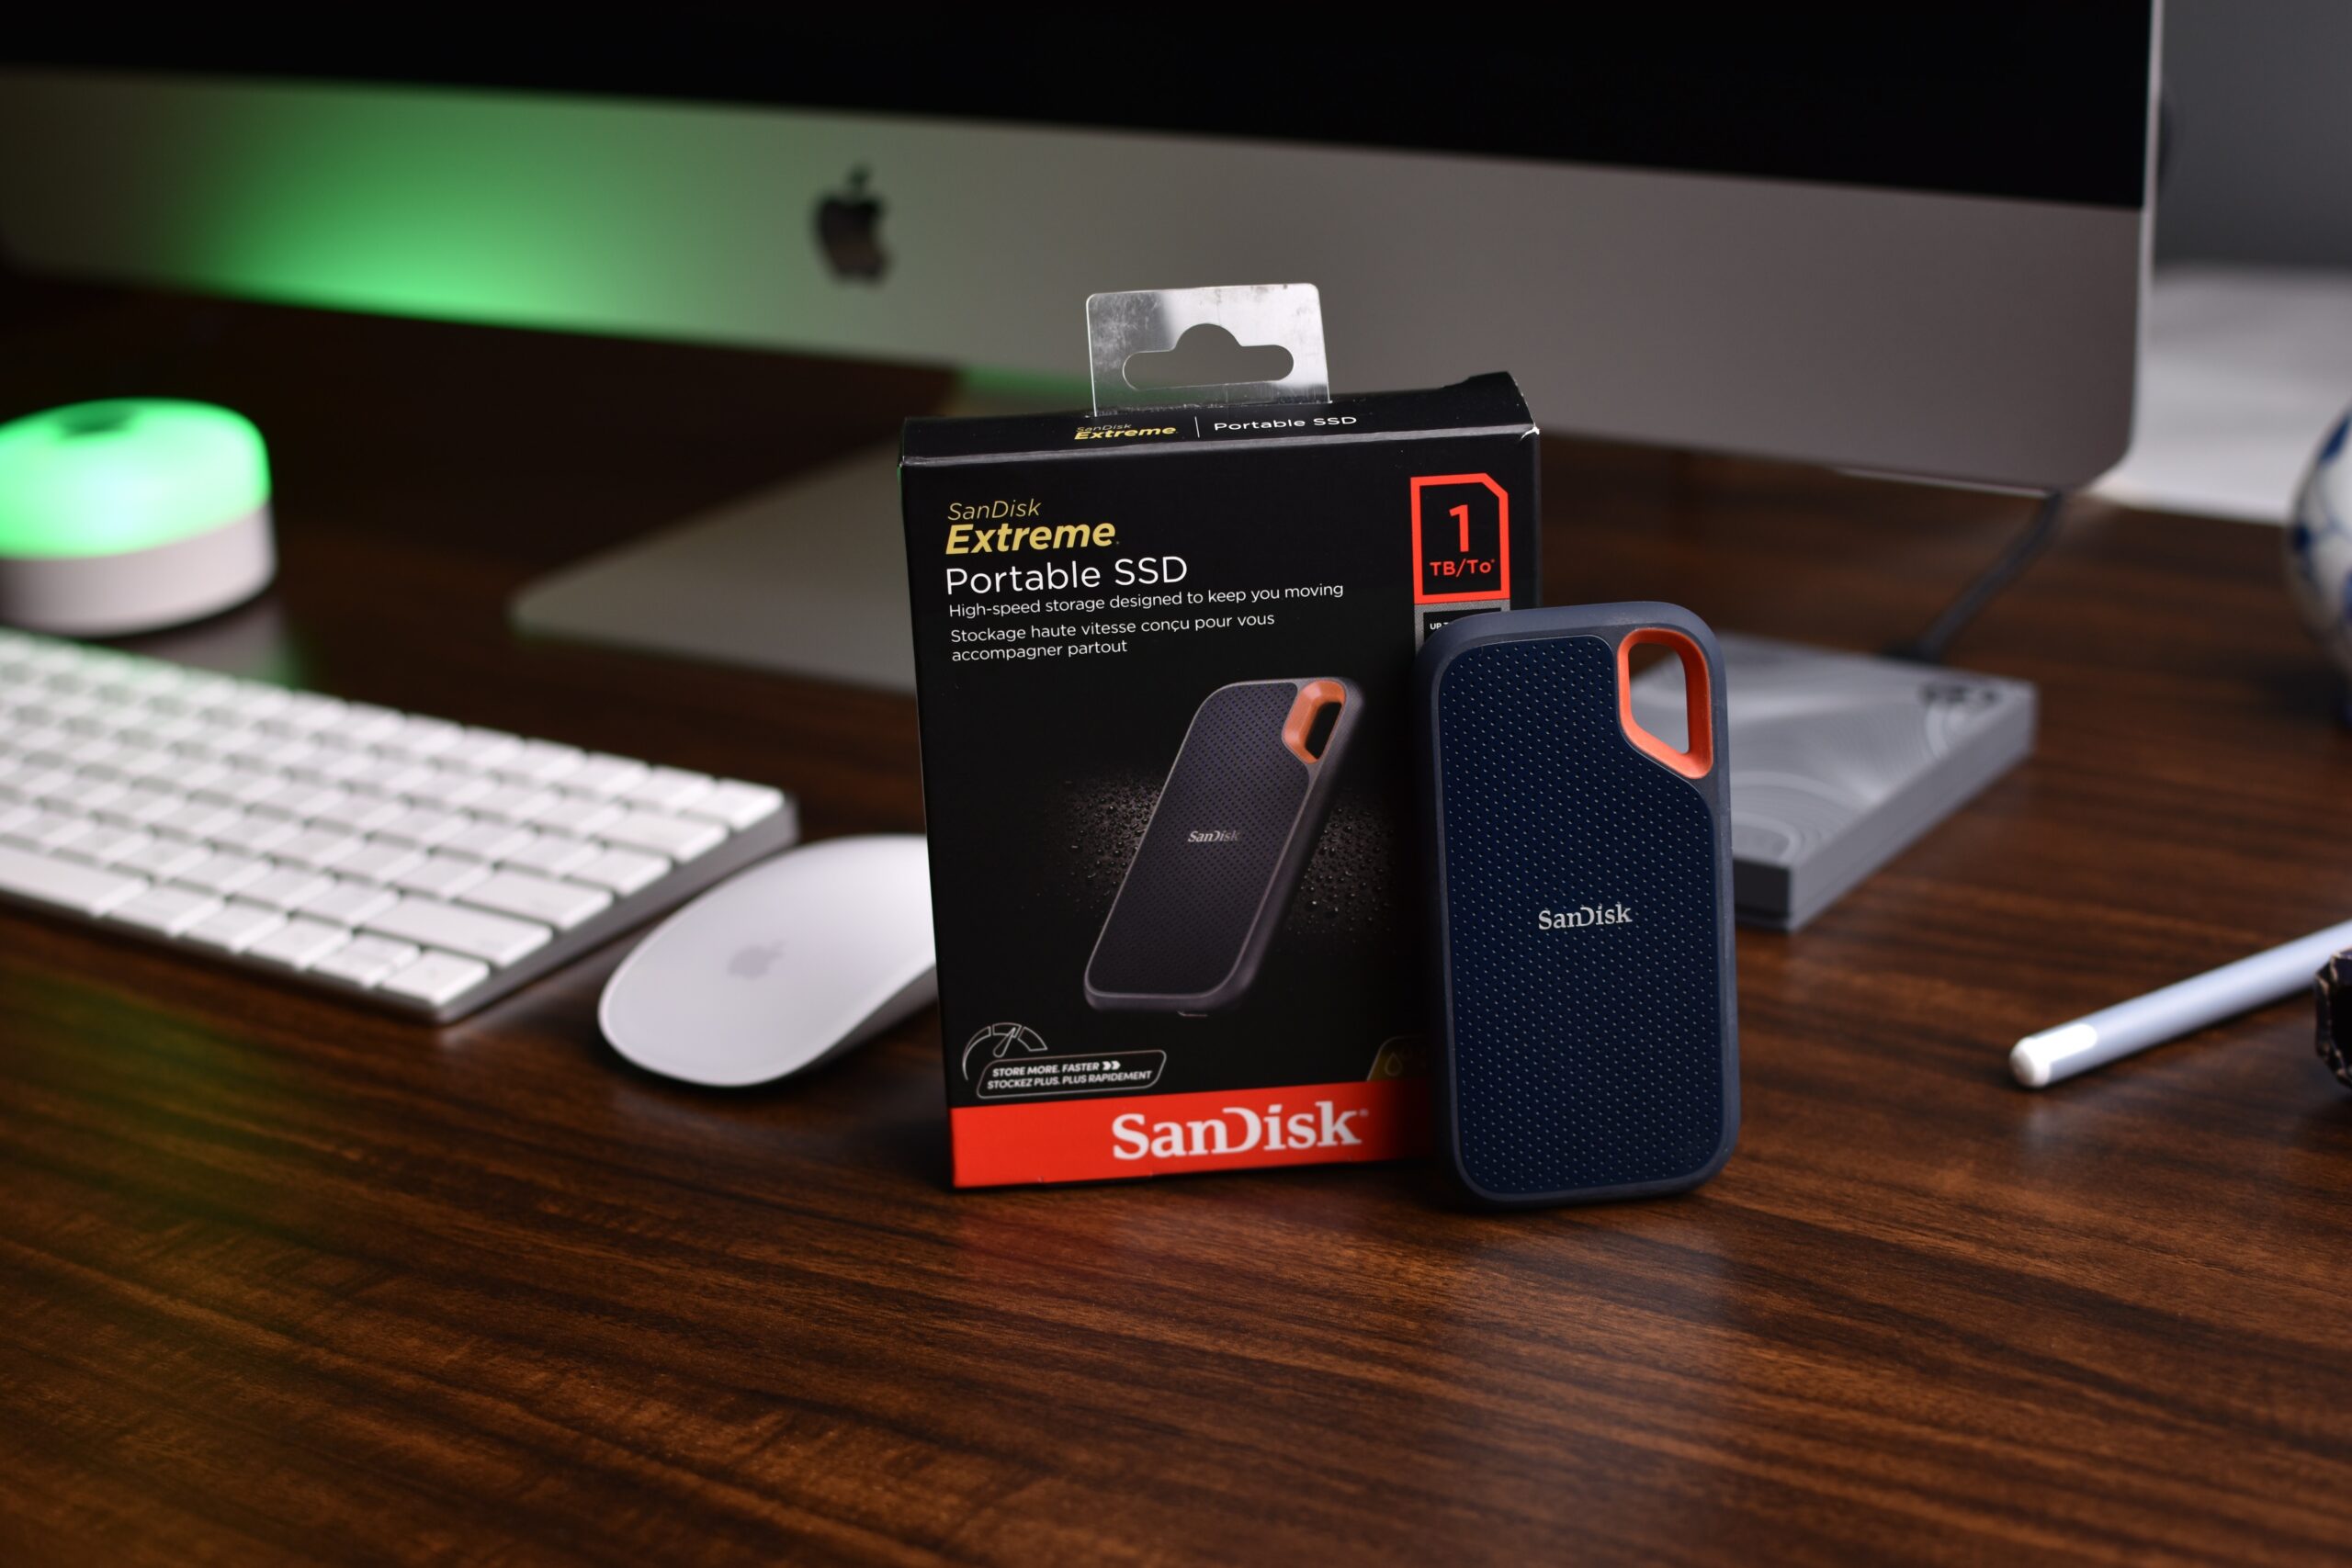
While portable HDDs offer good speeds, SSDs, being a more advanced technology, provide superior transfer speeds. Check out our advanced SSD buying guide for more info. In any case, be sure to use the USB 3.0 port for the best possible speeds. USB4 is the latest revision of the USB standard, but its infancy makes it quite rare to find one on any device.
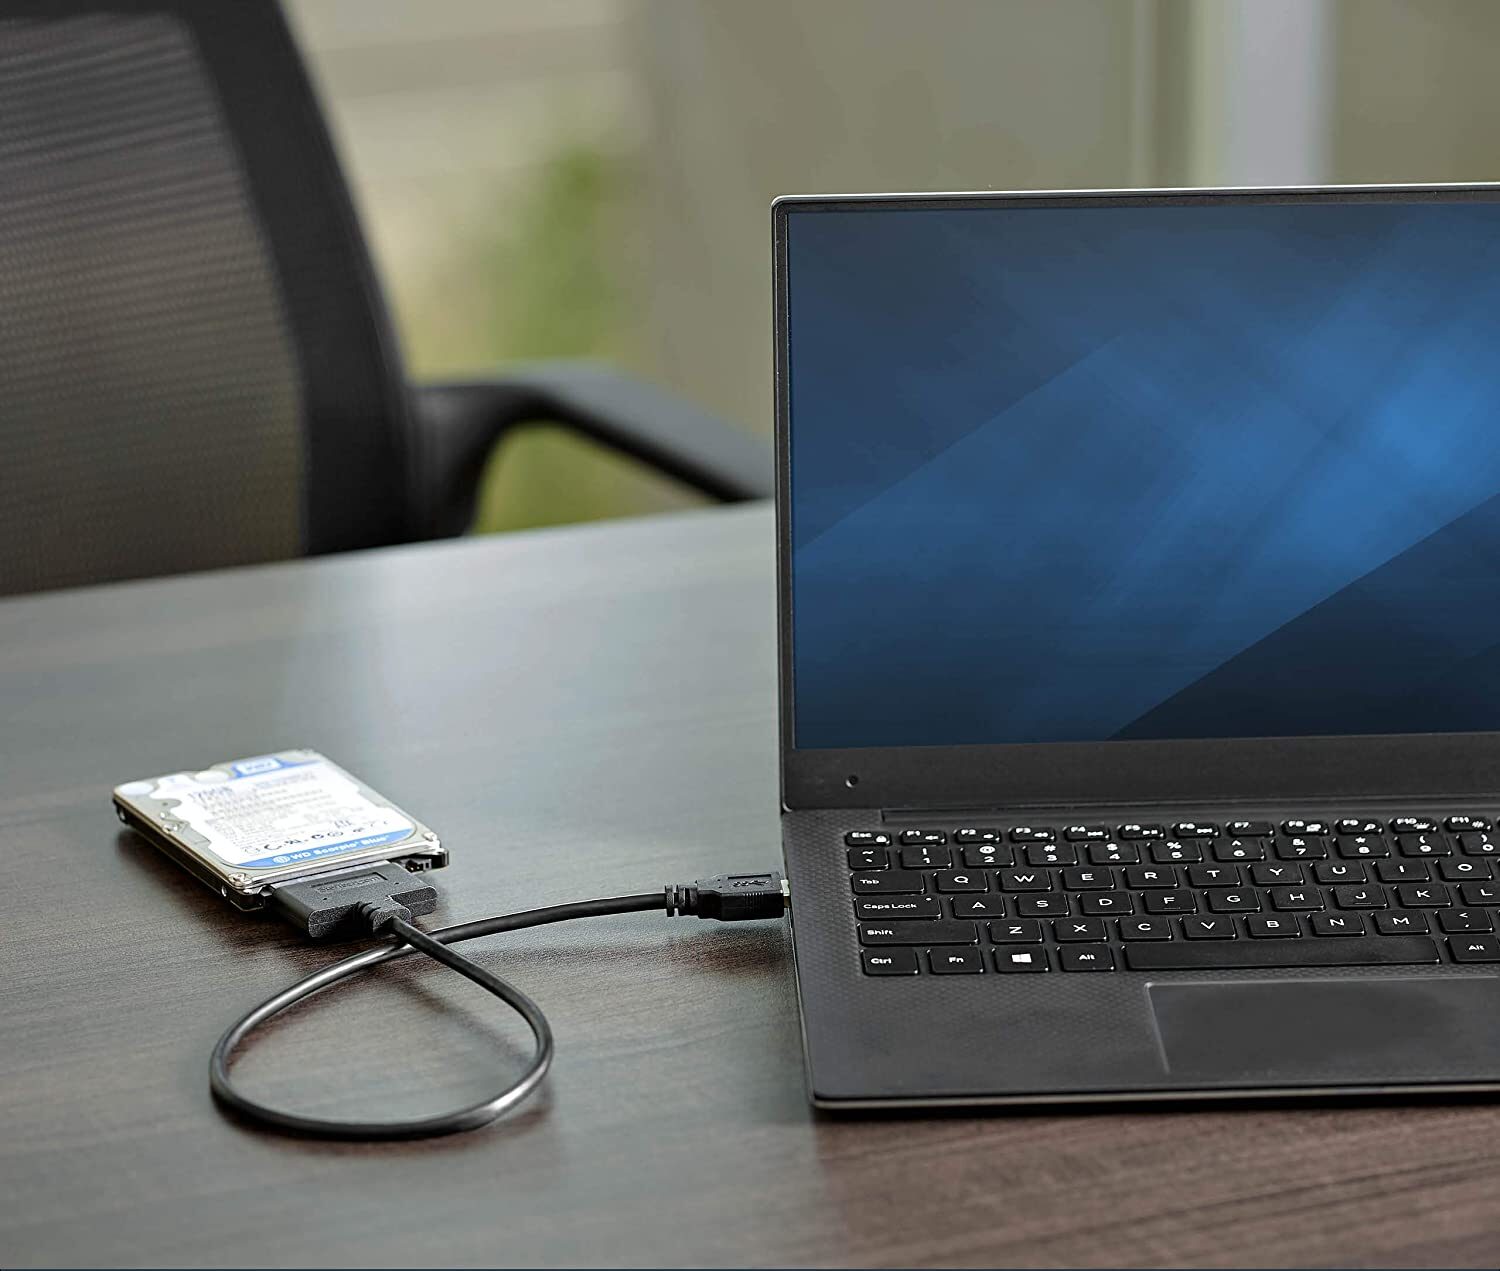
You can also transfer files using a SATA to USB connector if you have any spare SATA SSDs or HDDs. Once again, the speed of the transfer depends on how fast your SSD is and how fast the receiving PC will be. Even the fastest SATA device will top out at 600MB/s (megabytes, not bits) so be sure to pair it with the fastest converter you can find.
2. Using a USB Bridge
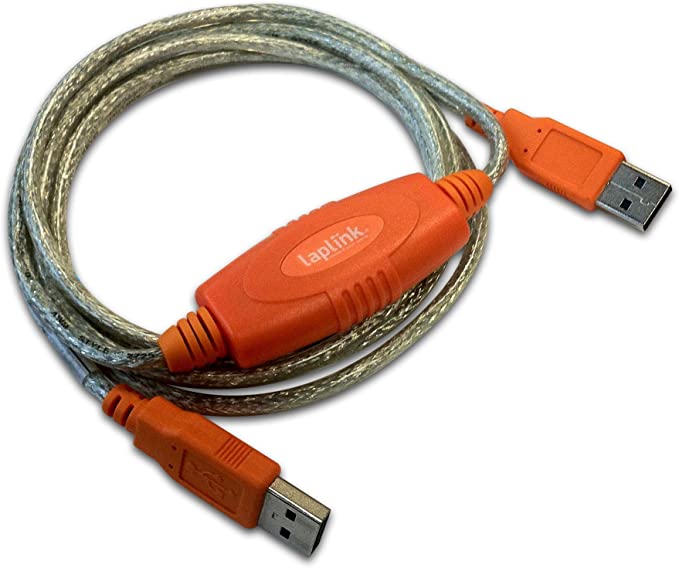
A USB bridge is a cable with a USB Type-A connections on both ends. Used for connecting 2 PCs together, it usually has its own software that must be installed on both PCs. This allows the connection between PCs to be established properly. This software may ship with the cable in the form of a CD or, in keeping up with the times, as a USB dongle. Usually though, it’s available on the internet to download.
After installing the software and setting up the connection, you can simply transfer files between the systems as you would do between the PC’s own storage drives. The main disadvantages of this method are that the PCs need to be in close proximity and that the software may not be compatible with all operating systems.
This method is much faster than using external storage media as the file transfer is direct. Most bridge cables are designed for high-speed transfers, but the brand you choose can have an impact. Again, use the USB 3.0 port on either device for the best possible speed.
3. Transferring files over LAN
For this method to work, both PCs need to be on the same local network, which means they need to connected to the same network via ethernet cables. Both ethernet cables should be connected to the (same) Wi-Fi router on one end and either PC on the other end.
Once that’s ensured, follow these steps in Windows:
Enabling Network Sharing:
- Using the Search function on Taskbar, open up Control Panel.
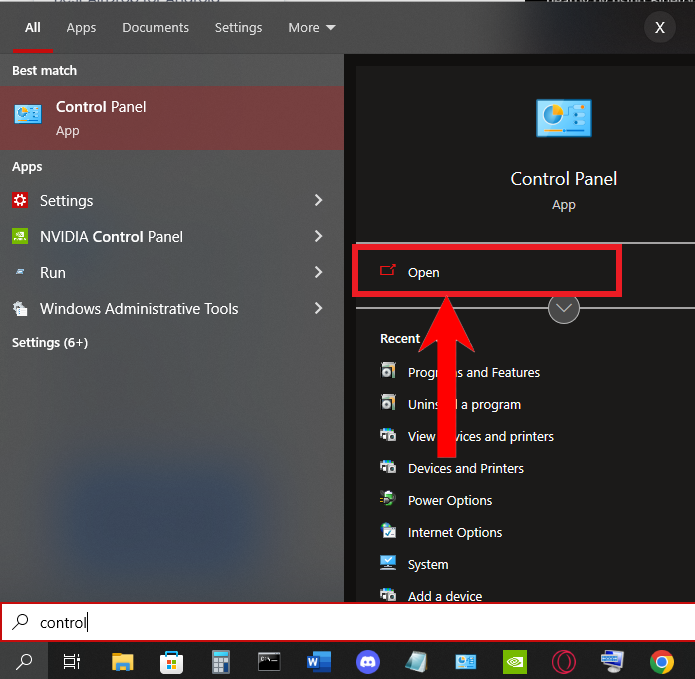
Search Control Panel and open it - On the Control Panel, click on Network and Internet.

Click on Network and Internet - Next, click on Network and Sharing Center.

Click on Network and Sharing Center - Now, select Change advanced sharing settings.
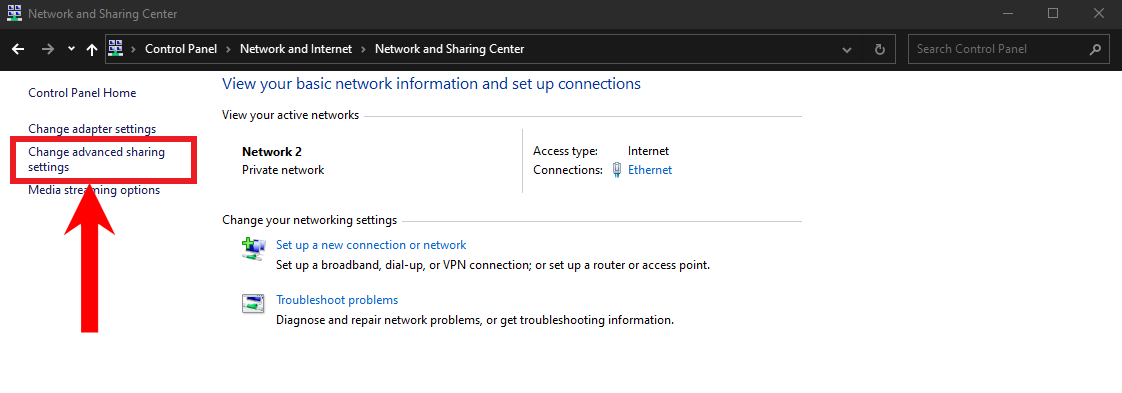
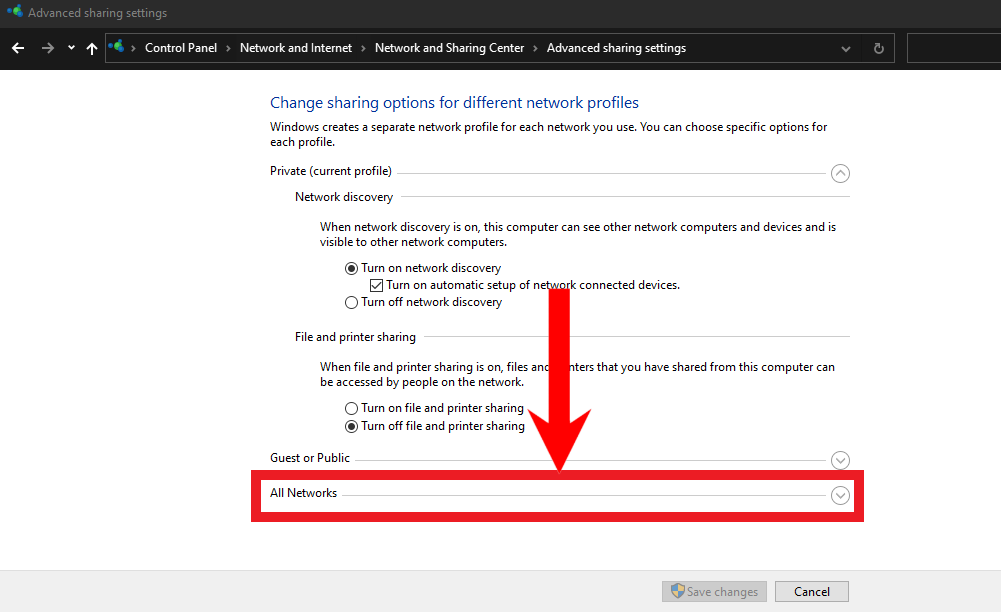
Click on Change advanced sharing settings - After this, click on the All Networks drop-down.
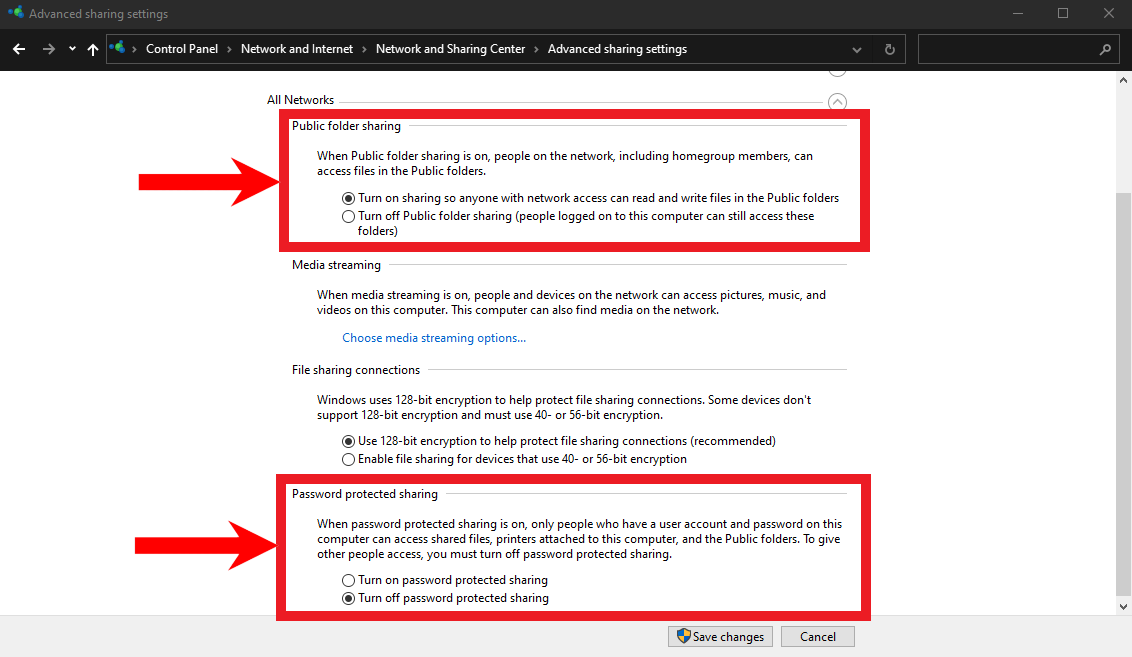
Open up the All Network settings - Once the All Networks settings open, ensure that Public folder sharing is turned on and Password protected sharing is turned off.
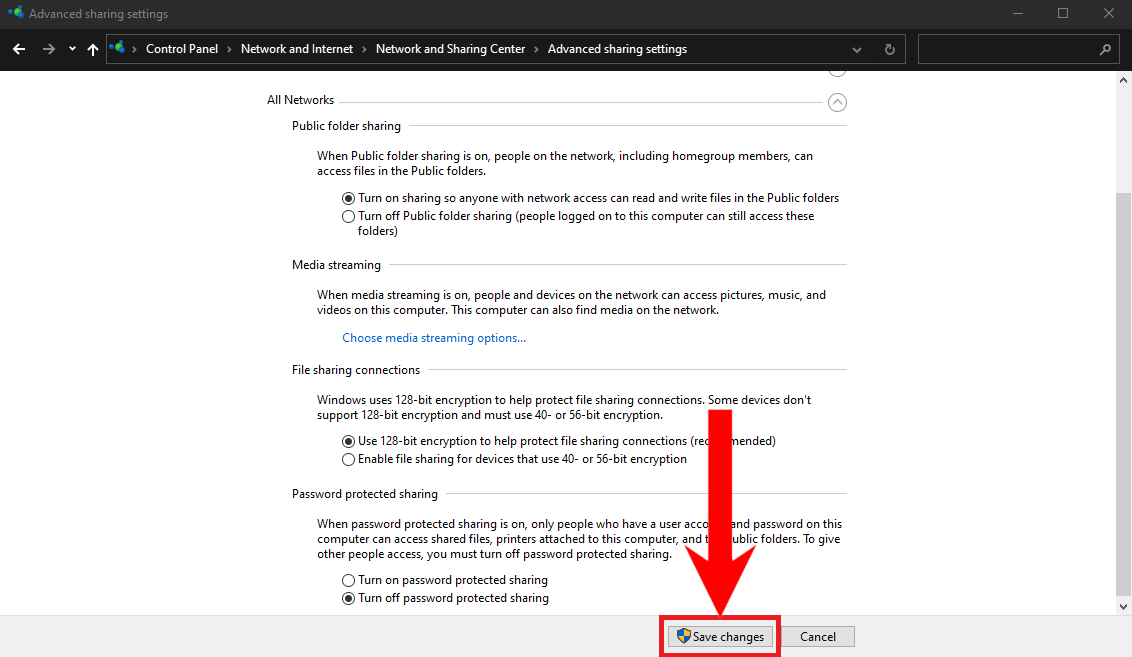
Make sure that these options are configured as shown - Click on Save changes when done.
Click on Save changes
Setting up Static IP Addresses:
- On the next window, click on Ethernet.
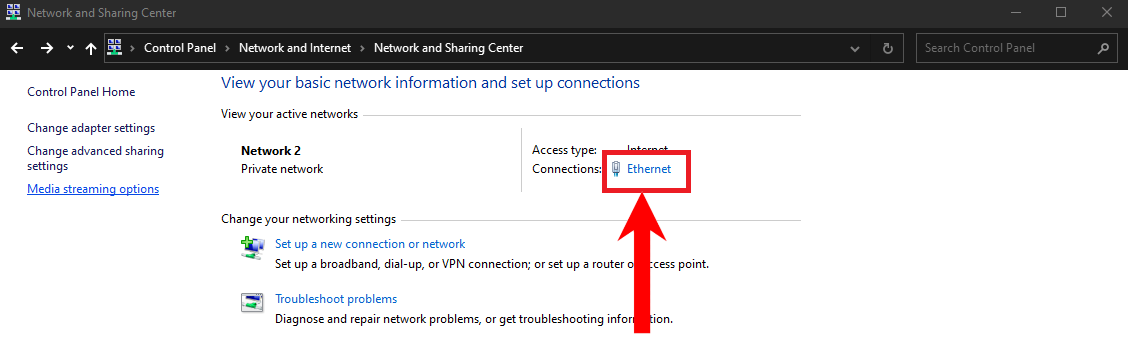
- On the pop-up menu, select Properties.

Click on Properties - From the Properties menu, scroll down and find Internet Protocol Version 4 (TCP/IPv4). Enable it if it isn’t. Click on Properties.

Select Internet Protocol Version 4 (TCP/IPv4) and select Properties - On the new window, select Use the following IP address. Input the following values. As for DNS server values, leave them blank.
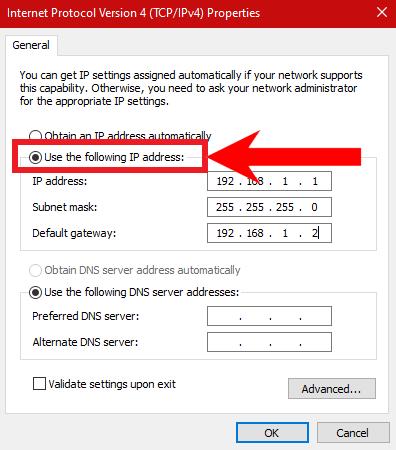
Enter the values as shown - Now, click on OK.

Click on OK - Meanwhile on the second PC, do the same thing except change the values as shown. Likewise, click OK when done.

Switch these values and enter them as shown - Lastly, open File Explorer. Click on Network. Accordingly, the PC will begin scanning for other devices connected via Ethernet to the network. If the PC has been set up correctly, it should show up.
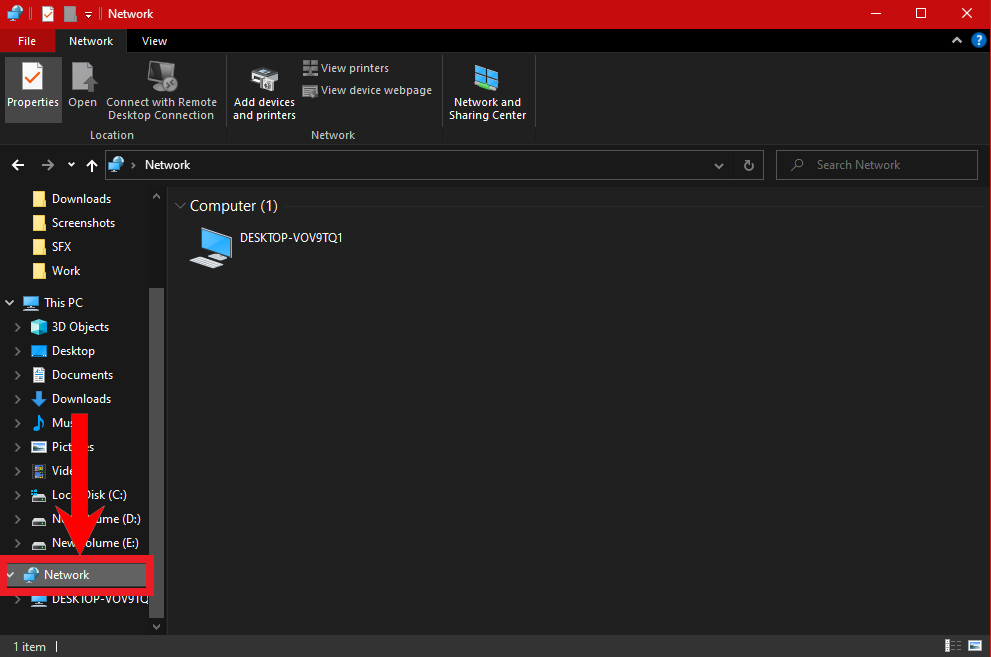
Click on Network
Sharing a File/Folder:
- On the file/folder you want to share, right-click and hover the cursor on Give access to. Select Specific people from the options shown.
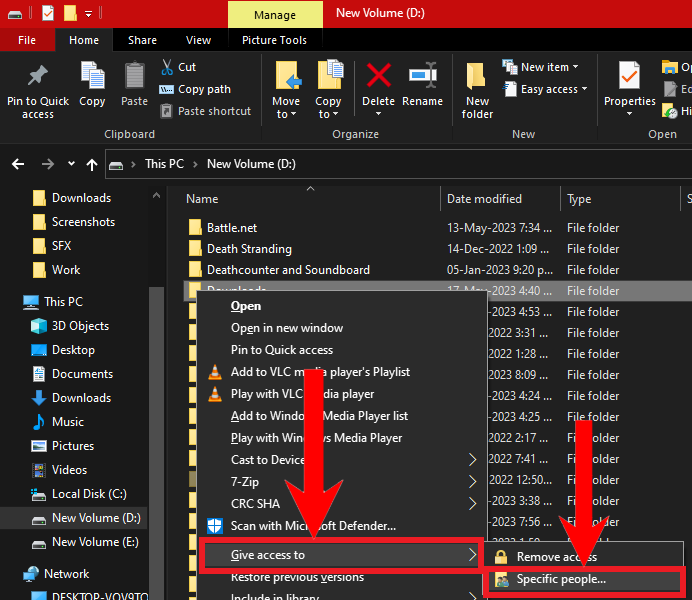
Select Specific people from the Give access to options - Consequently, a new window will open up. On this window, click on the drop-down arrow and select Everyone.
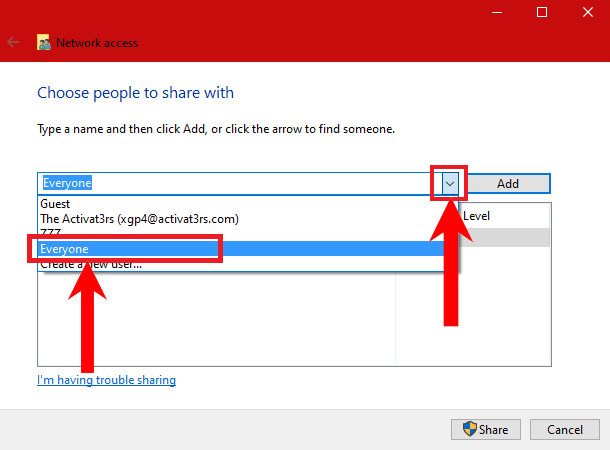
Select Everyone from the drop-down - Click on Share when done.

Click Share - Your file will be available for sharing. Click Done.
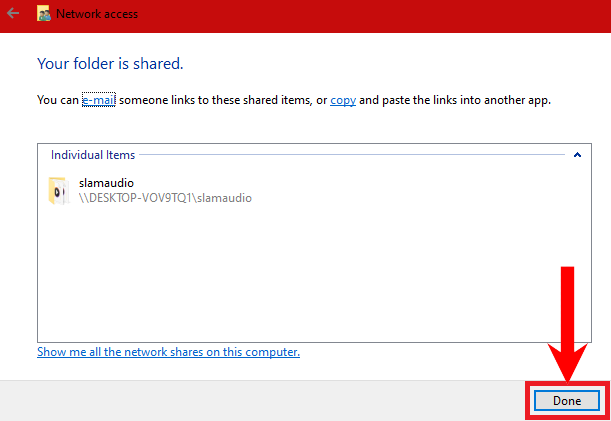
Click Done - Finally, on the second PC, you just need to go to the Network tab on the File Explorer and select the first PC. From there, browse to the same file/folder whose access you just changed. Simply copy-paste this file/folder as you would normally do.

The file/folder whose access you changed should be available
Similarly, this transfer method is also possible between two Mac devices.
4. Transferring Files over Wi-Fi
Transferring files over Wi-Fi is also a great method, as it can be done natively or through several third-party apps. These apps may be paid or free. Some great apps include SHAREit, FileFly, WiFi Transfer, etc.
The native tool for transferring files over Wi-Fi is known as “Nearby sharing“. It requires Bluetooth along with Wi-Fi. You can check out our dedicated guide on how to turn it on in Windows 11. Otherwise, here’s how to transfer over Wi-Fi natively on a Windows PC:
Enabling Nearby Sharing:
- Firstly, you’ll need to change the access of files as described above.
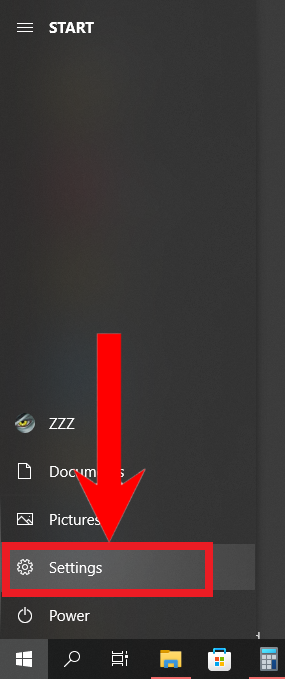
- Next, you’ll need to go to Settings. To do this, simply click on the Start Menu and click on Settings.
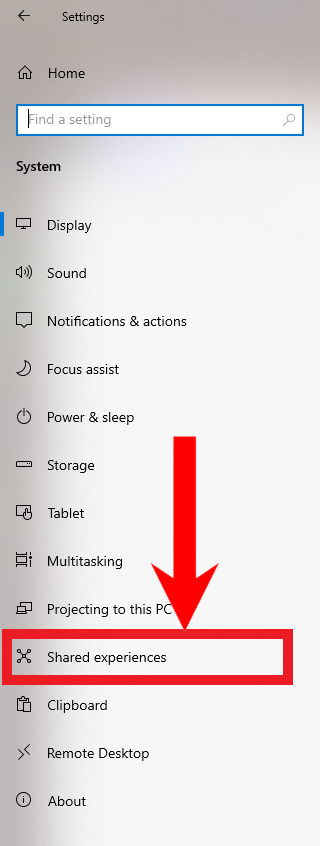
Click on Settings - In Settings, select System.

Choose System - Click on Shared experiences from the sidebar.
Click on Shared experiences - Now, make sure that the Nearby sharing option is enabled.

Ensure that the nearby sharing option is enabled - Next, open the drop-down and select Everyone nearby.
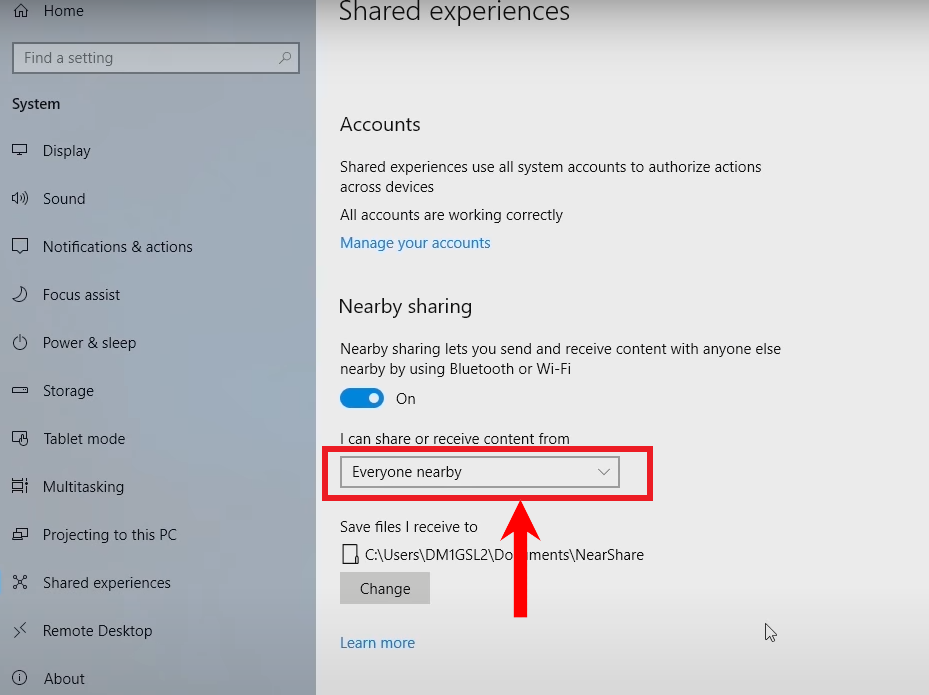
Select Everyone nearby to receive files from anyone who wants to share with you - Optionally, you can configure where the shared files are stored by clicking on Change.

Click Change to configure where the files are stored - Likewise, do this whole procedure on your other PC too.
Sharing A File:
- Finally, open File Explorer, select the file you want to share and right-click on it. Select Share.
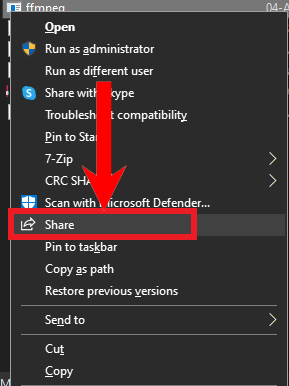
Select Share from the right-click menu. - Your other PC should show here if Nearby sharing is enabled

Your other PC should show here if Nearby sharing is enabled
This method also requires that the PCs be in close range. Additionally, a high-speed Internet is also preferred to ensure the fastest transfer, especially in the case of large files.
Furthermore, as many desktop PCs don’t come with Bluetooth, you’ll have to buy a dongle or adapter. They are plenty of options to choose from on Amazon. Also, Mac systems have a similar technology by the name of AirDrop.
5. Cloud Sharing
Cloud sharing is one of the best ways to transfer files from one PC to another, as it does not necessarily require the PCs to be near each other. The PCs can be countries apart, and still transfer files just fine. In fact, you can even enjoy PC games on Android using the cloud.
Cloud sharing does require you to have a high-speed internet connection, with decent upload and download speeds. There are various cloud storage services such as Google Drive, MEGA, Dropbox, OneDrive, etc., that we can take advantage of to facilitate this method.
Similarly, some browser-based file transfer services are also available. The best among them are Uppy, FilePizza, WeTransfer, amongst others.
We recommend using Google Drive as it is user-friendly, secure and fast. Additionally, to ensure privacy, you can limit access to the files that you share. Regardless, here are some steps to share files through Google Drive:
Uploading the File:
- Go to drive.google.com and sign in using your Google Account credentials.
- Once you’ve successfully signed in and see the homepage, click on New.
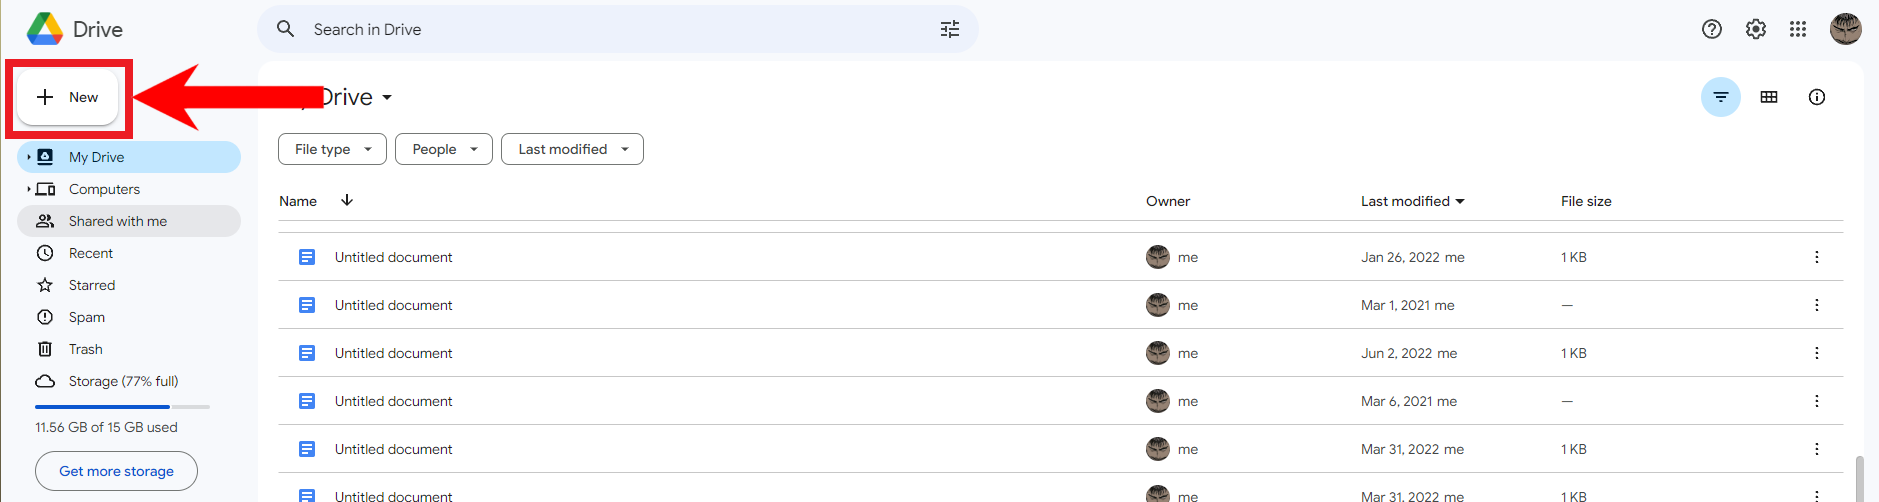
Click New - From the options that appear, select File upload.

Select File upload - Next, navigate to the file you wish to share in the File Explorer pop-up.

Select the desired file in File Explorer - Instantly, the file will begin uploading to your Google Drive. You can track its progress in the bottom-right of the screen.
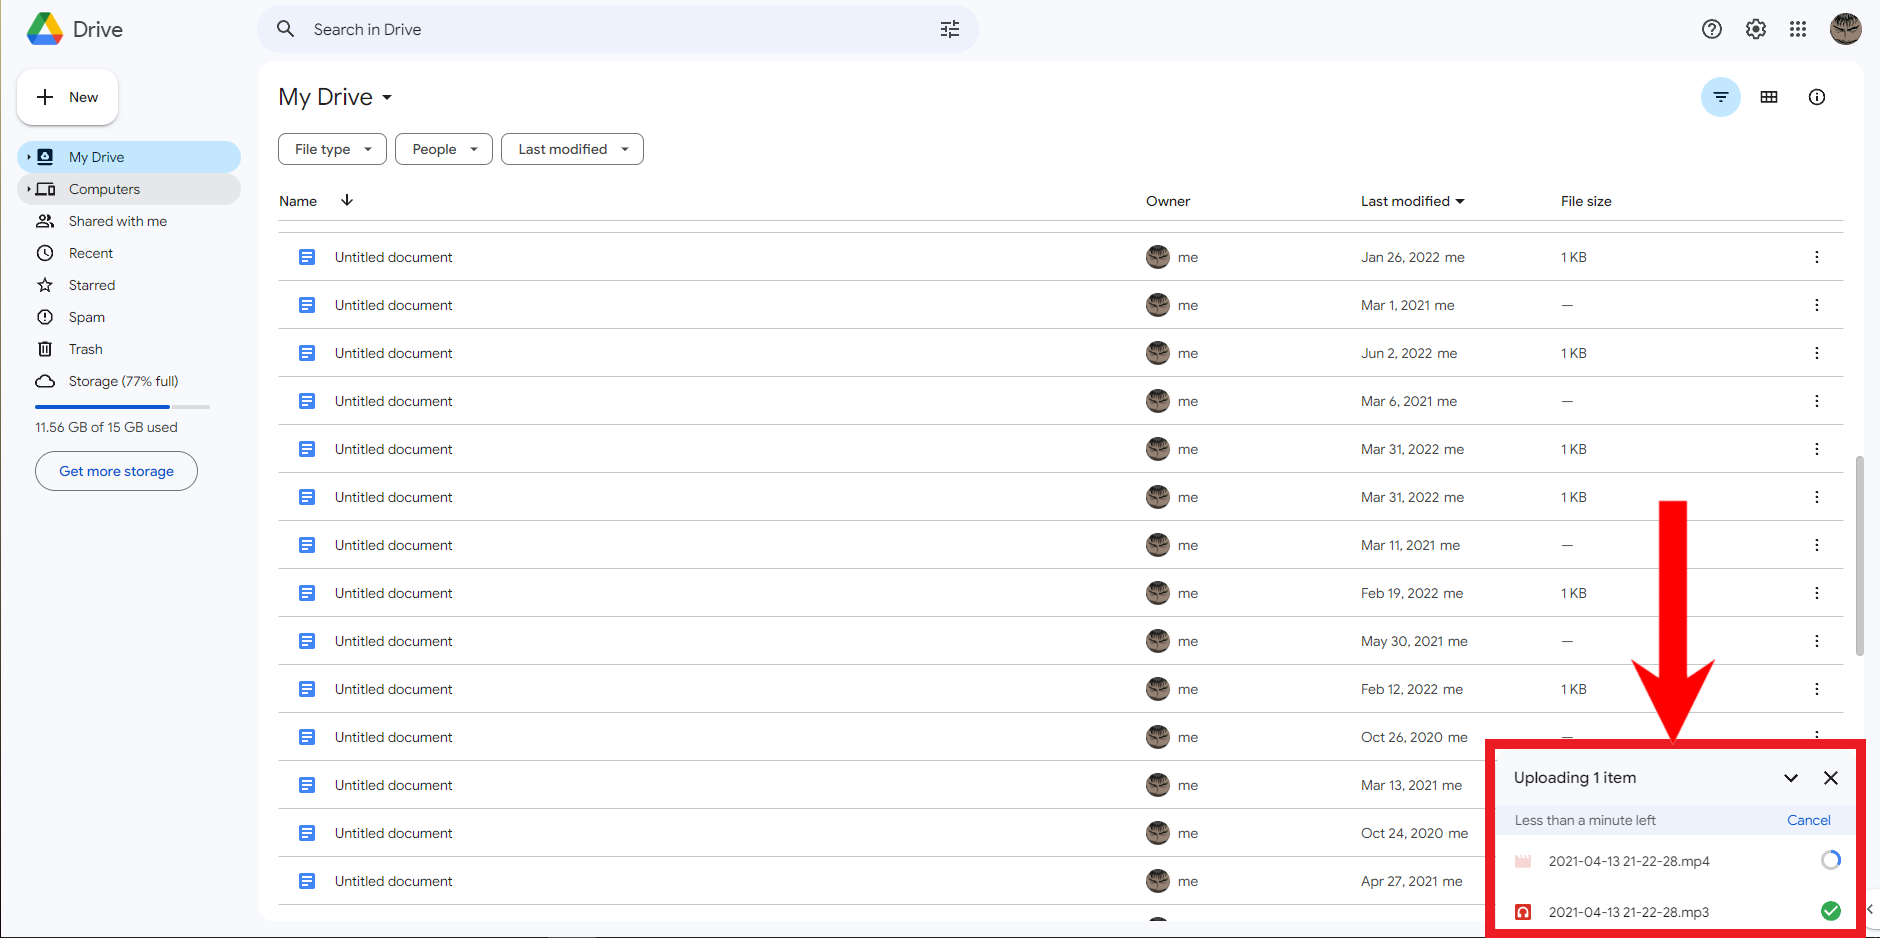
You can track the upload progress here
Sharing the File:
-
After the file has been uploaded, go to Recent. Beside the file you just uploaded on the far right of the screen, there should be 3 vertical dots representing More actions. Click on them.

Click on More options -
From More options, click on Share.
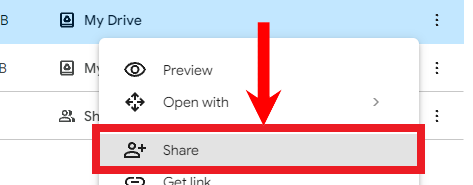
Click on Share -
Now, you’ll be able to configure who you want to share this file to. To make the transfer more private and secure, you can choose Restricted access. If you choose Restricted, you’ll have to add the email addresses of the people who you want to give access to the files. If the file is for a large group, you can change the access setting to Anyone with the link.
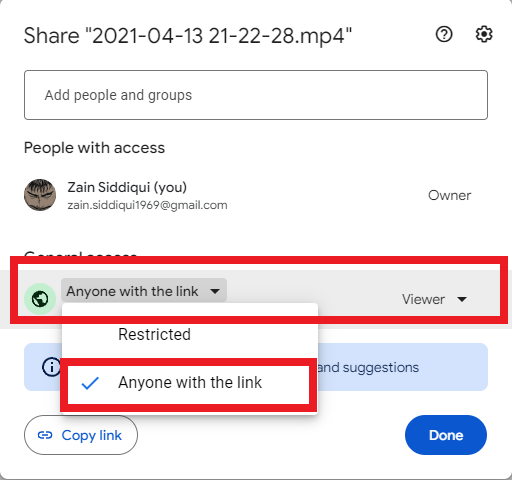
Change access to Anyone with the link to make the file available for public -
Finally, click on Copy link. Share the link with those who you want to share the file. Click Done.

Click on Copy link and Click Done when the settings are configured
Consequently, people can now access the files you uploaded and download them freely, any number of times and whenever they want. You can also keep the access restricted and add certain email addresses to only give them access to the files. In addition, we also have a detailed guide on how to transfer contents of Google Drive from one account to another with their ownership, if you need to do that.
Keep in mind that Google Drive offers only 15GB of free space, but you can upgrade your storage by subscribing to a paid plan.
Transfer Complete
Transferring files has become a necessity nowadays. No matter the situation, these methods are guaranteed to help you complete this task. Share away!
Reviewed by Huzaifa Haroon


