How to Fix Slow File Transfer Speed on Windows 10/11
Many Windows users are experiencing slow file transfer speeds when trying to move a file between two internal drives, between two PCs (over the network) or between one external drive and one internal drive. This problem is confirmed to occur on both Windows 10 and Windows 11.

As it turns out, there are several different potential culprits that might be responsible for this issue (either you’re on Windows 10 or Windows 11). To make this easier, we’ve made a list of the things you should troubleshoot if your current Windows installation has this problem:
- System file corruption – One of the most common scenarios that might trigger this issue is system file corruption affecting one or more file transfer dependencies. In this case, your first attempt at tackling this issue is to run a file system check scan. If that fails, deploy SFC & DISM scan in quick succession.
- Windows Auto-Tuning is enabled – Even if the Auto Tuning feature on Windows 11 has noble goals and works, for the most part, it will do much more damage than help if your current network uses an old router that works with limited bandwidth. Another scenario that might cause this issue is a firewall that does not support auto-tuning. In this case, you are better off disabling windows auto-tuning.
- Slowness caused by a limit imposed on reservable bandwidth – To accommodate system activity, Microsoft has the right to impose a default cap on network bandwidth of up to 80%. This cap may apply when uploading huge files and restrict the network performance of your PC, slowing down Windows file transfers. If this is the primary contributing factor to the problem, you can fix it by changing the default reserved bandwidth.
- 3rd party interference – As it turns out, a background program might interfere with the system file transfer jobs and damage your overall transfer speeds. You can test out this theory by booting up your computer in a clean boot state where no 3rd party service or startup item is permitted to run.
- Drive is fragmented – If you are experiencing this issue on a traditional HDD that was never defragmented, you first need to ensure that the leading service used for this task (Optimize drives) is enabled and configured to run at every startup.
- RDC service is enabled – The Remote Desktop Connection (RDC) service can also indirectly lower your transfer speeds locally and over the network. If the RDC is enabled on your PC, disabling it from the Windows Features screen should slightly improve your file transfer speeds.
- Outdated USB drivers – You should update your USB drivers if you’re only experiencing this problem while transferring files from or to an external storage device connected via USB. To do this, you must go under Device Manager and update every Universal Serial Bus Controller driver.
- Drive is formatted to FAT32 – FAT32 is notoriously slow when having to transfer big files. If you are happy with a tiny bump in your transfer speeds, you can resolve the issue by converting the pragmatic drive’s system format to NTFS from FAT32.
- File Indexing is enabled on low-end PC – As it turns out, this issue might be caused by an indexing bug if you’re running Windows on a low-end computer. Some users claim that their transfer speeds were significantly improved after they disabled the file indexing feature.
- Large Send Offload is Enabled – As it turns out, another potential culprit affecting your file transfer speed is a feature called Large Send Offload (LSO). One solution to ensure that this feature doesn’t impact your transfer speeds when moving a file (across your drives or over the network) is to disable it using Device Manager.
Now that we have gone over every potential reason why you see painfully slow transfer speeds when moving a file onto or out of your Windows installation let’s visit a couple of confirmed fixes that other Windows users have successfully used to fix the issue.
However, before you start with the troubleshooting methods, you should check if anything is running in the background, causing the High Disk Usage issue. If there is anything running in the background using a lot of disks, it can decrease the speed of your file transfers.
We have a dedicated article for this issue, you can check it out here: High Disk Usage on Windows.
1. Run a System Error Check scan
A system file corruption scenario that affects one or more file transfer dependencies is one of the most frequent ones that might cause this problem. In this situation, running a file system check scan is your first defence against this problem.
This utility will allow you to identify and resolve superficial periods that might bring your transfer speeds down in certain situations. The Error Checking tool is available on both Windows 10 and Windows 11.
If you haven’t run this type of scan yet, follow the instructions below for specific steps on how to do it:
- Press the Windows key + E to open up a File Explorer window.
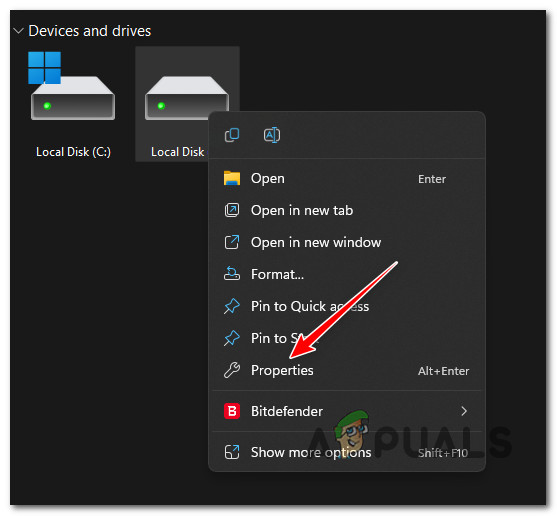
- Once you’re inside, go under This PC, right-click on the drive experiencing slow transfer speeds when transferring files in and out of the drive, and click on Properties.
Access the Properties screen - Once inside the Properties screen, select the Tools tab from the horizontal bar at the top, then click on the Check button associated with Error checking.
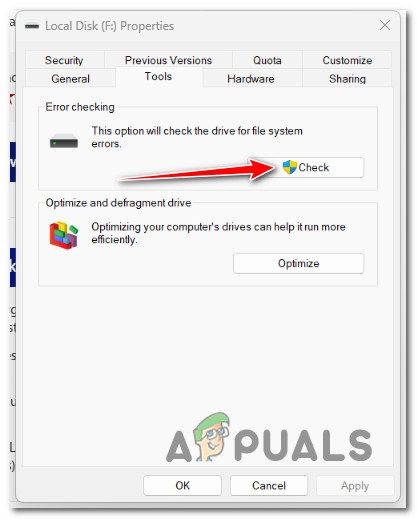
Checking for errors - Click on Yes to grant admin access at the UAC (User Account Control) prompt.
- Click on Scan drive and wait until the drive is found.
- Once the results are in, repair every error and wait until the issue is fixed.
If the problem is still not fixed, move to the next potential fix below.
2. Enable Defragmentation Service
If you are experiencing this issue on a traditional HDD that was never defragmented, the first thing you need to do is ensure that the leading service used for this task (Optimize drives) is enabled and configured to run at every startup.
Several affected users have reported that once they reconfigured the Optimize drives service and configured it to Automatic, the system ran a defragmentation task on the drive, fixing the transfer speed issue.
If you’re not sure if your system is configured to auto-defragment drives, follow the instructions below to enable the ‘Optimize drives’ service and change its startup behaviour:
- Press Windows key + R to open up a Run dialogue box.
- Next, type ‘services.msc’ inside the text box, then press Ctrl + Shift + Enter to open up the Services screen with admin access.

Access the Services screen - Click Yes to grant admin access at the User Account Control (UAC).
- Inside the Services screen, select Services (Local) from the left-hand side tab, then move over to the right-hand tab and scroll down through the list of services until you locate Optimize Drives.
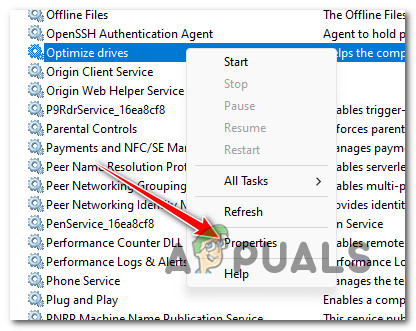
Access the Properties screen - Once you discover the correct service, right-click Optimize Drives and click on Properties from the context menu.
- From the Properties screen, click on the General tab and change the Startup type to Automatic before clicking on Apply to save the changes.

Optimize Drives - Reboot your PC to allow the drive to be defragmented and see if the transfer speed improves afterwards.
If the problem is still not fixed, move to the following method below.
3. Disable RDC
The Remote Desktop Connection (RDC) service can also indirectly lower your transfer speeds locally and over the network.
This service allows a sign user to log into a network computer running a terminal server. However, in doing so, it ‘hogs’ a lot of available transfer bandwidth that would otherwise be used when moving a file inside or outside your Windows drive.
If the RDC is enabled on your PC, disabling it from the Windows Features screen should slightly improve your file transfer speeds.
For specific instructions on how to disable the RDC service, move down to the following method below:
- Press the Windows key + R to open up a Run dialogue box.
- Next, type ‘appwiz.cpl’ inside the text box, then press Ctrl + Shift + Enter to open up the Programs and Features menu with admin access.

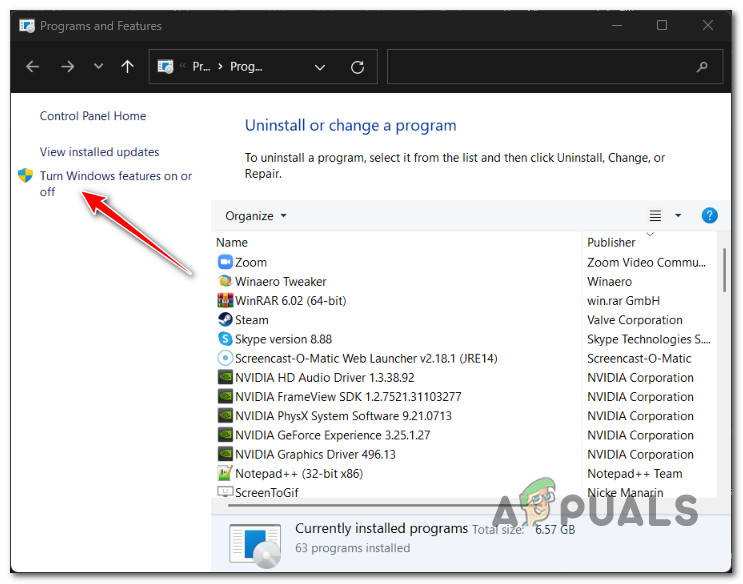
Access the Programs and Features menu - Click Yes to grant admin access at the User Account Control (UAC).
- Once inside the Programs and Features menu, click on Turn Windows features on or off.
Access the Turn Off or On Windows Features screen - Once inside the Windows Features screen, scroll down through the list of active Windows Features and locate the entry named Remote Differential Compression API Support.
- Uncheck the Remote Differential Compression API Support box and click on Ok to disable this feature.
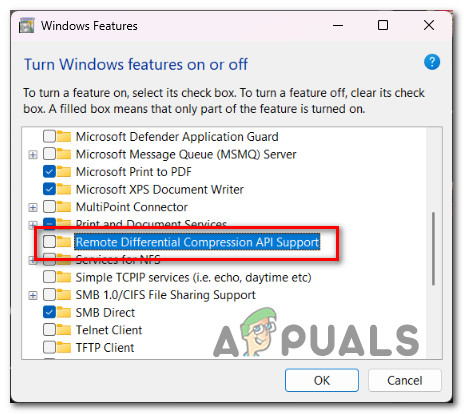
Disable Differential Compression API Support - Reboot your PC and see if the problem is now fixed.
If you don’t see any improvement in your transfer speeds, move down to the following method below.
4. Update USB Drivers (if applicable)
You should update your USB drivers if you’re only experiencing this problem while transferring files from or to an external storage device connected via USB. To do this, you must go under Device Manager and update every Universal Serial Bus Controller driver.
This will be effective in those scenarios where you’re only experiencing lower-than-normal transfer speeds while moving data on or from an external drive connected via a USB cable.
Follow the instructions below for specific steps on updating all your USB drivers and improving your file transfer speed:
- Press the Windows key + R to open up a Run dialogue box. Next, type ‘devmgmt.msc’ and press Ctrl + Shift + Enter to open up Device Manager with admin access.

Open Device Manager - Click Yes to grant admin access when prompted by the User Account Control (UAC).
- Once you’re inside Device Manager, scroll down through the list of services and expand the drop-down menu associated with Universal Serial Bus controllers.
- Next, right-click on every entry inside Universal Serial Bus controllers and click on Update driver.
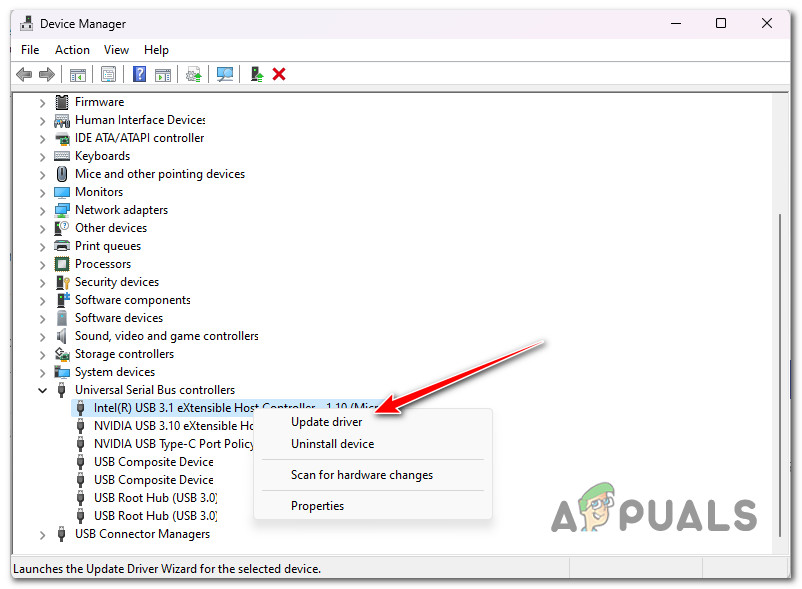
Updating the driver - From the next screen, click Search automatically for drivers, then wait for the scan to complete.
- If a new driver is identified, follow the on-screen instructions to install the pending update.
- Reboot your PC and see if the transfer speed is improved.
If the same issue is still occurring, move to the next method below.
5. Change file system format to NTFS (if applicable)
If you are happy with a tiny bump in your transfer speeds, you can resolve the issue by converting the pragmatic drive’s system format to NTFS from FAT32. Don’t expect a massive improvement, but you will see a sizeable difference when moving or copying larger files.
Important: This operation will remove all the existing USB drive data from your drive. Make sure you back up all your data before you lose everything during the conversion to the NTFS file system format.
If you understand what this will do to your files and you still want to go forward with this method, follow the instructions below:
Note: The instructions below will work on both Windows 10 and Windows 11.
- Press the Windows key + R to open up a Run dialog box. Next, type ‘cmd’ inside the text box, then press Ctrl + Shift + Enter to open up an elevated Command Prompt.

Open a CMD window - Click Yes at the UAC (User Account Control) prompt to grant admin access.
- Once you’re finally inside the elevated Command Prompt window, type or paste the following command to initiate conversion to the NTFS file format:
convert X:/fs:ntfs
Note: Keep in mind that X is a placeholder for the actual drive letter of the drive you are trying to convert to NTFS. If you’d wish to convert the D drive to NTFS, the actual command would be ” convert D:/fs:ntfs’.
- Wait until you get the conversion success message, reboot your PC and see if the transfer speeds are now improved.
If the problem is still not fixed, move to the next method below.
6. Disable file indexing
As it turns out, this same problem can also be brought on by an indexing bug if you’re running Windows 11 on a low-end computer that hardly fulfils the basic requirements.
Other concerned users claim that your transfer speeds will be significantly impacted if the indexing feature cannot obtain the resources needed to index all necessary files. It will then draw on the available transfer bandwidth.
If this situation applies, turning off your PC’s indexing is one way to solve the problem.
Note: If you do this, your files will no longer be indexed, making it difficult for you to discover them when doing a search quickly.
To suspend the indexing service using the standard Control Panel function, adhere to the directions below:
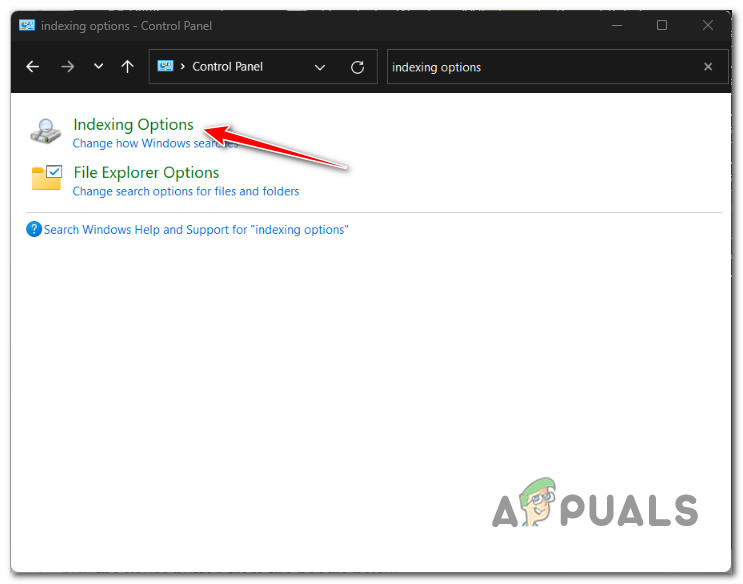
- To bring up the Run dialogue box, press Windows key + R. The traditional Control Panel interface will appear once you put “control” in the text field and hit Enter.

Access the Control Panel - When you’re in the traditional Control Panel interface, utilize the search box in the top-left corner to look up “indexing” and select Indexing Options from the context menu that just appeared.
Accessing the Indexing Options menu - After selecting each folder inside the Indexing Options menu, click Modify, then pick the Pause button from the handle below.

Disable indexing - During turning off the indexing feature, restart your computer and check to see if the issue has been resolved after the subsequent startup.
If you’re still experiencing the same painfully slow transfer speeds even when indexing is disabled, move down to the next method below.
7. Disable Large Send Offload
As it turns out, another potential culprit affecting your file transfer speed is a feature called Large Send Offload (LSO).
Note: Although Large Send Offload (LSO) is designed to boost the system’s network performance, it actually lets background programs use a lot of network bandwidth, which reduces the speed of network data transfer.
One solution to ensure that this feature doesn’t impact your transfer speeds when moving a file (across your drives or over the network) is to disable it using Device Manager effectively.
Follow the instructions below for specific steps on disabling the large send-offload feature via Device Manager:
- Press the Windows key + R to open up a Run dialogue box. Next, type ‘devmgmt.msc’ and press Ctrl + Shift + Enter to open up Device Manager with admin access.
Open Device Manager - Click Yes to grant admin access when the User Account Control (UAC) is prompted.
- Once you’re inside Device Manager, scroll through the list of services and expand the drop-down menu associated with Network Adapters.
- Next, right-click on your network adapter and choose Properties from the context menu.
- From the Properties screen, click on the Advanced tab, then select the Large Send Offload v2 (IPv6) Property and set the value to Disabled.
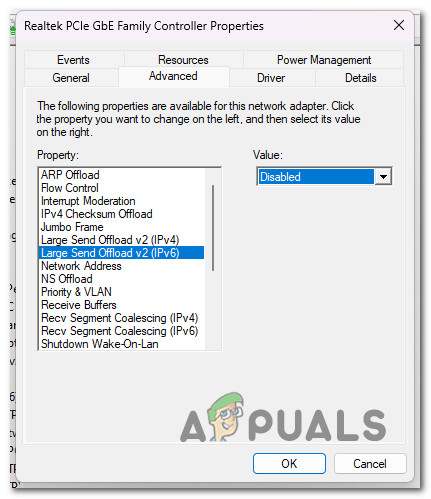
Disable Large Send Offload v2 (IPv6) - Repeat step 5 with the Large Send Offload v2 (IPv4) Property.
- Click Apply to save the changes, reboot your PC and see if the problem is now fixed.
If this made no difference in your transfer speed, move down to the next method below.
8. Disable Auto-Tuning Level
The auto-tuning function in Windows 10 should be considered if you intend to execute a file copy over the network. It should increase the effectiveness of the process and enhance the performance of applications that accept TCP data across networks.
You could notice a decreased file transfer speed; nevertheless, if your network has an outdated router or your firewall does not enable auto-tuning.
Note: The operating system can continuously analyze routing circumstances, including bandwidth, network latency, and application delay, thanks to the Auto-Tuning capability. To enhance network efficiency, the operating system can arrange connections by resizing the TCP receive window.
Our advice if you’re not using a high-end router or if you’re using a restrictive firewall (in a work or academic environment) is to disable auto-tuning. You will likely see a significant increase in your transfer speeds across the board.
If you want specific steps on how to disable this feature, follow the instructions below:
Note: The instructions below will work on both Windows 10 and Windows 11.
- Press the Windows key + R to open up a Run dialog box. Next, type ‘cmd’ inside the text box, then press Ctrl + Shift + Enter to open up an elevated Command Prompt.
Open a CMD window - Click Yes at the UAC (User Account Control) prompt to grant admin access.
- Once you’re finally inside the elevated Command Prompt window, type or paste the following command and press Enter to disable the auto-tuning feature effectively:
netsh int tcp set global autotuninglevel=disabled
- After this command has been processed successfully, engage in a file transfer operation and see if the transfer speed has improved.
- In case disabling the auto-tuning feature didn’t improve the transfer speed in your case, run the following command to re-enable the feature:
netsh int tcp set global autotuninglevel=normal
Note: There’s no need to keep this feature disabled if it doesn’t impact your transfer speeds.
If the issue is still not fixed, move to the next potential fix below.
9. Adjust the Limit Reservable Bandwidth
To accommodate system activity, Microsoft has the right to impose a default cap on network bandwidth of up to 80% (this is the default behaviour).
This cap may apply when uploading huge files and restrict the network performance of your PC, slowing down Windows file transfers. You can reduce or deactivate the default setting by following several instructions.
However, you will need to use the Group Policy Editor, a utility only available for specific Windows 10 and 11 editions. It is not available on Windows Home, Windows Education & N versions of Windows.
Note: If you want to install the Group Policy Editor utility on a Windows edition that doesn’t come with it preinstalled, follow this guide here.
Once you’ve ensured that you can use the Group Policy Editor utility, follow the instructions below to adjust the limit reservable bandwidth and remove the potential roadblock that might be affecting your transfer speeds:
Note: Keep in mind that going this route won’t trigger a massive difference. This will only be effective when you experience slow transfer speed when moving large files.
- Press the Windows key + R to open up a Run dialog box.
- Next, type ‘gpedit.msc’ and press Ctrl + Shift + Enter to open up the Group Policy Editor with admin access.

Open the Local Group Policy Editor - Click Yes to grant admin access at the User Account Control (UAC).
- Once you’re inside the Local Group Policy Editor, navigate to the following location from the left-hand side menu:
Computer Configuration>Administrative Templates>Network
- Next, move to the right-hand section and double-click on QoS Packet Scheduler.
- Under QoS Packet Scheduler, you should find a policy named Limit Reservable Bandwidth. Double-click on it to open it.
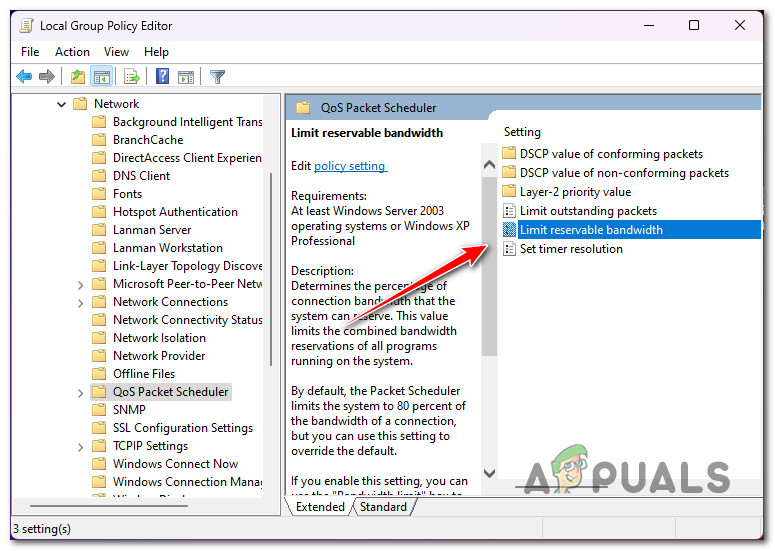
Limit reservable bandwith - After you open the Limit reservable bandwidth, change the status of the policy to Enabled, then modify the Bandwidth limit to 80.
- After this modification is enforced, reboot your PC and see if the problem is fixed.
If the same issue is still occurring or the fix above is unavailable, move down to the next potential fix below.
10. Perform a clean boot
It turns out that background software might impede system file transfers, slowing down all of your transfers. You might test this scenario by starting your computer in a clean boot state – this process forbids the execution of any startup items or third-party services.
Most of the time, the antivirus software you actively use is to blame for the issue. Try turning it off while the installation is ongoing. However, we advise you to clean the boot to ensure nothing will prevent the installation.
Note: Going this route will prevent non-Microsoft applications and services from running. Once you’ve completed it successfully, you may go back to regular mode.
What you must do is as follows:
- Press the Windows key + R key on your keyboard. Enter ‘MSCONFIG’ in the Run dialogue box, then hit OK.
- If you are prompted by the User Account Control, click Yes to grant admin access.
- Select the Boot tab and deselect the Safe Boot checkbox (if checked).

Accessing the MsConfig menu - Click the Selective startup option under the General tab in the same window, and then click the Load startup items check box to ensure it’s not ticked.
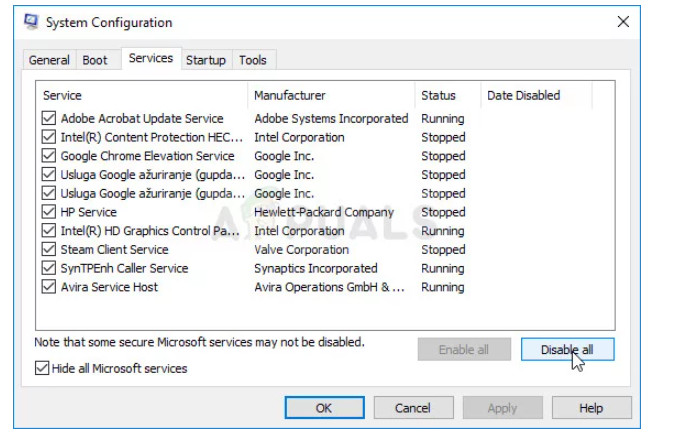
Disable all services - Click Disable all after selecting the Hide all Microsoft services check box under the Services tab.
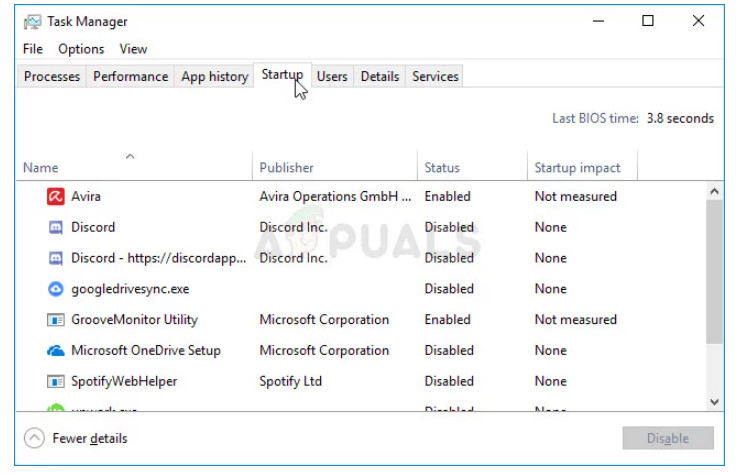
Disable the Startup items - Choose Open Task Manager under the Startup tab. Right-click any startup item enabled in the Task Manager window’s Startup tab and chose Disable.
- Next, achieve the clean boot state by booting your PC up in a clean boot state and seeing if the transfer speeds are improved.
- Regardless of the outcome, the same procedure (as explained above) must be reverse engineered to restart every service and startup item that you previously disabled.
If this doesn’t allow you to improve your transfer speeds on Windows 10 or 11, move down to the next method below.
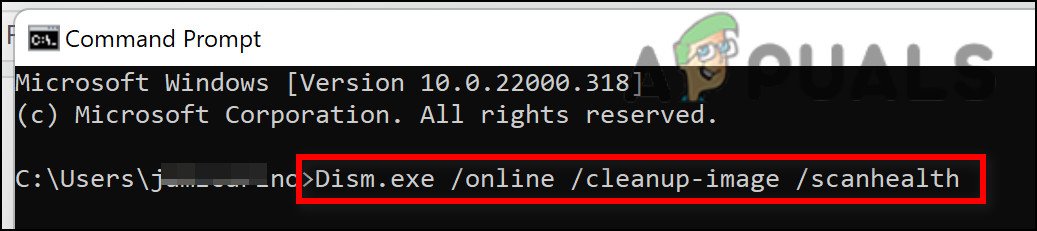
11. Deploy an SFC or DISM scan
Another reason you could be experiencing this transfer speed issue is that the Windows Update component is faulty (either directly or indirectly).
The next step in resolving this problem is to run quick successions of SFC (System File Checker), and DISM (Deployment Image Servicing and Management) scans.
Note: Even though SFC and DISM are somewhat similar, we advise running both scans quickly, one after the other to increase your chances of fixing the corrupted system files. Even if the two scans are comparable in some ways, this should still be done.
If this circumstance applies, you need to start with a basic SFC scan.
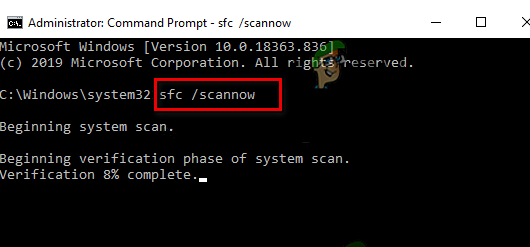
Note: This tool functions entirely locally and does not require you to be actively connected to the internet. The CMD window must not be closed after this procedure starts, even if the utility seems to have stopped responding and frozen.
Wait until the process is complete before interfering because doing so might cause logical errors on your HDD or SSD.
Restart your computer when the SFC scan has been successfully completed, and after the machine has started again, check to see if the issue has been fixed.
If the transfer speed is still slow, complete a DISM scan.
Noting that DISM uses a component of Windows Update to retrieve healthy copies of corrupted system files to replace such files, this is an essential distinction between DISM and SFC. As a result, you must make sure that you have access to a solid internet connection before starting this process.
You will need to restart your computer once again to determine if the problem has been fixed once the DISM scan has been successfully completed.
Go to the next step below if the problem has not been fixed.
12. Perform a repair install
If you’ve read this far, the issue you’re having is likely the result of system file corruption, which cannot be fixed using standard techniques. You need to replace each possible corrupted OS file if your transfer speed is still sluggish after trying every other solution mentioned above.
Refreshing every Windows component is the recommended action to solve the issue without performing a total OS reinstall (including boot data).
There are two choices available:
- Repair install – This process is more laborious and referred to as in-place repair. Although you must supply an installation medium, the benefit is that you may maintain all of your personal files—including music, movies, software, and even specific user preferences—without having to back up beforehand.
- Clean install – This is the most straightforward process. You may start it right from the menu in Windows 10 without using any installation disk. You will lose it all if you don’t back up your personal data before starting this process.


Thx, my nvme runs much faster now