What Does SOS Mean on iPhone? 11 Methods to Fix It
 Reviewed by Huzaifa Haroon
- The SOS sign on your iPhone means that it's disconnected from cellular networks and relying on emergency connections only.
- iPhone 14 series and later can connect to Satellite in certain regions to facilitate SOS in emergency situations and remote areas without network coverage.
- To fix SOS on your iPhone, make sure Airplane Mode is turned off, iOS and carrier settings are up to date, data roaming is enabled, and you're in an area that has cellular signals.
Are you seeing an SOS sign on your iPhone? While it’s not a message you expect to see, rest assured that it doesn’t mean your iPhone is sending out emergency alerts.
Turns out that the SOS or SOS Only message is Apple’s way of telling their users that their iPhone isn’t connected to a cellular network and can only be used to place emergency calls.
So, if your phone keeps throwing up errors when you are trying to send a text or make a call, don’t fret. In this article we will explore how SOS works on an iPhone and how you can fix it to get your device back to normal again.
Table of Contents
- What Does SOS Mean and Is It Available for All iPhones?
- Reasons Why Your iPhone is Showing SOS
- 11 Ways to Fix SOS on iPhone
- 1. Move Spots With Better Network Connectivity
- 2. Turn Off and Turn On Airplane Mode
- 3. Check for iOS Update
- Extra: Restart Your iPhone
- 5. Enable Data Roaming
- 6. Switch to 4G or LTE
- 7. Update Your Carrier Settings
- 8. Disable and Enable Automatic Network Selection
- 10. Reset Network Settings
- 11. Contact Your Network Carrier
- Conclusion
What Does SOS Mean and Is It Available for All iPhones?
The SOS or SOS Only message usually appears on the status bar of your iPhone when there is no cellular coverage or Wi-Fi connection available. But to clear a big misconception, the SOS feature doesn’t work the same for all iPhones.
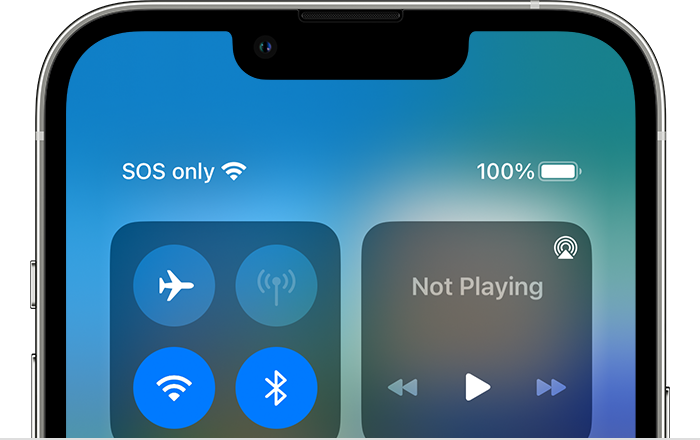
In iPhone 13 or older models, the SOS feature can be used to make emergency calls or texts in case of possible threats only when you have an available internet connection or a cellular network nearby. This means, that if you are in the middle of nowhere, your iPhone isn’t going to be of any help.
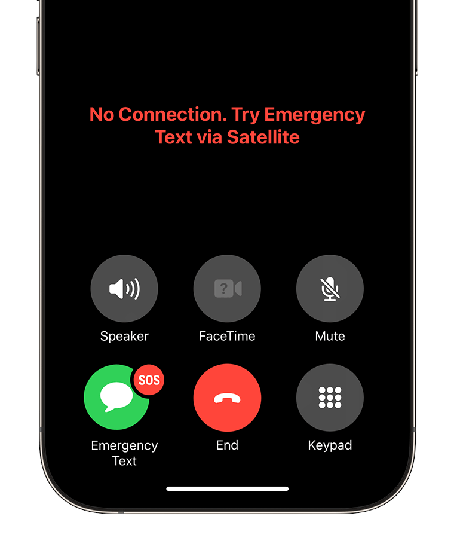
On the contrary, with the launch of iPhone 14 series, Apple introduced “Emergency SOS via Satellite.” With this feature, even if you don’t have access to a cellular network or are completely off the grid your iPhone can still make emergency calls using Satellite connectivity in select regions.
Read More: iPhone Not Receiving Calls? Explained & Resolved
Reasons Why Your iPhone is Showing SOS
There are multiple reasons as to why your iPhone can be showing SOS, let’s look at a few of them:
- Weak network coverage.
- Carrier issues.
- Airplane mode turned on.
- Damaged or improperly inserted SIM card.
- Software glitch or bug.
- Hardware issue.
11 Ways to Fix SOS on iPhone
Now that you know what the issue means and how it usually occurs, it’s time to look into some methods to fix SOS on an iPhone.
1. Move Spots With Better Network Connectivity
If you’re in an area with poor network connectivity, then the best solution is to change your location until you find a spot with better connectivity. Move around and reposition yourself if possible. However, if you are somewhere that usually has great coverage, but your iPhone is still showing SOS then keeping looking into the following fixes.
Read More: FIXED: “Cellular Network Not Available for Voice Calls” Error
2. Turn Off and Turn On Airplane Mode
Another method to fix the SOS message is by turning airplane mode on and off. Although, this might seem like a quick fix most network connectivity issues can be solved by simply restarting your iPhone’s Airplane Mode. Here’s a quick rundown to carry it out:
For iPhone X and Later
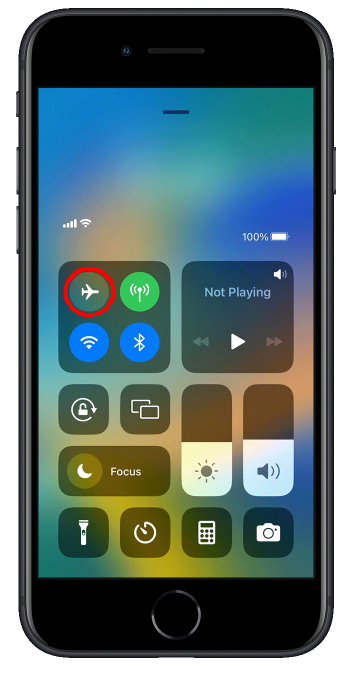
- Swipe down from the top right-side of your iPhone to open up the Control Centre.

Open up your control centre - Once you are in, you will see your Wi-Fi, Bluetooth, and Mobile Data icons. Now, tap on the Airplane Mode icon to activate it.
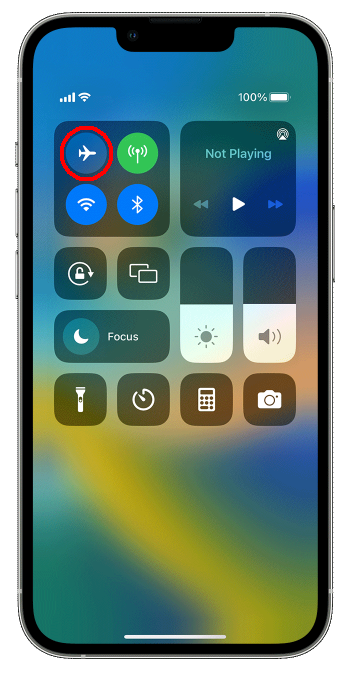
Turn your airplane mode on and off - Wait for a few seconds and then tap on the Airplane Mode icon again. This will restart your iPhone’s mobile network and will re-attempt the connection shortly.
For iPhone 8 and earlier
- Swipe up from the bottom edge of your screen, to open the Control Centre.
Open your control center - From here simply tap on the Airplane Mode icon and then turn it back off again.
Enable and disable airplane mode | Apple
3. Check for iOS Update
Updating iOS is essential for optimal performance, and that includes preventing any bugs or glitches. If there are any pending updates on your iPhone, then it’s possible that they might be the reason behind the SOS message.
Here’s how to quickly check for updates:
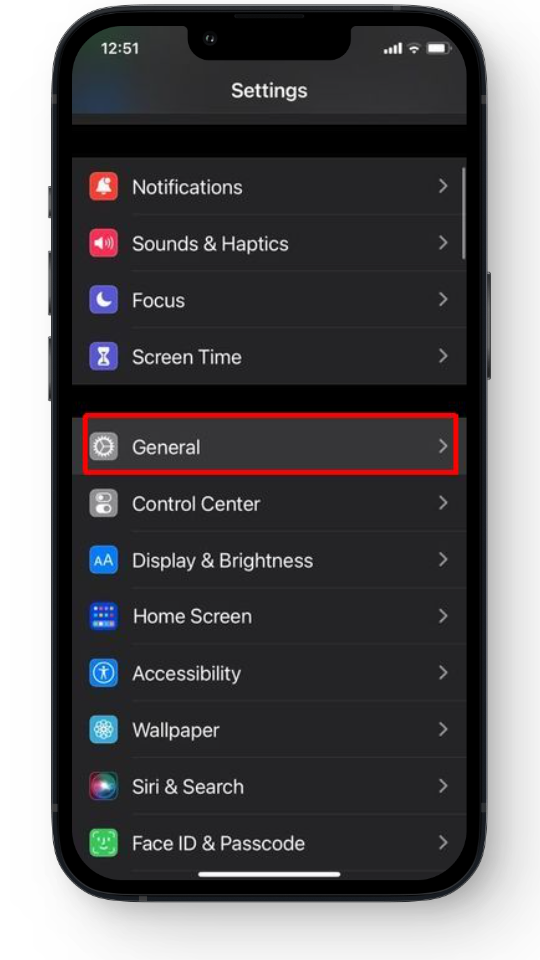
- Head to settings on your iPhone.
- Next, select the General tab.
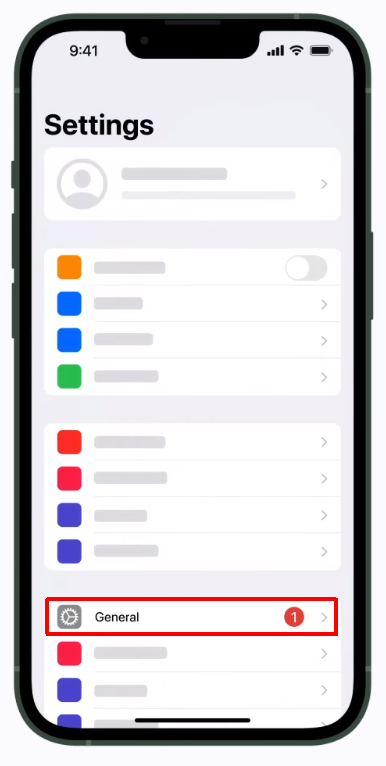
Head to settings > general - From here, Locate “Software Update.”
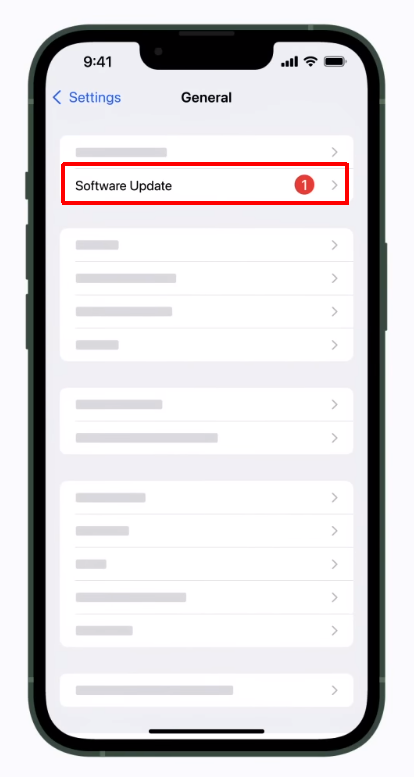
Select software update - If there’s an available simply hit the “Download and Install” option.
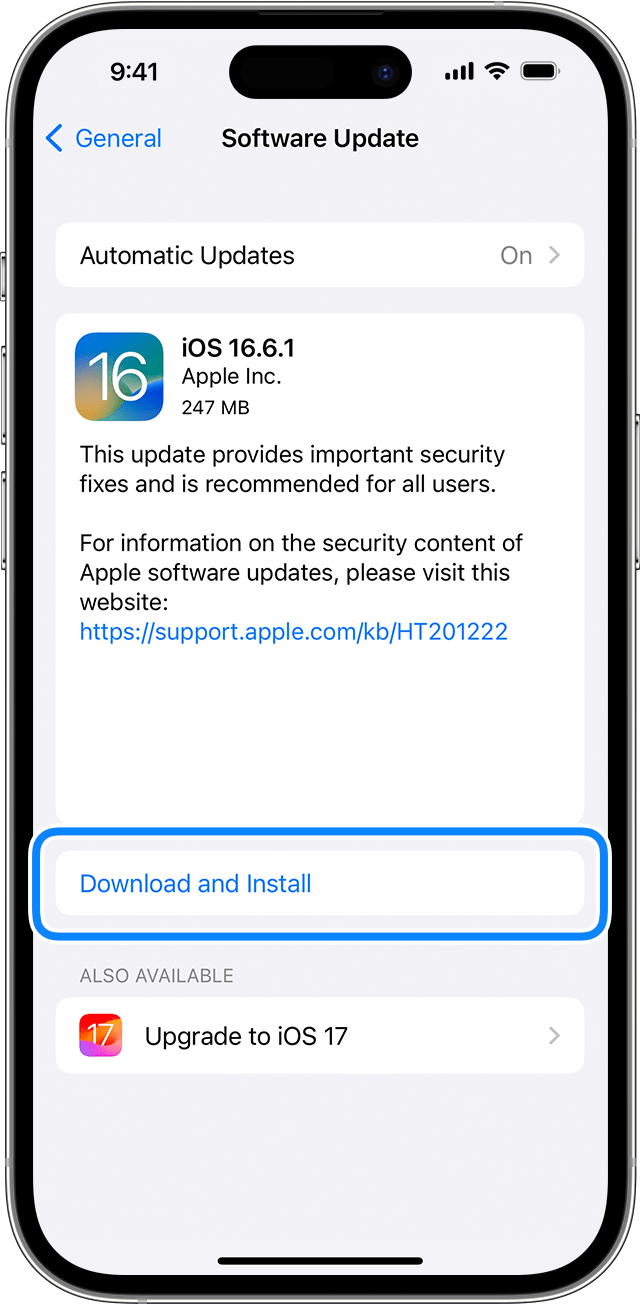
Update your iOS if you have one available | Apple
Extra: Restart Your iPhone
One last straightforward method before we jump into some technical ones is to give your iPhone a quick restart. Restarting your iPhone can fix cache issues and bugs to ensure a more stable and reliable network connection.
Here’s how to restart your iPhone:
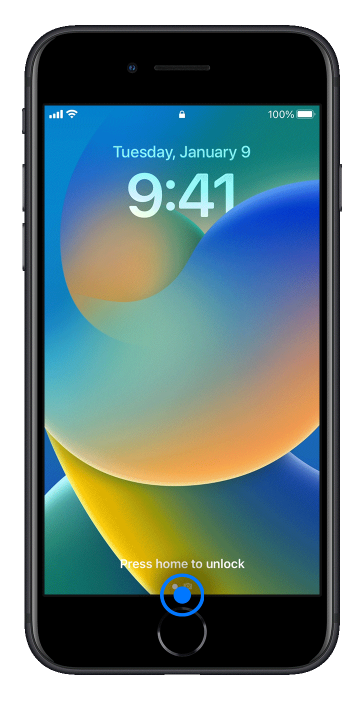
For iPhones With Home Button
- Simply press and hold the power button until the power slider screen appears.
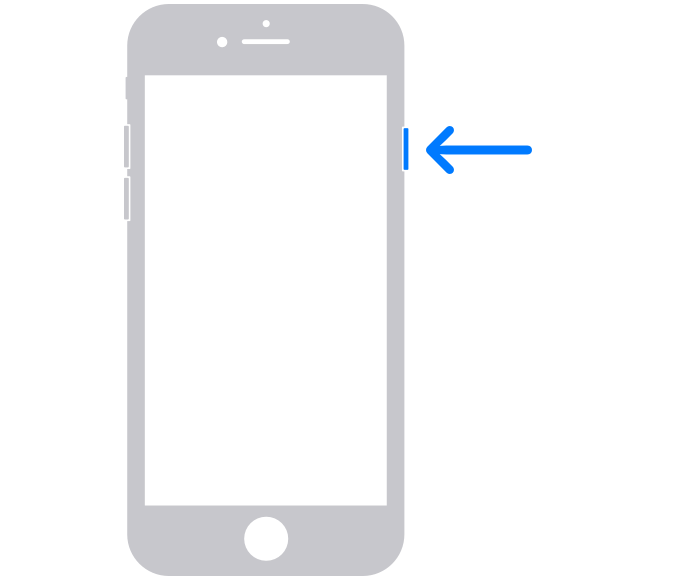
- To turn off the device, just drag the power slider to the right.

For iPhones With Face ID
With the newer generations of iPhones, you can restart your device by:
- Press and hold the volume up or down button and the power button simultaneously.
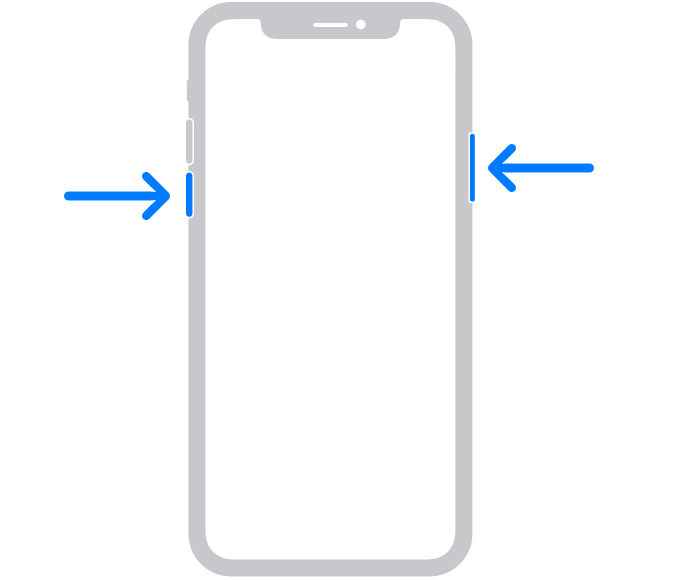
- Once the power slider screen appears, simply drag it to the right to turn off the device.
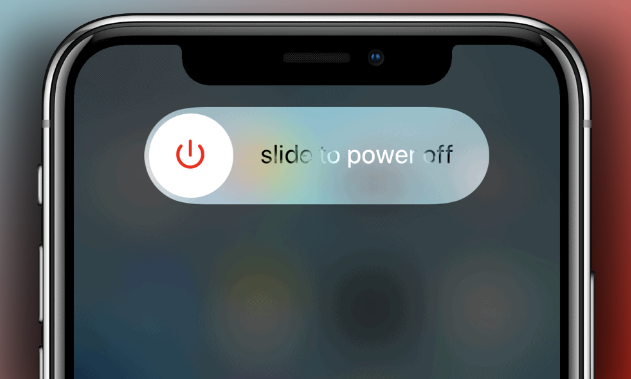
To turn the phone back on, just hold the power button for a few seconds.
5. Enable Data Roaming
Before we jump into enabling data roaming, let’s first understand what roaming actually is. Essentially, data roaming is a convenient way of staying connected to your network even when you are outside the set boundaries (in a state or even country).
Although data roaming comes at a cost, it can usually be a life safer when traveling abroad. Hence, if you are taking a trip and are seeing SOS try following these steps:
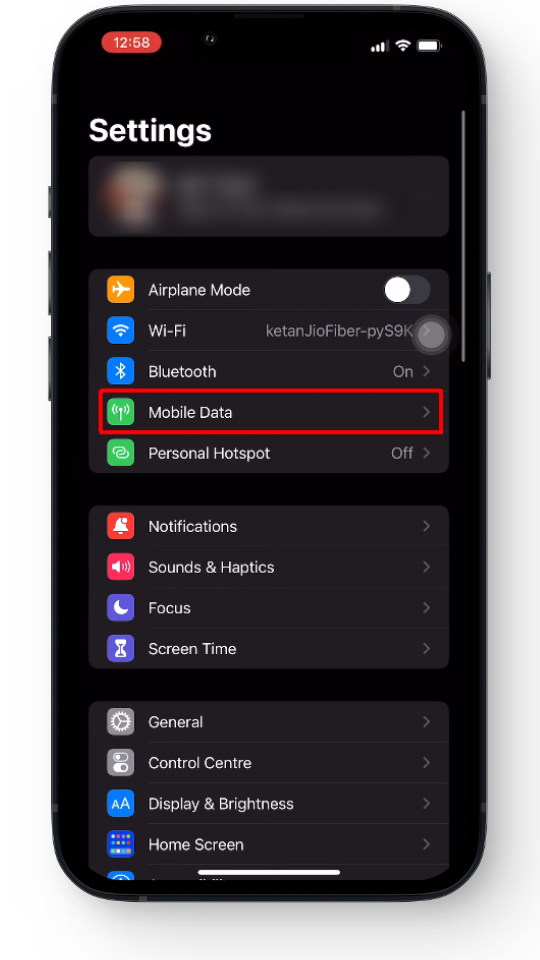
- Open up your iPhone settings.
- Head to the “Mobile Data” option and make sure it’s turned on. This might be called Cellular or Cellular Data on certain devices.
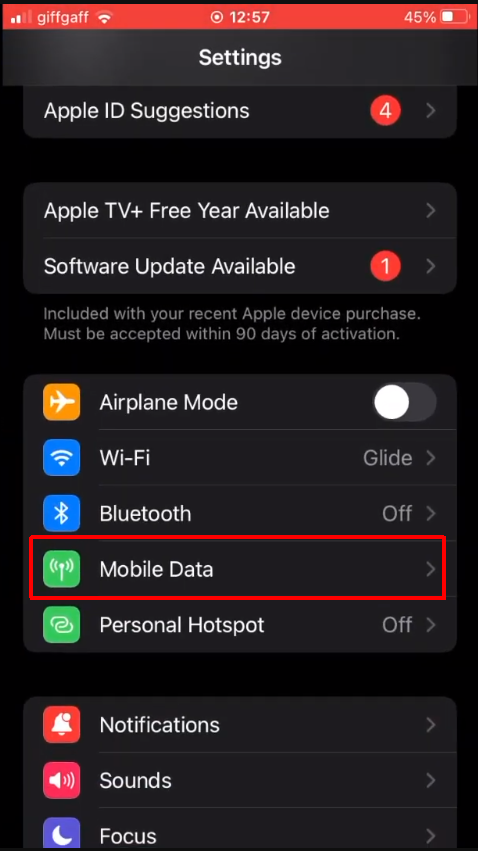
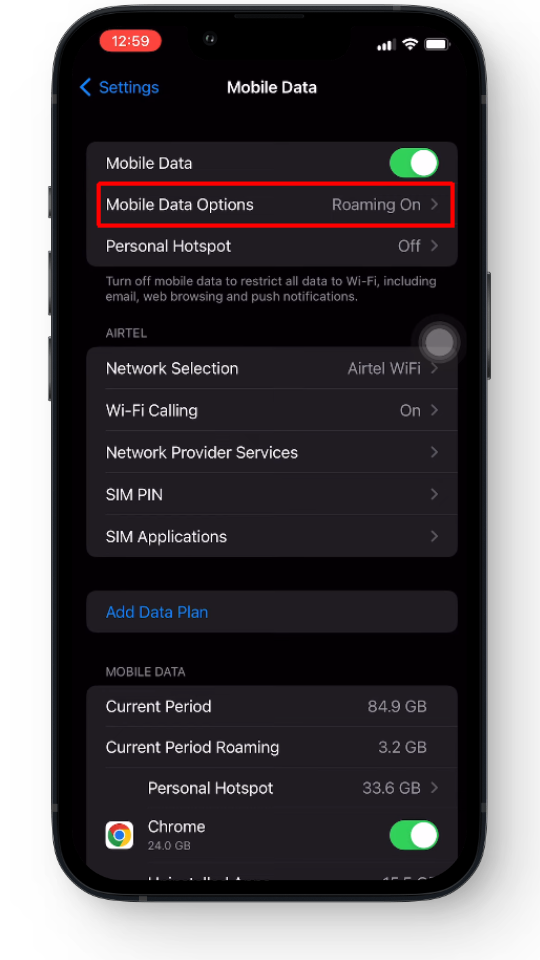
Head to settings > Mobile Data - Next, tap on the “Mobile Data Options.”
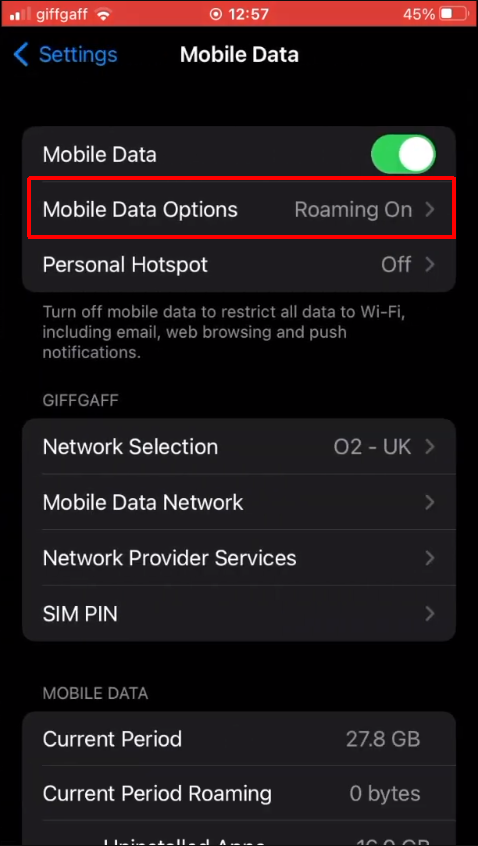
Go to Mobile Data Options - Once you are in, simply toggle on the Data Roaming option.
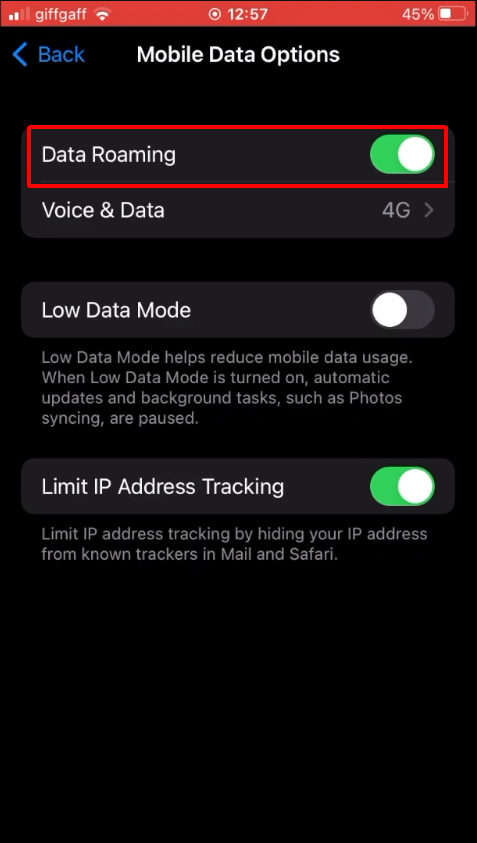
Enable Data Roaming
Screenshots sourced from The How to Cow.
6. Switch to 4G or LTE
5G has been out for 3 years now on iPhone. But even in 2023, it’s still not fully functional in various parts of the world. And this has led to several users facing the SOS error. Hence, it’s best to disable 5G on your iPhone and switch to 4G or LTE.
Here’s how to change your network connection:
- Open up your iPhone settings.
- From here, select the “Mobile Data” option. This might be called Cellular or Cellular Data on certain devices.
Head to settings > Mobile Data - Head to “Mobile Data Options.”
Select Mobile Data Options - Next, choose the “Voice & Data” settings.
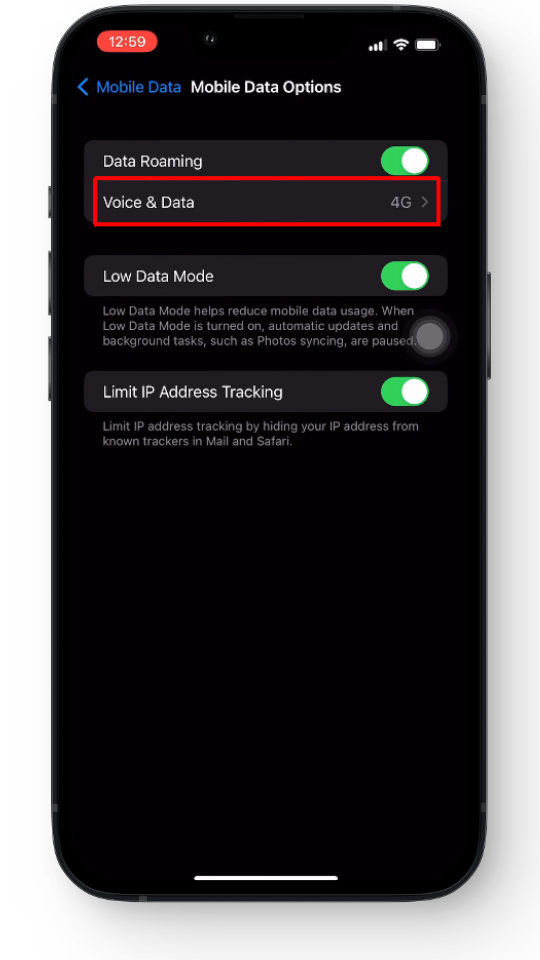
Select Voice & Data settings - Switch the network from 5G to 4G or LTE and toggle on VoLTE.

Switch networks
VoLTE is short for “Voice over LTE” which allows users to make calls via a 4G/LTE mobile network.
Screenshots sourced from Ket Tech.
7. Update Your Carrier Settings
Carrier settings are designed to improve cellular connectivity and your phone’s overall performance. Oftentimes, due to old carrier settings, you can encounter network issues which ultimately lead to the SOS or SOS Only symbol.
Although these settings are set to automatic, you can also update them manually on your iPhone by following these steps:
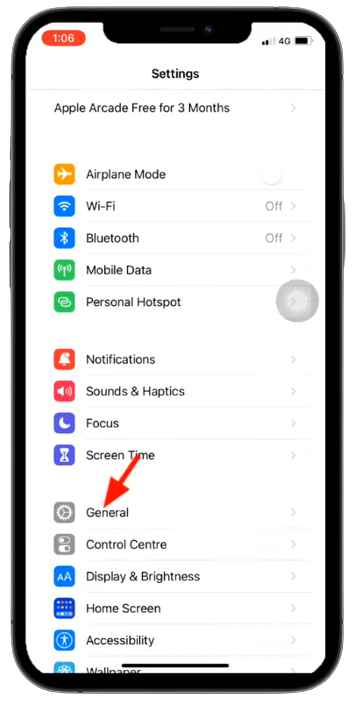
- Open settings and tap on “General.”
Head to settings > general - Next, press the “About” option.
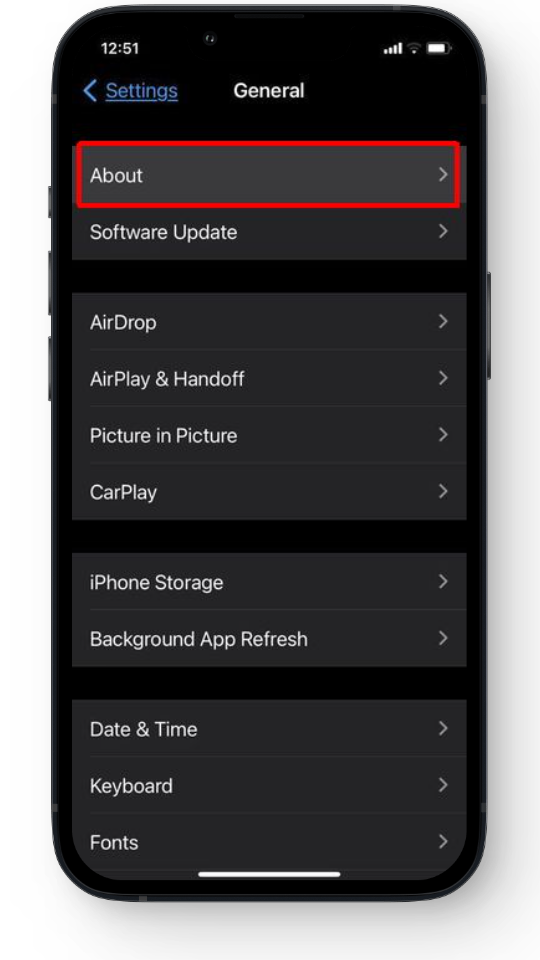
Select the About option - If a pop-up appears asking you to update your carrier settings, simply install it.
8. Disable and Enable Automatic Network Selection
Automatic network selection allows your iPhone to search for all the available networks and ensures that your phone is connected to the most stable one. Resetting it forces your phone to re-establish a fresh connection possibly fixing bugs and issues like SOS or SOS Only.
Although this setting is enabled automatically, you might have turned it off accidentally. In any case, here’s how to give it a quick restart:
- Open your iPhone Settings.
- Select “Cellular, Cellular Data, Mobile Data”.
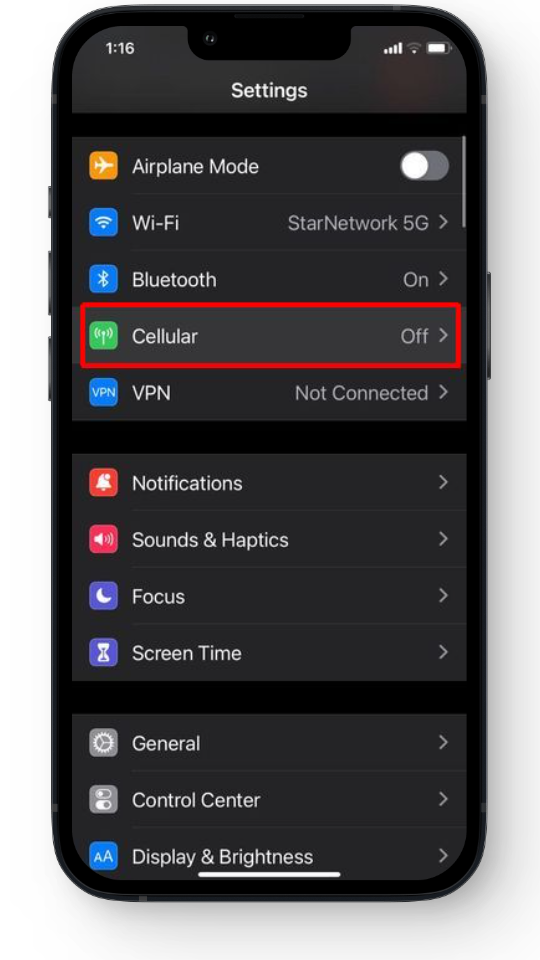
Head to settings > cellular data - Head to the “Network Selection” option.
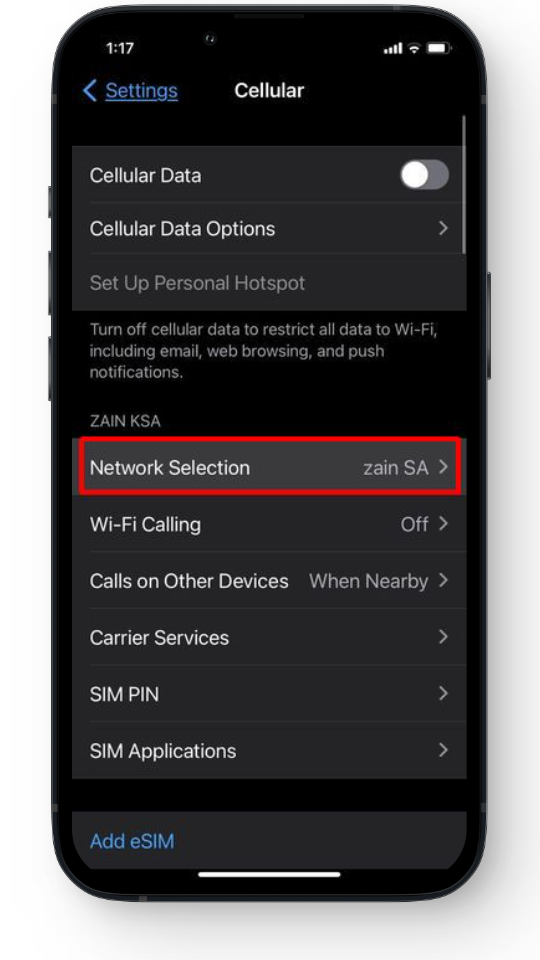
Head to Network selection - If the Automatic option is enabled, simply toggle it off for a few seconds and then turn it back on.
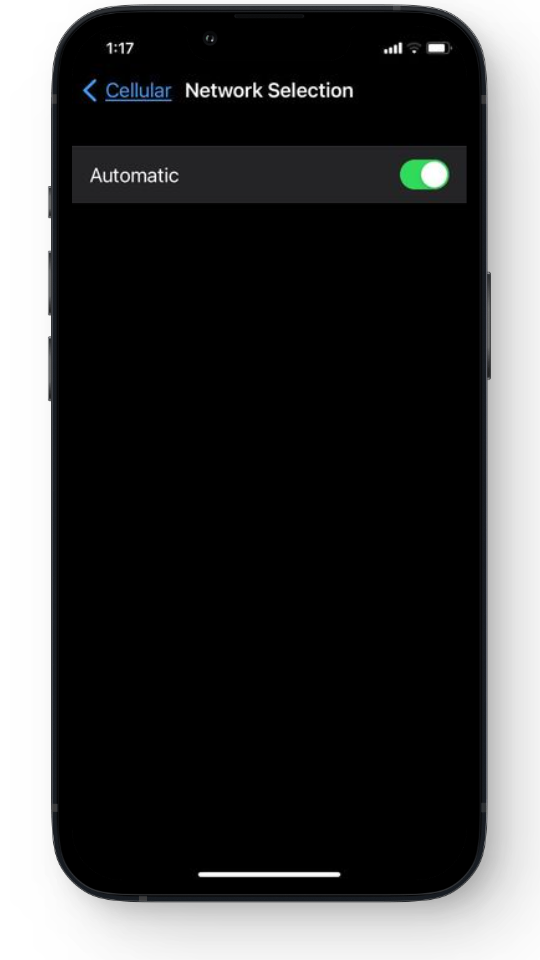
Toggle Automatic updates on and off
9. Check for Physical Damage and Re-Insert SIM
If you still are encountering SOS errors, then it’s best to give some last efforts a try. Sometimes, network issues can be caused by issues within the SIM card. Although re-inserting a SIM can sound like a technical job, it’s nothing but a simple procedure.
Here’s how to take out your SIM card:
- Use the SIM ejector tool and open the SIM card slot on the side of your iPhone
- Once the tray comes out, carefully remove the SIM card.
- Use a dry cloth to clean up your SIM card and place it back in the tray.
- Finally, close the tray.
While you are at it, we suggest thoroughly looking for any damages or scratches on the surface of the SIM card as these can also contribute to SOS issues.
10. Reset Network Settings
If none of the above methods solve the SOS issue, then it’s time to give the ultimate method a shot. Resetting network settings can pretty much erase all saved Wi-Fi passwords, connected Bluetooth devices, VPN settings, and other related configurations.
So before heading down this path, write down all your necessary details somewhere and follow these steps:
- Launch settings and head to the “General” tab.
- Scroll down to “Transfer or Rest iPhone” settings.
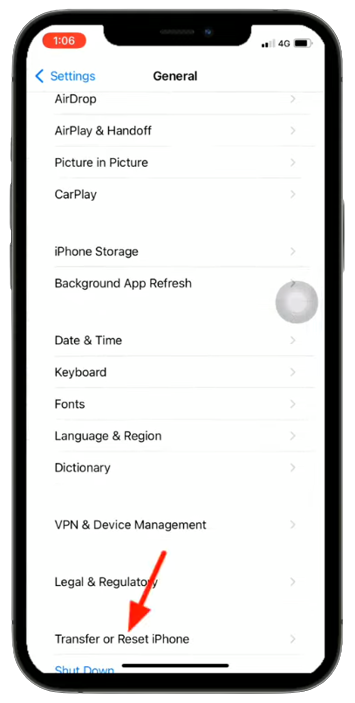
Press Transfer or Reset iPhone - From here, simply tap on Reset.

Tap on Reset - Next, click on “Reset Network Settings.” Enter your passcode if prompted.

Tap on Reset Network Settings - Confirm the task by tapping “Reset Network Settings” once more.
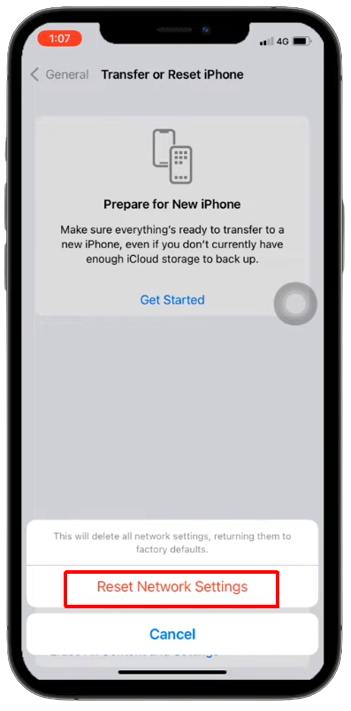
Confirm by pressing Reset Network Settings
Screenshots sourced from Apple TechPage.
11. Contact Your Network Carrier
That’s pretty much all the methods to fix the SOS error on your iPhone and if you are still facing one, the only thing left is to reach the experts. So, get on a call with your network carrier and explain your issue in detail.
We also recommend telling them about the troubleshooting methods you have already tried from our article. If their response doesn’t solve the issue, your last resort is to contact Apple Support. Explain your issue thoroughly and hope for the best.
Read More: 20 Guaranteed Solutions To Fix iPhone Not Ringing Problem
Conclusion
The SOS message is quite common on iPhones and solving one can be tricky without the proper guide. However, after giving the methods mentioned in our article a shot, we hope your issue will be resolved.
We recommend carrying out the easy methods first before moving on to the more complex ones as there’s a good chance that simply resetting your iPhone might fix this. If all else fails, it’s best to contact your network carrier and let them know what you are going through.
FAQs
To clean a SIM card properly, use a soft, lint-free cloth dampened with isopropyl alcohol to gently wipe the gold contacts. Allow it to air dry and then reinsert it into your device. Avoid using excessive force or abrasive materials.
No, incoming calls cannot be received when your iPhone is in SOS Only mode as the iPhone is restricted to making emergency calls for urgent situations. To accept incoming calls, you must deactivate SOS Only mode.
You can contact Apple support through their website, Apple Support app, by phone, at an Apple Store or Authorized Service Provider, and on social media platforms like Twitter.
Reviewed by Huzaifa Haroon


