20 Guaranteed Solutions To Fix The iPhone Not Ringing Problem
 Reviewed by Huzaifa Haroon
In the current age of information, a perpetually silent iPhone is more than just annoying. If left unattended to, this seemingly trivial problem can wreak havoc on everything from personal relationships to performance at work.
Before things get out of hand, it’s best to make a move towards fixing the issue immediately. To help you out, we’ve compiled a list of the 20 most effective solutions to the iPhone not ringing problem. Go through each fix carefully to avoid the hassle of an expensive repair.
1. Check If Your iPhone Is In Silent Mode
If your iPhone won’t ring for incoming calls, you should first check if it has been left on silent mode. This rookie mistake can be made by anyone, so it is best to review and hence eliminate this as a viable solution from the get-go.
The easiest way to check if your iPhone is in silent mode is to examine the side switch. This is located above the volume buttons on the top-left of your phone. If the switch is pushed down to be closer to the back of the iPhone, this means it is in silent mode and hence won’t ring for any calls or text messages. A thin orange line can also be seen above the slider to indicate this.
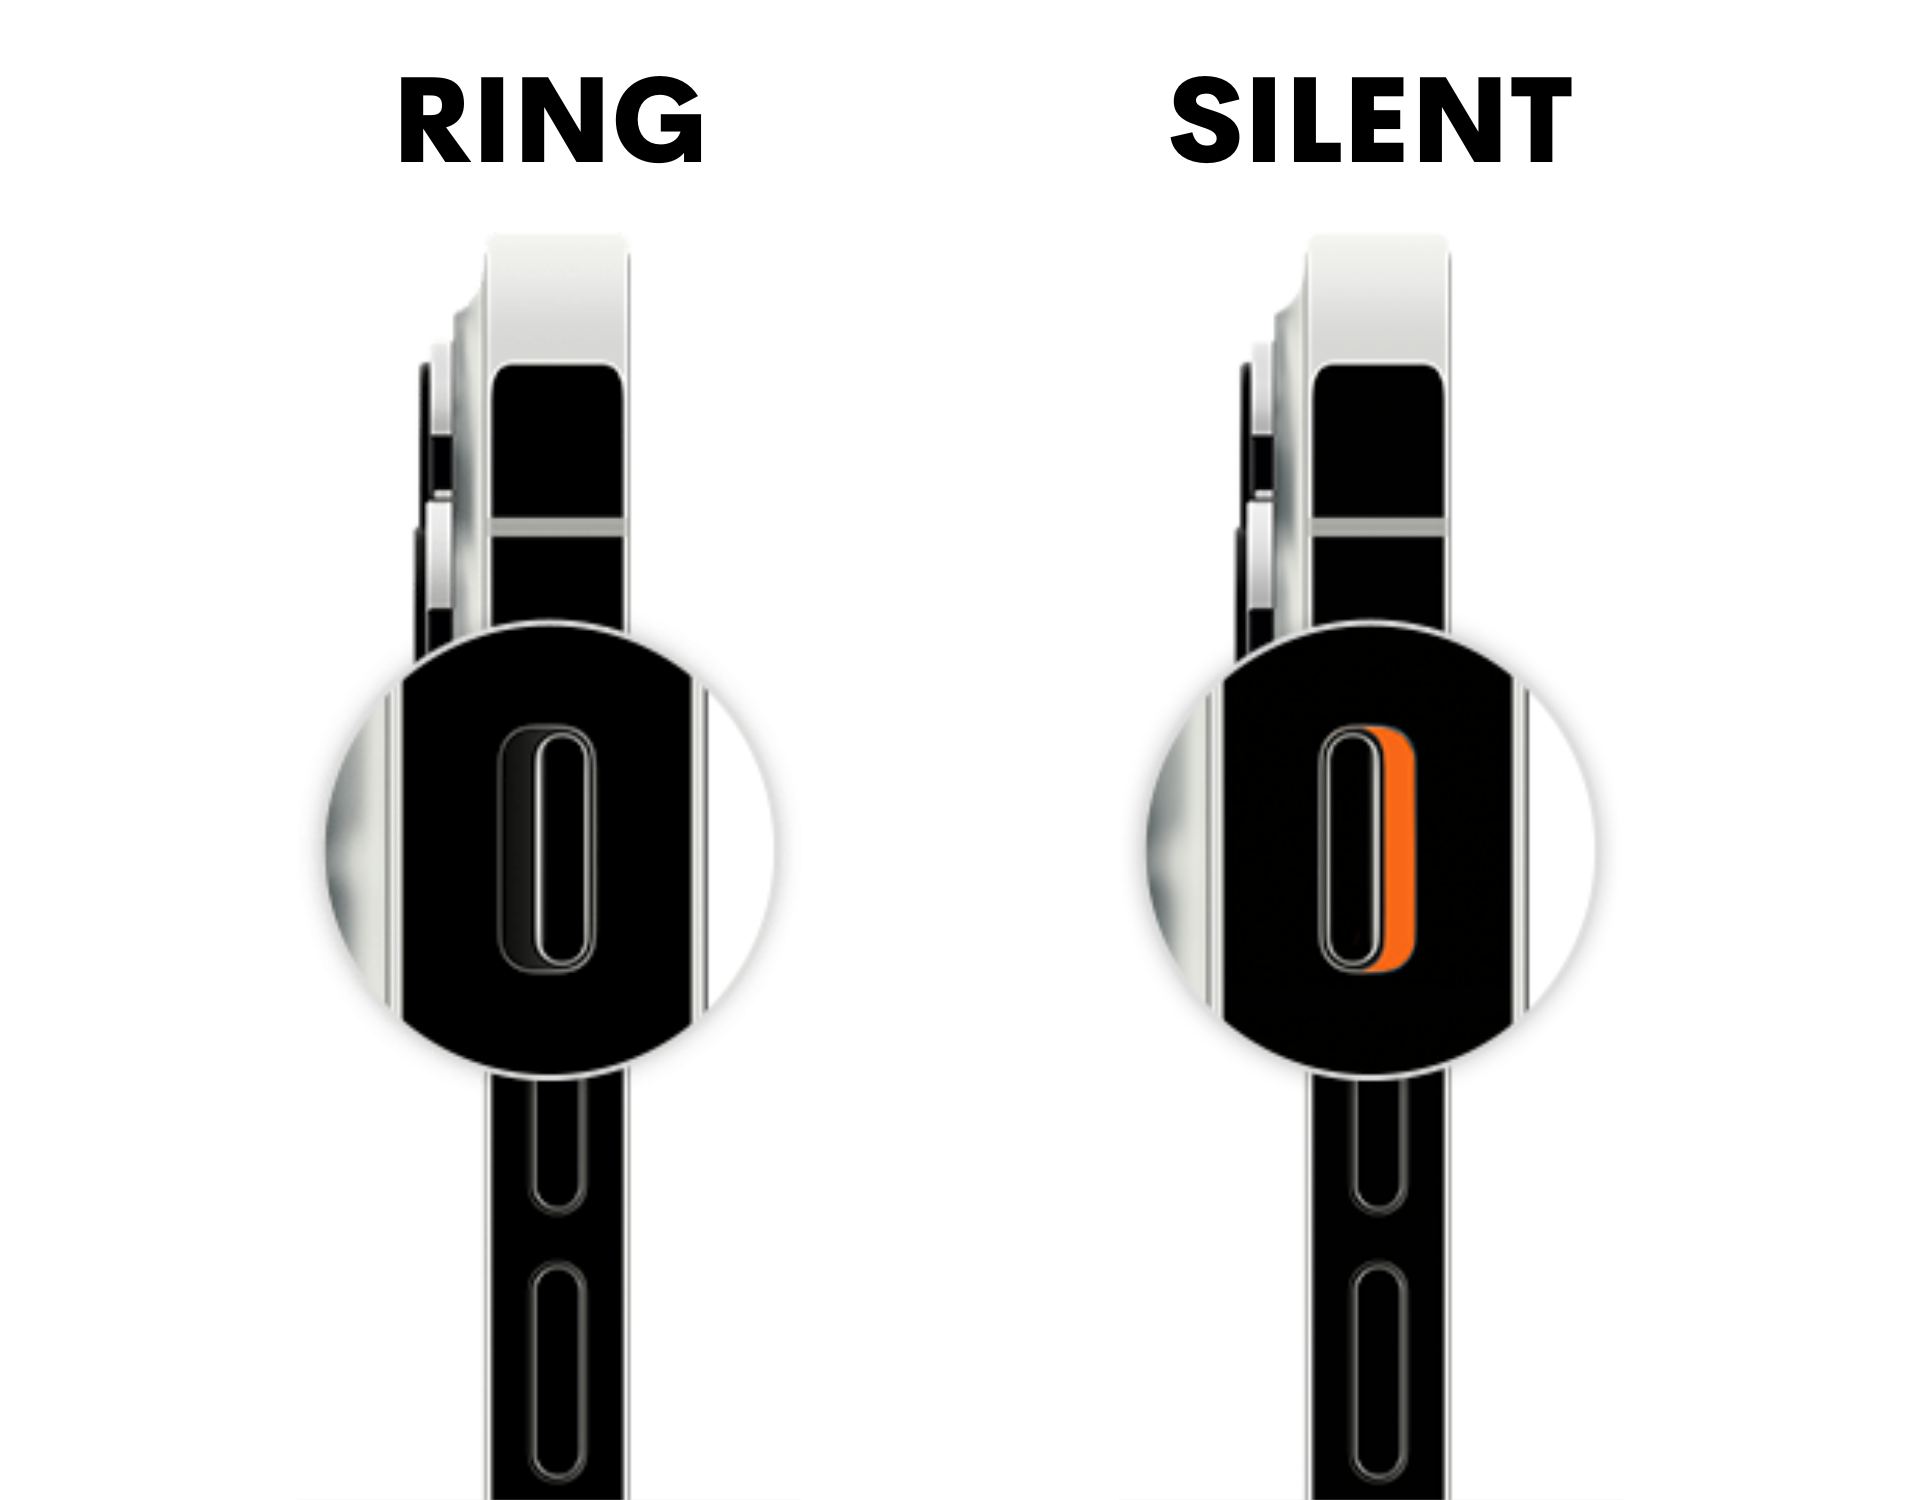
You should push this switch up to be closer to the screen, making it so the orange line is hidden from view. This will turn off silent mode.
2. Disable Do Not Disturb
The Do Not Disturb feature makes it so that your phone won’t make any noise to prevent its user from being disturbed. An iPhone left in this mode won’t ring for any incoming calls so checking it right away is necessary.
Open the Control Center on your iPhone and look for a button with the image of a crescent moon and the word Focus. Depending on your model of iPhone, the control center can be accessed by either swiping down on the top right or by swiping up from the bottom.
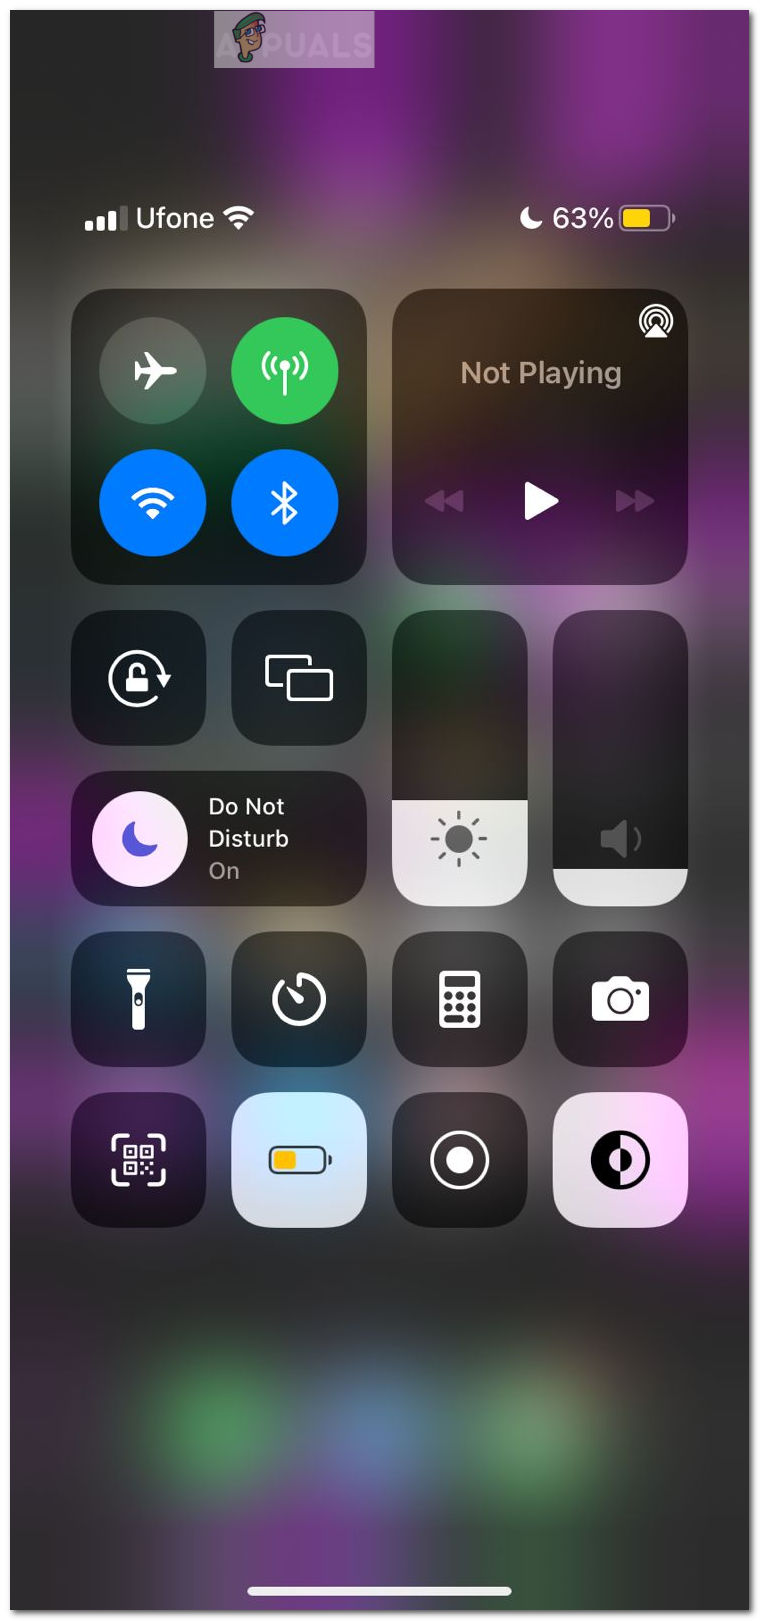
If Do Not Disturb mode is enabled, the crescent will be highlighted in purple. To bring your iPhone out of this state, simply tap on the crescent again until it is transparent.
3. Turn Off Airplane Mode
iPhones in Airplane Mode disconnect from all communication services, including cellular networks, Wi-Fi, and Bluetooth. If that is the case, you won’t be able to receive any calls at all.
To turn off Airplane Mode, open the Control Center by swiping on your screen and look for an icon with the image of an airplane. If it is highlighted in orange, that means your phone is stuck in Airplane Mode.
Tap on the icon again until it is no longer highlighted to turn off Airplane Mode on your iPhone.
4. Restart iPhone
Restarting your phone can help get rid of unresolved issues that seem to have no fix.
If you have an older model iPhone which features a Home Button, you can turn off your phone by continually pressing the power button on the right until the prompt Slide to turn off iPhone is displayed. Pressing the power button again will wake the phone up and restart it.
For newer models, you can turn off your iPhone by simultaneously pressing the volume up button on the left side with the power button on the right.
5. Disconnect Bluetooth Devices
An accidentally left on Bluetooth device like earbuds can be another cause of the problem. If your iPhone is left connected to a Bluetooth device, you won’t be able to hear the sound of your phone ringing from its speakers.
The easiest way to fix this is to turn off Bluetooth on your iPhone. Open the Control Centre and look for an icon with the Bluetooth symbol on it.
If this symbol is highlighted in blue, this means your Bluetooth is on and a device may be connected. Tapping on the icon will disconnect all Bluetooth devices. To disconnect a specific device, navigate to the Bluetooth category in the Settings app and review the list of recognized devices.
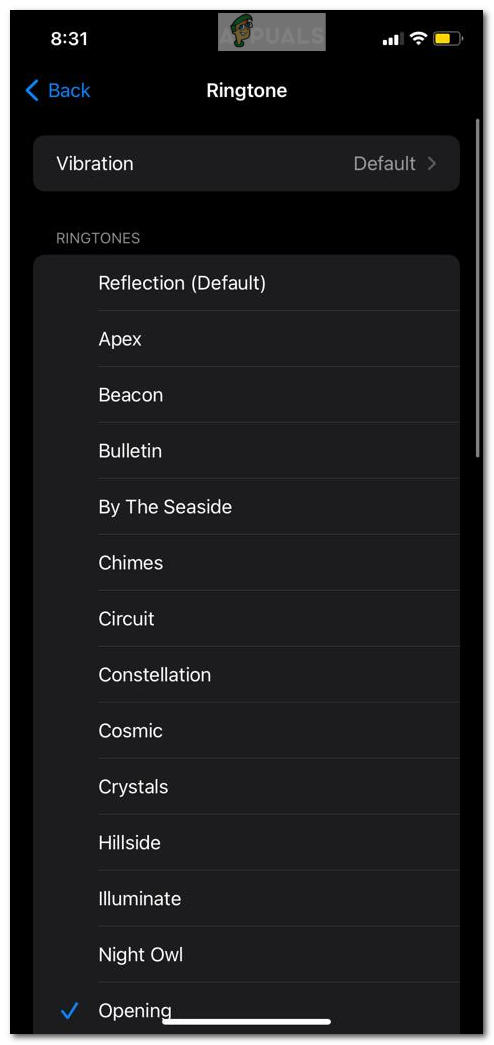
6. Change Selected Ringtone
It may be possible that the ringtone you have selected for your iPhone is not alarming enough for you to realize your phone is ringing. Changing the ringtone can help solve this problem.
- Open the Settings app and navigate to the Sounds & Haptics category
- Tapping on this will reveal a list displaying the sounds and vibration patterns for your ringtone, text tone, mail, etc.
- Tap on Ringtone and select the most striking one from the list of available sounds
7. Manually Increase Ringtone Volume
If your iPhone is making a faint noise when receiving incoming calls, chances are the volume of your ringtone is too low. This can be easily fixed by one of two ways.
Locate two buttons on the left side of your iPhone placed directly next to one another. The button on top is to increase the volume of your ringtone while the button on the bottom is for decreasing.
If pressing these buttons has no effect on the volume of your ringtone its possible that they may be malfunctioning. In this case, you can still adjust your ringtone’s volume manually in Settings.
- Open the Settings app and navigate to the Sounds and Haptics category
- Under Ringtone and Alerts there will be a slider
- Adjust this to increase or decrease the volume to fix the problem of your iPhone not ringing
8. Check Custom Ringtone For Selected Contacts
If your iPhone is not ringing properly for only specific contacts, it may be possible that a custom ringtone has been set for them.
- Open the Contacts app and search for your desired contact
- On the page displaying their information, tap on Edit in the top right corner
- Tap on Ringtone to check what ringtone has been assigned to this specific contact
- Try marking it as Default and see if this is able to fix the problem
9. Review Blocked Contact List
If updating the ringtone of a specific contact still isn’t able to fix the problem, it may have been accidentally added to the blocked contact list. In this case, you won’t be notified of the person’s calls at all.
- Open the Settings app and go to the category labeled Phone
- Scroll down until you see Blocked Contacts
- Tapping on this should reveal a list of the phone numbers you have blocked. Review it carefully.
In case you wish to remove a phone number from this list, tap on Edit in the top right corner and select that number. Once it is removed, it will no longer be seen on the list and you will be able to receive calls from that contact again.
10. Disable Call Forwarding
When the call forwarding feature is turned on, phone calls are diverted to another number automatically leaving your phone free of notifications. To check if this is enabled, follow the steps below.
- Open the Settings app and navigate to the Phone option
- Tap on Call Forwarding
- Make sure the toggle switch is not highlighted green, indicating that this feature is disabled
11. Disable Silence Unknown Callers
Unknown callers may be automatically silenced if this feature is left enabled.
- Open the Settings app and tap Phone
- Next to Silence Unknown Callers, check if it says Off or On
- Toggle the switch to disable this feature
12. Turn Off Calls On Other Devices
This feature helps you to receive calls on other devices with the same Apple ID such as your Mac, iPad, iPod, etc. Turning it off may help solve the problem.
- Open the Settings app and tap on Phone
- Scroll down until you see Calls on Other Devices
- Make sure the toggle switch is set to off
13. Turn Off Attention Aware
If you have a newer model iPhone which supports Face ID, the Attention Aware feature may be causing your iPhone to not ring or ring very quietly at certain times. This is because the phone attempts to detect whether your attention is already focused to the screen, in which case a loud ring is not necessary if there is an incoming call.
This feature, though helpful at times, may be making the wrong assessment leading your iPhone to not ring even if your focus is diverted. To fix the issue, you can turn off this feature in Settings.
- Navigate to Accessibility and then tap on Face ID & Detection
- Identify the Attention Aware Features toggle and turn it off
- You may be asked for confirmation via your password
Once the password is verified, your iPhone will now ring regardless of whether your attention is on the screen or not.
14. Check For Third-Party Call Blockers
Sometimes third-party applications may obtain access to your phone preventing some incoming calls from going through.
- Open the Settings app and navigate to Phone
- Scroll down and tap on Call Blocking and Identification
- Review the list of the applications which have blocked numbers and choose to remove them individually
15. Update To The Latest Version of Apps
Sifting through each application in your phone to check if they may be affecting your iPhone ringtone is a hassle. To avoid this, you can simply update all apps to their latest version in hopes that their developers have fixed the issue.
- Open the App Store and tap on the Profile icon in the top right corner of the screen.
- You’ll see a list of the apps pending update.
- Tap on Update All and wait for all applications to be restored to their latest versions.
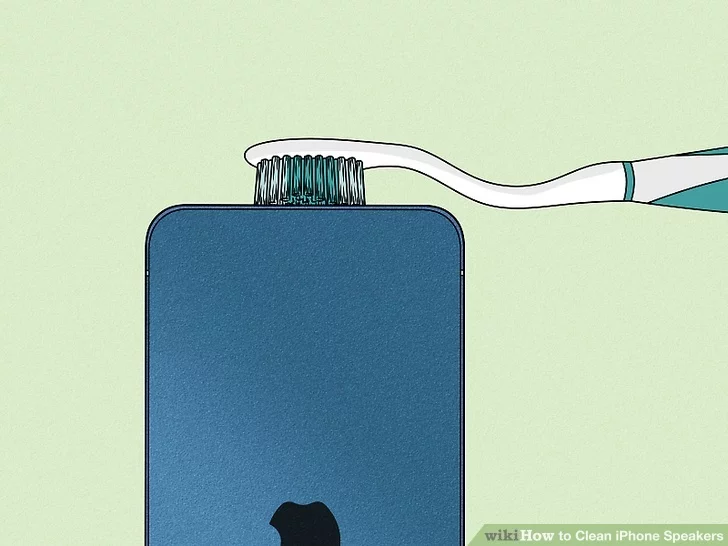
16. Clean iPhone Speaker
If none of the options above work for you, it’s possible that this may be an issue with your iPhone’s hardware. You can try cleaning out the speaker to free out any trapped dirt or debris which may be clogging up the space and preventing it from ringing properly.
You can use a soft bristled brush to glide over the top speaker and thin toothpicks to insert in and out of the speaker holes on the bottom of your iPhone. An air blower can also be used here, provided it is at a low enough setting to not accidentally cause damage to the hardware.
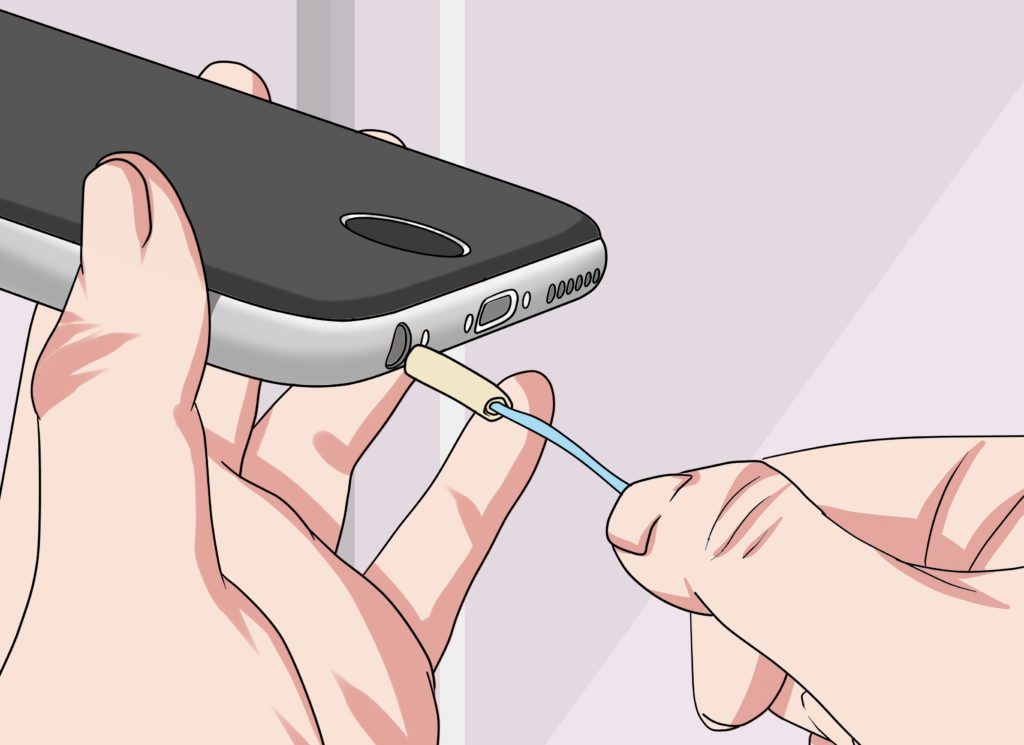
17. Clean Headphone Jack
In older iPhone models, a dirty headphone jack can make it seem as if there is a device connected to the phone and subsequently cause it to not ring from its speakers.
You can clean out your headphone jack by using a Q-tip dipped in some rubbing alcohol. A simple paperclip can also get the job done provided you are extremely careful. Keep in mind that rubbing aggressively may cause damage to the machine and make your problem worse. Follow this guide for a more in-depth tutorial.
18. Update To Latest IOS Version
Apple is always making updates to their software to ensure any bugs experienced by users may be dealt with. Keeping your iPhone up to date with the latest iOS version can be a simple but effective solution to fixing this problem.
You can check for a new software update in the Settings app. If a new version of iOS is available, it will be displayed near the top. Tap on Install to update your iPhone.
19. Reset Network Settings
If the problem still persists, you can try resetting the network settings. By doing this, you unpair Bluetooth devices, delete saved Wi-Fi networks, and restore default network settings for all other settings. Your personal information will remain intact.
- Open the Settings app and select General
- Scroll down until you see the option to Transfer or Reset iPhone
- Tap on Reset and select Reset Network Settings
20. Factory Reset Your iPhone
If all else fails, the last resort is to factory reset your iPhone, wiping away all data and settings so the phone is back to its default, fresh-out-the-box form. You should only do this after backing up any passwords, photos, or important documents stored on your phone as there will be no way to retrieve it once the phone has been reset.
To factory reset your iPhone:
- Open the Settings app and tap on General
- Scroll down until you see the option to Transfer or Reset iPhone
- Tap on Erase All Content and Settings and click confirm once the popup is generated
One of these solutions is bound to get your iPhone back to its ringing status. However, if there is a serious hardware fault under the hood, the absolute last resort is to take it to an Apple Store, or a trusted technician for a diagnosis. If your device is under warranty, the repairs won’t be unreasonably expensive. Make sure to try out every fix mentioned in this guide before you go ahead with hardware repair.
Reviewed by Huzaifa Haroon