Photoshop Not Opening? – Here’s How to Fix it (6 Easy Fixes)
Photoshop not opening is often an installation issue caused by corrupted or damaged files. There are also cases in which the process encounters an issue while starting, leading it to a frozen state. When this occurs, the process runs in the background, but no operations are performed.
In some instances, if your computer does not meet the minimum requirements for Adobe Photoshop, the application will not be able to start. This can happen often on older systems, and you should regard the minimum system requirements of Photoshop before proceeding.
If your system meets the minimum requirements, you can follow the methods down below to mitigate the issue in question.
1. Force Close Photoshop
The first thing you should do when you start troubleshooting the issue is to make sure the process is not in a frozen state. In some instances, when a process fails to start properly in a Windows environment, it can go into an inactive state where the process runs in the background but does not perform any operations.
Another reason Photoshop may not start successfully could be insufficient permissions in the Windows environment. This can occur when other background processes interfere with the app, preventing it from launching.
Follow the instructions down below to do this:
- First, open a Task Manager window by right-clicking on the Start Menu and choosing Task Manager from the menu that appears.
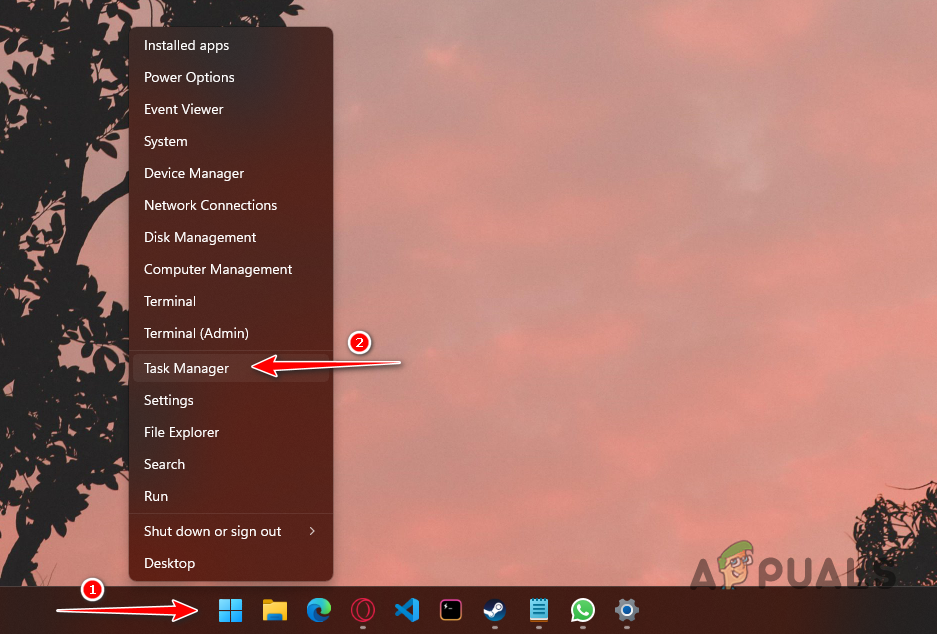
Opening Task Manager - After that, locate the Photoshop process on the Processes tab of the Task Manager.
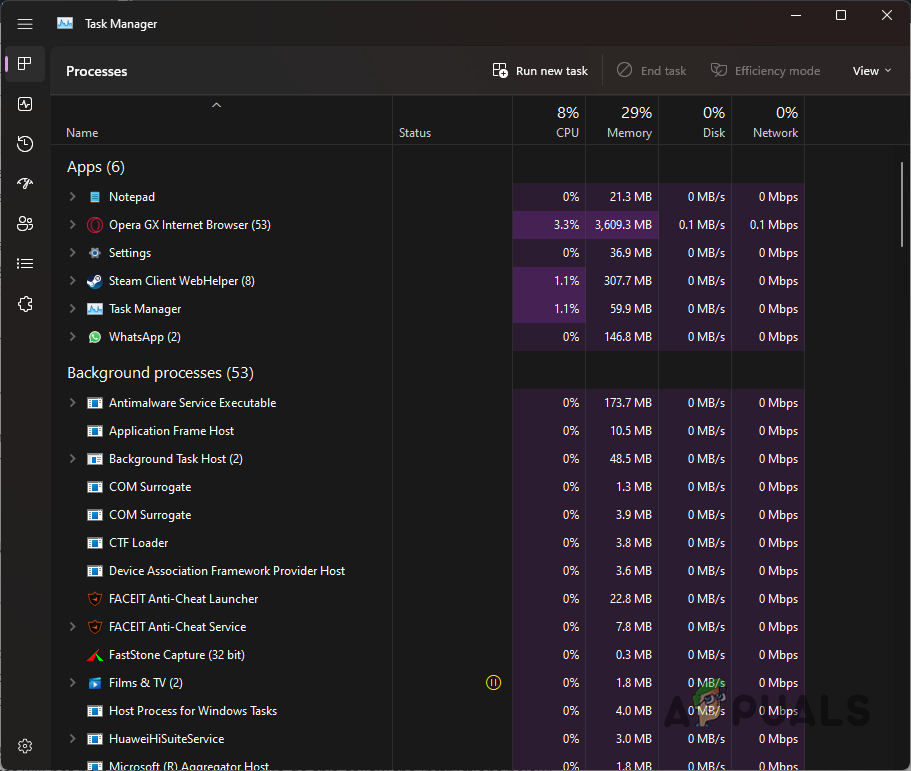
Task Manager Processes Tab - Then, select the Photoshop process and click on the End task option.
- This will kill the process and you can try opening Photoshop again to see if the issue persists.
2. Run Photoshop as Admin
Another reason Photoshop cannot start successfully can be insufficient permissions in the Windows environment. This can happen when other processes in the background interfere with the app, preventing it from launching.
Such scenarios are often true when you have a third-party antivirus program installed and running in the background. However, that does not always have to be the case. As such, to overcome this issue, you will need to run Photoshop with administrative privileges.
Running the app with admin permissions will allow it to survive in the Windows environment, and other processes will not be able to interfere with it. To do this, follow the instructions below:
- First, open the Start Menu and search for Photoshop.
- Right-click on the result shown and choose Run as administrator from the drop-down menu.
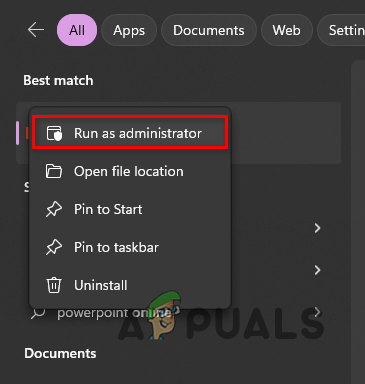
Opening Photoshop as Administrator - On the follow-up User Account Control dialog box, click the Yes button.
- See if that resolves the issue.
3. Open Photoshop without Plug-ins
Using third-party plug-ins in Photoshop can be very useful as they add more functionality to the app. However, in some scenarios, one of the third-party plug-ins can cause an issue with the app which prevents it from launching.
This can happen when the plug-in files are damaged on your system. To verify this, you can run Photoshop without plug-ins to see if the problem goes away. If Photoshop opens normally without the third-party plug-ins, you will have to uninstall them one by one to find the culprit.
To launch Photoshop without loading any third-party plug-ins, simply press and hold the Shift key on your keyboard while opening the application. If the problem persists, move to the next method.
4. Clear Photoshop Font Cache
Photoshop uses a font cache on your computer which contains a list of the fonts available on your computer along with its various features. In some scenarios, this font cache can get damaged which can prevent the app from opening since the cache is loaded at the start.
If this scenario is applicable, you will have to delete Photoshop’s font cache on your computer to mitigate the issue. Deleting the font cache is completely safe as the app will automatically create a new one on the next launch.
Follow the instructions below to delete the font cache:
- First, press the Windows key + R on your keyboard to open the Run dialog box.
- In the Run dialog box, type in %AppData% and press the Enter key.
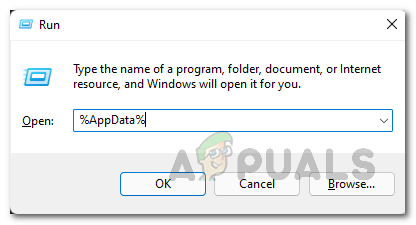
Navigating to AppData Directory - This will open a File Explorer window. Then, navigate to Adobe > Adobe Photoshop folder.
- There, permanently delete the CT Font Cache folder.
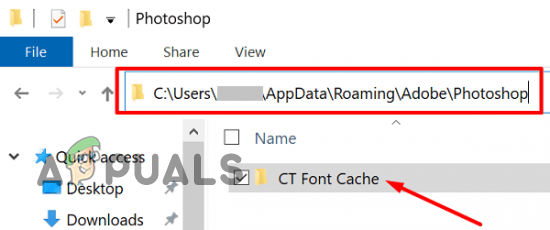
Deleting Photoshop Font Cache - After that, open Photoshop to see if the problem is still there.
5. Reset Photoshop Preferences
Photoshop allows you to customize the app to suit your workflow. This is achieved by enabling users to change various program settings which are then stored in a local preferences file. This can generally include display options, cursor options, presets and more.
In some scenarios, the preferences file can get corrupted which can lead to Photoshop not launching as it cannot load the preferences file. To resolve this, you will have to delete your preferences and restore Photoshop to its default state.
Follow the instructions below to reset Photoshop’s preferences:
- First, open the Run dialog box by pressing the Windows key + R on your keyboard.
- In the Run dialog box, type in %AppData% and hit Enter.

Navigating to AppData Directory - After that, in the File Explorer window, navigate to Adobe > Adobe Photoshop.
- There, drag the Adobe Photoshop Settings folder to a different location, for example, your desktop.
- Once you do that, open Photoshop to see if that fixes the issue.
- If the problem persists, you can move the settings folder back to its rightful place.
6. Use Creative Cloud Cleaner
Finally, if none of the above methods has resolved the issue for you, the problem could be related to the installation files of Photoshop. In such a scenario, you will have to use the Adobe Creative Cloud Cleaner utility which helps in resolving installation problems of different Adobe products.
Creative Cloud Cleaner will clean up any installation files of Photoshop on your computer. After that, you can install the application again and the issue should be no more. Follow the instructions to do this:
- First, download the Adobe Creative Cloud Cleaner tool from the official source by clicking here.
- After that, navigate to the file and right-click on it. Choose Run as administrator from the drop-down menu.
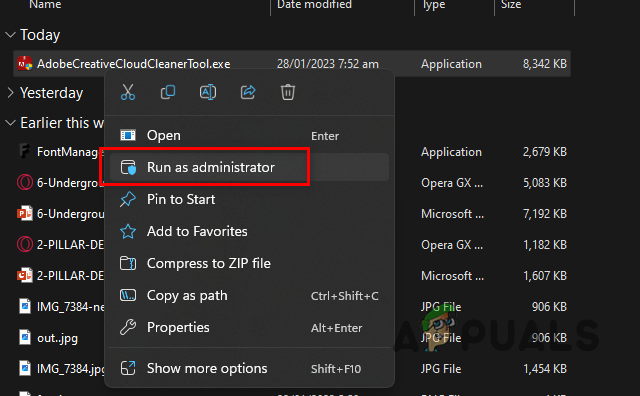
Running Creative Cloud Cleaner as Admin - On the first prompt, press E and hit Enter to choose English.
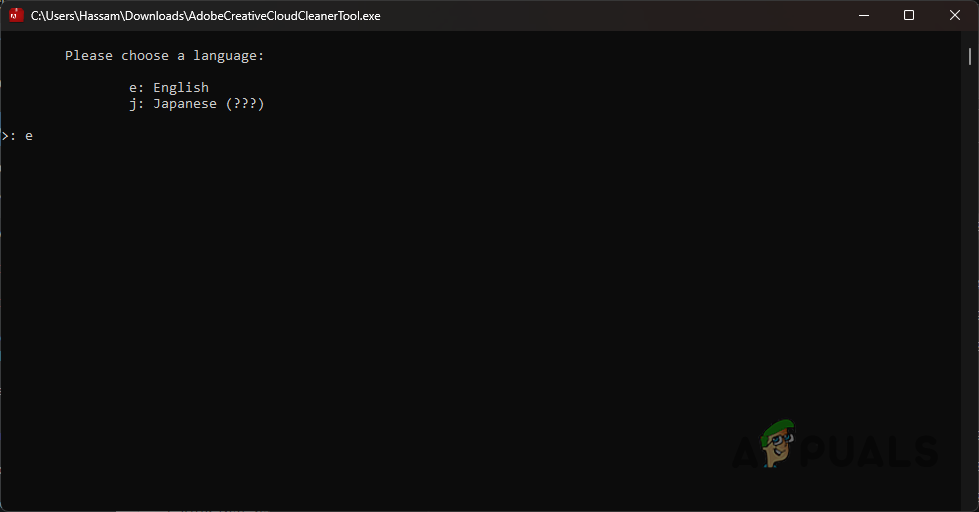
Choosing Language - Follow it up by pressing Y and Enter to agree to the license agreement.
- After that, from the list, choose the respective number. Press 4 to uninstall Creative Cloud Apps.
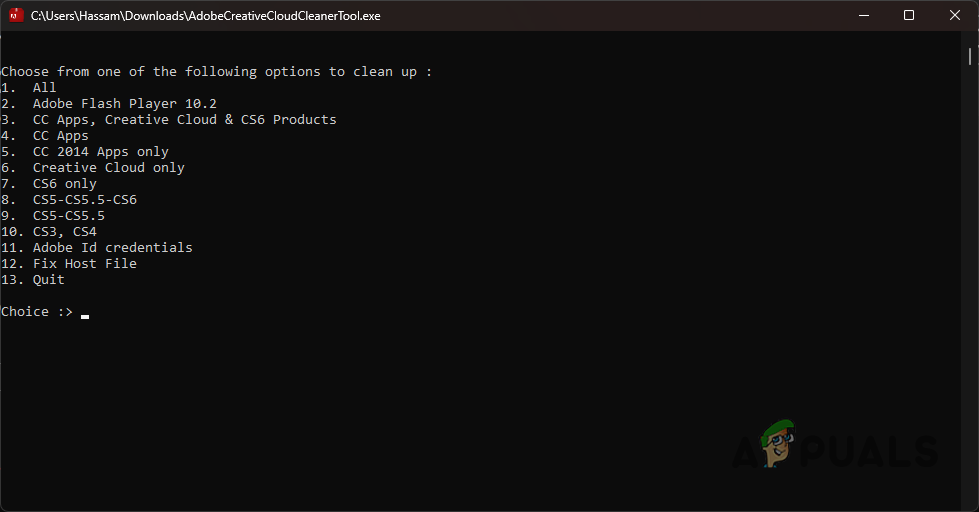
Creative Cloud Cleaner Options - Then, enter the number of Photoshop and hit Enter.
- Wait for the tool to finish successfully.
- After that, install Photoshop on your computer and check if the problem still occurs.


