How to Fix Metal: Hellsinger Crashing Issue on Windows?
The crashing issue in Metal: Hellsinger can be related to many factors, such as corrupt game files, outdated Graphics Card drivers, Antivirus/Firewall interference, and VRAM issues. The final level of Metal: Hellsinger is where most players have been encountering repeated crashes, but there have also been many reports of the game crashing at startup and after finishing certain levels, such as Incaustis.
The game tends to crash when there are many elements on the battlefield at once, making it very difficult for players to complete levels – especially the game’s final level. Below, we’ve listed all the possible reasons for the crashing issue in Metal: Hellsinger.
- Incorrect Windows Regional Format: The most common cause of the crashing issue in Metal: Hellsinger is the regional format of Windows. Some specific regional formats, such as Turkey, seem to be why players have been experiencing these crashes.
- Online Mode: When Metal: Hellsinger is played with an active internet connection, it has a higher chance of crashing due to issues with the game’s leaderboard.
- Low VRAM: Metal: Hellsinger is a very graphically-intensive game requiring much GPU power. Specifically, it requires a decent amount of VRAM to be able to render all the elements. So if your GPU lacks VRAM, you must adjust the in-game graphics accordingly to solve this issue.
- Missing Administrator Privileges: A lack of administrator privileges can lead to many problems in games, the most common being the crashing issue.
- Windows Fullscreen Optimization: The Windows Fullscreen Optimization feature is known to cause problems such as lag, input delay, and stutters in games, and it can also lead to frequent crashes in games such as Metal: Hellsinger.
- Antivirus and/or Windows Firewall Interference: Your Antivirus program or the Windows Firewall may be interfering with Metal: Hellsinger’s game files and preventing them from being able to run properly.
- Missing or Corrupt Game Files: Some of Metal: Hellsinger’s game files might have become corrupted while it was downloading, or they might have failed to download. This can be a major cause of the crashing problem.
- Missing Microsoft Visual C++ Redistributable: If the Microsoft Visual C++ Redistributable package is not installed in your system, it can cause your game to crash on startup or during levels.
- Overlay Issues: The overlays of apps like Steam, NVIDIA GeForce Experience, MSI Afterburner might be conflicting with Metal: Hellsinger and causing the crashing issue.
- Lack of RAM and Virtual Memory: A lack of RAM and Virtual Memory in your PC could lead to crashes, as Metal: Hellsinger seems to consume a substantial amount of RAM to be able to run smoothly.
- Improper Controller Settings: If you’re playing Metal: Hellsinger using a controller, you must configure some controller settings properly. Otherwise, they can lead to some problems.
- Update GPU Drivers: Outdated drivers can seriously bottleneck the performance of a GPU, resulting in significant performance errors like frame drops, constant microstutters, and crashes.
1. Check Metal: Hellsinger’s System Requirements
When trying to fix the crashing problem in Metal: Hellsinger, the first step is to check the game’s system requirements. The game has great graphics, and its gameplay is extremely fast-paced, so it needs a powerful system to run smoothly. Look at the chart below and see how your PC’s specifications compare.
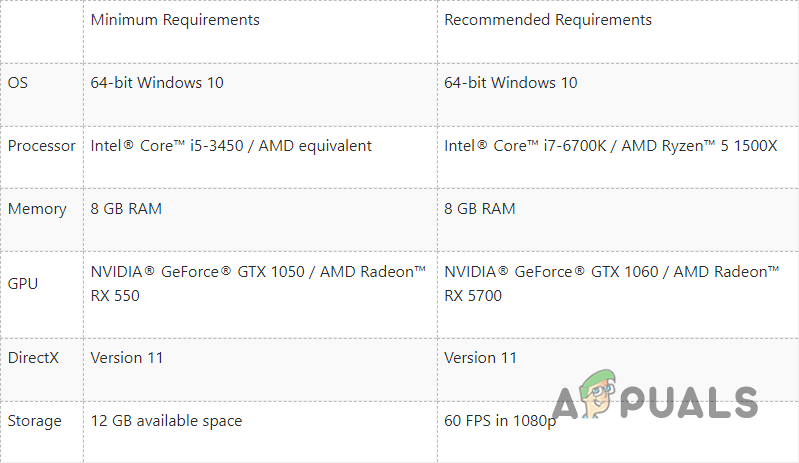
If your PC does not meet minimum system requirements, then your PC’s weak hardware is likely the main cause of the crashing problem. But even if that’s the case, the solutions we’ve listed below will help you minimize the crashing issue as much as possible.
2. Play in Offline Mode
A quick and easy way to completely fix the crashing issue in Metal: Hellsinger is to play in offline mode. According to several reports on forums, a major cause of the crashing issue seems to be its leaderboard.
As you play Metal: Hellsinger, the game’s leaderboard continuously tracks your score and determines your position. And due to some problems with the netcode, it leads to your game crashing.
So an easy way to solve this issue would be simply to play Metal: Hellsinger in Offline mode. After the game crashes, disconnect your internet from your system and relaunch the game.
Continue your playthrough of the game and see if it crashes again. If you don’t experience any more crashes, then your internet connection is the culprit of the issue. And unfortunately, you won’t be able to do any troubleshooting on your end to fix this problem, as this problem is with the game itself. All you can do now is wait until the developers of Metal: Hellsinger release a patch for the game which fixes this leaderboard issue.
3. Update the Game to the Latest Patch
Due to the number of players experiencing performance issues and crashes in Metal: Hellsinger, the developers are working hard to fix these problems by releasing hotfixes and new patches for the game. So, if you’re experiencing constant crashes, ensure that you’re downloading all the updates and playing the game on the latest version.
If you’re playing the game through Steam, you can check whether or not you’re playing the latest version of Metal: Hellsinger by going into your downloads tab. To go to the downloads tab, click on the “Downloads” button at the bottom of the Steam window.
Once you’re in the Downloads tab, check if there’s an update available for Metal: Hellsinger. If there isn’t, your game is already updated to the latest version. But if an update is available, click on the arrow icon next to its name to download the update.
If you don’t want to download the updates for Metal: Hellsinger manually each time a new one is released, you can make Steam update the game automatically. To do so, follow the steps listed below.
- Open Steam and go to your Library.
- Right-click on Metal: Hellsinger and select Properties.
- Navigate to the “Updates” section.
- Put a checkmark next to “Always keep this game updated.”
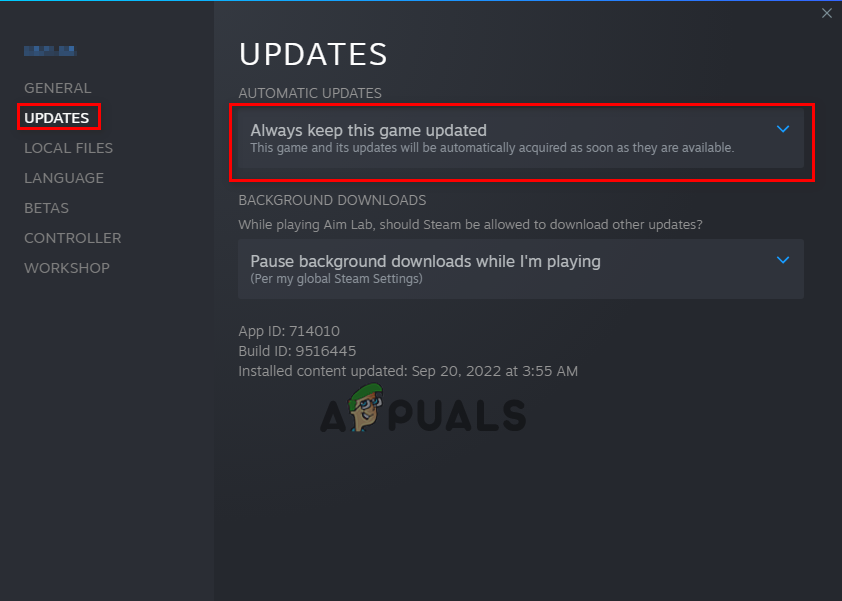
Keeping the game updated automatically
4. Change Graphics Settings
According to the developers of Metal: Hellsinger, the crashing problem can be related to the system’s VRAM (Video RAM). VRAM is the RAM present on your Graphics Card, which handles graphical information processing.
If your Graphics Card does not have a large amount of VRAM, you’ll need to change the graphics settings of Metal: Hellsinger to compensate for it. The more you decrease the game’s graphics settings, the less VRAM the game will require.
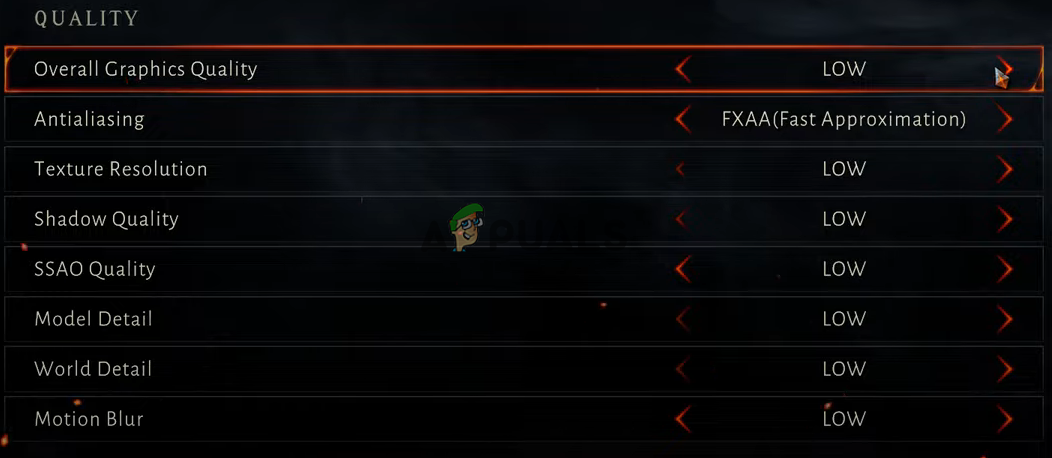
You should first launch the game and set the Overall Graphics Quality to LOW. You can do this by opening the game’s settings menu and navigating to the Graphics category. Once the Overall Graphics Quality has been set to LOW, close the settings menu and start playing through a level.
If you don’t experience any crashes after turning the graphics quality to low, your VRAM is the main cause of the crashing issue. But if you’re still experiencing the crashing problem, continue with the other solutions we’ve listed below.
If VRAM is the cause of your crashing issue, you will need to adjust the in-game graphics settings so that you efficiently use your Graphics Card’s VRAM. You have to tune the Graphics settings so that you don’t overload your GPU but also maintain the best visuals you can. This will be a trial and error process.
After turning all the Graphics settings to low, turn each setting back up individually and play for a while each time. When the crashes start reoccurring again, you can slightly decrease the graphics. This will allow you to fix the crashing issue without sacrificing the game’s visual quality.
5. Run Metal: Hellsinger as Administrator
If Metal: Hellsinger keeps crashing on startup, then a lack of administrator privileges is likely the cause of the problem. When a game isn’t granted administrator privileges, it can lack the ability to execute essential commands and get access to certain DLL files.
This lack of administrator privileges usually leads to performance errors, the most common being constant crashes. You can quickly fix this problem by granting Metal: Hellsinger administrator privileges.
To do so, you’ll need first to find the .exe file of the game. This file will be in the directory where you installed Metal: Hellsinger. If you’re unsure where the game is installed on your system, follow the steps listed below to find the install location:
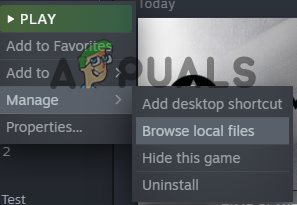
- Open Steam.
- Navigate to the Library.
- Right-click on Metal: Hellsinger.
- Select Manage > Browse Local Files.
Opening Location of Game Files through Steam
After you click on the Browse Local Files option, the install location of Metal: Hellsinger will open. In this folder, look for the .exe file of the game.
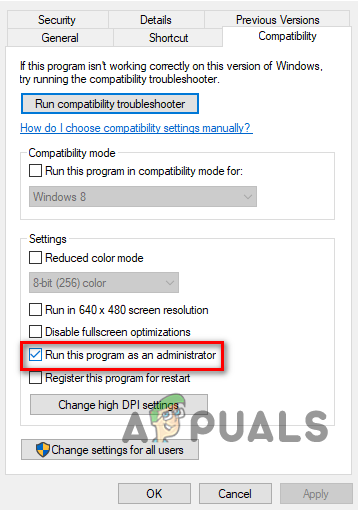
Once you’ve found the .exe file, right-click on it and click the Properties option. Click on the Compatibility tab and then check off the “Run as administrator” option. Now that there’s a checkmark next to this option, Metal: Hellsinger will always launch with administrator privileges, which can possibly fix the crashing issue.
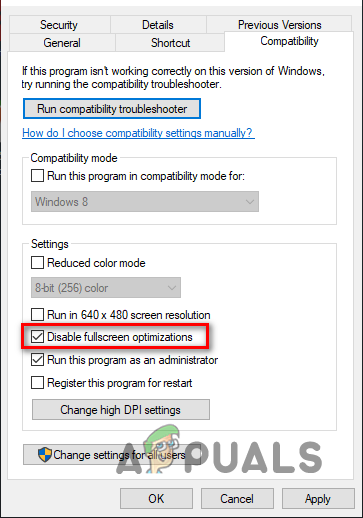
Before applying these changes, there’s another option that you have to put a checkmark next to. This is the “Disable Fullscreen Optimizations” option.
The Fullscreen Optimizations feature of Windows can have a very negative impact on the performance of games. Despite the Windows Fullscreen Optimization feature being made to boost game performance by running them in a hybrid of fullscreen and windowed (instead of pure fullscreen), this feature actually decreases performance in most games.
The idea of Windows Fullscreen Optimizations is to allow for fast and easy minimizing/maximizing of games, but it seems not to do that either. Therefore, there’s no reason to leave this option on as it only negatively impacts game performance.
So, put a checkmark next to both “Run as administrator” and “Disable Fullscreen Optimizations” and then click Apply.
After that, relaunch Metal: Hellsinger, and you should immediately feel an improvement in the game’s performance. But if the game continues to crash, move on to the next solution we’ve listed below.
6. Change Windows Language and Regional Format (If applicable)
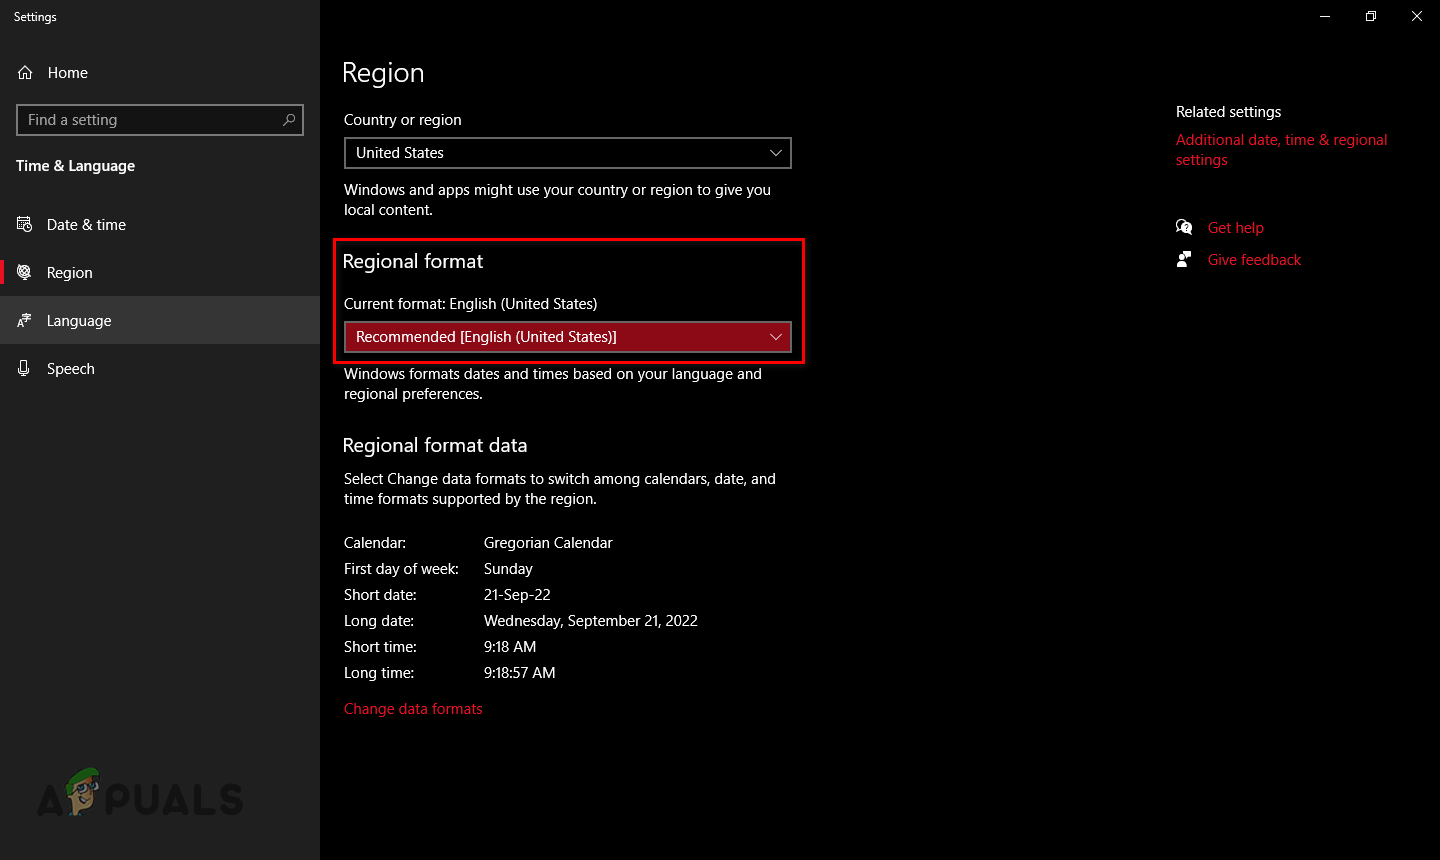
According to several reports on forums, the crashing issue in Metal: Hellsinger can be related to the user’s Windows Display Language and Regional Format settings. If Windows’s Regional Format and Display Language settings are not set to English, they seem to cause errors with the game’s leaderboard, especially during the Incaustis level.
So you should ensure that both these settings on your system are set to English. If they are not, you can follow the steps below to change the Windows Regional Format and Display Language setting to English:
- Press Windows Key, type Regional Format, and press enter.
- In the Region Settings window, change the Regional Format to English.
Changing Windows Regional Format to English - Click on the Language section on the left side of the window.
- Set Windows Display Language to English.
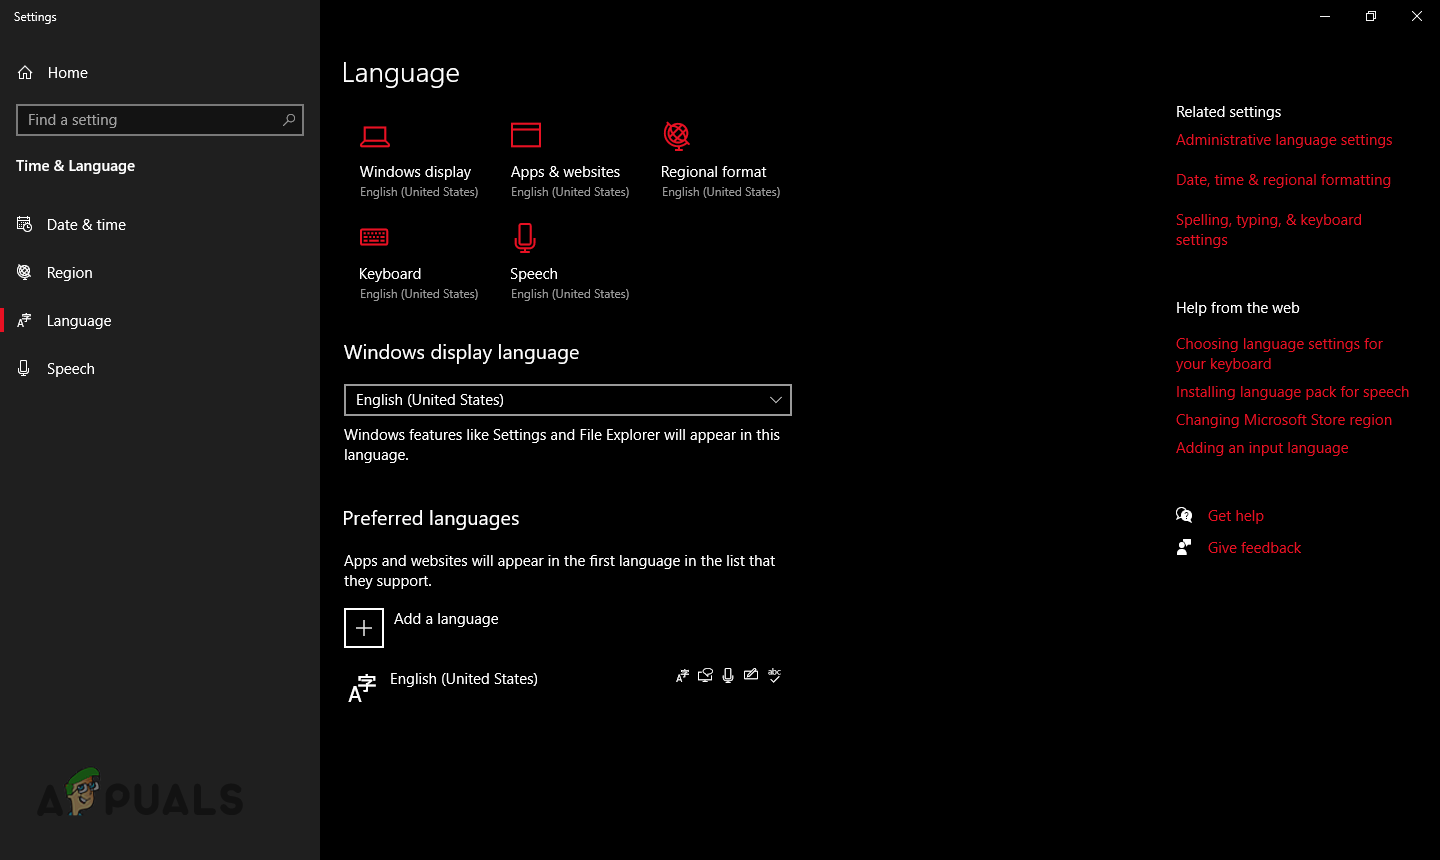
Changing Windows Display Language to English
After changing the Regional Format and language settings, relaunch Metal: Hellsinger and load back into the level. If you were experiencing the crashing problem during the Incaustis level, it should now be resolved.
7. Add Exception in Firewall
Another reason why Metal: Hellsinger is crashing on startup may be because of interference from the Windows Firewall.
Windows Firewall is a Windows security program that is always active on your PC. Its job is to scan every application you launch on your system. If it finds any malicious files within the application, it prevents it from being launched to protect your system.
However, the Windows Firewall does not do a good job of differentiating safe applications from dangerous ones. It has a tendency to flag safe and trusted applications as threats to your PC, which prevents them from being able to launch. This results in the applications crashing on startup.
This could explain why Metal: Hellsinger is having such trouble launching on your system. To solve this problem, you’ll need to manually add an exception for Metal: Hellsinger in Windows Firewall.
To do so, follow the steps we’ve listed below.
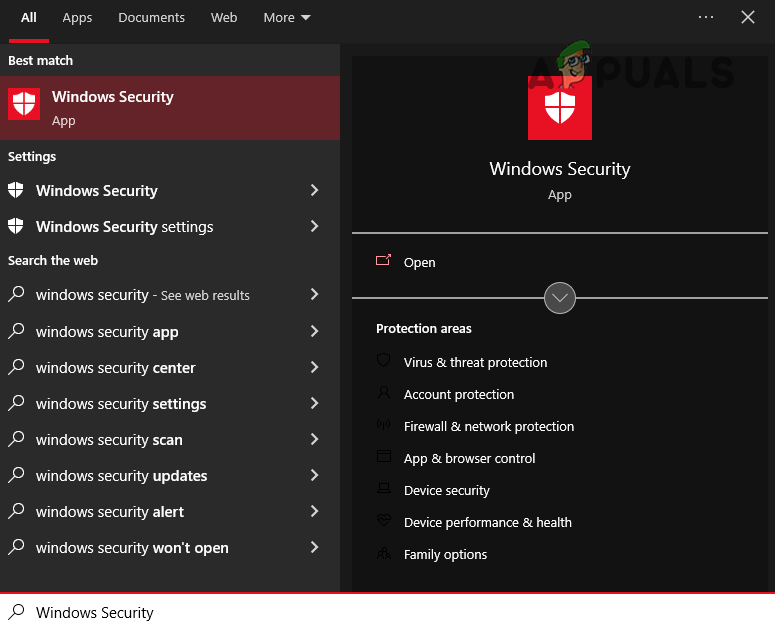
- Press the Windows Key, type Windows Security, and press enter.
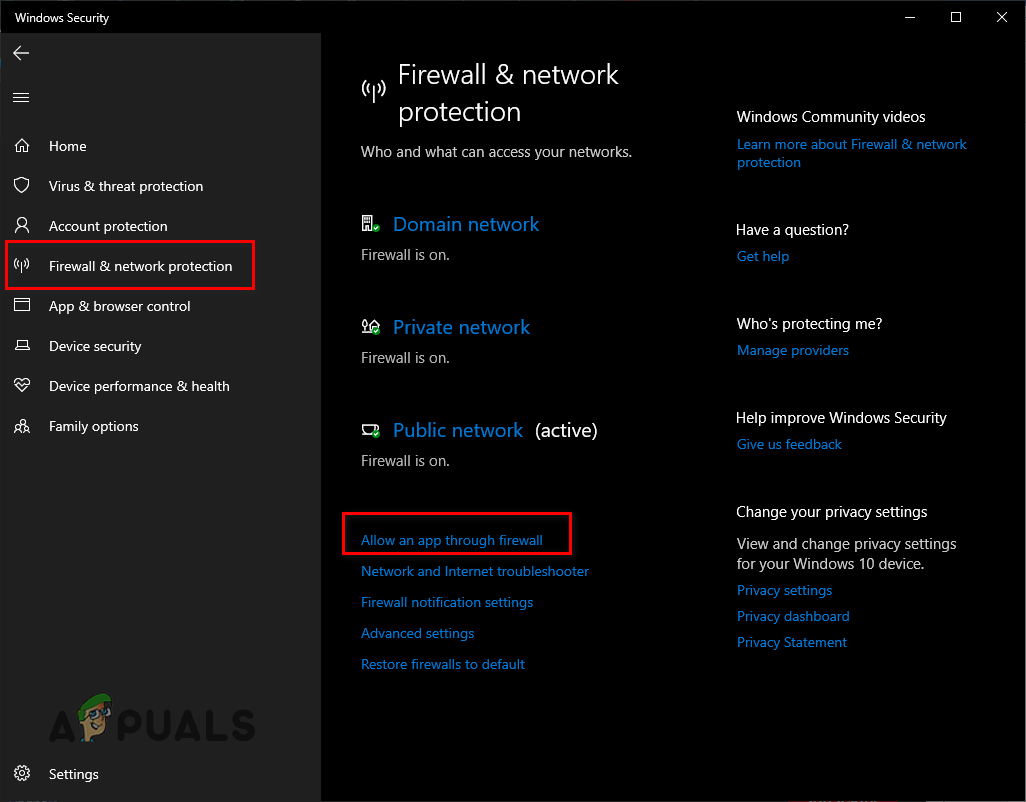
Opening Windows Security - Click on the Firewall & Network Protection section.
- Click “Allow an app through Firewall.”
Opening Firewall Settings - Click on the “Change Settings” button at the top.
- Click on the “Allow another app…” button at the bottom.
- Search for the .exe file of Metal: Hellsinger in File Explorer and double-click on it to add it to the list.
- Put a checkmark next to Metal: Hellsinger and Steam and Click OK.
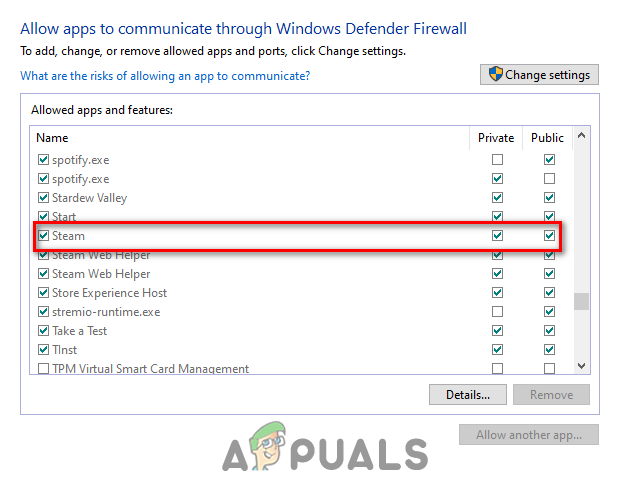
Adding Firewall Exception
Now that an exception has been created for Metal: Hellsinger and Steam, you’ve ensured that Windows Firewall will no longer interfere with the game. If Windows Firewall was the cause of the issue, the game will now have no trouble launching.
8. Temporarily Disable Antivirus
Since Metal: Hellsinger is a brand new game, Antivirus programs are likely not accustomed to it. So the Antivirus program installed on your system might be mistakenly flagging the game as a threat to your PC, which would prevent it from obtaining the read and write privileges it needs to work as intended. This lack of privileges can be a significant cause of crashes.
To stop your Antivirus program from conflicting with Metal: Hellsinger, you will need to disable the Antivirus program temporarily.
You don’t have to disable it permanently as you need the program to help protect your PC. You should only keep it disabled while you’re playing Metal: Hellsinger. Once you’re finished playing the game, you can re-enable the Antivirus so it can continue safeguarding your system from threats.
To temporarily disable your Antivirus program, follow the steps we’ve listed below:
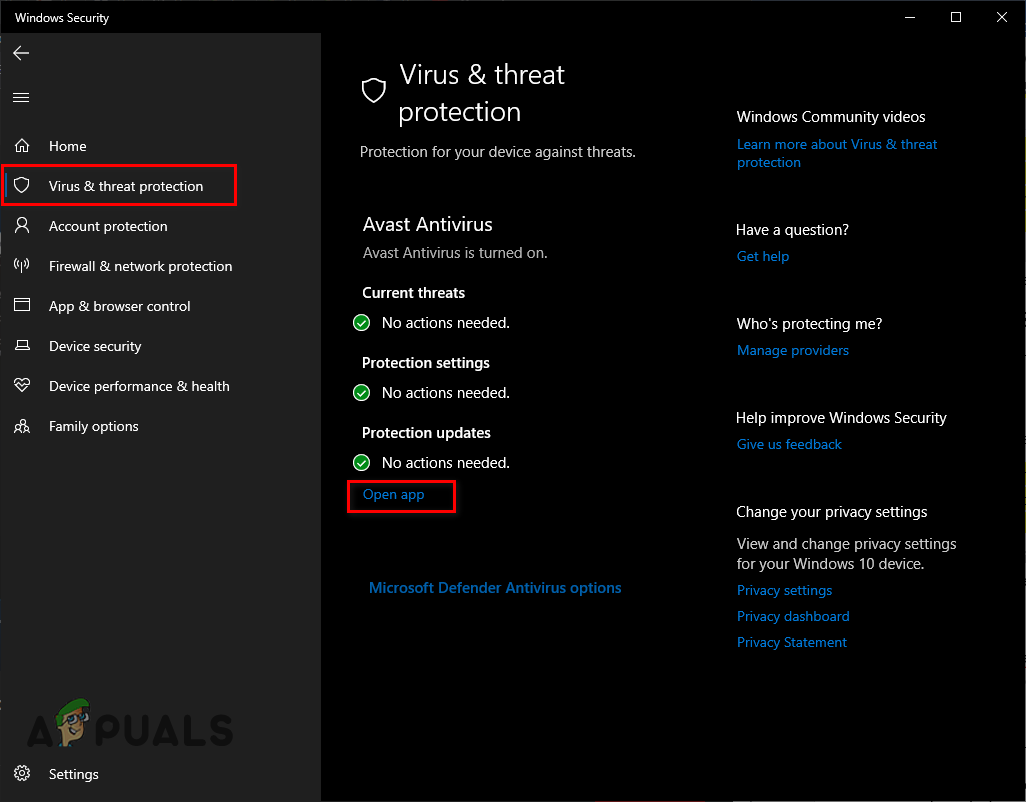
- Press the Windows Key, type Windows Security, and press enter.
Opening Windows Security - Click on the Virus & Threat Protection section.
- Click “Open App.”
Opening Antivirus menu
The Open App option will open the menu of the Antivirus program installed on your system. Through this menu, you’ll be able to disable the Antivirus. There will likely be an option for temporarily disabling the program for a certain period of time, so select that option instead of permanently disabling the Antivirus.
If there’s no such option for temporarily disabling it, simply disable the Antivirus, play Metal: Hellsinger, and re-enable the Antivirus from the same menu once you’re done playing.
9. Verify Integrity of Game Files
Missing and/or corrupted game files are among the most common causes of game performance issues. This problem usually arises during the download process. If the user has an unstable internet connection or if the internet connection temporarily disconnects while the game is downloading, some of the game files can get lost/corrupted in the process.
Therefore, you should always try repairing/replacing these corrupted/missing game files each time you encounter such a performance error. To do this, you’ll need to verify Metal: Hellsinger’s game files through Steam. This verification process will allow Steam to scan the game files for any problems. Once it’s scanned all the files, Steam will repair any corrupted/missing files automatically, fixing your crashing issue.
Follow the steps listed below to repair Metal: Hellsinger’s game files:
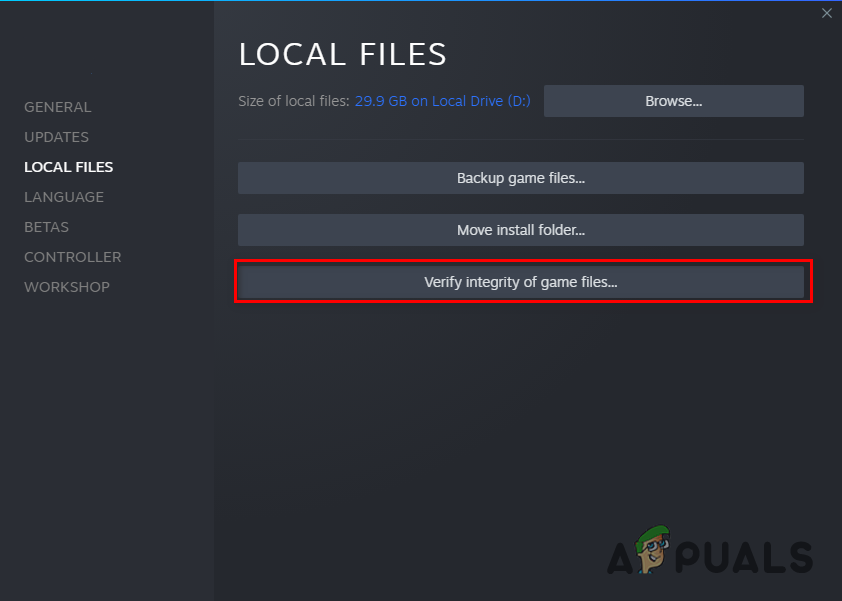
- Open Steam.
- Navigate to the Library.
- Right-click on Metal: Hellsinger.
- Click on the Properties option.
- Click on the Local Files tab.
- Select the “Verify Integrity of game files…” option.
Verifying Integrity of Game Files through Steam
Once it’s finished, it will let you know whether it found (and repaired) any missing/corrupted files or not. If it says, “All files successfully validated,” it indicates that there were no problems found with the game files. In that case, you can continue with the next solution listed below.
10. Use Dedicated GPU (If Applicable)
If you have a dedicated Graphics Card (GPU) installed in your system, you have to ensure that Metal: Hellsinger is running on the dedicated GPU instead of running on the integrated graphics of your CPU.
If a game runs on the CPU’s integrated graphics instead of the dedicated GPU, the user will face severe performance issues as the integrated graphics are (usually) considerably weaker than the dedicated GPU.
Follow these steps to ensure that Metal: Hellsinger is running the dedicated GPU installed in your system:
- Press Windows Key, type Graphics Settings in the search bar, and press enter.
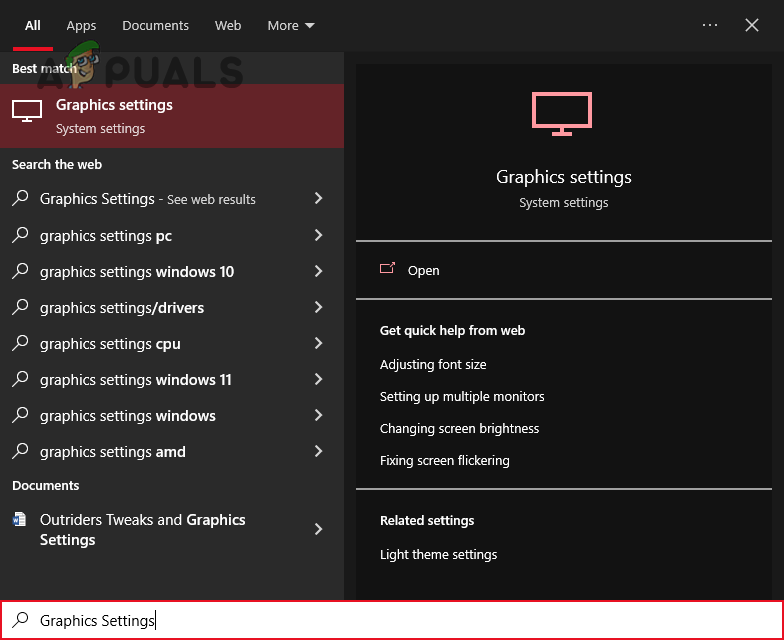
Opening Graphics Settings - Select the Browse option.
- Find the .exe file of Metal: Hellsinger.
- Add it to the list.
- Click on the newly added Metal: Hellsinger from the list.
- Click on Options.
- Change Graphics Performance to the “High Performance” option.
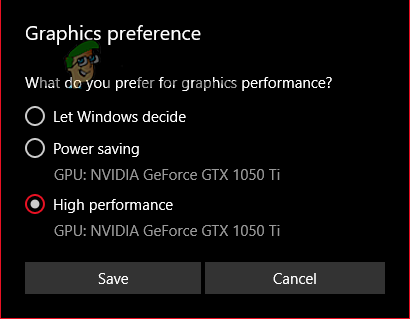
Changing Graphics Settings to High Performance
Once you’ve selected the High Performance option for Metal: Hellsinger, the game will always run on the dedicated GPU. If Metal: Hellsinger was running on your CPU’s integrated graphics before, the game’s performance will now be significantly improved, and the crashing issue will likely go away.
11. Install the Latest Microsoft Visual C++ Redistributable Package (If Applicable)
Microsoft Visual C++ is a compiler made by Microsoft which compiles C and C++ code. If this compiler is not installed in a user’s system, many programs (especially games) will fail to run properly. And if the Microsoft Visual C++ package installed in the system is outdated, it will have trouble compiling the code of modern games such as Metal: Hellsinger.
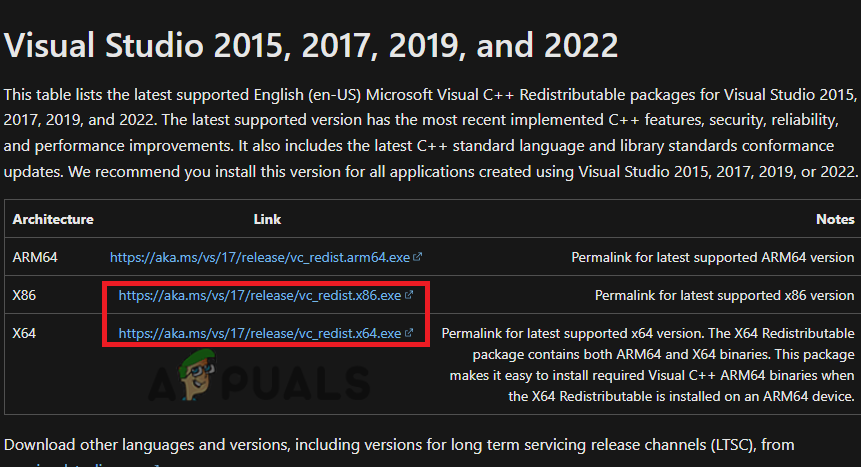
So you must ensure that you have installed the latest Microsoft Visual C++ Redistributable Package in your system. To install the latest version of Microsoft Visual C++, follow the steps listed below:
- Go to this website.
- Click the link marked in the image below to download the latest Microsoft Visual C++ Redistributable Package.
- Download the X86 version if your processor is 32-bit.
- Download the X64 version if your processor is 64-bit.
Downloading Microsoft Visual C++
To find out what type of processor you have, follow these steps:
- Press Windows Key.
- Type “This PC.”
- Right-click on the This PC icon.
- Select Properties.

Checking the specifications of your processor
The properties window will show you important information regarding your PC’ specifications, such as your processor’s type.
After figuring out your processor’s type, head back to the website and download the appropriate package. Once it’s downloaded, install it in your system and restart your PC. Once your PC has booted up, relaunch Metal: Hellsinger and see if the crashing issue has been resolved or not.
12. Turn Off Overlays
Many programs, such as Steam, NVIDIA GeForce Experience, Discord, Xbox Game Bar, and so on, come with a built-in overlay feature. These overlays help users with productivity by allowing them to access the app features without even opening the app itself.
But unfortunately, these app overlays come with many side effects. First, overlays passively use CPU and GPU resources while they’re active. So if an overlay is active but not actually being used by the user, it will be using the system’s resources for no reason. Having only one or two overlays will likely not use that many resources, but if you have many app overlays active simultaneously, they can consume a significant amount of system resources together.
And on top of that, overlays are known to cause issues with different applications due to compatibility errors. These overlays can conflict with the application that’s currently in focus, as well as with each other. This leads to many performance errors, such as stutters, black screens, and crashes.
This is why you should ensure that your overlays are disabled while playing Metal: Hellsinger. They might be the root cause of the crashing problem.
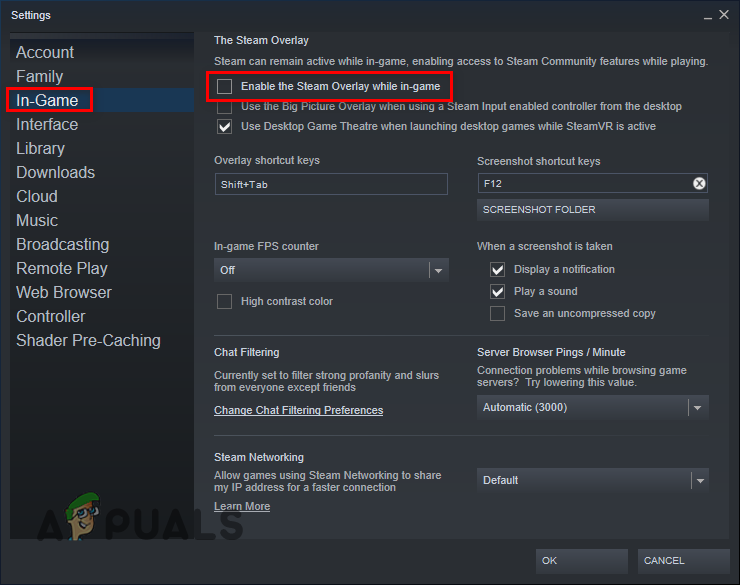
According to the developers, the overlay which tends to conflict with Metal: Hellsinger the most is the Steam Overlay. You should try disabling this overlay first. Follow the steps below to turn off the Steam Overlay:
- Open Steam.
- Click on the “Steam” option in the top-left corner of the window.
- Select Settings.

Opening Steam Settings - Click on the In-Game option.
- Remove the checkmark next to “Enable the Steam Overlay while in-game.”
- Click OK.
Disabling the Steam overlay
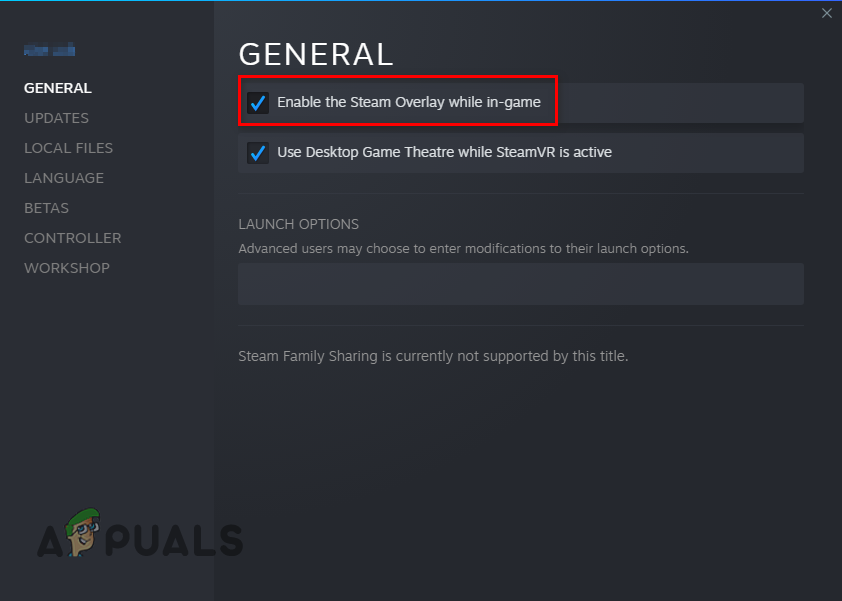
If you want to disable the Steam Overlay only for Metal: Hellsinger, then follow these steps instead:
- Open Steam.
- Navigate to the Library.
- Right-click on Metal: Hellsinger.
- Select Properties.
- Remove the checkmark next to “Enable the Steam Overlay while in-game.”
Disabling the Steam Overlay for Metal Hellsinger
Another app overlay infamous for causing game performance errors is the Xbox Game Bar. It is a native overlay feature of Windows which grants the user some helpful productivity features, such as performance monitoring, video capturing, audio controls, etc.
However, the Xbox Game Bar is not optimized well and consumes too many system resources. Therefore, it can lead to performance errors such as stutters, lag spikes, and crashes.
To disable the Xbox Game Bar overlay, follow the tips listed below:
- Press Windows Key, type Settings in the search bar, and press enter.
Opening Windows Settings - Select the Gaming option.
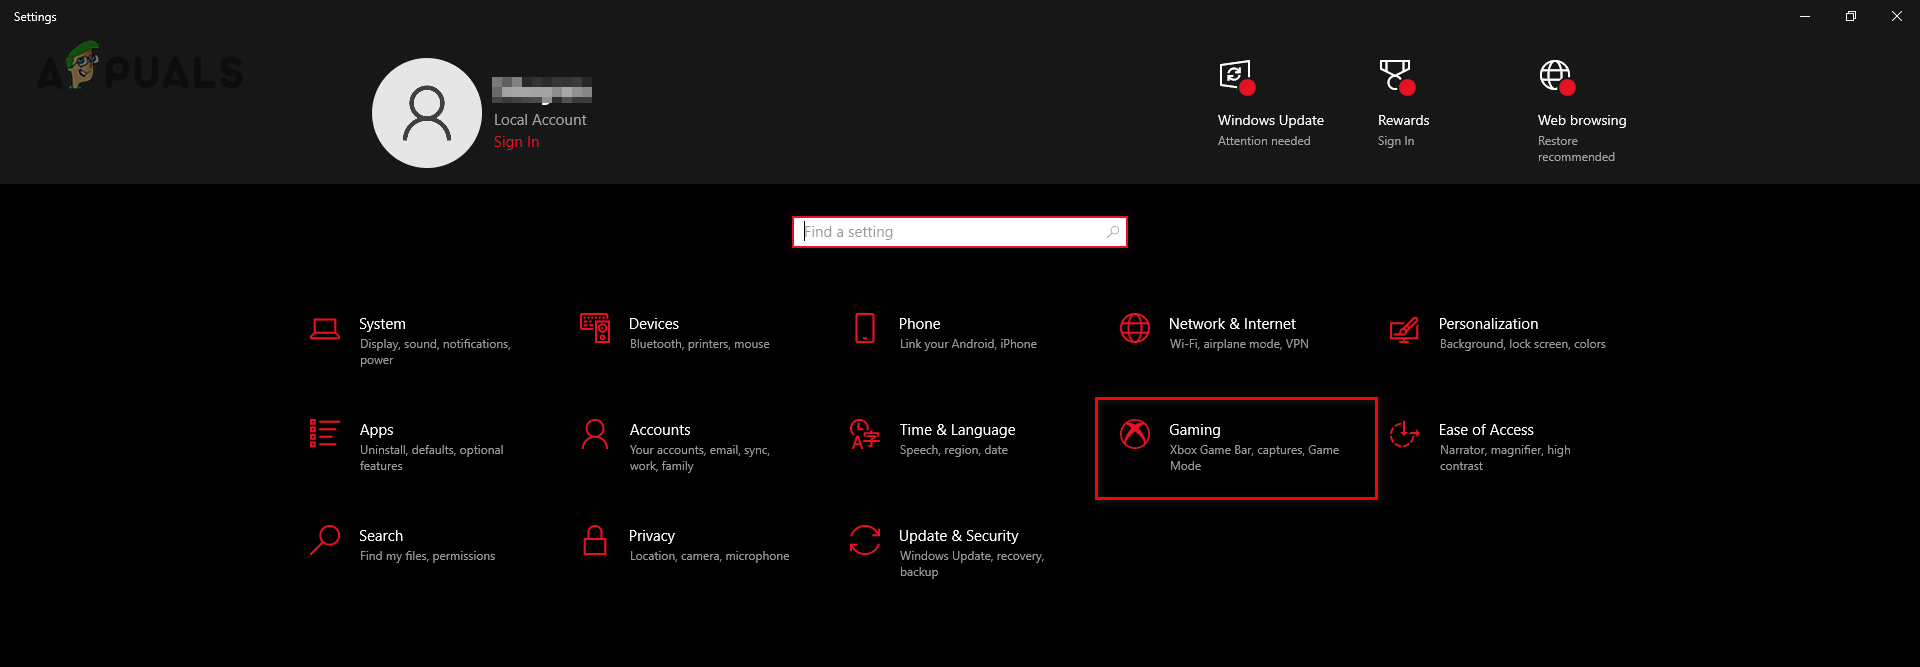
Opening the Gaming Settings menu - Turn off the Xbox Game Bar.
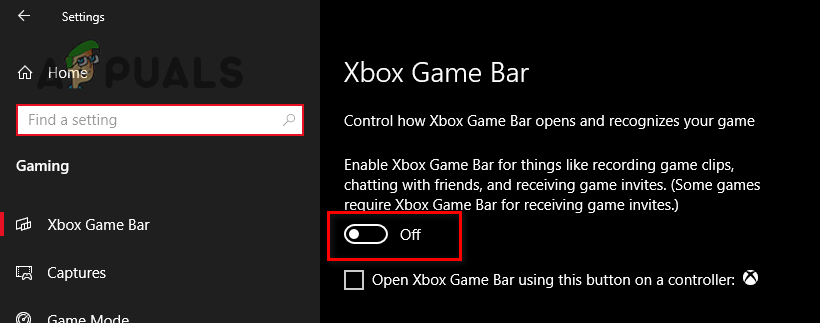
Disabling the Xbox Game Bar
After disabling the Steam Overlay and Xbox Game Bar, relaunch Metal: Hellsinger and see if the crashing issue is fixed. If the game continues to crash, try disabling the overlay of other applications as well.
13. Close Background Processes and Increase Paging File Size
Due to Metal: Hellsinger’s poor optimization, it consumes a substantial amount of RAM. It seems like the game requires more than 8 GB of RAM to run without crashing, despite the recommended requirements stating that it only needs 8 GB.
To determine if your RAM is the cause of the crashing issue, you must check how much RAM is currently installed in your system. To do so, follow these steps:
- Press Windows Key.
- Type “This PC.”
- Right-click on the This PC icon.
- Select Properties.
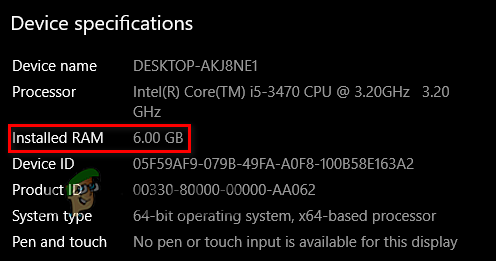
Checking how much RAM you have installed
In this window, you’ll be able to see exactly how much RAM your PC has. If the system has 8 or fewer gigabytes, then your RAM might be the main culprit of the crashing problem in Metal: Hellsinger.
To solve this problem, you must first ensure that your RAM is being used in the most efficient way possible while playing this game. This means you shouldn’t have any non-essential applications running in the background while playing the game.
These background applications usually don’t consume a lot of RAM individually, but if you have dozens of them running simultaneously, they can needlessly use up a significant amount of RAM. This will lead to problems such as crashing with games like Metal Hellsinger.
To stop unnecessary background applications from running on your system, follow these steps:
- Press Windows Key + X at the same time.
- Click on Task Manager.
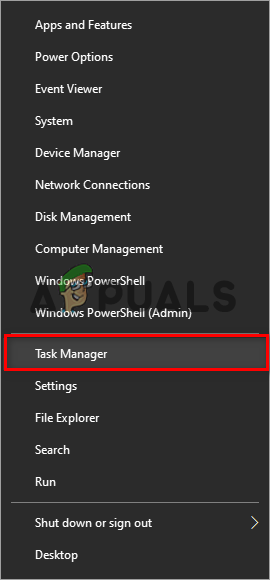
Opening Task Manager - Scroll through the applications shown in the Processes tab and find the unnecessary ones.
- After finding an unnecessary program, left-click on it.
- Select the “End Task” option at the window’s bottom-right corner.
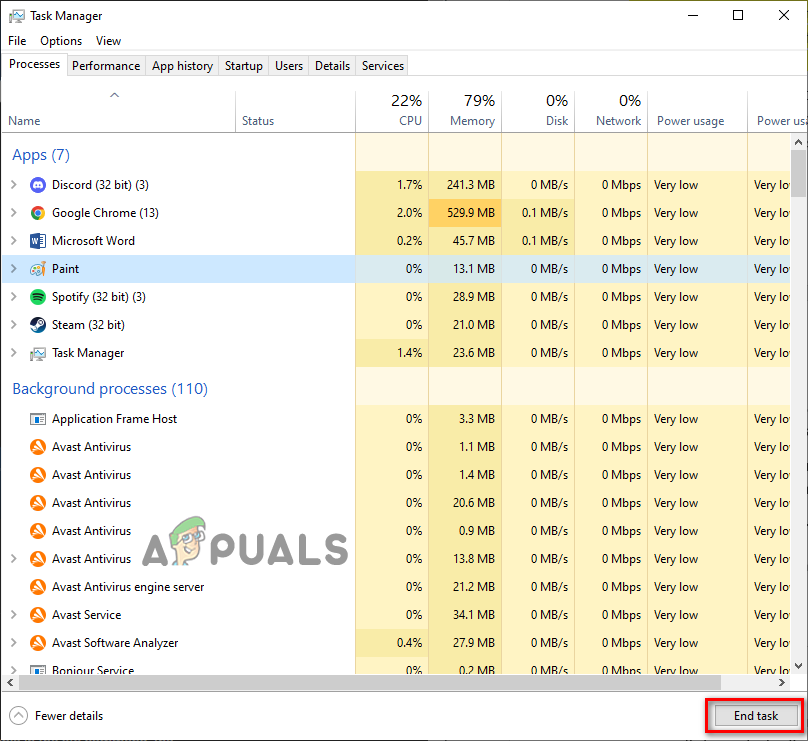
Closing Background Processes
Once you’ve closed all the unnecessary background applications, you should have enough RAM to run Metal Hellsinger smoothly. But if the crashing error continues to occur, don’t be alarmed, as there’s another way to fix this RAM issue.
The next method is to increase the Paging File Size in Windows. Paging File, also known as Virtual Memory, is the space reserved by Windows on your disk drive to use as additional RAM. When your physical RAM is near its maximum capacity, Windows offloads some files over to the Virtual Memory to ease the stress on the Physical RAM.
If there’s a lack of Virtual Memory, Windows won’t be able to offload these files. This will overload the physical RAM installed on your system, which will result in the application crashing.
To prevent this from happening, increase the Paging File Size on Windows by following the steps we’ve listed below:
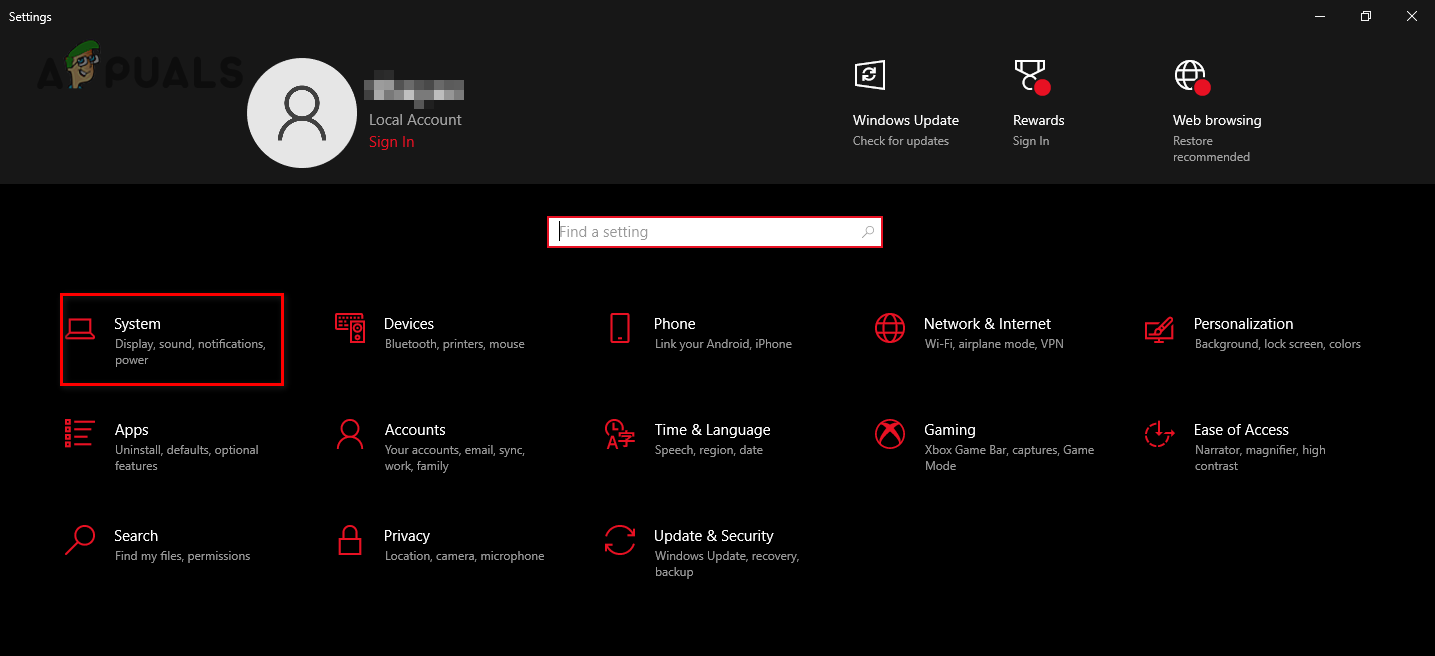
- Press the Windows Key, type Settings, and press enter.
Opening Windows Settings - Click on the System option.
Opening System Settings - Click on the About option on the left side of the window (at the very bottom).
- Select the “Advanced system settings” option on the right side of the window.
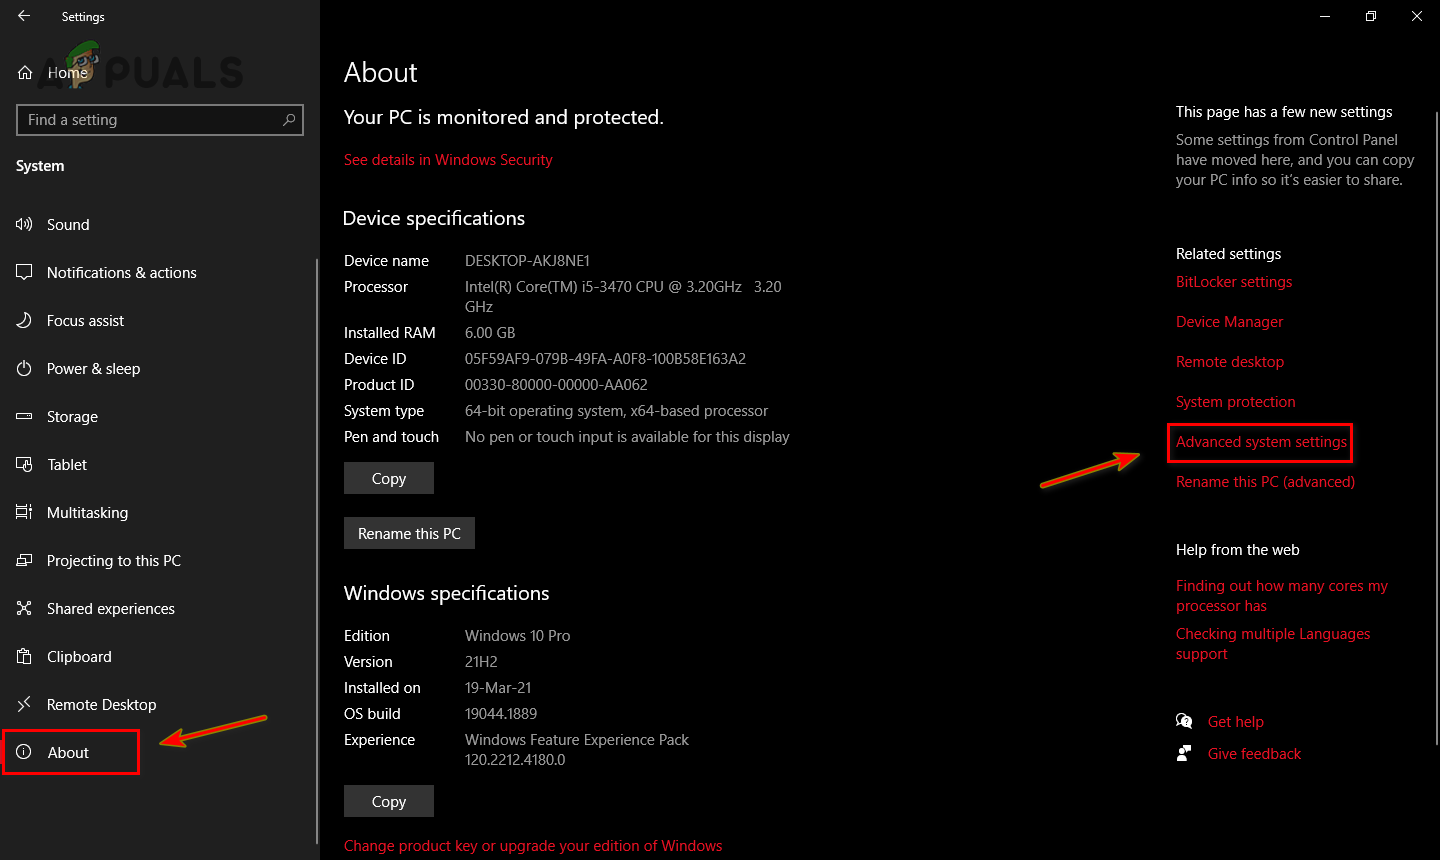
Opening Advanced System Settings - Under Performance, click on Settings.
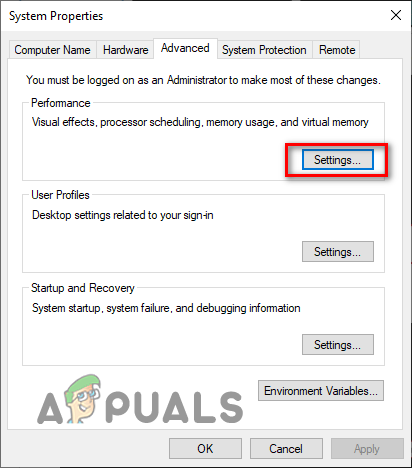
Opening Performance Settings - Click on the Advanced tab.
- Under Virtual Memory, click on the “Change…” option.
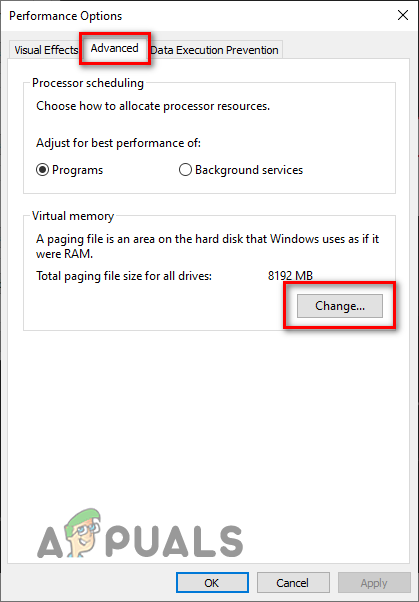
Opening Virtual Memory Settings - Remove the checkmark next to “Automatically manage paging file size for all drives“
- Click Custom Size.
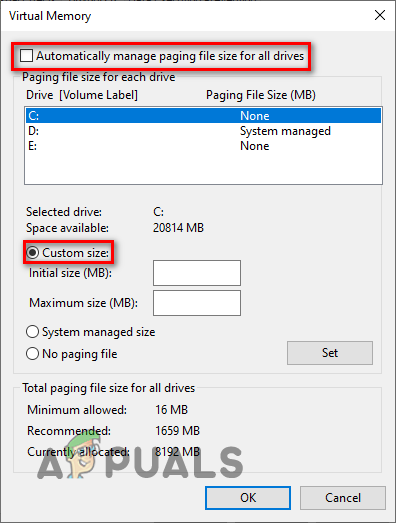
Changing the size of Virtual Memory (Paging File Size)
You’ll now have the option to put an initial and maximum size for your Virtual Memory. The general rule of thumb is to set the initial size to 1.5 times the amount of physical RAM installed on your system. And the maximum size should be 4 times your physical RAM.
For example, if you have 10 GB of RAM installed, the initial size should be 15 GB, and the maximum size should be 40 GB. However, remember that this does not consider the size of your disks.
Before you set these values, open File Explorer, click on This PC, and take a look at the space available in your drives. If your drives are critically low on space, it will be unwise to set the Paging File Size this high as that can lead to further issues.
So, increase your Paging File Size in accordance with the amount of space available on your drives. After you’ve entered the appropriate values into the Virtual Memory window, click on Set and then press OK to confirm the changes.
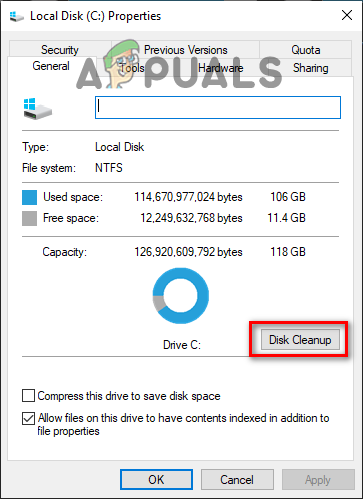
If your drives are extremely low on space, you should clean them up using the Windows Disk Cleanup tool. This will allow you to free up enough space to increase the Paging File Size. Ideally, your drives should have at least 25% of their total space available as free space. If they have less than that, perform a Disk Cleanup by following the steps listed below:
- Open File Explorer and navigate to the This PC section.
- Right-click on the drive where Metal: Hellsinger is located.
- Select Properties.
- Select the “Disk Cleanup” option.
Performing Disk Cleanup
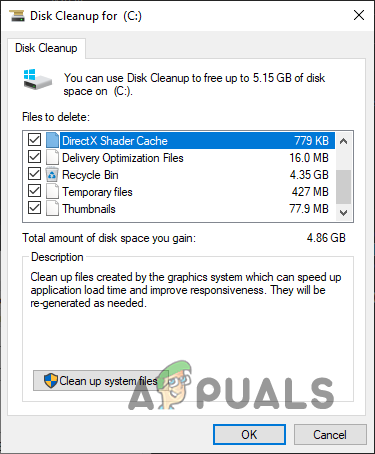
The Disk Cleanup feature will take a minute or two to scan the disk for junk. After scanning, it will show you a list of all the junk files/folders on the disk.
Before you delete the items, scroll through the list and see if there are any important files/folders there or not. The Disk Cleanup feature has a tendency to mark important folders/files, such as the Downloads folder, as junk. So, ensure that the items on the list are actually junk.
After ensuring that there are no important items on the list, put a checkmark next to the junk files/folders and then click on OK. This will delete all of the selected items.
14. Disable Xbox Configuration Support for Controller
If you’re trying to play Metal: Hellsinger using a controller and are experiencing crashes as soon as you connect the controller, then you might be able to fix your problem by turning off the Xbox Configuration Support setting in Steam.
This configuration setting enables the user to map inputs on the controller directly through Steam instead of doing it through the game itself. This is a convenient configuration setting, but according to the developers, it can conflict with the game and lead to crashes.
To disable Xbox Configuration Support on Steam, follow these steps:
- Open Steam.
- Click on the “Steam” option in the window’s top-left corner.
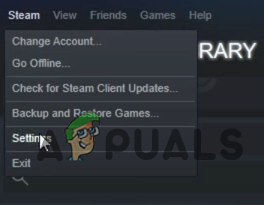
Opening Steam Settings - Select Settings.
- Click on the Controller category.
- Click on General Controller Settings.
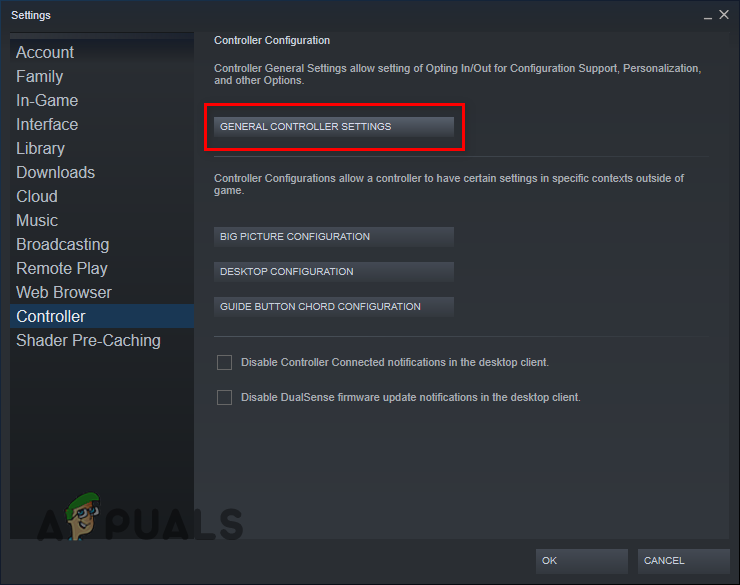
Opening General Controller Settings - Remove the checkmark present next to “Xbox Configuration Support.”
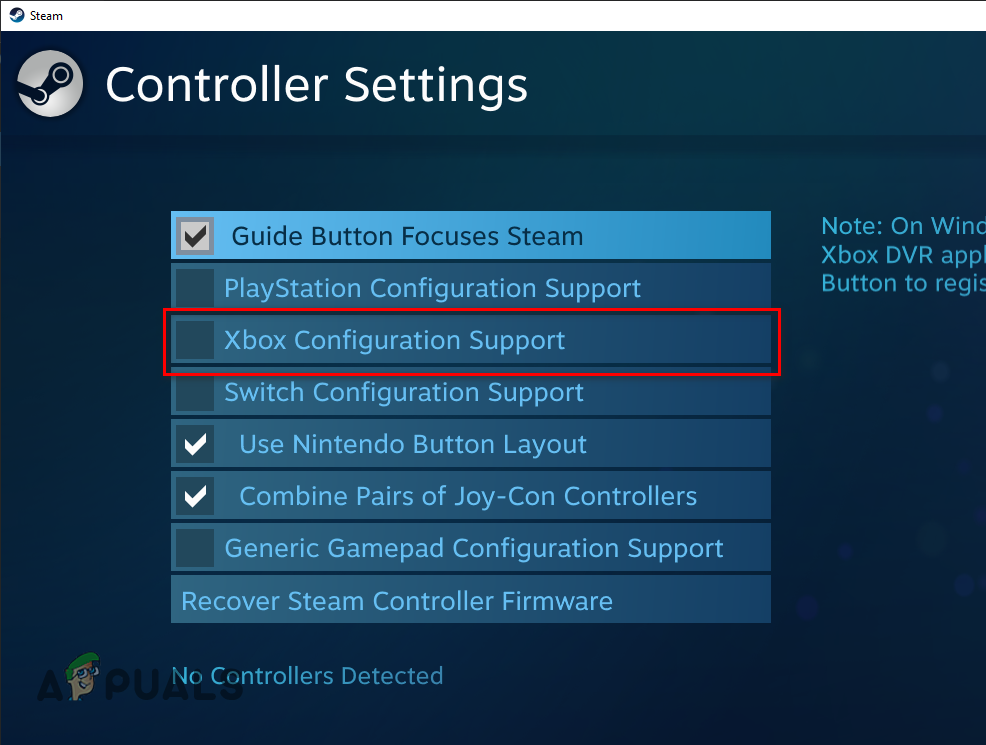
Disabling Xbox Configuration Support
After disabling the Xbox Configuration Support option, relaunch Metal Hellsinger and the game should stop crashing.
But if the crashing issue continues after you’ve disabled this setting, the real cause of the issue is most likely your controller itself. As of right now, Metal: Hellsinger only supports Xbox Controllers.
So if you’re using a different type of controller, such as the Nintendo Switch or PS4/PS5 Controller, you’ll need to use a program that can emulate an Xbox controller. Only then will you be able to play the game using your controller.
15. Update Graphics Card Drivers
The next step in fixing the crashing issue in Metal: Hellsinger is to update your Graphics Card’s drivers. The GPU drivers installed in your system have a massive impact on the performance of your GPU. So if the drivers installed are outdated, missing, or corrupt, your GPU’s performance will suffer greatly.
Therefore, you should always update your GPU drivers to the latest version. This will ensure that the GPU is performing at its highest potential. Newer GPU drivers are optimized for new games like Metal: Hellsinger, so updating to the latest drivers will give you a performance boost in this game and can help fix the crashing issue.
To update your GPU drivers to the latest version, you must first figure out the brand and model of your GPU. This will help you find its respective drivers.
To find your GPU’s brand and model, follow the steps we’ve listed below:
- Press Windows Key + X (simultaneously), then click on Device Manager.
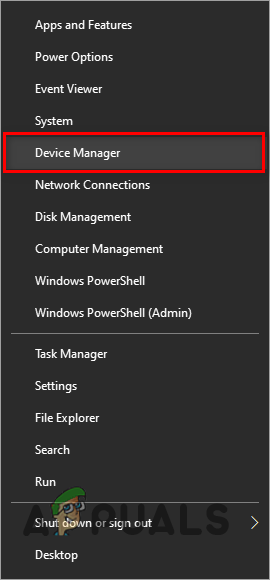
Opening Device Manager - In the Device Manager window, expand the Display Adapters section.
- Note down the name of your GPU.
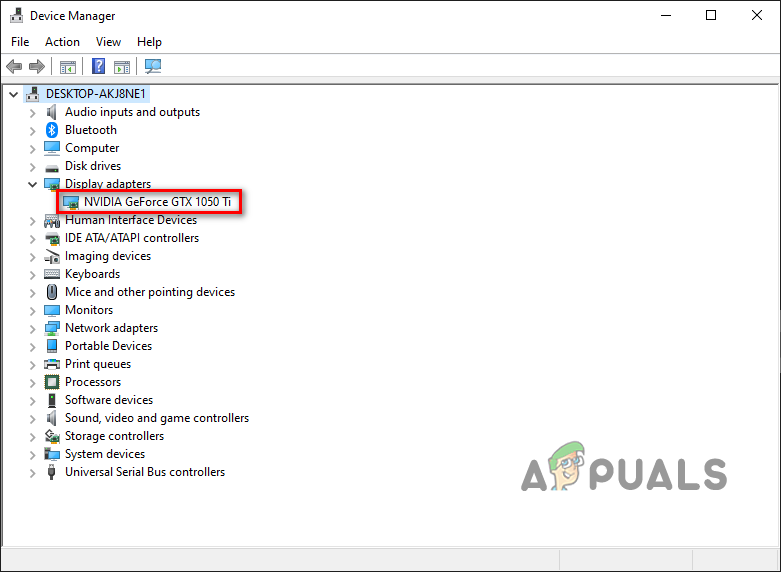
Identifying GPU model using Device Manager
By following this method, you’ll be able to find out your GPU’s brand and model within a few clicks.
However, if Device Manager shows your GPU’s name as “Microsoft Basic Display Adapter”, there is an issue with your GPU drivers.
Microsoft Basic Display Adapter is not the name of your GPU. Windows is showing it as such because your GPU drivers are either missing or corrupt, causing Windows not to recognize the GPU installed in your system.
So if Device Manager is showing your GPU as Microsoft Basic Display Adapter, then follow the steps we’ve listed below to find the actual brand and model of your GPU:
- Press Windows Key + X (simultaneously), then click on Device Manager.
Opening Device Manager - In the Device Manager window, expand the Display Adapters section.
- Right-click on Microsoft Basic Display Adapter.
- Select Properties.
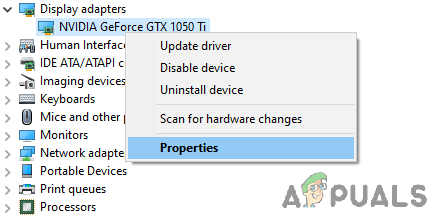
Selecting GPU Properties - Go to the Details tab.
- Click on the drop-down list below “Property” and select Hardware Ids.
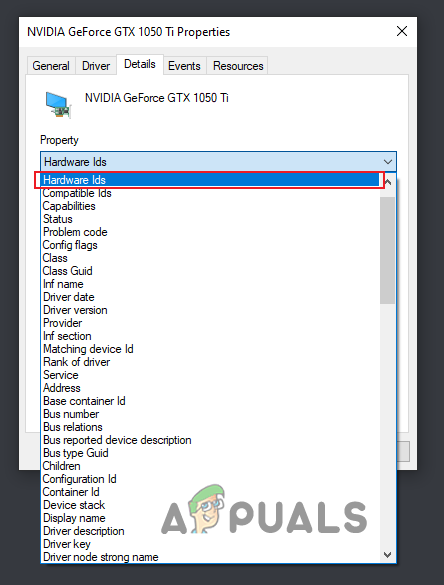
Selecting Hardware Ids - Copy the first line of text written under the Value section.
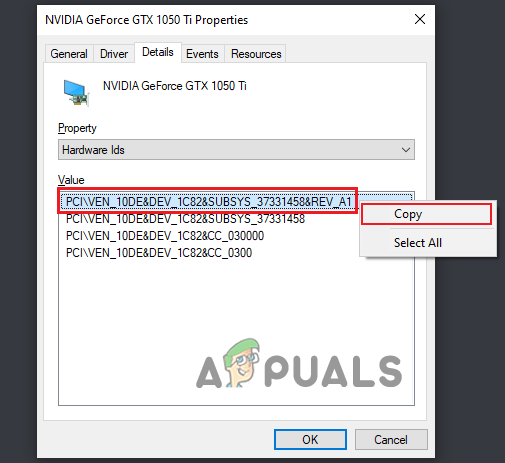
Copying Hardware Id - Open your browser, paste the text into the search bar, and press enter.
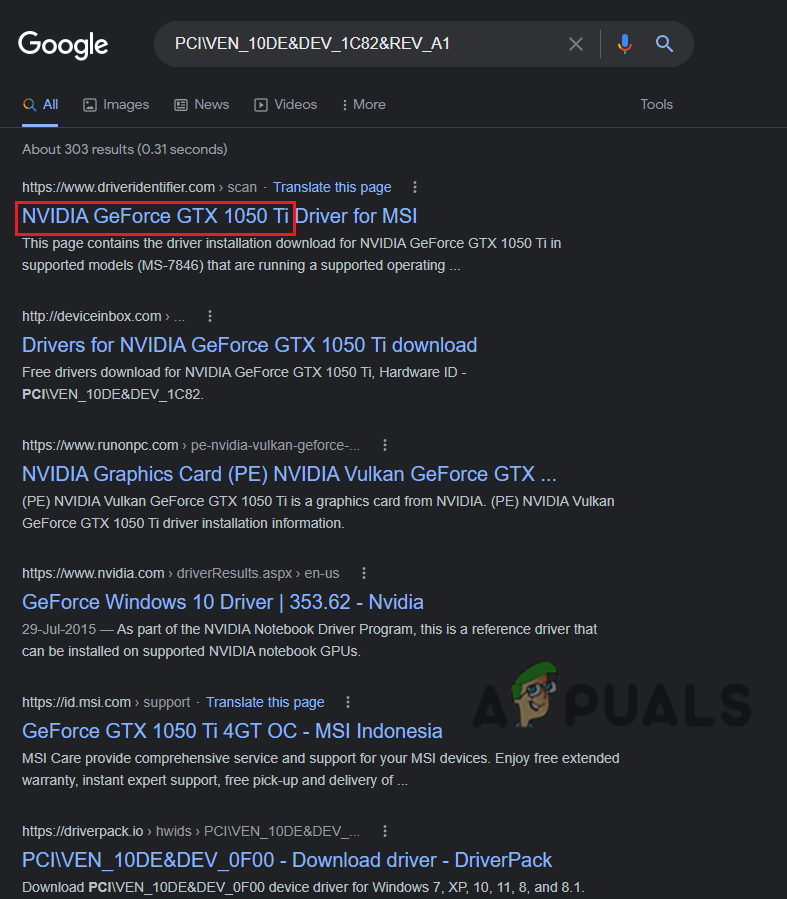
Finding name of GPU through Google
The results that will show up for your query on Google will allow you to determine your GPU’s exact brand and model easily.
Now that you’ve figured that out, the next step is to wipe the currently installed drivers from your system. If these drivers are not wiped, they can conflict with the latest ones you will install shortly. And if there’s a conflict, it can lead to significant performance issues.
We’ll use a program called Display Driver Uninstaller (DDU) to wipe the current GPU drivers on your PC. This program is much better than the default Windows driver uninstaller, as it completely wipes all traces of the drivers. Whereas the default Windows driver uninstaller will likely leave some files behind.
After downloading and installing DDU, you need to boot your system into Safe Mode. When your PC is in Safe Mode, all unnecessary applications and drivers will become inactive, allowing DDU to remove the drivers safely without encountering any problems.
To boot your system into Safe Mode, follow the steps we’ve listed below:
- Press Windows Key and right-click the Power button.
- Hold the shift key on your keyboard and select the Restart option.
- After your PC restarts, select Troubleshoot, then click Advanced Options.
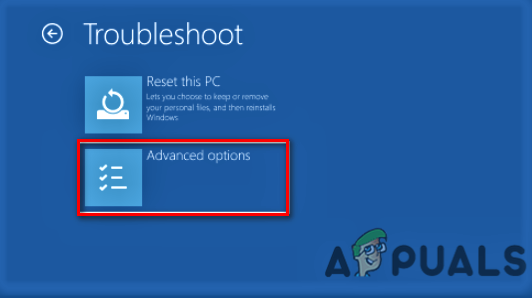
Advanced Options - Click on Startup Settings.
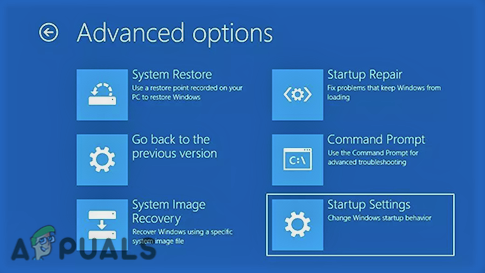
Selecting Startup Settings - Press F5.
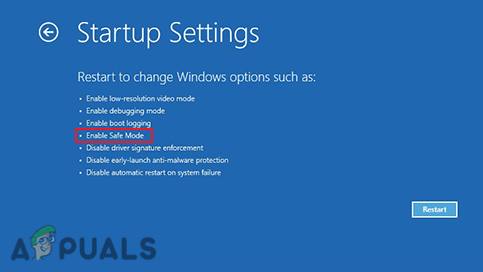
Selecting Safe Mode
After pressing F5, your PC will restart one more time to enter into Safe Mode. Once your PC is in Safe mode, you can safely remove the GPU drivers using DDU.
Open DDU and select the Device Type (GPU) and the respective brand of your Graphics Card. After selecting these options, click on the Clean and Restart button at the top-left to remove the GPU drivers from your PC.

The GPU driver removal process will take a few minutes to finish. Once it finishes, your system will restart. This will be an indication that the GPU drivers have been successfully uninstalled. Now that the drivers are wiped, the final step is downloading the latest drivers for your GPU.
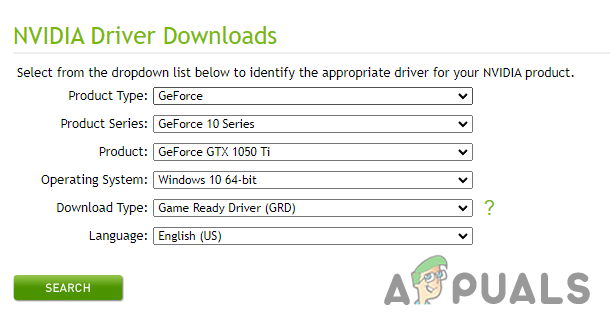
If you have an NVIDIA GPU, go to this website. Select the exact model of your GPU using the drop-down lists, and then press the SEARCH button to download the latest drivers.
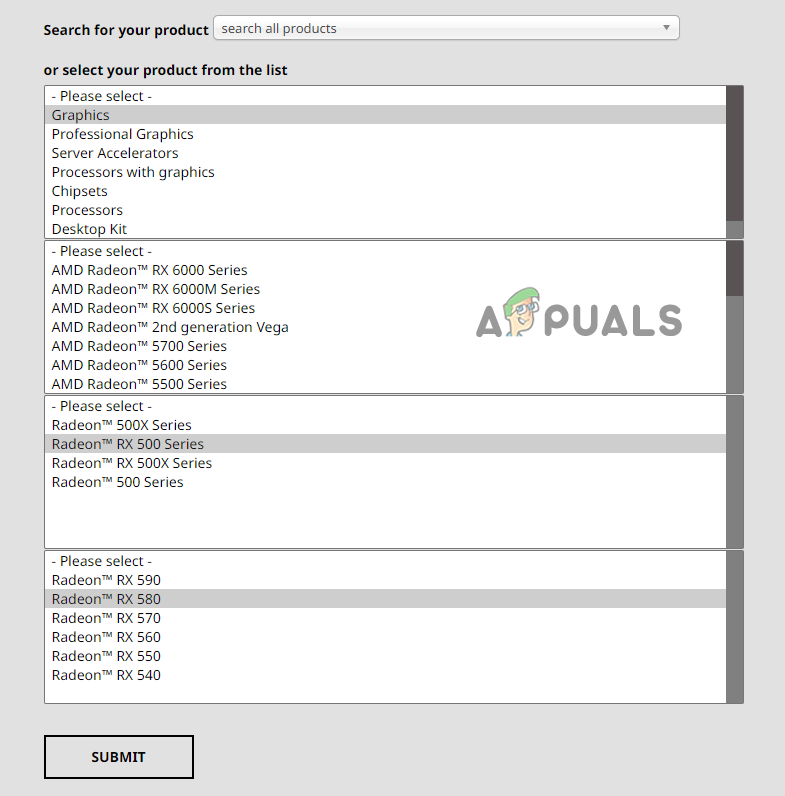
If you have an AMD GPU, go to this website. Select the exact model of your GPU using the drop-down lists, and then press the SUBMIT button to download the latest drivers.
The driver file will take a few minutes to be downloaded. And once it’s finished downloading, double-click on the file to start installing the drivers. The installer will ask you whether you want an Express or Custom installation during the installation process. Choose the Express option for the quickest driver installation.
16. Perform a Clean Boot
If none of the above solutions have fixed the crashing issue in Metal: Hellsinger, then some specific service/application installed in your system might be conflicting with the game and causing this problem.
To determine what service/application is the cause of the issue, you’ll need to perform a Clean Boot of your system. When you Clean Boot a system, it boots with only the essential services and drivers, so no unnecessary drivers, services, or applications are opened on startup.
To perform a Clean Boot of your system, follow the steps listed below:
- Open the Run dialog box by pressing Windows Key + R simultaneously.
- Type msconfig in the search bar and press enter.
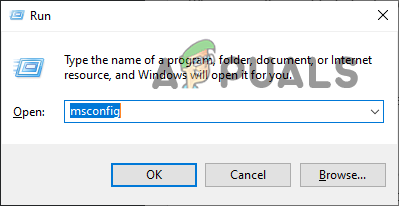
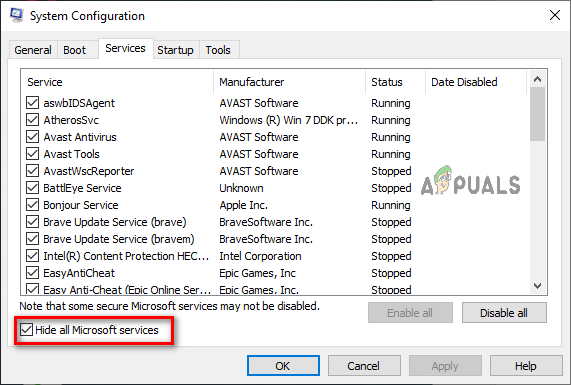
Opening msconfig - Navigate to the Services tab.
- Click on the “Hide all Microsoft Services” option.
Hiding all Microsoft Services
Microsoft Services are essential for the functionality of your system. So once these services are hidden, the list will only show the non-essential services.
Disable all of these non-essential services by removing the checkmark next to them, but keep Steam and Metal: Hellsinger active. Then, click on Apply to save the changes.
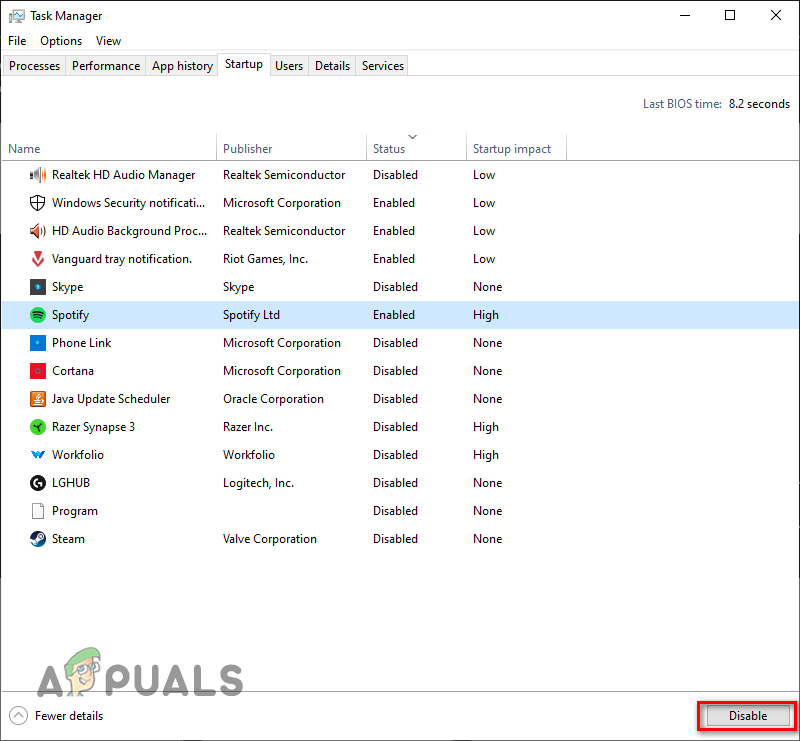
After disabling the services, navigate to the Startup tab in the System Configuration window and click on Open Task Manager. In the Startup section of Task Manager, you’ll be able to see all the apps that launch automatically when your PC boots up.
Left-click on all of the unnecessary startup applications and then disable them by selecting the Disable option at the bottom-right corner of the window. This will stop them from automatically launching when your system boots up, but you’ll still be able to open the apps by launching them manually.
Now that all non-essential services, applications, and drivers are disabled, restart your PC to perform a Clean Boot. After your PC boots up, relaunch Metal: Hellsinger and see if the crashing problem has been fixed or not.
If the crashing problem becomes resolved, it means that one or more of the services you disabled were the cause of the problem.
The next step is to determine which service(s) were the cause of the issue. To figure this out, you must re-enable the services in sets of four. Start by re-enabling four services, then eight in total, then twelve in total, and so on.
Each time you re-enable a set of services, restart your system and launch Metal: Hellsinger. When Metal: Hellsinger begins to crash again, it means that one or more of the services in the last set you re-enabled is causing the issue. You can then easily figure out which service(s) it is.
17. Reinstall Metal: Hellsinger
If none of the solutions listed above have solved the crashing issue in Metal: Hellsinger for you, the final step is to reinstall the game completely. To do so, you’ll need first to uninstall Metal: Hellsinger from your system by following the steps listed below:
- Press Windows Key, type Settings in the search bar, and press enter.
Opening Windows Settings - Click on the Apps option.

Opening the Apps menu - Type Metal: Hellsinger in the search bar.
- Click on Metal: Hellsinger.
- Select the Uninstall option.
After the game has finished uninstalling, open your Steam Library and reinstall the game from there. Once Metal: Hellsinger is reinstalled, the crashing issue should finally be resolved.


