How to Get More FPS from an Old AMD GPU? [Complete Guide]
Increase AMD GPU Performance [Full Optimization + Custom Driver]
There are a lot of people that are using old AMD graphics cards that have been on the market for a few years now. Maybe they don’t want to buy a new GPU because they don’t feel like the investment is worth it, or who knows what reason. But they still want to play some games on their computers.
This becomes almost impossible for them because they are running through different problems. They are constantly having low FPS or stuttering issues that do not let them play the games they want.
Even if the minimum system requirements for that game indicate that their GPU and other components are enough for it, they are still going through problems like this. When the GPU is getting older, the performance reduces at the same time. This is partly because of degrading hardware and party because AMD is ‘encouraging’ you to upgrade by limiting your performance by supporting your GPU model.
After many complaints were made by players about their AMD graphics card running slower and slower with time, we have decided to look into this problem to see what might cause these issues besides the GPU. Here’s a short list of all the possible causes:
- In-game settings too high – The first thing you need to investigate when you are having low FPS is the graphics settings of the game. These are determining the performance of the game because maybe the graphics settings are too high for your computer to support it properly. To fix this, all you have to do is to the graphics settings of the game you are playing and try to lower the settings to see if there are any improvements. You can change the resolution of the game, and also you can disable graphics features that are making your PC run slower.
- Outdated GPU and Windows drivers – Another important thing that you need to make sure of is that the graphics card and Windows are updated with the newest updates available. This can make your PC slower, and especially when gaming you will encounter problems like the low FPS one. To get more FPS out of your old AMD GPU, you need to go to the Windows Update to see if the Windows is up-to-data, then go to the AMD Radeon Software application to see if that is up-to-data as well.
- Disabled Game Mode – You can also get some more FPS out of your old AMD GPU by having the Windows Game Mode enabled. This is a feature that comes preinstalled with Windows and its role is to improve your gaming experience by killing some background processes that are making your PC slower. All you have to do is to go to the Windows Settings and find the Game Mode, then enable the feature.
- GPU model is no longer supported with performance optimization drivers – If you’re using an AMD GPU model more than 4 years old, chances are it’s no longer supported by performance optimization drivers. This is an industry practice that sucks (NVIDIA does it too). Fortunately, there are community drivers that will help you out with this and give you the FPS your old GPU deserves. Installing the Amernime Zone 3rd party driver always helps in this situation.
- Frequency and clocks are insufficient – If you’re using an AMD GPU model that is simply not capable enough to render the game you’re attempting to play with acceptable FPS, one way to alleviate the problem is to overclock your GPU. However, depending on your level of expertise, this is a procedure that might produce irreparable damage to your graphics card, so tread carefully!
Now that you are aware of all the possible causes, here is a list of methods that will help your get more FPS from an old AMD GPU, without needing to change it:
1. Reduce game graphics settings
The first thing that you need to do in order to get more FPS is to lower the graphic settings of the game you are trying to play. The graphics settings might be the principal reason that is leading to your low FPS, so you should start with this before.
All you have to do is to launch the game that you want to play and go to the graphics settings of it. You should start by lowering a bit from every setting to see if you are seeing any improvements.
You can also use the premade presets that games have (Low, Medium, High, etc) to try to lower the settings by a level.
Besides that, you can go deeper than that and go to Advanced Options, where you can change the advanced graphics settings on your own. Try different combinations in order to get the best out of the game.
After you do that and the FPS is still low, you can also try to lower the resolution of the game. There are bigger chances that this will get more FPS out of your old AMD GPU. But lower them with a limit because you still want to play the game with playable graphics.

One last graphics aspect that you can touch on is features like ambient occlusion, tessellation, antialiasing, and more. These are features that change the details of the games but do not affect the graphics significantly for every game. In some cases, the visible changes might be almost impossible to observe, but you can feel them when you are playing the games. All you have to do is to disable these features to see if this will be helpful.
In case you have done that and you still do not see any improvements to your old AMD GPU and its performance, go to the next method below.
2. Update your Windows and AMD GPU
The second thing that you need to take care of is to make sure that your Windows and AMD GPU have the latest updates installed. This could be another important factor in your game performance because the GPU can’t work at full performance without its newest updates.
All you have to do is to go to the Windows Updates to see if there are other updates available. After that, you should also look for updates using the Device Manager, or using the AMD Radeon Software.
In case you don’t know how to do this, here is a guide that will show you all the steps you need to follow:
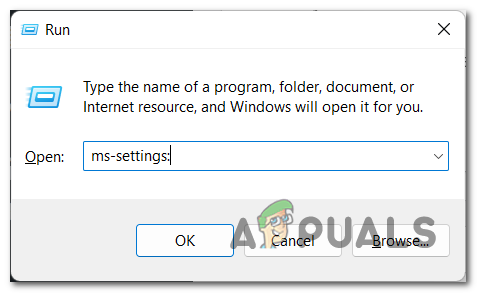
- The first thing you need to do is to open a Run dialog box by pressing the Windows key + R, then inside the search bar type ‘ms-settings:‘ to open the Settings of your PC.

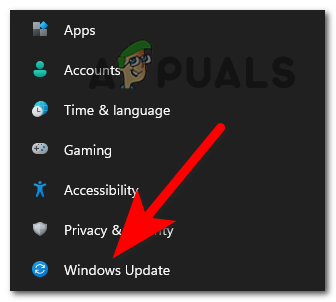
Opening the Windows Settings using a Run dialog box - Once you are inside the Windows Settings, look for Windows Update on the left side of the screen and access it when you find it.
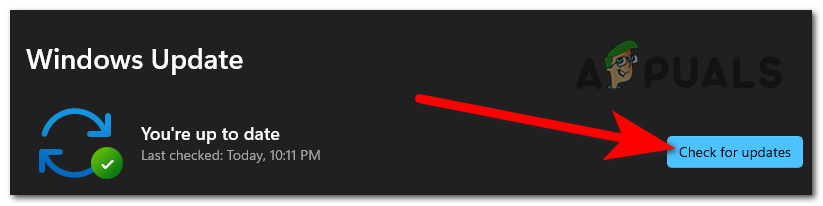
Selecting the Windows Update from the Settings - Now that you are inside the Windows Update, you need to click on the blue button that says Check for updates. Wait until the scan is complete.
Checking for available updates for your Windows - After the scan is complete and there are updates available, download and install them.
- Once you’ve done that, you need to open another Run dialog box by pressing the Windows key + R and typing inside the search bar ‘devmgmt.msc‘, then press Enter to open the Device Manager.

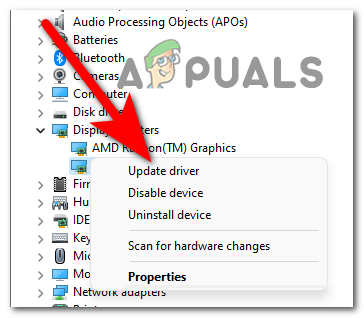
Using a Run dialog box to open the Device Manager - Now you need to expand the menu that is associated with Display adapters by clicking on the arrow. Then you need to right-click on the AMD GPU that you are using and click on Update driver.
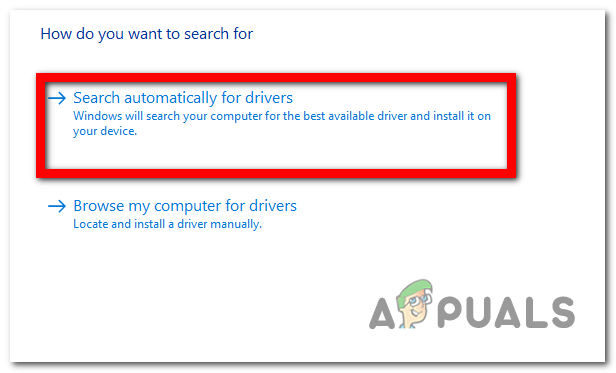
Updating your AMD graphics card from the Device Manager - After you’ve done that, click on Search automatically for drivers and wait until the scan is done. If any updates were found, make sure to install them.
Searching for available GPU drivers - When you are done with that, you can also use the AMD Radeon Software to look for available updates for your specific GPU. You need to open the app.
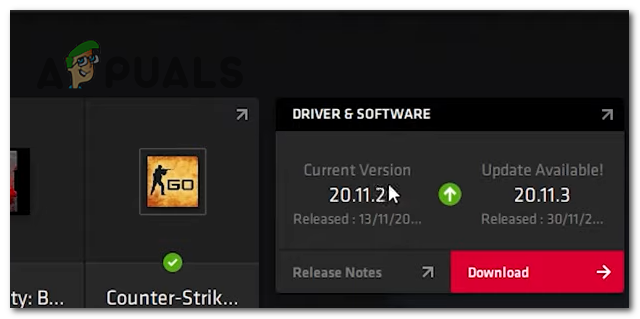
- Once you are inside the AMD Radeon Software, look on the right side of your screen to where it says Drivers & software. There you will see if other updates are available. If there are, you can click on Download to download and install them. If not, you can click on Check for updates to see scan for newer updates.
Looking for available updates using the AMD Radeon Software - When you are done with that, the only thing that is left to do is to launch the game you want to play to see if the performance has improved.
In case you still don’t get enough FPS from your old AMD GPU, go to the next method below.
3. Enable the Windows Game Mode
Another thing that you can try is to make sure that the Game Mode is enabled. Some players have managed to improve their old AMD GPUs by doing this.
This feature has the role to prioritize the processor and graphics card resources for your game. Basically, it makes the game the priority for your PC and it kills some background processes that are slowing your computer. This can slightly improve your AMD GPU by getting some more FPS out of it.
All you have to do is to go to the Settings of your Windows and make sure that the Game Mode is enabled.
In case you don’t know how to enable the Game Mode, here’s a guide that will show you how:
- Press the Windows key + R to open a Run dialog box and type inside the search bar ‘ms-settings:‘, then press Enter to open the Settings.
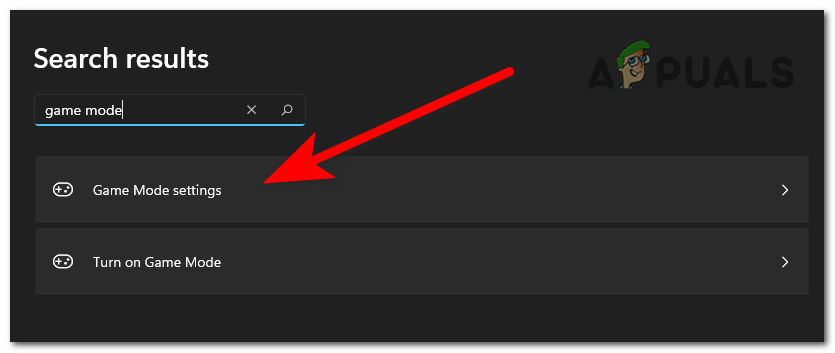
Using a Run dialog box to open the Settings of your Windows - Inside the Settings, use the search option and type ‘Game Mode‘, then press Enter and open the Game Mode settings.
Opening the Game Mode settings from the Windows Settings - Once you’ve done that, make sure that the Game Mode is enabled. The toggle next to it should be blue.

Make sure that the Game Mode is enabled - After that, you can close the Settings and launch the game to see if now it will work.
Go check the next method in case this one wasn’t helpful with your low FPS.
4. Install the Amernime Zone Radeon 3rd party driver
A very good thing that you can do to get more FPS from your old AMD graphics card is to install the Amernime Zone Unified Radeon 3rd-Party Driver Family. This is a driver created by the people of the AMD community that are going through this problem and wanted to help other people fix it.
The role of this driver is to give more FPS to old AMD GPUs, improving their performance. The driver is available in 3 different mods, every one of them being compatible with some models of GPUs.
All you have to do is to download the specific driver that you need, then install it. After that, you should be able to see improvements to your GPU.
Note: Before going straight to the steps, you need to know that you need to have at least Windows 10 installed for this driver to work.
Here is a guide that we’ve made to show you how to install the Amernime Zone Radeon 3rd party driver:
- The first thing you need to do is to visit their site to download the driver.
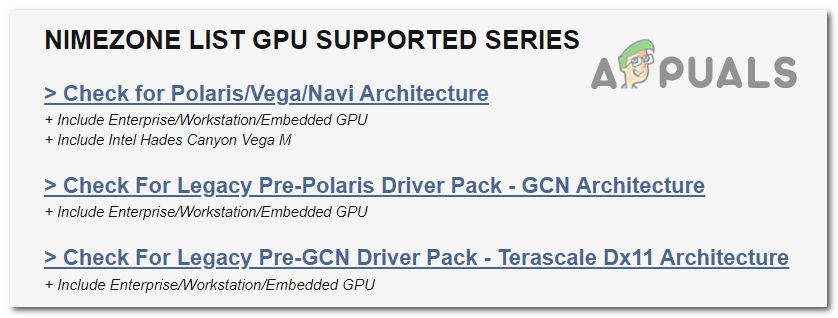
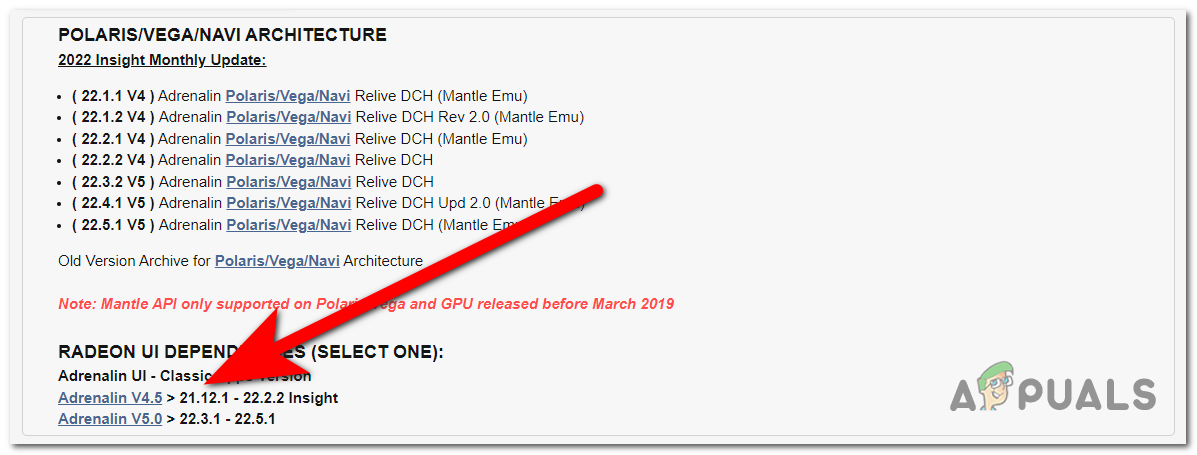
- When you are inside the site, go to Nimezone list GPU supported series and look at every one of the three architectures. This is how you will tell which of the driver is compatible with your AMD GPU.
Telling which of the drivers is compatible with your AMD graphics card - After you check all the three options and you know which is the one your need, scroll down to Download Link. Click on the architecture that is compatible with your GPU and download the driver you need. Save it on the desktop to make it easier to install it.

Downloading the specific driver that is compatible with your AMD GPU - Once the driver is downloaded on your PC, you need to also download the interface of the driver. Look a bit lower to see which of the interfaces are compatible with the driver you’ve downloaded.
Downloading the specific interface for the driver - Now click on the interface you need and download it. Save it on the desktop as well.
- After you are done with that, create a folder on the desktop and open the Win RAR file that you have downloaded, then extract all the files in the folder. You can simply copy them and paste them inside the folder.
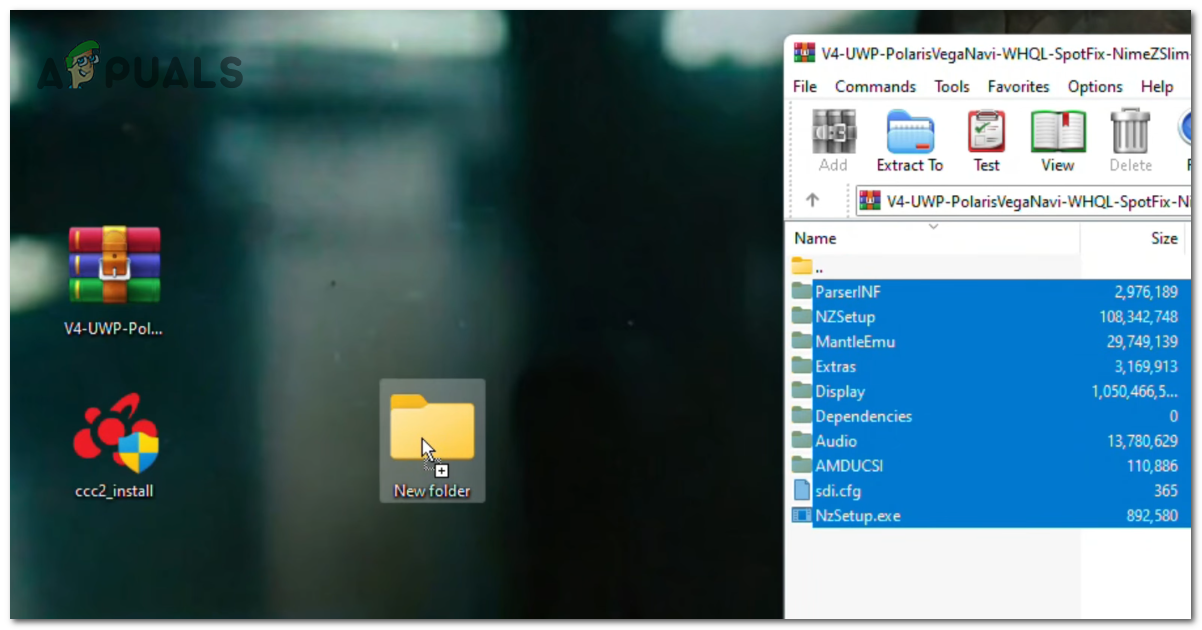
Extracting the files into a new folder to install the driver - Once the extraction is complete and the files are inside the folder, you can actually delete the Win RAR file because you don’t need it anymore.
- Now you need to open the newly created folder and access the Dependencies folder, then you need to move the ccc2_install file from the desktop to this folder.
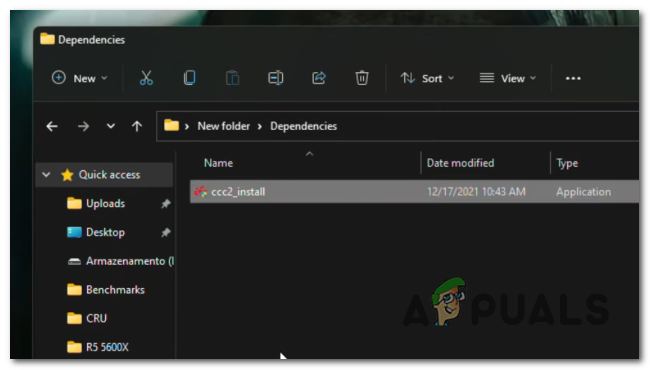
Moving the driver installer to the folder you need to use - After that, you need to go back to the initial folder. Now you need to open the NzSetup to install the driver.
- When the installer appears on your screen, press the 1 keyboard to start the installation process. Then press Enter to proceed.
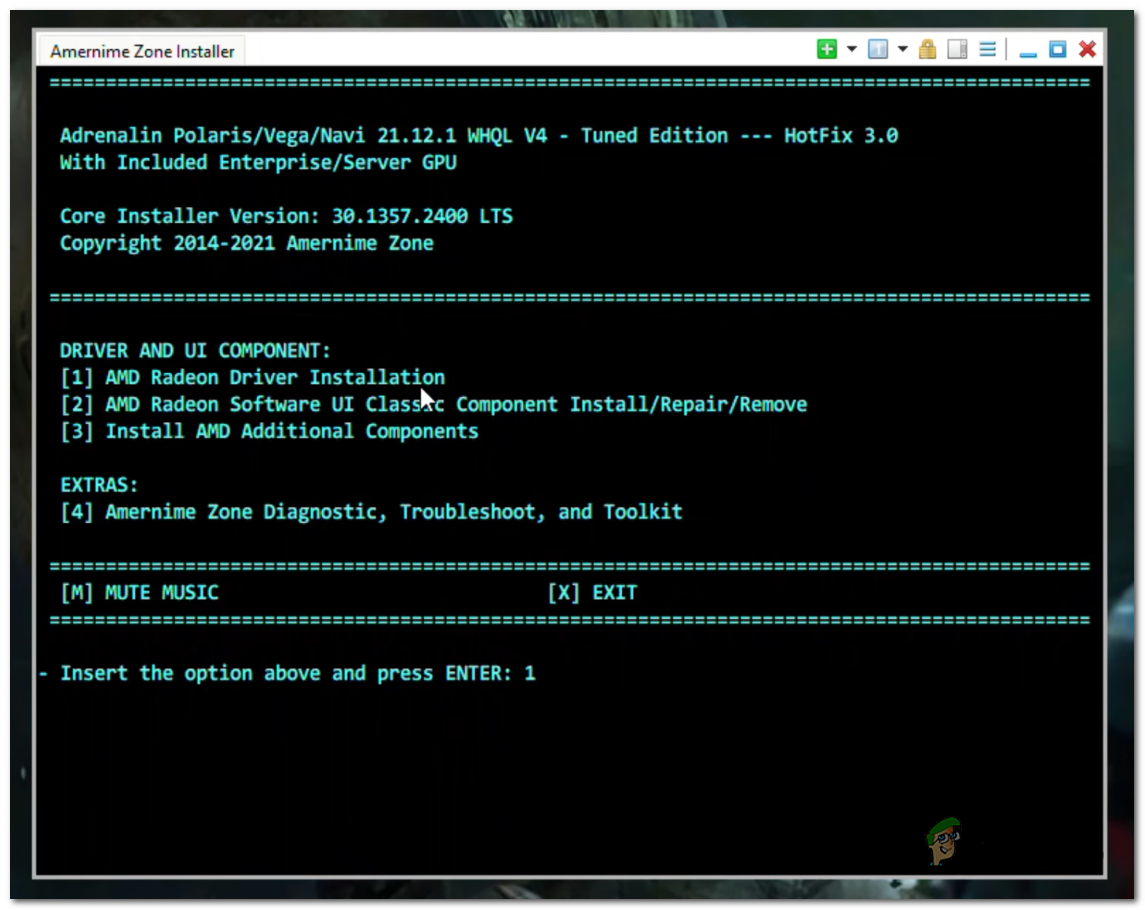
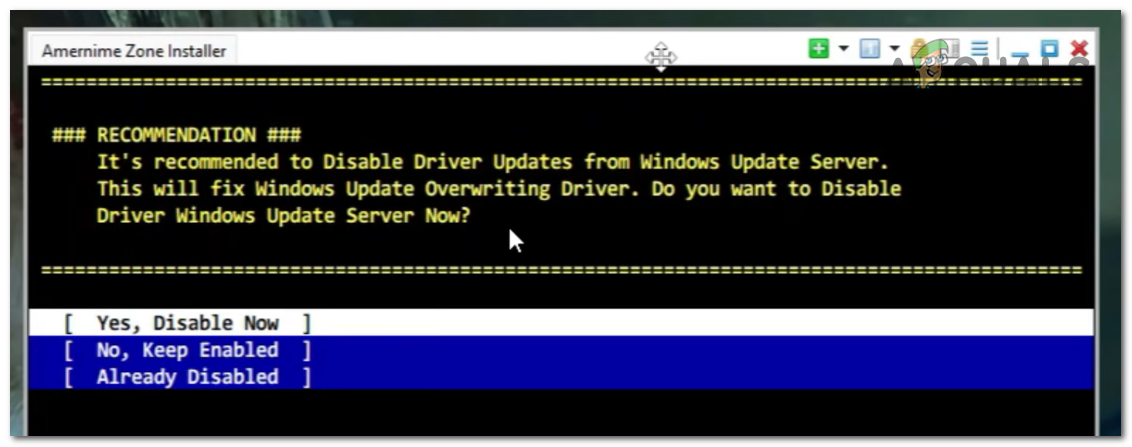
Starting the installation process - Now you will be asked if you want to disable the Driver Update from the Windows Update Server. It is recommended to do this because, if not disabled the Windows will install newer updates over this one and overwrite it. To disable it, you need to press Enter.
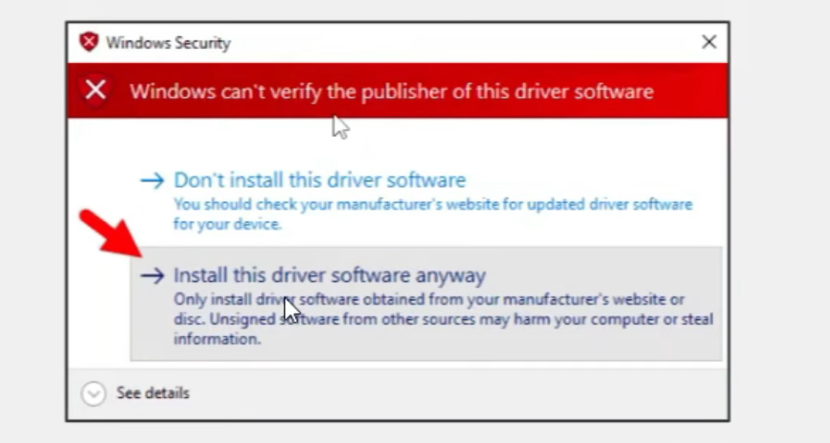
Disabling the Driver Updates from Windows Updates Server - You will be asked by Windows Security if you want to continue installing this driver because it is not an official driver. Click on Install this driver software anyway to confirm that you want it.
Confirming if you want to install the community AMD driver - Once you have confirmed it, select Use Microsoft PnP to continue the installation.
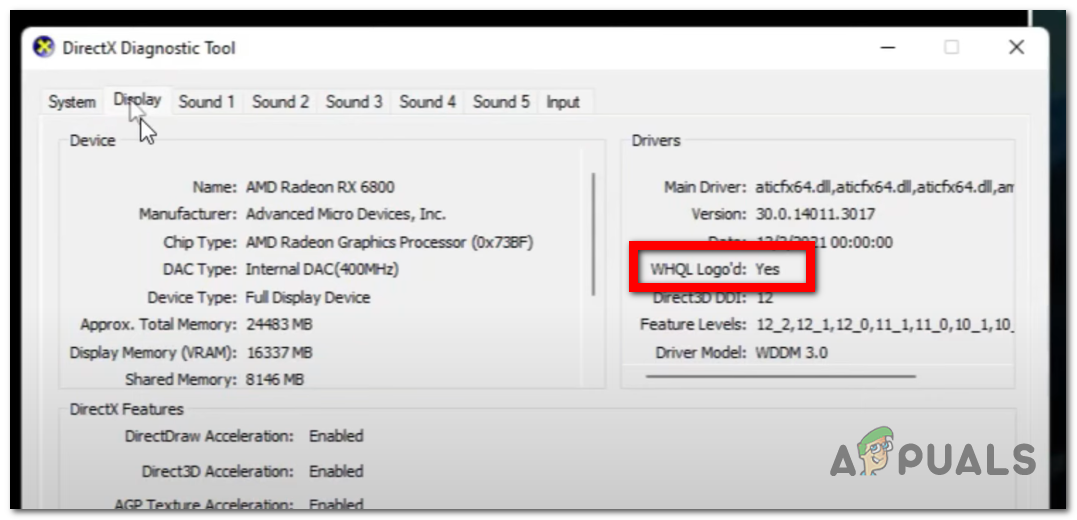
- After the driver installation is complete, DirectX Diagnostic Tool will open automatically. You need to click on the Display section and look at where it says WHQL Logo’d. Right after this, you need to see a Yes message. That means that the driver has been installed correctly and it is being recognized as an official driver by Windows.
Verifying if the driver has been installed correctly - Once you have verified the status, you can close the DirectX Diagnostic Tool.
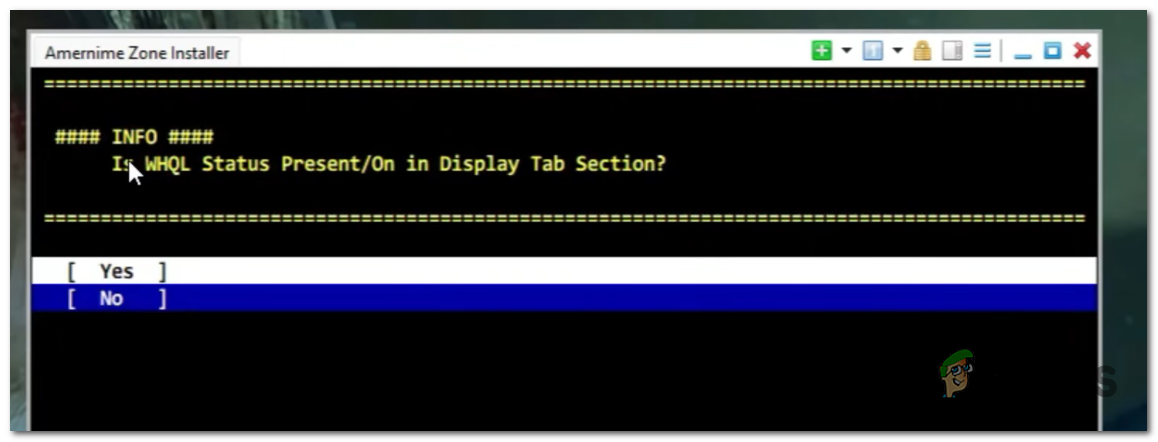
- You will be asked about the status that the WHQL Logo’d displayed. You need to choose between Yes or No depending on the status that was shown to you. If the status said No and you choose the negative option, the problem will be solved right away.
Confirming that the driver has been installed correctly - Now you will be asked to move the AMD Adrenalin UI Installation inside the Dependencies folder. But if you have followed step 8 and done what we showed you, this should already be done. Press any key to continue.
- After that, a screen with a lot of options will appear on your screen. Press the 1 key at first, then 2, and after that press 3. When you are done with that, press the B key to go back to the main menu.
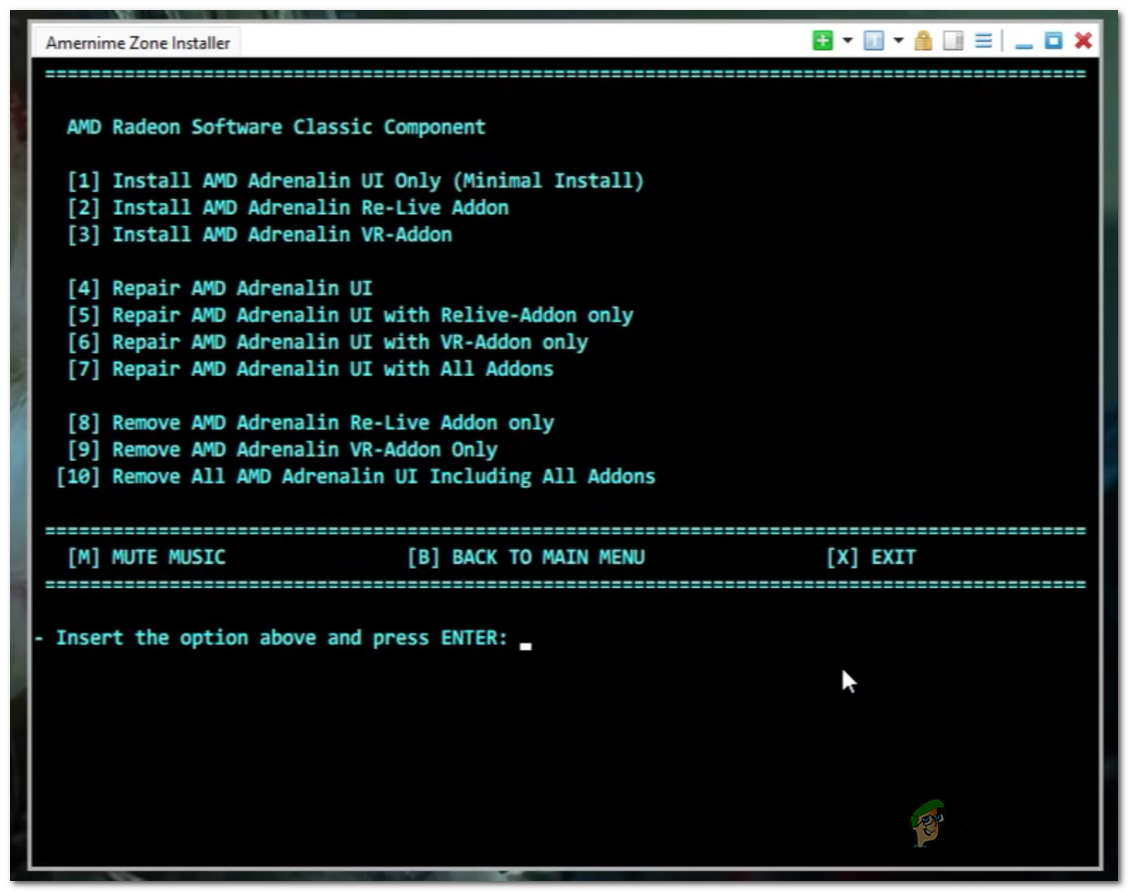
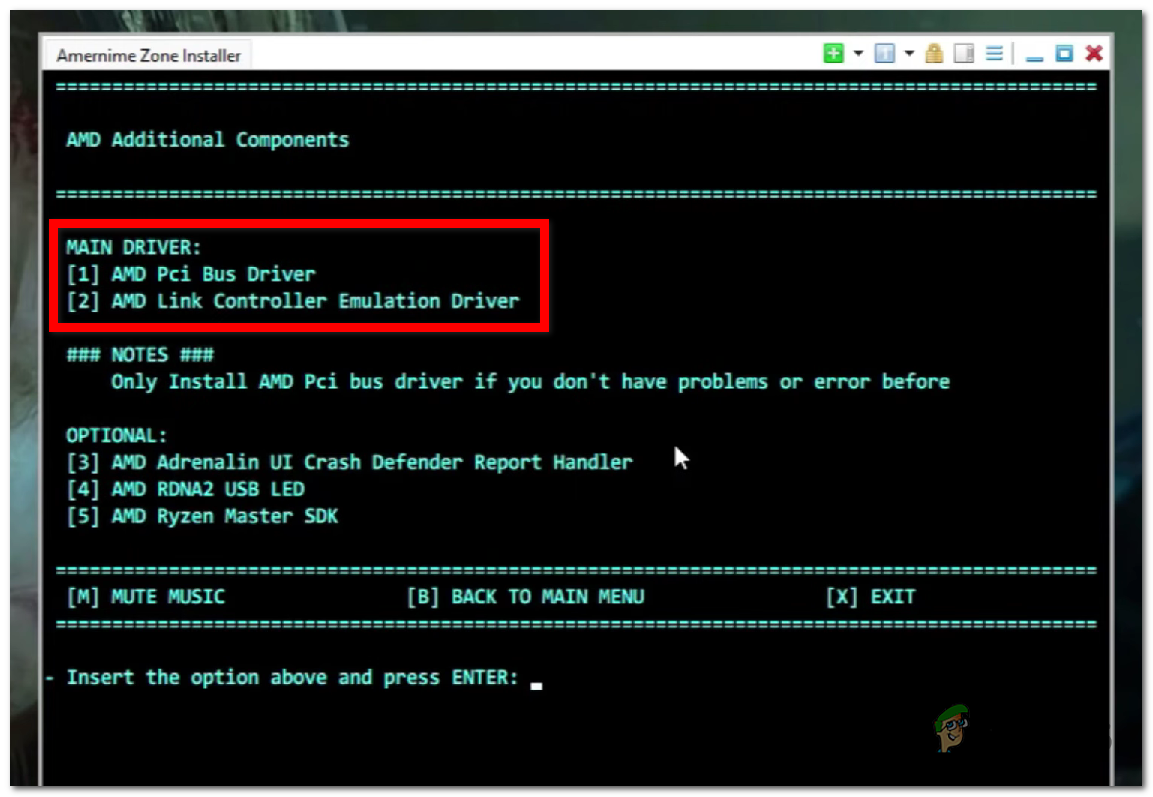
Completing the installation of the driver - Now that you are at the first screen, press 3 to install the AMD Additional Components. You need to install both the main drivers, so press 1 then press 2.
Installing the additional drivers that you need - When you are done with that as well, you can also press the 4 key to access the extras. There you will be able to configure lots of things depending on your preferences.
- Once you are done with that as well, you can finally press the X key to close the Amernime Zone Installer.
- Your computer will automatically reboot after you close the installer to apply the new driver to your PC.
- After the PC has rebooted, it should be good to go.
If this method and the others before weren’t enough to get more FPS out of your old AMD GPU, go check the next method below.
5. Overclock your GPU
The last thing that you can do to improve the performance of your AMD GPU is to overclock your graphics card. This process will boost the performance of your GPU by increasing its core frequency. But before you jump straight to the steps, you have to be aware of a few things.
If you are a laptop user and thinking about overclocking the GPU of it, you should not do it because it is not recommended for laptops. You can easily make the laptop overheat and broke it, so do this only if you are using a computer.
But keep in mind that the overheating problem might appear to the computer as well if you are increasing the core frequencies too much. Make sure that your PC has plenty of power and cooling to avoid this issue to happen.
Another thing that you need to know is that if you are using a pre-built PC, overclocking your GPU might void its warranty. If you are in this situation, make up your mind before you go to the installation.
Manually overclocking your GPU is a more complicated process that takes more time and is harder to do, so we recommend you to use the AMD Radeon Software tool. This will scan the hardware of your PC and prepare the best-suited overclock settings that won’t cause problems for your PC. It is the safest way to overclock your GPU without the risk of overheating.
In case you want to know how to overclock your GPU using the AMD Radeon Software, here are the steps you need to follow:
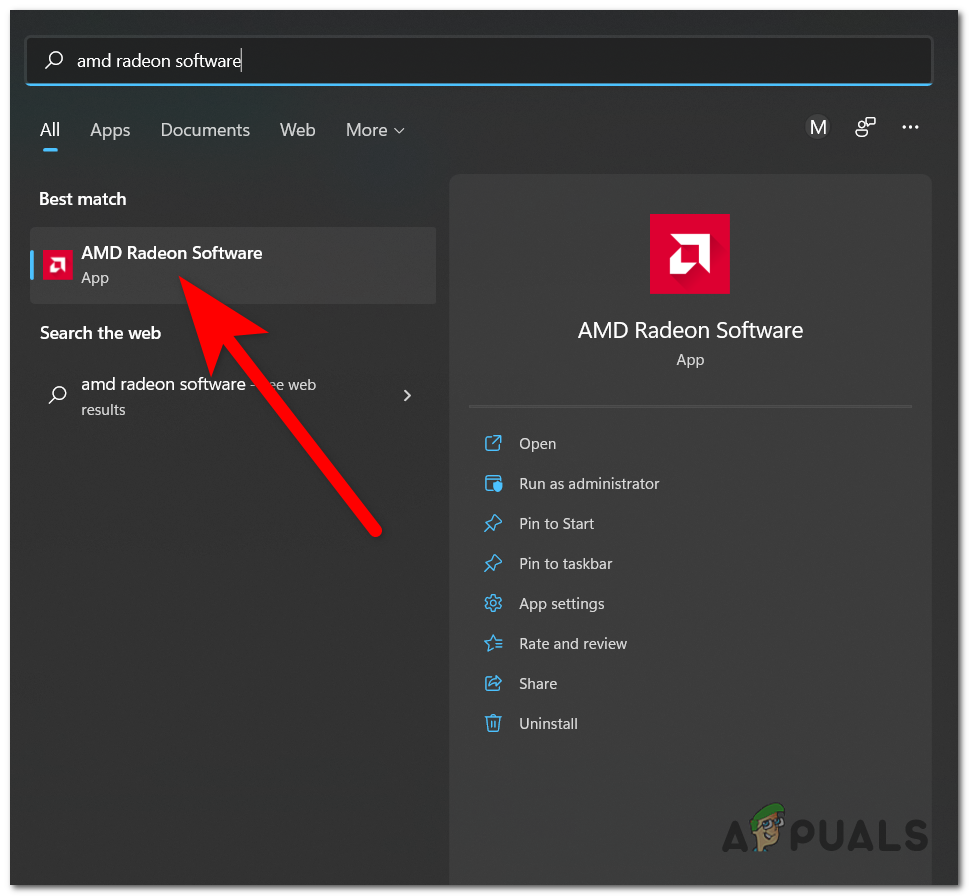
- The first thing you need to do is to open the AMD Radeon Software. You can do this by searching the name inside the taskbar search option. When you find it, press Enter to open it.
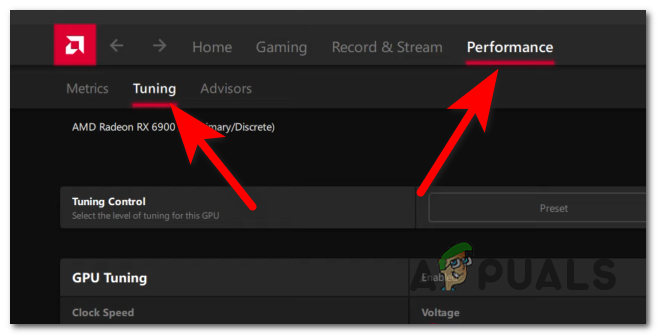
Using the taskbar search option to open the AMD Radeon Software - Once you’ve done that, you need to select the Performance tab from the upper side of the screen.
- After that, you need to click on the Tuning section to get to the overclock screen.
Accessing the Tuning section to overclock your AMD GPU - Once you are done with this, you can see that there are two sections, Automatic Tuning and Manual Tuning. The Automatic Tuning will scan all your PC hardware to determine which settings are suited the best to your computer, and to make sure that it won’t cause problems. You have 4 profiles there, choose the one you want to use and click on Overclock GPU to start the scan.
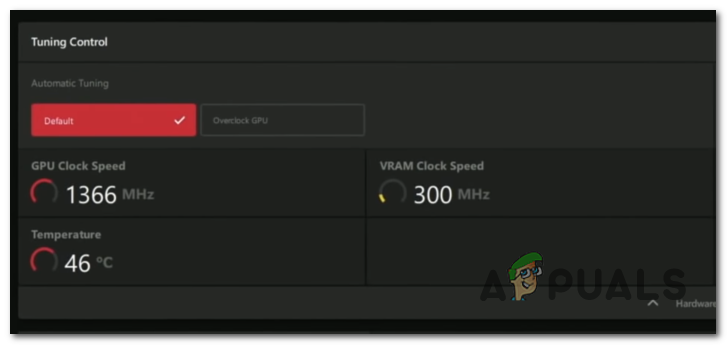
Automatically overclocking your old AMD graphics card - The process will take about 20 minutes to completely scan your computer. When it’s done, you should be good to go.
- In case you feel like this wasn’t enough and didn’t change anything to your PC, you can also go to Manual Tuning.
- Here you decide the Power Tuning that you want to use, the frequency percentage that you want to give to your GPU, and many more. In case you want to manually overclock your GPU, search online for detailed instructions to not broke your computer.
- Once you are done with this, click on Apply Changes to save the overclock settings.
- Now you can test your PC to see if you will get more FPS from your old AMD GPU or not.