Fix: vt-x is not available (verr_vmx_no_vmx)
Some users have been getting the VT-x is not available (verr_vmx_no_vmx) error message every time they try to start any of their VMs (virtual machines) using VirtualBox or similar software.

What is causing the vt-x is not available (verr_vmx_no_vmx) error
We investigated the issue by trying to recreate the issue and looking at various user reports. From what we were able to gather, several scenarios will lead to the apparition of this error message:
- VT-X is not enabled in the BIOS settings – VT-X can be disabled from the BIOS settings manually or remotely by some 3rd party applications.
- The machine’s CPU doesn’t support VT-X – Although these cases are rare, there are instances where the error is occurring because the PC in question is simply not equipped to support the VT-X technology.
- Hyper-V virtualization is enabled in Windows – This is perhaps the most common cause why this error occurs. Since Microsoft’s Hyper-V technology is known to conflict with VT-X, the OS will automatically disable VT-x if Hyper-V virtualization is enabled.
- Avast update disabled VT-X – As it turns out, Avast released an update that effectively disables VT-x while the real-time protection is active unless the user enables nested virtualization from the settings menu.
- Core Isolation is enabled – Core isolation is a Windows Defender Security option that is known to conflict with VT-X while it’s enabled.
If you’re struggling to resolve this particular issue, this article will provide you with a list of verified troubleshooting steps. Below you have a collection of methods that other users in a similar situation have used to get the issue resolved.
Since the methods below are ordered by complexity and efficiency, you should follow them in the order that they are presented and keep going until you find a fix that is effective in your particular case.
1. Disabling Hyper-V virtualization
Since this is one of the most common scenarios because a lot of people reported that after Windows 10’s Fall Creators Update they started having this issue quite often. Let’s start by making sure that Hyper-V virtualization is not interfering with VT-x. Whenever Hyper-V virtualization is enabled, it will automatically disable the VT-x virtualization equivalent. It’s possible the update broke the functionality of Hyper-V. So we are going to disable the Hyper-V Manually using the commands.You might be dealing with this problem after installing an application like Docker. Keep in mind that in most cases, even if you uninstall the application that enabled Hyper-V, the technology will remain enabled – preventing VT-x from running.
Let’s test this scenario by disabling Microsoft Hyper V. There are several ways that you can use to disable the Hyper-V virtualization, but let’s keep things as simple as possible. Here’s how to disable Microsoft Hyper V from an elevated Command Prompt:
- Press Windows key + R to open up a Run dialog box. Then, type “cmd” and press Ctrl + Shift + Enter to open up an elevated Command Prompt. When prompted by UAC (User Account Control) window, click on Yes.
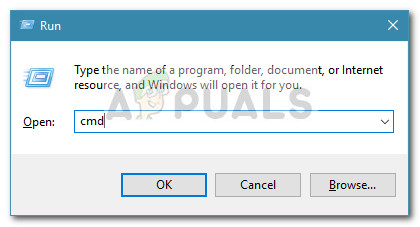
Run dialog: cmd then press Ctrl + Shift + Enter - In the elevated command prompt, paste the following commands one by one to disable Microsoft Hyper V and press Enter:
bcdedit /set hypervisorlaunchtype Off
bcdedit /set vm No
dism.exe /Online /Disable-Feature:Microsoft-Hyper-V
- Once the commands run successfully, close the elevated Command Prompt and restart your computer.
- At the next startup, open a Virtualbox machine again and see if you’re still getting the same error message.
If you’re still seeing the VT-x is not available (verr_vmx_no_vmx) error when you try to start a VM, move down to the next method below.
2. Enable Nested virtualization from Avast Settings menu (if applicable)
If you’re using Avast, keep in mind that an application update released in June 2017 adds an automatic feature that will automatically prevent VT-X from running on your system if certain conditions are met.Luckily, there is a way to rectify this issue without uninstalling the 3rd party security client. A lot of users have reported being able to fix the problem after going to Avast Settings > Troubleshooting and enabling the checkboxes associated with Use nested virtualization where available and Enable hardware-assisted virtualization.

If this method didn’t apply to your particular scenario, move over to the next method below.
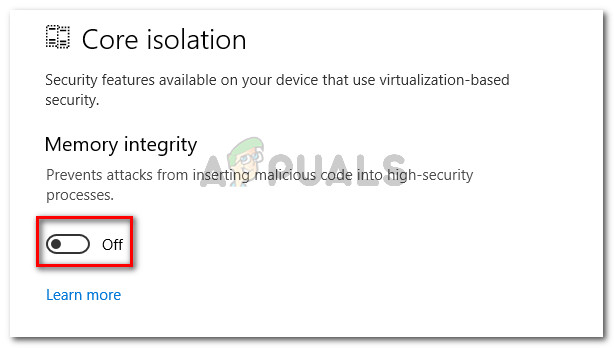
3. Disable Core isolation from Windows Defender
Core Isolation is a Windows Defender Device security option that is known to conflict with VT-X. If you’re getting the VT-x is not available (verr_vmx_no_vmx) error and you’re using Windows Defender as the default security option, we encourage you to make the necessary investigations to determine if Core isolation is enabled.Here’s how to do this:
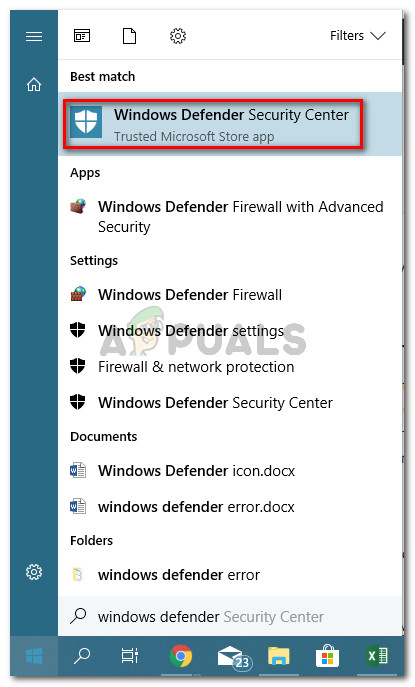
- Access the start icon in the bottom-left corner and search for Windows Defender. Then, click on Windows Defender Security Center to open up the built-in security option.
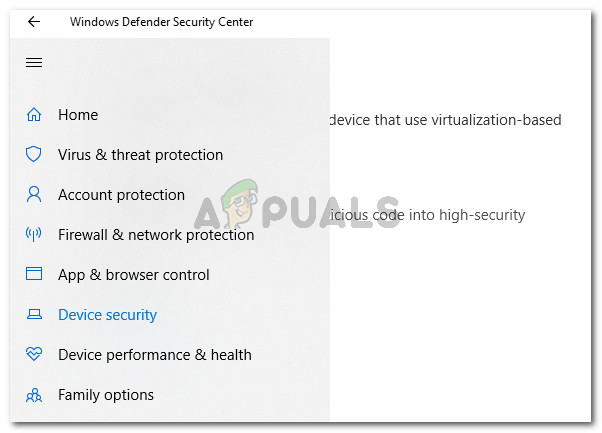
Opening Windows Defender Security Center - Once you’re inside Windows Defender Security Center, click on the Device security entry from the left-hand side menu.
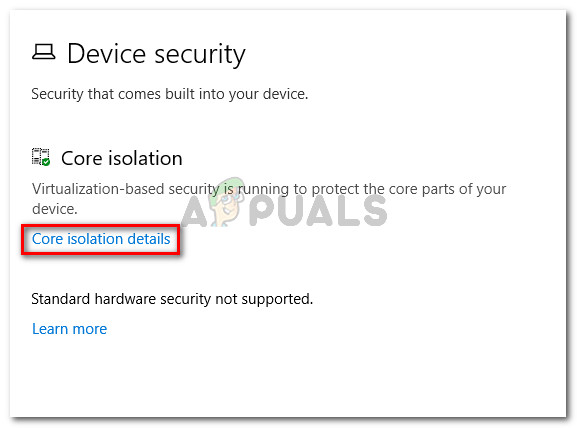
Access the Device Security menu of Windows Defender - Inside the Device Security menu, click on Core isolation details (under Core isolation).
Accessing the Core Isolation settings - Inside the Core isolation menu, make sure that the toggle associated with Memory integrity is turned OFF.
Disabling Core Isolation memory integrity - Once the setting has been disabled, restart your computer and see if the issue has been resolved at the next startup.
If you’re still unable to run a Virtualbox VM without getting the VT-x is not available (verr_vmx_no_vmx) error, move down to the final method.
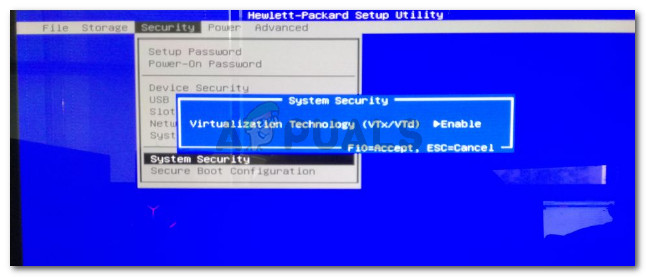
4. Enable VT-X from BIOS settings
If you’ve come this far without a result, it’s likely that the reason why you’re getting the VT-x is not available (verr_vmx_no_vmx) error is because the technology is disabled from your BIOS settings. Keep in mind that some 3rd party applications might override these settings, so don’t dismiss this method before checking out if this scenario holds.The steps of accessing the BIOS settings and checking if VT-X is enabled will differ depending on your motherboard manufacturer. But typically, you can find this setting under Security (System Security) listed as Virtualization Technology or VTx/VTd.
If all the methods above have proven to be a bust, likely, your machine is not equipped to support VT-X. You can see if this scenario applies to your situation by installing and running this Microsoft Developed tool (here) to see if your CPU supports HAV (the technology behind VT-X).


That thing made me paranoid….Searched everywhere for a solution but after few hours of trying and fail i stumble here where mentioned about (something i didnt saw elsewhere)
Core Isolation is enabled
Which was the source of my headache. Much appreciated