How to Fix VMware Operating System not Found Error?
The Operating System not found error occurs when users try to install an OS from a physical drive or an ISO file. The issue is not specific to a particular version of Windows, as it has been confirmed on multiple versions.
What Causes this Error?
The potential reason that can trigger the Operating System not found error include:
- ISO is not bootable – Often, the error occurs because the user is using an ISO file that is not bootable and merely contains updates. If this scenario applies to you, the issue can be resolved by using a different, bootable ISO file.
- VMware isn’t configured to use a physical drive – If you are using a physical disk (an optical or flash drive) for your virtual machine installation, you will need to configure VMware to recognize this in the settings. Modifying the settings associated with the VM can resolve this issue.
- Corrupted VM files – Sometimes, this error may be due to corrupted files within the virtual machine. In such cases, recreating the virtual machine from scratch can resolve the issue.
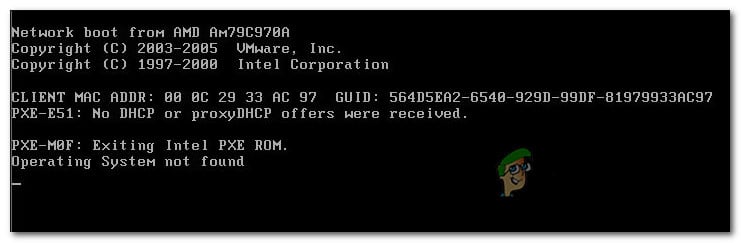
- PXE boot period is too short – The boot sequence may fail if the PXE sequence concludes before the screen prompting for user interaction is displayed. To resolve this, you can add a boot delay by modifying the .vmx file.
This article provides tested solutions that may fix the issue. The methods below are organized by efficiency and difficulty, and it is recommended to follow them in the presented order. One of these methods is likely to resolve the problem, regardless of the cause.
1. Verify that the ISO is Bootable
This issue commonly occurs when users attempt to use an ISO file containing updates rather than a bootable operating system. It is crucial to use bootable operating system media to ensure successful mounting on your virtual machine.
If you encounter the error while installing an OS on VMware, start by confirming that the ISO you’re using is indeed bootable. If you determine that the ISO is not bootable, choose a different ISO or proceed to the next method.
2. Specify that You’re Using a Physical Device (if applicable)
Encountering this error may indicate a failure to specify the correct boot drive when attempting to install the OS from a bootable disk. By clearly designating the use of a physical drive within VMware’s configuration, the program gains the necessary direction to access and boot from the actual hardware, whether it be a CD, DVD, or USB drive.
This adjustment bridges the gap between the physical and virtual environments, eliminating the error by guiding VMware to the correct boot path.
- Open VMware Workstation or VMware Player.
- In the main menu, right-click on the virtual machine with issues and select Settings.
- In the Virtual Machine Settings, select the Hardware tab at the top of the window.
- Scroll down the list of devices and select CD/DVD (SATA).
- In the right pane, set the Connection option to Use physical drive. Then, select the appropriate optical drive from the drop-down menu.
- After directing VMware to use the correct physical optical drive, click OK to save the changes.
- Attempt to launch the virtual machine again to see if the issue is resolved.

3. Recreate the Virtual Machine
Recreating the virtual machine basically provides a fresh start, eliminating any potential corruption or misconfigurations that might have occurred with the previous setup. By starting fresh and carefully making sure the BIOS settings are correct (preferably going for BIOS instead of UEFI if the issue persists), you increase the likelihood of a successful boot sequence without encountering the error.
- Launch your VMware application and select Home from the left-hand menu. Then click on Create a New Virtual Machine in the right-hand menu.
- In the New Virtual Machine Wizard, specify your installation source and click Next.Note: If using VM Fusion or VMware Workstation, make sure that Easy Install is not selected.
- Provide a name for your virtual machine and choose a save location.
- On the following screen, define the maximum disk size and choose a method for storing the virtual disk before clicking Next again.
- At the hardware settings screen, leave the values at their default or customize them, then click Finish.
- Start the new virtual machine to check if the issue is resolved.
4. Make Sure You See the Windows Installer Screen
In certain configurations, VMware may try to PXE boot and fail if the user doesn’t quickly enough connect with the VM and press a key at the Press any key to boot into the Windows Installer prompt.
If this situation applies to you, solving the issue may be as simple as establishing a boot delay of at least 6 seconds to give you time to interact during the Press any key to boot into the Windows Installer prompt.
- Close all running virtual machines and the main VMware application.
- First, you’ll need a text editor capable of editing .vmx files. Notepad can work, but to avoid accidental data corruption, consider downloading and installing Notepad++ (here).
- Once you’ve installed a suitable text editor, open File Explorer and navigate to:
C:\Users\*YourUser*\Documents\Virtual Machines
Note: Replace *YourUser* with your actual Windows account name.
- In the Virtual Machines folder, open the folder corresponding to the VM with which you’re having issues.
- Look for the .vmx file inside the folder. If you don’t see file extensions, select the View tab at the top, making sure that File name extensions is checked.
- Right-click on the .vmx file and select Edit with Notepad++.
- In Notepad++, scroll to the bottom and paste the following line:
bios.bootDelay = "6000"
- Save the file by selecting File and Save, then close Notepad++.
- Reopen the virtual machine previously displaying the error, and verify if the problem is fixed.