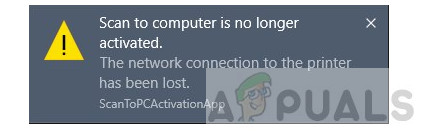
Fix: Scan to computer is no longer activated
Many users who have their printer setup with their computer encounter an error which states “Scan to computer is no longer activated”. This notification is rather annoying and may cause to be troublesome when you are working on your Windows machine.
The workarounds for this issue are quite straightforward; either you can fix the error message by fixing the settings or you can disable the notification altogether and see where that turns up. Take a look at them below. Start with the first and work your way down.
Solution 1: Disabling ‘Scan to computer’
Scan to computer means to scan a document and send it to the computer. This feature is mostly packed with Hewlett Packard (HP) printers or laptops. It allows an easy access for scanning where without getting into the hassle of details, you can easily scan any document and send it to your computer.
If this error message pops again and again, we can try disabling this method. Do note that this is primarily meant for HP systems or printers.
- Click on the Printer icon present on your desktop and upon clicking, the HP Printer Assistant will be brought up.
- Now select “Print, Scan and Fax” present on top of the screen and under the heading of Scan, click “Manage Scan to Computer”.

- Now click on the Disable button present and make sure that the line Automatically start Scan to Computer when I log on to Windows is unchecked.
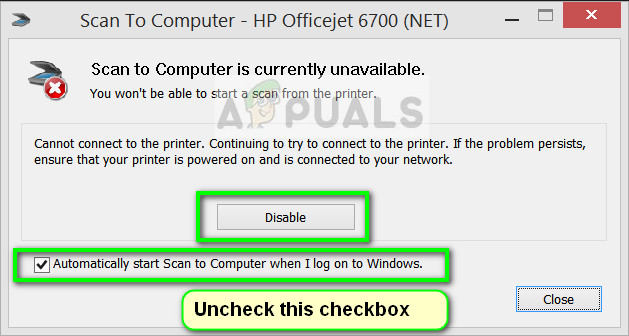
- Click Close. Now check if the notification pops up again. If it does, restart your computer and check again.
Solution 2: Disabling ScanToPCActivationApp
The error message you are seeing is due to a module installed on your computer which is called ScanToPCActivationApp. This is module by Hewlett-Packard and is responsible for managing scan jobs for the computer. It is usually bundled with the full feature software of the printer you are using. We can disable this application from starting itself on the Startup and check if this makes any difference of any kind.
- Press Windows + R, type “taskmgr” in the dialogue box and press Enter.
- Once in the task manager, navigate to the startup tab, select ScanToPCActivationApp and click on the Disable button present underneath.
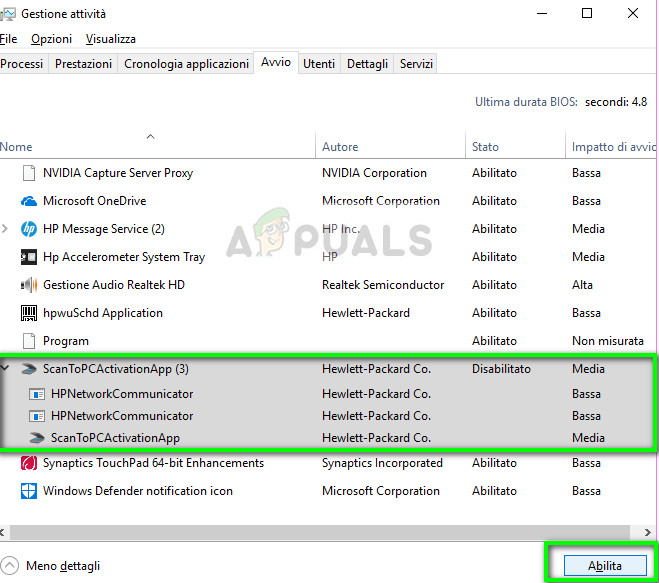
- Once the service is disabled, restart your computer completely and check if this solves the problem.
If the application still doesn’t turn off after disabling it, you should head over to services and try disabling the service by selecting it and clicking End Task.
Solution 3: Power cycling the entire System
Another workaround which proved to be fruitful was power cycling the entire system (both the computer and the printer). There has been a known issue in printers of all sorts where they get into a bad configuration and are not fixed until they are rebooted properly. There were some indications which showed that if the printer was turned on for some time without any activity, it would inevitably not perform as per standards.
Power cycling is the act of completely turning off your computer/printer and cutting the power.
- Turn off your computer using proper shutdown mechanism. Do the same with your printer.
- Once everything is turned off, take out the power cord of both the computer and the printer.
- Wait for 8-10 minutes before plugging everything back in and start up the system. After connecting both the modules, check if the problem is solved.
Solution 4: Updating Printer Drivers
If all the above solutions don’t work, we can try updating the printer drivers. You should navigate to the manufacturer’s website and download the latest printer drivers available. Make sure to download the exact drivers meant for your printer. You can look for the model number present on the front of your printer or in its box.
Note: There are few cases where a newer driver doesn’t work. In that case, download an older version of the driver and install it using the same method described below.
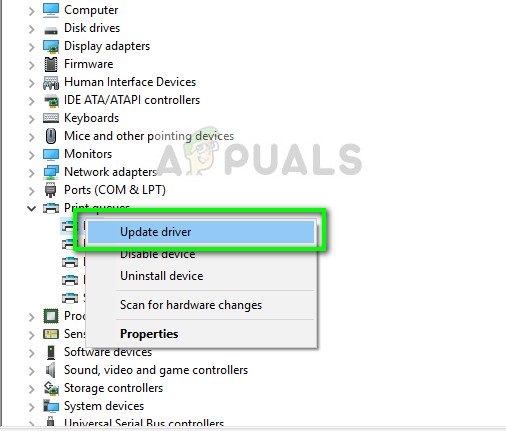
- Press Windows + R to launch the Run Type “devmgmt.msc” in the dialogue box and hit Enter. This will launch your computer’s device manager.
- Navigate through all the hardware, open the sub-menu “Print queues”, right click on your printer hardware and select “Update driver”.
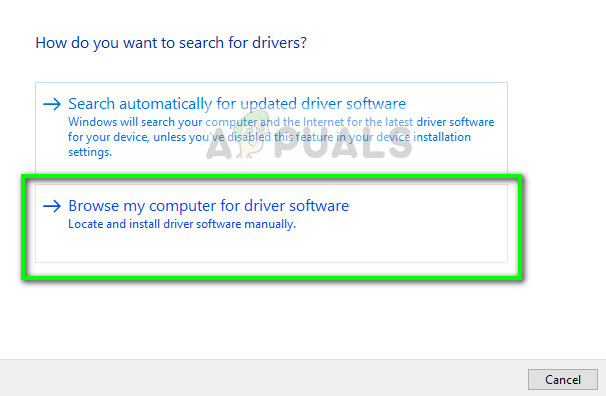
- Now Windows will pop a dialogue box asking you which way do you want to update your driver. Select the second option (Browse my computer for driver software) and proceed.
Select the driver file you downloaded using the browse button when it appears and update it accordingly.
- Restart your computer and check if the problem gets resolved.
Note: If you can’t update the drivers manually, you can also select the first option “Search automatically for updated driver software”. This option will make Windows search the web automatically and select the best driver out there. You can also try uninstalling the printer and restart the computer. This will install the default drivers meant for the system.